2
TABLE OF CONTENTS
PAGE
PAGE
1 Safety Precautions
-----------------------------------------------
1.1. General Guidelines ----------------------------------------3
1.2. Before Repair and Adjustment--------------------------4
1.3. Caution for Fuse Replacement -------------------------4
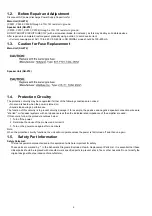
1.4. Protection Circuitry-----------------------------------------4
1.5. Safety Part Information -----------------------------------4
2 Warning
--------------------------------------------------------------
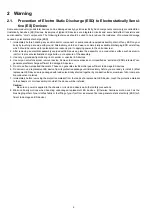
2.1. Prevention of Electro Static Discharge (ESD)
to Electrostatically Sensitive (ES) Devices ----------6
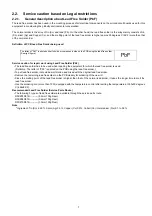
2.2. Service caution based on Legal restrictions---------7
3 Service Navigation
------------------------------------------------
3.1. Service Information ----------------------------------------8
4 Specifications
------------------------------------------------------
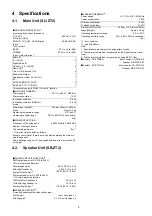
4.1. Main Unit (SU-ZT2)----------------------------------------9
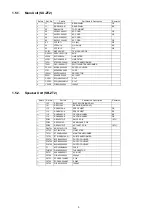
4.2. Speaker Unit (SB-ZT2) -----------------------------------9
5 Location of Controls and Components
------------------
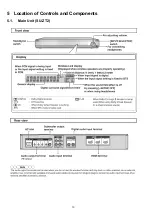
5.1. Main Unit (SU-ZT2)-------------------------------------- 10
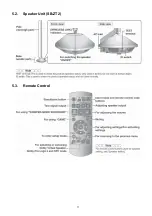
5.2. Speaker Unit (SB-ZT2) --------------------------------- 11
5.3. Remote Control------------------------------------------- 11
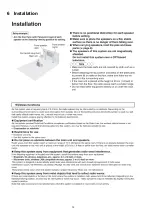
6 Installation
---------------------------------------------------------
6.1. Basic Connections --------------------------------------- 13
6.2. AC power supply connection ------------------------- 17
7 Speaker setting (SB-ZT2)
-------------------------------------
7.1. Setting the speakers (Front and Surround
speakers)--------------------------------------------------- 18
7.2. Setting surround speakers----------------------------- 20
7.3. Initialize the Speaker Setting -------------------------- 21
8 Self-diagnostic and special mode setting
--------------
8.1. Activating Service Mode-------------------------------- 22
8.2. Activating Doctor Mode--------------------------------- 22
8.3. Error Codes Display List-------------------------------- 22
8.4. Inspection Mode------------------------------------------ 23
8.5. Returning to Normal Display -------------------------- 24
9 Troubleshooting
-------------------------------------------------
9.1. HDMI Checking Method -------------------------------- 25
9.2. Troubleshooting Flow Chart --------------------------- 27
10 Disassembly and Assembly Instructions
---------------
10.1. Main Parts Location Diagram ------------------------- 33
10.2. Disassembly flow chart --------------------------------- 35
10.3. Main Unit (SU-ZT2)-------------------------------------- 37
10.4. Speaker Unit (SB-ZT2) --------------------------------- 48
11 Service Position
-----------------------------------------------
11.1. Main Unit (SU-ZT2)------------------------------------ 106
11.2. Speaker Unit (SB-ZT2) ------------------------------- 108
12 Voltage Measurement & Waveform Chart
-------------
12.1. Main Unit (SU-ZT2)-------------------------------------116
12.2. Speaker Unit (SB-ZT2) ------------------------------- 126
12.3. Waveform Chart ---------------------------------------- 128
13 Illustration of IC’s, Transistors and Diodes
----------
14 Overall Simplified Block
------------------------------------
14.1. Signal Flow (SU-ZT2) --------------------------------- 133
15 Block Diagram
-------------------------------------------------
15.1. Main Unit (SU-ZT2)------------------------------------ 134
15.2. Speaker Unit (SB-ZT2) ------------------------------- 141
16 Wiring Connection Diagram
-------------------------------
16.1. MAIN UNIT (SU-ZT2) --------------------------------- 145
16.2. Speaker Unit (SB-ZT2) ------------------------------- 146
17 Schematic Diagram Notes
---------------------------------
18 Schematic Diagram
-------------------------------------------
18.1. Main Unit (SU-ZT2) ------------------------------------149
18.2. Speaker Unit (SB-ZT2) --------------------------------163
19 Printed Circuit Board
-----------------------------------------
19.1. Main Unit (SU-ZT2) ------------------------------------169
19.2. Speaker Unit (SB-ZT2) --------------------------------173
20 Terminal Function of IC’s
-----------------------------------
20.1. IC8001 (RFKWMZT2PPK2) MICRO
PROCESSOR -------------------------------------------177
21 Exploded View and Replacement Parts List
----------
21.1. Exploded View and Mechanical Replacement
Parts List --------------------------------------------------179
21.2. Electrical Replacement Parts List ------------------185
Содержание VIERA Link SB-ZT2EE
Страница 10: ...10 5 Location of Controls and Components 5 1 Main Unit SU ZT2 ...
Страница 11: ...11 5 2 Speaker Unit SB ZT2 5 3 Remote Control ...
Страница 12: ...12 6 Installation ...
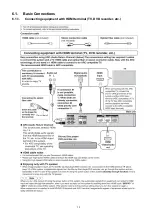
Страница 13: ...13 6 1 Basic Connections 6 1 1 Connecting equipment with HDMI terminal TV DVD recorder etc ...
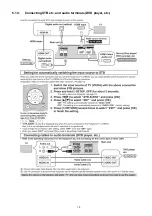
Страница 14: ...14 6 1 2 Connecting equipment without HDMI terminal DVD player VCR etc ...
Страница 15: ...15 6 1 3 Connecting STB etc and audio terminals DVD player etc ...
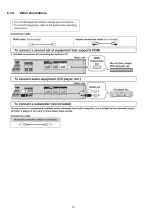
Страница 16: ...16 6 1 4 Other connections ...
Страница 17: ...17 6 2 AC power supply connection ...
Страница 18: ...18 7 Speaker setting SB ZT2 7 1 Setting the speakers Front and Surround speakers ...
Страница 19: ...19 ...
Страница 20: ...20 7 2 Setting surround speakers ...
Страница 28: ...28 9 2 2 Speaker Unit SB ZT2 ...
Страница 29: ...29 9 2 3 Speaker Unit SB ZT2 Wireless Link ...
Страница 30: ...30 ...
Страница 32: ...32 ...
Страница 33: ...33 10 1 Main Parts Location Diagram 10 1 1 Main Unit SU ZT2 ...
Страница 34: ...34 10 1 2 Speaker Unit SB ZT2 ...
Страница 36: ...36 10 2 2 Speaker Unit SB ZT2 ...
Страница 49: ...49 Step 4 Remove the Weight ...
Страница 50: ...50 Step 5 Remove 10 screws ...
Страница 54: ...54 Step 11 Remove 2 screws Step 12 Lift up to remove Arm Cover A ...
Страница 56: ...56 Step 14 Tilt the Woofer Block in order as arrows shown to detach it from the Tweeter Block ...
Страница 57: ...57 10 4 2 Disassembly of Middle Cabinet Assembly Refer to Disassembly of Woofer Block Step 1 Remove 7 screws ...
Страница 67: ...67 Step 3 Remove the heatsink with the IC5701 ...
Страница 68: ...68 Step 4 Remove 1 screw Step 5 Remove IC5701 from the heatsink ...
Страница 70: ...70 Step 4 Place the heatsink with the IC5701 onto the SMPS P C B ...
Страница 73: ...73 Step 2 Desolder pins of Diode D5802 on the solder side of SMPS P C B Step 3 Remove the Diode D5802 ...
Страница 82: ...82 Step 4 Remove 3 screws Step 5 Remove the Power Button ...
Страница 87: ...87 Step 3 Remove 4 screws Step 4 Lift up to remove Woofer Speaker SP1 ...
Страница 104: ...104 Caution 3 Ensure that the wires are bound by the himelon at the bottom side of the Tweeter Base Frame ...
Страница 109: ...109 Step 6 Remove the speaker wires from the slot 1 Step 7 Remove the tweeter wires from slots 2 6 ...
Страница 111: ...111 Step 11 Remove 3 screws ...
Страница 112: ...112 Step 12 Remove the Light Panel Step 13 Remove the Power Button ...
Страница 113: ...113 Step 14 Hold on to the P C B Holder and lift up the Input P C B as arrow shown ...
Страница 114: ...114 Step 15 Place the D Amp P C B and Input P C B on an insulation sheet ...
Страница 132: ...132 ...
Страница 133: ...133 14 Overall Simplified Block 14 1 Signal Flow SU ZT2 ...
Страница 144: ...144 ...
Страница 148: ...148 ...
Страница 168: ...168 ...
Страница 176: ...176 ...
Страница 178: ...178 ...
Страница 182: ...182 ...


