23
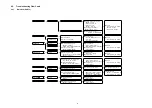
Fig. 3
8.4.
Inspection Mode
FL display
Symptom
Cause and Remedy
F61/OVERLOAD
Speaker short, amplifier failure, electrical over-
load etc.
Speaker short and failure in power amplifier, pre-amplifier
circuits. Check for faulty parts and replace with new parts if
necessary.
Humidity protection activated
FANLOCK
Fan stopped
Failure fan and fan control circuits. Check for faulty parts
and replace with new parts if necessary.
F70
Communication error between sub micro- pro-
cessor and its peripheral LSI
Failure sub-micro processor and its peripherals LSI. Check
for faulty parts and replace with new parts if necessary.
F76
When the power is turned on, the unit power
automatically turns off; the power cannot be
turned on.
Failure in the power circuit system of the unit. This may
happen when the direct current electricity is supplied to
speaker terminals. Check that the speaker wires are not
shorted (bare wire touching each other) or that the unit is in
a hot enviroment without proper ventillation.
Remote 2
Remote 1
Main unit code setting problem with remote
control.
Set the same remote control code for this system and
remote control.
• If “REMOTE 2” is displayed, set remote control code to
“2”.
• If “REMOTE 1” is displayed, set remote control code to
“1”.
U701
HDMI does not work properly.
The equipment connected by the HDMI cable is not com-
patible with this system’s copyright protection technology.
U704
HDMI does not work properly.
The system is receiving video signals that are incompatible
with it through HDMI connection. Check the settings of the
connected equipment.
U703
A problem has occured with the HDMI connec-
tion.
A problem has occurred with the HDMI connection. Try the
following to correct the problem. Consult your dealer if the
error code remains on the display.
• Turn the connected equipment off and on again.
• Disconnect the HDMI cable then reconnect it.
• Do not connect more than 2 equipment in series to the
output of this system.
NOT POSSIBLE FOR THIS INPUT
SOURCE
(Scrolling)
Input signals are automatically cancelled.
You cannot use Dolby Virtual Speaker, Dolby Pro Logic II
and SFC for dual sounds.
NOT POSSIBLE FOR THIS PCM
SOURCE
(Scrolling)
Input signals are automatically cancelled.
You cannot use Dolby Virtual Speaker, Dolby Pro Logic
and SFC effect with PCM signals with sampling frequency
over 48 kHz.
SFC is not available for multi-channel LPCM signal.
Remote Control
Test Mode Function and settings
Selector
Sound Mode
Other settings
Vol/Tone
SPEAKE LEVEL -
AUX 4
STEREO
Analog
-18dB/0dB
SPEAKER LEVEL
CH
AUX 3
STEREO
E2 : OPT2, Others : Analog
-18dB/0dB
ENTER(OK)
TV
STEREO
Digital (OPT1)
-48dB/0dB
SFC MUSIC
AUX 2
STEREO
Digital (E2 : CAOX, Others : OPT2)
-48dB/0dB
MUTE
All indicators of FL are displayed. All LED are off.
Note: After this setting, only “POWER” button or “Checker Command” code by the remote control can be entered.
VOL +
Check Main
μ
P software version.
Display [M---- ****]; ---- is current version; **** is current checksum. If no ROM correction, [NO] is displayed.
* Volume is still increased but not displayed.
VOL -
Check HDMI uP software Version.
Display [H---- ^^^^^]; ---- is current version.
* Volume is still increased but not displayed.
Содержание VIERA Link SB-ZT2EE
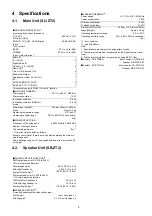
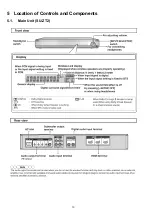
Страница 10: ...10 5 Location of Controls and Components 5 1 Main Unit SU ZT2 ...
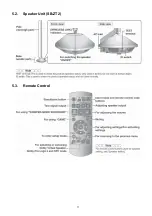
Страница 11: ...11 5 2 Speaker Unit SB ZT2 5 3 Remote Control ...
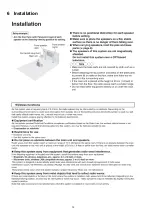
Страница 12: ...12 6 Installation ...
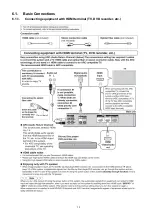
Страница 13: ...13 6 1 Basic Connections 6 1 1 Connecting equipment with HDMI terminal TV DVD recorder etc ...
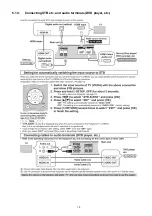
Страница 14: ...14 6 1 2 Connecting equipment without HDMI terminal DVD player VCR etc ...
Страница 15: ...15 6 1 3 Connecting STB etc and audio terminals DVD player etc ...
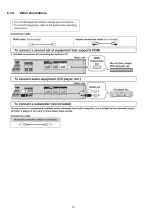
Страница 16: ...16 6 1 4 Other connections ...
Страница 17: ...17 6 2 AC power supply connection ...
Страница 18: ...18 7 Speaker setting SB ZT2 7 1 Setting the speakers Front and Surround speakers ...
Страница 19: ...19 ...
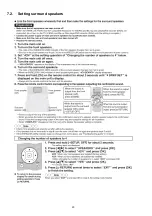
Страница 20: ...20 7 2 Setting surround speakers ...
Страница 28: ...28 9 2 2 Speaker Unit SB ZT2 ...
Страница 29: ...29 9 2 3 Speaker Unit SB ZT2 Wireless Link ...
Страница 30: ...30 ...
Страница 32: ...32 ...
Страница 33: ...33 10 1 Main Parts Location Diagram 10 1 1 Main Unit SU ZT2 ...
Страница 34: ...34 10 1 2 Speaker Unit SB ZT2 ...
Страница 36: ...36 10 2 2 Speaker Unit SB ZT2 ...
Страница 49: ...49 Step 4 Remove the Weight ...
Страница 50: ...50 Step 5 Remove 10 screws ...
Страница 54: ...54 Step 11 Remove 2 screws Step 12 Lift up to remove Arm Cover A ...
Страница 56: ...56 Step 14 Tilt the Woofer Block in order as arrows shown to detach it from the Tweeter Block ...
Страница 57: ...57 10 4 2 Disassembly of Middle Cabinet Assembly Refer to Disassembly of Woofer Block Step 1 Remove 7 screws ...
Страница 67: ...67 Step 3 Remove the heatsink with the IC5701 ...
Страница 68: ...68 Step 4 Remove 1 screw Step 5 Remove IC5701 from the heatsink ...
Страница 70: ...70 Step 4 Place the heatsink with the IC5701 onto the SMPS P C B ...
Страница 73: ...73 Step 2 Desolder pins of Diode D5802 on the solder side of SMPS P C B Step 3 Remove the Diode D5802 ...
Страница 82: ...82 Step 4 Remove 3 screws Step 5 Remove the Power Button ...
Страница 87: ...87 Step 3 Remove 4 screws Step 4 Lift up to remove Woofer Speaker SP1 ...
Страница 104: ...104 Caution 3 Ensure that the wires are bound by the himelon at the bottom side of the Tweeter Base Frame ...
Страница 109: ...109 Step 6 Remove the speaker wires from the slot 1 Step 7 Remove the tweeter wires from slots 2 6 ...
Страница 111: ...111 Step 11 Remove 3 screws ...
Страница 112: ...112 Step 12 Remove the Light Panel Step 13 Remove the Power Button ...
Страница 113: ...113 Step 14 Hold on to the P C B Holder and lift up the Input P C B as arrow shown ...
Страница 114: ...114 Step 15 Place the D Amp P C B and Input P C B on an insulation sheet ...
Страница 132: ...132 ...
Страница 133: ...133 14 Overall Simplified Block 14 1 Signal Flow SU ZT2 ...
Страница 144: ...144 ...
Страница 148: ...148 ...
Страница 168: ...168 ...
Страница 176: ...176 ...
Страница 178: ...178 ...
Страница 182: ...182 ...

