background image

31

VQT2Q72

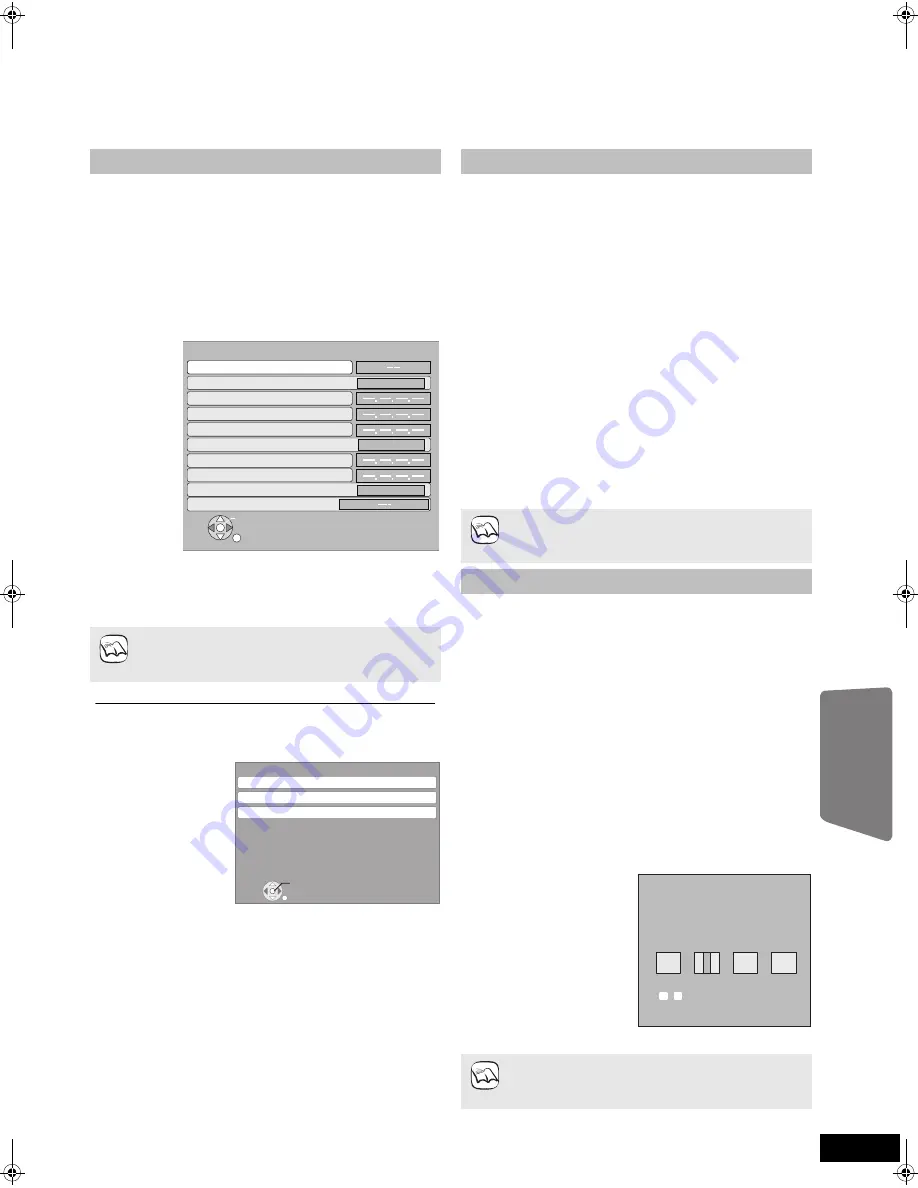
Network settings 

[BTX77]

These settings are used if you will connect this unit to the Internet. (

>

38)

The connection to the Internet may take time or the Internet may not be connected depending on the connection environment. 

It is required that you use a broadband connection.

Preparation

Connect to a broadband network. (

>

11)

Testing of “IP Address / DNS Settings”

Always test the connection when a LAN cable is connected.

1

While stopped

Press [BD/SD] to select “BD/DVD”.

2

Press [SETUP].

3

Press [

3

,

4

] to select “Network Settings” and 

press [OK].

4

Press [

3

,

4

] to select “IP Address / DNS 

Settings” and press [OK].

5

Press [

3

,

4

] to select “Connection Test” and 

press [OK].

“Testing...”: The test is in progress.

“Pass”:

The connection is completed.

Press [RETURN] to exit.

“Fail”:

Please check the connection and settings.

Perform the “Connection Test” also when any 

change was made to the “IP Address / DNS 

Settings”.

If the connection test fails, it may be necessary to set the 

MAC address of this unit at the router side. The MAC 

address can be displayed by pressing [SETUP] and 

selecting “Network Settings”.

N

R

U

T

E

R

K

O

IP Address/DNS Settings

Connection Test

On

On

On

On

On

On

IP Address Auto-Assignment

DNS-IP Auto-Assignment

IP Address

Subnet Mask

Gateway Address

Primary DNS

Secondary DNS

Connection Speed Auto-Config

Connection Speed Setting

NOTE

RETURN

Network Settings

IP Address / DNS Settings

Proxy Server Settings

MAC Address: xx-xx-xx-xx-xx-xx

OK

Network Service

Setting the IP address

In most cases, default settings can normally be used 

without making any changes.
Set the IP address only when the router has no DHCP 
server functions or when the router’s DHCP server 

function is disabled.

After performing steps 

– 

4

 (

D

left)

5

Press [

3

,

4

] to select “IP Address 

Auto-Assignment” and press [

2

,

1

] to select 

“Off”.

6

Press [

3

,

4

] to select “IP Address”, “Subnet 

Mask” or “Gateway Address” and press [OK].

7

Enter numbers with the numbered buttons and 
press [OK].

After checking the specifications for your broadband 

router, enter each number.

If the number is unknown, then check the number of 

other devices such as personal computers connected 

via a LAN cable. Assign a different number from those 

of other devices for the “IP Address” and the same 

number for others.

If a wrong number is entered, then press [CANCEL].

8

Press [

2

,

1

] to select “Yes” and press [OK].

The numeric input range is between 0 and 255.

Setting the DNS-IP

In most cases, default settings can normally be used 

without making any changes.
When setting an assigned DNS server from your Internet 
service provider, perform the following settings. 

After performing steps 

– 

4

 (

D

left)

5

Press [

3

,

4

] to select “DNS-IP 

Auto-Assignment” and press [

2

,

1

] to select 

“Off”.

6

Press [

3

,

4

] to select “Primary DNS” or 

“Secondary DNS”and press [OK].

7

Enter numbers with the numbered buttons and 
press [OK].

Follow the instructions given by your Internet service 

provider and enter the numbers.

If the number is unknown, then check the number of 

other devices such as personal computers connected 

via a LAN cable and assign the same number.

If a wrong number is entered, then press [CANCEL].

8

Press [

2

,

1

] to select “Yes” and press [OK].

The numeric input range is between 0 and 255.

NOTE

192

.

.

.

1

Primary DNS

Please input Primary DNS and press
[OK]. Press [CANCEL] to delete the selected 
character. To clear this setting, delete all 
characters and press [OK].

Num

ber

0  -  9    

NOTE

Advanced operations

SC-BTX77&75EGEB-VQT2Q72_eng.book  31 ページ  2010年1月6日 水曜日 午後7時54分

Содержание SC-BTX75

Страница 1: ...is product please read the instructions completely Please keep this manual for future reference To update the firmware of this unit refer to page 30 Model number suffix EB denotes UK model Region management information BD Video This unit plays BD Video marked with labels containing the region code B Example DVD Video This unit plays DVD Video marked with labels containing the region number 2 or AL...

Страница 2: ...ry 2010 These may be subject to change 1 Remote control BTX77 N2QAKB000073 BTX75 N2QAKB000075 2 Remote control batteries 1 Video cable K2KA2BA00001 1 FM indoor antenna RSAX0002 1 Antenna plug adaptor For the United Kingdom and Republic of Ireland K1YZ02000013 2 Speaker cables Front REEX1152A with red connector REEX1153A with white connector 1 AC mains lead For Continental Europe K2CQ2CA00007 1 AC ...

Страница 3: ...ening and viewing pleasure Dust and dirt may adhere to the unit s lens over time making it impossible to play discs Use the lens cleaner not included about once every year depending on frequency of use and the operating environment Carefully read the lens cleaner s instructions before use Maintenance of the lens Remove dust carefully with an air blower for camera lenses optional Recommended produc...

Страница 4: ...S broadcasting 24 TV Enjoying TV etc with this unit s speakers 25 Adjusting the sound 25 Making settings for digital audio input 25 Linked operations with the TV VIERA Link HDAVI ControlTM 26 What is VIERA Link HDAVI Control 26 What you can do with HDAVI Control 26 Easy control only with VIERA remote control 27 Other devices Using the iPod 28 iPod Connection 28 iPod Playback 29 Advanced operations...

Страница 5: ... more information about operating this kind of disc please read the instructions that came with the disc Displaying Title View and Album View screens Only the R and G buttons B 21 Operating contents of VIERA CAST 30 BTX77 Show Setup menu 35 Select speaker channel 18 Show status messages 18 TV operation buttons You can operate the TV through the unit s remote control Í Turn the television on and of...

Страница 6: ...liding door 12 Select the source 14 RADIO EXT IN FM USB AUX D IN 1 D IN 2 USB on the unit s display is not displayed when a USB device is not inserted into the USB port Display Remote control signal sensor iPod Docking switch lever 28 Connect iPod 28 Disc tray 12 A Sliding door B USB port 16 C SD card slot 16 1 SPEAKERS terminal 8 2 FM Radio antenna terminal 10 3 Cooling fan 4 OPTICAL DIGITAL IN t...

Страница 7: ...in excessive bass Cover walls and windows with thick curtains For optional wall mount refer to page 39 Keep your speakers at least 10 mm away from the system for proper ventilation Do not Attach the speaker Insert the wire fully r White s Blue line Push Tighten securely Press into the groove Slide into the groove Leave about 70 mm Thread the speaker cable through the base NOTE 60 Main unit To allo...

Страница 8: ...hem near televisions personal computers or other devices easily influenced by magnetism You can damage your speakers and shorten their useful life if you play sound at high levels over extended periods Reduce the volume in the following cases to avoid damage When playing distorted sound When the speakers are reverberating due to a record player noise from FM broadcasts or continuous signals from a...

Страница 9: ...CDHS30 3 0 m RP CDHS50 5 0 m etc This unit incorporates HDMITM v 1 3a with Deep Colour x v ColourTM High Bit rate Audio technology 51 When outputting 1080p signal 37 HDMI Video Format please use HDMI cables 5 0 meters or less NECESSARY SETTINGS for HDMI connections HDMI Audio Output Off 37 With this connection you can use VIERA Link HDAVI Control 26 To enjoy TV audio from this home theatre system ...

Страница 10: ...nections between this unit and the TV refer to TV connections 9 If you have various sound sources and this unit s terminals are not sufficient connect them to the available inputs on the TV and the TV output should then be connected to the AUX or OPTICAL 1 TV terminal of the main unit Refer to the operating instructions of the TV video cassette recorder DVD recorder or Set Top Box for settings to ...

Страница 11: ...slow Internet connection the video may not be displayed correctly After connecting to the Internet perform necessary settings 31 Inserting any cable other than a LAN cable in the LAN terminal can damage the unit Main unit LAN Shielded LAN cable not included Internet Hub or broadband router Telecommunications equipment modem etc NOTE AC mains lead For the United Kingdom and Republic of Ireland For ...

Страница 12: ...rn to the previous screen press RETURN 7 Press OK to finish the EASY SETUP RADIO EXIT IN DISC OPEN CLOSE RADIO EXIT IN iPod OPEN CLOSE Do not open or close the sliding door by hand Keep your hands away for the sliding door while it is opening or closing Your hand or clothing s etc might get caught inside the door Keep your fingers away from the sliding door when it is closing to avoid possible min...

Страница 13: ...0 AUX TV 1 To enjoy TV broadcasts with this unit s speakers 25 DIGITAL IN 1 TV 1 To enjoy TV broadcasts with this unit s speakers 25 DIGITAL IN 2 CABLE SAT 2 To enjoy audio from other devices with this unit s speakers 25 1 TV is displayed next to items set for TV AUDIO input B 26 Setting the TV audio for VIERA Link HDAVI Control 2 CABLE SAT is displayed next to DIGITAL IN 2 when set for CABLE SAT ...

Страница 14: ...source by the remote control Press To select BD DVD CD or SD 16 IPOD iPod 28 Each time you press the button FM 24 USB 16 AUX 1 For audio input through the AUX terminal 25 D IN1 DIGITAL IN 1 1 25 D IN2 DIGITAL IN 2 2 25 1 TV is displayed next to items set for TV AUDIO input 26 Setting the TV audio for VIERA Link HDAVI Control 2 CABLE SAT is displayed next to DIGITAL IN 2 when set for CABLE SAT AUDI...

Страница 15: ... effective only when playing 4 1 ch sources or above 2CH STEREO You can play any source in stereo without the surround sound effect 1 7 1CH VS is not available when the audio source currently playing is 2 1 ch 3 1 ch 2 The 7 1 channel surround like effect will only function when playing 6 or more channel sources 3 The effects do not work when audio is output from the HDMI AV OUT terminal NOT CONDI...

Страница 16: ...nsert it straight in Some USB devices inserted into this unit may cause this unit to stop operating Such USB devices cannot be used on this unit About the use of USB device Since the physical size of USB device can vary please consider its width when connecting any USB device to this unit If the USB device does not fit we recommend using a USB extension cable not included When connecting a USB dev...

Страница 17: ...ber of skips DivX Backward direction SKIP only Direct Play During playback you can access specific recordings or scenes through direct entry of the numbered buttons Play starts from the selected title or chapter BD V AVCHD e g 5 0 B 0 B 5 15 0 B 1 B 5 DVD V e g 5 0 B 5 15 1 B 5 While stopped the image on the right is displayed on the screen the title is designated While playing the chapter is desi...

Страница 18: ... sides of the image are cut off when the black bar is not displayed BD V DVD V Side cut does not have any effect When TV Aspect 37 is set to 4 3 or 4 3 Letterbox the Zoom effect is disabled Setting the sleep timer 1 BTX77 Press and hold SLEEP for 3 seconds BTX75 Press SLEEP 2 While SLEEP is displayed BTX77 Press SLEEP several times to select the time in minutes BTX75 Press SLEEP several times to s...

Страница 19: ...ve content available on the Blu ray discs may require an Internet account to be created in order to access the BD Live content Follow the screen display or instruction manual of the disc for information on acquiring an account Preparation Connect to the network 11 1 Insert an SD card 16 If the SD card menu screen is displayed press BD SD to select BD DVD 2 Insert the disc 16 For operation method r...

Страница 20: ...e screen Press DISPLAY ABOUT DIVX VIDEO DivX is a digital video format created by DivX Inc This is an official DivX Certified device that plays DivX video Visit www divx com for more information and software tools to convert your files into DivX video You can play DVD R R DL CD R RW discs and USB device which contain DivX video contents that have been recorded on a personal computer About structur...

Страница 21: ...d the file selection menu may be displayed DVD R R DL CD R RW SD card USB device If the media containing data in different file formats is inserted the file selection menu may be displayed Press 3 4 to select Play Pictures JPEG and press OK Picture View screen is displayed B Go to step 3 2 Press 3 4 2 1 to select the album and press OK 3 Press 3 4 2 1 to select the still picture and press OK Small...

Страница 22: ...rder CD Order of Music list display in repeat mode iPod The music files will be played back in repeat mode When a music CD a USB device with MP3 recorded and an iPod is inserted connected to this unit the iPod has first priority to be played back as Background To playback MP3 recorded on a USB device as Background music remove the iPod and music CD from the main unit To select a folder A folder to...

Страница 23: ...ks Total Play Time 20min54sec Track3 Track4 Track5 Play RETURN indicates the track currently playing e g CD TIPS MP3 Playing a track in another folder 1 While the Music list is displayed Press OPTION press 3 4 to select Select Folder and press OK 2 Press 3 4 to select a folder and press OK The Music list for the folder appears You cannot select folders that contain no compatible tracks To return t...

Страница 24: ...uency Main unit Press 6 5 9 to select the frequency When a radio broadcast is being received T lights in the display To start automatic tuning press and hold SEARCH6 SEARCH5 main unit 6 5 9 until the frequency starts scrolling Tuning stops when a station is found Presetting stations manually Up to 30 stations can be set 1 While listening to the radio broadcast Press OK 2 While P is flashing on the...

Страница 25: ...also press STATUS and then 3 4 to select the mode The digital audio input settings are to be set separately to each source D IN 1 and D IN 2 The selected effect will only be displayed on the main unit 3 While the selected mode is displayed Press 2 1 and select the desired setting 3 When D IN 1 is selected 4 When D IN 2 is selected 5 The device connected to the OPTICAL 2 STB terminal must be connec...

Страница 26: ...1 2 Press STATUS 3 Press 3 4 to select TV AUDIO 4 Press 2 1 to switch AUX or D IN 1 DIGITAL IN 1 and press OK Whenever the connection or settings are changed reconfirm the points above Setting the audio from the STB This unit can be set to link operations with the TV so as to output audio from the connected STB etc when the TV input is set to the input channel designated for the STB etc Preparatio...

Страница 27: ...th a TV that supports HDAVI Control 4 If connected with a TV VIERA with the Intelligent Auto Standby setting activated on the TV when switching the TV input the unit will be automatically turned to standby For details please read the operating instructions of the TV When Speaker selection is set to Home Cinema the main unit will not automatically turn to standby One touch play You can turn on this...

Страница 28: ...ng the iPod for an extended period of time after recharging has completed disconnect it from main unit as the battery will be depleted naturally Once fully recharged additional recharging will not occur The cooling fan may operate while the iPod battery is being charged 3 Connect the iPod not included firmly 4 Gently push the docking switch lever back until it clicks into place Recharging starts w...

Страница 29: ...While in MUSIC or VIDEOS mode it is possible to select the following playback modes 1 For music playback only 1 Press START 2 Press 3 4 to select Menu and then press OK 3 Press 3 4 to select Play Mode and then press OK 4 Press 3 4 to select an item and press OK 5 Press 3 4 to select the setting and press OK While playing music or video it is possible to use the following buttons of the remote cont...

Страница 30: ... delay Top Movie Rental XXXXXX Top TV Show XXXXXX COMING SOON COMING SOON NOTE When this unit remains connected to the Internet it will automatically check for the latest firmware version when it is turned on When latest firmware version is available the following screen is displayed Select Yes or No If Yes is selected then follow the on screen instructions If No is selected then manually update t...

Страница 31: ...router has no DHCP server functions or when the router s DHCP server function is disabled After performing steps 1 4 D left 5 Press 3 4 to select IP Address Auto Assignment and press 2 1 to select Off 6 Press 3 4 to select IP Address Subnet Mask or Gateway Address and press OK 7 Enter numbers with the numbered buttons and press OK After checking the specifications for your broadband router enter e...

Страница 32: ...changes Please use this setting when instructed to by your Internet service provider After performing steps 1 4 left 5 Press 3 4 to select Proxy Address and press OK The text entry screen is displayed Text field shows the text you have entered 6 Press 3 4 2 1 to select a character and press OK Repeat this step to enter other characters Press PAUSE to delete 7 Press STOP when you complete the entry...

Страница 33: ... The audio attributes appear D below Audio attribute DivX Select the soundtrack number Soundtrack numbers are displayed even when there is only one audio type Subtitle BD V AVCHD DVD V Turn the subtitle on off and select the language D below Language DVD VR Only discs that contain subtitle on off information Turn the subtitle on off DivX Turn the subtitle on off and select Text or the subtitle num...

Страница 34: ...es of the film content appear jagged or rough when Auto is selected However if the video content is distorted as shown in the illustration to the right then select Auto 24p DVD V On Off Only when you have selected On in 24p Output 37 and play discs recorded at a rate of 60 fields per second Sound Sound Effects 1 2 Off Re master This feature gives you a more natural sound by adding higher frequency...

Страница 35: ... the menu screen D 16 Enter a code 43 with the numbered buttons when you select Other English German French Italian Spanish Dutch Russian Original The original language of each disc will be selected Other Subtitle Preference Automatic If the language selected for Soundtrack Preference is not available subtitles of that language will automatically appear if available on that disc English German Fre...

Страница 36: ...when the connected equipment cannot process signals with sampling frequency of 96 kHz Off Signals are output as 96 kHz Choose when the connected equipment can process signals with sampling frequency of 96 kHz Downmix Switch the downmix system for playing back multi channel surround sound When Dolby D Dolby D Dolby TrueHD or DTS DTS HD is set to Bitstream there are no downmix effects for the output...

Страница 37: ...V When this unit is connected to a TV supporting 1080 24p output via an HDMI cable this unit displays each frame at 1 24 second intervals the same interval originally shot with the film camera When playing DVD Video set to On and then set 24p in Picture 34 to On On Images in 24p are output in 24p as they are However when video is being output at 24 frames images from any other terminal than the HD...

Страница 38: ...f when the audio is warped This function has no effect when the audio source is 2 ch On Off Reduced Screen Display The screen is displayed reduced so the displayed screen of the VIERA CAST does not get truncated On Off Time Zone By selecting the time zone it is possible to set the unit s time to match your location Some VIERA CAST contents require the time zone to be set Set the time zone if neces...

Страница 39: ...ing over 10 kg You will need to obtain the appropriate screw eyes to match the walls or pillars to which they are going to be fastened Consult a qualified housing contractor concerning the appropriate procedure when attaching to a concrete wall or a surface that may not have strong enough support Improper attachment may result in damage to the wall or speakers Use a string of less than 2 0 mm whic...

Страница 40: ... that do not conform to CD DA specifications copy control CDs etc cannot be guaranteed CD Recorded discs Finalized Type of media Logo Formats Indicated as Type of media Logo Formats Indicated as BD RE Version 3 of the BD RE Recording Format JPEG format BD V JPEG DVD R DL DVD Video Format Version 1 2 of the DVD Video Recording Format MP3 format JPEG format AVCHD format DivX format DVD V DVD VR MP3 ...

Страница 41: ...s that support USB 1 0 1 1 and USB 2 0 Full Speed High Speed USB devices of up to 128 GB can be used USB devices that support bulk only transfer CBI Control Bulk Interrupt is not supported Digital Cameras which require additional programme installation when connected to a PC are not supported MTP Media Transport Protocol device is not supported A multi port USB card reader is not supported File sy...

Страница 42: ...der they are displayed in the following order of priority srt sub txt In the following situations the subtitles cannot be displayed as recorded Furthermore depending on the methods used to create the file or the state of the recording only parts of the subtitles may be displayed or the subtitles may not be displayed at all When special text or characters are included in the subtitles text When the...

Страница 43: ...XXXX jpg P0000001 jpg P0000002 jpg XXXXX DCIM XXXX jpg 1 2 XXXXX 2 3 3 Root e g XXXX jpg P0000001 jpg DCIM P0000003 jpg P0000004 jpg XXXXX P0000002 jpg 3 2 Folder A Root e g Abkhazian 6566 Afar 6565 Afrikaans 6570 Albanian 8381 Amharic 6577 Arabic 6582 Armenian 7289 Assamese 6583 Aymara 6589 Azerbaijani 6590 Bashkir 6665 Basque 6985 Bengali Bangla 6678 Bhutani 6890 Bihari 6672 Breton 6682 Bulgaria...

Страница 44: ...ssary to set the code of the remote control again after changing the batteries for remote control You are not pointing the remote control at the main unit s remote control signal sensor during operation Coloured glass may obstruct the signal reception transmission Don t place the signal sensor in direct sunlight or in areas that may be subject to sunlight exposure 47 5 5 47 5 The unit is on but ca...

Страница 45: ...SC television This unit can convert NTSC signals to PAL60 for viewing on a PAL television NTSC Contents Output in the Picture DivX Images may not be output due to how files were created If you are using an indoor TV antenna change to an outdoor antenna The TV antenna wire is too close to the unit Move it away from the unit 9 37 37 37 37 35 Picture stops DivX Picture may stop if the DivX files are ...

Страница 46: ...or use a new card 19 Music on an SD card cannot be played Data that can be played from an SD card are AVCHD MPEG2 and JPEG data 41 The contents of the card cannot be read The card is not compatible or the contents on the card may be damaged Turn off and then turn on the unit again 41 The contents of the USB device cannot be read Remove the USB device from the USB port and then insert again If this...

Страница 47: ... not played Ensure the disc is for the correct BD Video region code or DVD Video region number and is not defective You have set a ratings level to limit BD Video or DVD Video play Change this setting Some BD Video can only be output with HDMI Cover 35 Picture in picture is not played with BD Video Confirm whether the disc supports picture in picture The BD Live is not played with BD Video BTX77 C...

Страница 48: ...en the router may not operate in DHCP mode Check the router settings and operation You may reset the router to restore it to normal 11 11 This IP address is already in use Please check the setting BTX77 This unit s IP address is used by another device Check the IP addresses of this unit personal computers and routers etc If necessary reconfigure them to avoid IP addresses from being duplicated Con...

Страница 49: ... the unit U72 U73 The HDMI connection acts unusually The connected equipment is not HDMI compatible Please use HDMI cables that have the HDMI logo as shown on the cover The HDMI cable is damaged H or F stands for a number Check and correct the speaker connections There is something unusual The service number displayed after H and F depends on the unit s condition Check the unit using the troublesh...

Страница 50: ... have a region code or number Please tell me about disc compatibility with this unit Refer to Media Disc card and USB device information and About MP3 JPEG DivX files You cannot write to a disc with this unit 40 42 SD card What kinds of operations are available on the SD card slot on this unit The following operations are available Play back JPEG data recorded with a digital camera etc Play back A...

Страница 51: ...and DTS 96 24 formats It is compatible with sampling frequency 96 kHz 48 kHz DTS HD Master Audio Essential This is a lossless audio format and compatible with 96 kHz 7 1 ch and 192 kHz 2 ch or less In addition faithful reproduction of the master audio is enabled using lossless audio encoding technology Dynamic range Dynamic range is the difference between the lowest level of sound that can be hear...

Страница 52: ...30 Type 1 way 1 speaker system Kelton type Speaker unit s 1 Woofer 16 cm Cone type 2 Passive Radiator 25 cm Impedance 6 Output sound pressure 78 dB W 1 m Frequency range 35 Hz to 180 Hz j16 dB 40 Hz to 160 Hz j10 dB Dimensions WkHkD 180 5 mmk322 mmk351 mm Mass Approx 4 6 kg Power supply AC 220 V to 240 V 50 Hz iPod Connector DC OUT 5 V 500 mA MAX Power consumption 85 W Power consumption in standby...

Страница 53: ...r 1 system USB Standard USB 2 0 High Speed MP3 JPEG 4 DivX 7 Format FAT12 FAT16 FAT32 1 Finalizing is necessary 2 includes SDHC card includes miniSD cards need a miniSD Adaptor includes microSD cards need a microSD Adaptor 3 Does not support long file name 4 The total combined maximum number of recognizable picture contents and folders 3000 picture contents and 300 folders 5 The total combined max...

Страница 54: ...pegla com DivX is a registered trademark of DivX Inc and is used under license Blu ray Disc is a trademark BD LIVE logo is a trademark of Blu ray Disc Association BONUSVIEW is a trademark of Blu ray Disc Association YouTube and Picasa are trademarks of Google Inc Made for iPod means that an electronic accessory has been designed to connect specifically to iPod and has been certified by the develop...

Страница 55: ...an kytkeä kokonaan irti verkkovirrasta irrottamalla verkkojohdon pistoke pistorasiasta ADVARSEL DETTE PRODUKTET ANVENDER EN LASER BETJENING AV KONTROLLER JUSTERINGER ELLER ANDRE INNGREP ENN DE SOM ER BESKREVET I DENNE BRUKSANVISNING KAN FØRE TIL FARLIG BESTRÅLING DEKSLER MÅ IKKE ÅPNES OG FORSØK ALDRI Å REPARERE APPARATET PÅ EGENHÅND ALT SERVICE OG REPARASJONSARBEID MÅ UTFØRES AV KVALIFISERT PERSON...

Страница 56: ...track 33 Status messages 18 Still pictures 21 Subtitle 33 Surround sound effects 15 U Unit and media care 3 USB 16 V VIERA CAST 30 VIERA Link HDAVI ControlTM 26 W Whisper mode Surround 15 X x v ColourTM 51 24p 34 37 51 Information for Users on Collection and Disposal of Old Equipment and used Batteries These symbols on the products packaging and or accompanying documents mean that used electrical ...

Отзывы: