Panasonic PT-MZ880 Скачать руководство пользователя страница 44

Chapter 2

Getting Started — Connecting

44 - ENGLISH

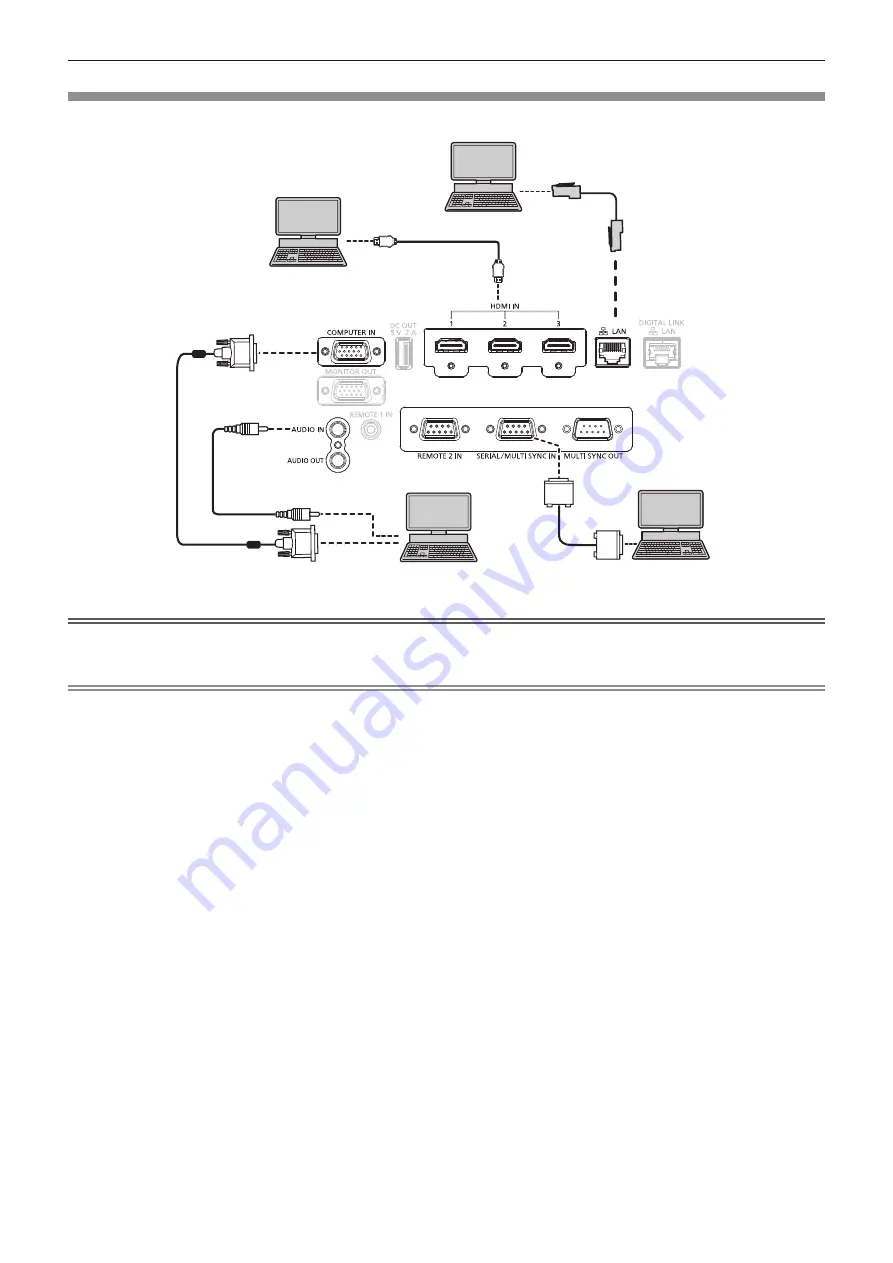
Connecting example: Computers

Control computer

Control computer

Computer

Computer

Attention


f

When connecting the projector to a computer or an external device, use the power cord supplied with each device and commercially 

available shielded cables.

Note


f

Switching of the setting in the [DISPLAY OPTION] menu → [HDMI IN] → [EDID SELECT] may be required depending on the connected 

external device when HDMI signal is input.


f

For the HDMI cable, use an HDMI High Speed cable that conforms to the HDMI standards. However, when the following 4K video signal 

exceeding the supported transmission speed of the HDMI High Speed cable is to be input, use the HDMI cable supporting the high speed 

transmission of 18 Gbps such as the one with Premium HDMI cable authentication.


g

A video signal with high specification color depth and gradation such as 3840 x 2160/60p 4:2:2/36-bit or 3840 x 2160/60p 4:4:4/24-bit

Images may be disrupted or may not be projected when a video signal exceeding the supported transmission speed of the HDMI cable is 

input.


f

The <HDMI IN 1>/<HDMI IN 2>/<HDMI IN 3> terminals can be connected to an external device with the DVI-D terminal by using an HDMI/

DVI conversion cable. However, this may not function properly for some external devices, and image may not be projected.


f

If you operate the projector using the computer with the resume feature (last memory), you may have to reset the resume feature to operate 

the projector.

Содержание PT-MZ880

Страница 1: ...k model WT White model z z for other countries or regions B Black model W White model Before operating this product please read the instructions carefully and save this manual for future use Before us...

Страница 2: ...projector 49 Connecting the power cord 49 Power indicator 50 Switching on the projector 51 When the initial setting screen is displayed 52 When the administrator account setting screen is displayed 55...

Страница 3: ...5 SERVICE PASSWORD 125 TEST PATTERN menu 126 TEST PATTERN 126 SIGNAL LIST menu 127 Registering new signals 127 Renaming the registered signal 127 Deleting the registered signal 127 Protecting the regi...

Страница 4: ...Appendix Technical information 183 Using the PJLink function 183 Using Art Net function 184 Control commands via LAN 188 SERIAL MULTI SYNC IN MULTI SYNC OUT terminals 191 REMOTE 2 IN terminal 195 COM...

Страница 5: ...his equipment may cause radio interference for Taiwan WARNING This equipment complies with the Class A standard of CNS13438 This is Class A information technology equipment that may cause radio freque...

Страница 6: ...jector is the Class 3R laser product that complies with IEC 60825 1 2007 DPQT1601ZA DPQT1359ZA DANGER CLASS 4 LASER RADIATION WHEN OPEN AVOID EYE OR SKIN EXPOSURE TO DIRECT OR SCATTERED RADIATION DANG...

Страница 7: ...ca Taiwan This equipment is equipped with a three pin grounding type power plug Do not remove the grounding pin on the power plug This plug will only fit a grounding type power outlet This is a safety...

Страница 8: ...for a Class A digital device pursuant to part 15 of the FCC Rules These limits are designed to provide reasonable protection against harmful interference when the equipment is operated in a commercia...

Страница 9: ...13 amp socket If a new plug is to be fitted please observe the wiring code as shown below If in any doubt please consult a qualified electrician WARNING THIS APPLIANCE MUST BE EARTHED IMPORTANT The wi...

Страница 10: ...exceeds 1 m 39 3 8 and it will be for professional use instead of consumer use In case of risk group 3 there is a possibility of damaging the eyes by direct irradiation when looking into the projectio...

Страница 11: ...For the latest information visit the Panasonic website https panasonic net cns projector Attention f f If the light projected from the projector directly enters the eyes while you are inside the haza...

Страница 12: ...ailure to observe this will result in electric shocks Do not overload the wall outlet If the power supply is overloaded ex by using too many adapters overheating may occur and fire will result Clean t...

Страница 13: ...eiling should only be carried out by a qualified technician If installation is not carried out and secured correctly it can cause injury or accidents such as electric shocks r r ACCESSORIES Do not use...

Страница 14: ...ojector in extremely hot locations Doing so will cause the outer casing or internal components to deteriorate or result in fire f f Take particular care in locations exposed to direct sunlight or near...

Страница 15: ...Do not attach the air filter unit while it is wet Doing so may result in electric shock or malfunctions f f After you clean the air filter units dry them thoroughly before reattaching them Ask your de...

Страница 16: ...do pela bateria pode irritar a garganta danificar o lacre do inv lucro ou o vazamento provocar calor ruptura da blindagem e produzir fogo devido ao curto circuito dos terminais N o incinere nem aque a...

Страница 17: ...demark of Cisco in the U S and other countries and is used under license f f Android and Google Chrome are trademarks of Google LLC f f Adobe Acrobat and Reader are either registered trademarks or tra...

Страница 18: ...iendly design Power consumption is lowered compared with the preceding PT MZ770 series In addition up to 20 000 hours 1 long term operation of the filter is achieved reducing total cost of ownership T...

Страница 19: ...ENGLISH 19 Chapter 1 Preparation This chapter describes things you need to know or check before using the projector...

Страница 20: ...t up the projector in the following locations f f Places where vibration and impacts occur such as in a car or vehicle Doing so may cause damage to internal components or malfunction f f Location clos...

Страница 21: ...not use the projector in a location that the ambient temperature exceeds 45 C 113 F Using the projector in a location that the altitude is too high or the ambient temperature is too high may reduce th...

Страница 22: ...longer f f Do not install the projector in a confined space When installing the projector in a confined space provide air conditioning or ventilation separately Exhaust heat may accumulate when the ve...

Страница 23: ...e start to the projector f f Smart Projector Control This application software sets and adjusts the projector connected via LAN using a smartphone or a tablet f f Multi Monitoring Control Software Thi...

Страница 24: ...when a still image is projected for long time and in such case project a full white image for 1 hour or longer Note that the residual image may not be completely erased r rDo not move the projector or...

Страница 25: ...or remote control unit Lens cover 1 6103626291 Attention f f After unpacking the projector discard the power cord cap and packaging material properly f f Do not use the supplied power cord for devices...

Страница 26: ...contact your dealer 2 When the projector is mounted to the existing Ceiling Mount Bracket in combination with the Model No ET PKD120H for High Ceilings or ET PKD120S for Low Ceilings and the Model No...

Страница 27: ...on Used to simultaneously control all the projectors with a single remote control in a multiple projector environment x page 31 11 ECO button Displays the setting screen relating to ECO management x p...

Страница 28: ...projector operate the remote control within a distance approximately 30 m 98 5 from the remote control signal receiver The remote control can control at angles of up to 30 vertically and horizontally...

Страница 29: ...signal receiver rear 17 Air filter cover There is the air filter unit inside 18 Luminance sensor x page 79 19 Top slide cover There is the lens lock lever for mounting the projection lens inside x pag...

Страница 30: ...ontrol with a cable when controlling the projector with a wired remote control 10 REMOTE 2 IN terminal This is a terminal to remotely control the projector using the external control circuit 11 SERIAL...

Страница 31: ...jector body and remote control as necessary For details on setting the ID number of the remote control refer to Setting ID number of the remote control x page 69 Note f f Set the ID number of the proj...

Страница 32: ...32 ENGLISH Chapter 2 Getting Started This chapter describes things you need to do before using the projector such as the setup and connections...

Страница 33: ...Menu item Setting value Menu item Setting value FRONT REAR FRONT FRONT REAR REAR FLOOR CEILING AUTO or CEILING FLOOR CEILING AUTO or CEILING Portrait setting and projecting forward Portrait setting a...

Страница 34: ...D120S for Low Ceilings ET PKE301B Projector Mount Bracket When the projector is mounted to the existing Ceiling Mount Bracket in combination with the Model No ET PKD120H for High Ceilings or ET PKD120...

Страница 35: ...LW LT SW SH SH SW H L1 L1 Projected image Screen Screen L LW LT 1 Projection distance L1 Lens protrusion dimension SH Projected image height SW Projected image width H Distance from the lens center to...

Страница 36: ...ed Vertical keystone correction angle Horizontal keystone correction angle Vertical keystone correction angle Horizontal keystone correction angle Min value of R2 L2 Min value of R3 L3 Min value of R2...

Страница 37: ...3 22 3 97 5 42 8 90 14 59 14 52 23 19 2 52 5 080 200 2 692 4 308 7 01 11 96 3 46 4 30 5 31 7 25 11 91 19 49 19 43 30 99 3 38 6 350 250 3 365 5 385 8 77 14 96 4 34 5 39 6 65 9 07 14 91 24 39 24 34 38 7...

Страница 38: ...24 20 03 19 98 31 86 3 47 6 350 250 3 113 5 535 9 02 15 38 4 46 5 54 6 83 9 33 15 33 25 07 25 02 39 87 4 36 7 620 300 3 736 6 641 10 83 18 47 5 36 6 66 8 21 11 20 18 42 30 10 30 07 47 89 5 24 8 890 3...

Страница 39: ...49 22 08 22 03 35 11 3 83 6 350 250 3 810 5 080 9 94 16 95 4 91 6 11 7 53 10 28 16 90 27 62 27 58 43 94 4 80 7 620 300 4 572 6 096 11 94 20 34 5 91 7 34 9 05 12 35 20 30 33 17 33 14 52 77 5 78 8 890...

Страница 40: ...83 x SD 0 054882 2 676260 x SD 0 048228 ET ELW22 0 786 0 983 1 16 10 0 690394 x SD 0 048460 0 855787 x SD 0 045477 0 787 0 984 1 16 9 0 709587 x SD 0 048460 0 879578 x SD 0 045477 0 947 1 18 1 4 3 0 7...

Страница 41: ...projection lens remove the lens cover attached to the projection lens f f Panasonic takes no responsibility for any damage or malfunction of the product resulting from the use of projection lenses whi...

Страница 42: ...the projection lens all the way in Fig 2 f f When the mark red dot on the projection lens is aligned with the mark red dot on the projector the projection lens guide groove is aligned with the guide o...

Страница 43: ...may be temporarily disrupted f f The signal that can be connected to the projector is YCBCR YPBPR signal analog RGB signal synchronization signal is TTL level and digital signal f f Some computer mod...

Страница 44: ...the HDMI High Speed cable is to be input use the HDMI cable supporting the high speed transmission of 18 Gbps such as the one with Premium HDMI cable authentication g g A video signal with high specif...

Страница 45: ...tc f f When laying cables between the twisted pair cable transmitter and the projector confirm that cable characteristics are compatible with CAT5e or higher using tools such as a cable tester or cabl...

Страница 46: ...operation has been verified with this projector visit the Panasonic website https panasonic net cns projector Note that the verification for devices of other manufacturers has been made for the items...

Страница 47: ...als of the second projector Connecting terminals of the third projector Communication cable straight all connected Communication cable straight all connected Note f f The contrast synchronization func...

Страница 48: ...48 ENGLISH Chapter 3 Basic Operations This chapter describes basic operations to start with...

Страница 49: ...hat the power cord can be inserted Fig 1 2 Check the shapes of the AC IN terminal on the back of the projector and the power cord connector then insert the connector completely in the correct directio...

Страница 50: ...psed after the projector enters the standby mode if the projector is set as following The specified time is a time set in the PROJECTOR SETUP menu ECO MANAGEMENT QUICK STARTUP VALID PERIOD g g The PRO...

Страница 51: ...o NORMAL f f When the PROJECTOR SETUP menu ECO MANAGEMENT QUICK STARTUP is set to ON and the power is turned on before the specified time elapses after the projector enters the standby mode an image w...

Страница 52: ...enu operations If you press the MENU button while the INITIAL SETTING screen is displayed you can go back to the previous screen Same operation is available by pressing the RETURN button Focus adjustm...

Страница 53: ...ting Initial setting standby mode Set the operation mode during standby The factory default setting is NORMAL which allows you to use the network function during standby To keep power consumption low...

Страница 54: ...ceed to Step 4 when 16 10 is selected 16 10 4 6 SCREEN POSITION Set as necessary for the screen in use INITIAL SETTING SET CHANGE SCREEN FORMAT ENTER 2 Press as to select SCREEN POSITION 16 9 0 4 6 SC...

Страница 55: ...can change the setting from the PROJECTOR SETUP menu DATE AND TIME To set the date and time automatically refer to Setting the date and time automatically x page 111 1 Press as to select an item 20XX...

Страница 56: ...recommended Uppercase letters Lowercase letters Digits Symbols _ Setting the administrator account Set the user name and password of the administrator account 1 Press as to select USER NAME and press...

Страница 57: ...ator rights can be set on the Set up password page x page 159 of the web control screen Making adjustments and selections It is recommended that images be projected continuously for at least 30 minute...

Страница 58: ...the ENTER button Or press the power v b button again f f Projection of the image will stop and the power indicator ON G STANDBY R on the projector body lights orange The fan keeps running 3 Wait for a...

Страница 59: ...of the signal input to the HDMI IN 3 terminal is projected COMPUTER Switches the input to COMPUTER The image of the signal input to the COMPUTER IN terminal is projected DIGITAL LINK Switches the inpu...

Страница 60: ...Pressing the button changes the adjustment screen in the order of FOCUS ZOOM and SHIFT 2 Select each adjustment item and press asqw to adjust Using the remote control 1 Press the lens buttons FOCUS Z...

Страница 61: ...attached to the projector 1 This product is equivalent to the standard zoom lens 6 Press the ENTER button f f The LENS CALIBRATION screen is displayed 7 Press qw to select OK and press the ENTER butt...

Страница 62: ...te f f Use the projection lens in the standard projection position without adjusting the lens shift when the optional Fixed focus Lens Model No ET ELW21 is attached Adjusting adjustable feet Install t...

Страница 63: ...audio reappear Note f f The power indicator ON G STANDBY R will blink green slowly while the shutter function is in use shutter closed f f The fade in fade out time of the image can be set in the DIS...

Страница 64: ...EZE button again f f Freezing of the image is canceled and audio is turned on Note f f FREEZE is displayed on the screen when video is paused f f When freezing of the moving image is canceled the imag...

Страница 65: ...is not a malfunction f f Adjustment is required for each input signal f f Automatic adjustment can be canceled by pressing the MENU button or the RETURN button during the automatic adjustment operatio...

Страница 66: ...ement position or adjust the magnification with following button operation f f The digital zoom is canceled when the AUTO SETUP CANCEL button on the remote control or the LENS CANCEL button on the con...

Страница 67: ...n timer is ended when the P TIMER button is pressed and held for 3 seconds or longer f f For details such as setting of the presentation timer function refer to the DISPLAY OPTION menu P TIMER x page...

Страница 68: ...C 87 F 31 C 87 F 31 C 87 F PT MZ880 Note f f The projector status can also be displayed using the menu operation Refer to the PROJECTOR SETUP menu STATUS x page 121 for details Using the ECO manageme...

Страница 69: ...er set on the projector body using the number 0 9 buttons f f If you press the ID ALL button you can control the projectors regardless of the ID number setting of the projector body Attention f f Sinc...

Страница 70: ...70 ENGLISH Chapter 4 Settings This chapter describes the settings and adjustments you can make using the on screen menu...

Страница 71: ...UAGE DISPLAY OPTION PROJECTOR SETUP TEST PATTERN SIGNAL LIST SECURITY NETWORK MENU SELECT SUB MENU ENTER 2 Press as to select an item from the main menu f f The selected item is highlighted in yellow...

Страница 72: ...items refer to Main menu x page 73 and Sub menu x page 73 f f The cursor color depends on the setting in the DISPLAY OPTION menu ON SCREEN DISPLAY OSD COLOR The selected item is displayed with the ye...

Страница 73: ...main menu item is displayed and you can set and adjust items in the sub menu PICTURE Sub menu item Factory default Page PICTURE MODE STANDARD 1 76 CONTRAST 0 76 BRIGHTNESS 0 76 COLOR 0 77 TINT 0 77 CO...

Страница 74: ...ADJUSTMENT OFF 93 COLOR CORRECTION OFF 93 SCREEN SETTING 94 AUTO SIGNAL OFF 94 AUTO SETUP 94 COMPUTER IN 95 HDMI IN 96 DIGITAL LINK IN 98 ON SCREEN DISPLAY 99 SIGNAL SEARCH ON 101 BACK COLOR BLUE 102...

Страница 75: ...131 MENU LOCK OFF 131 MENU LOCK PASSWORD 131 CONTROL DEVICE SETUP 132 CONTROL DEVICE PASSWORD CHANGE 133 NETWORK Sub menu item Factory default Page ETHERNET TYPE LAN 134 DIGITAL LINK 134 WIRED LAN 136...

Страница 76: ...ate to use in a dark room Note f f DICOM is an abbreviation of Digital Imaging and COmmunication in Medicine and is a standard for medical imaging devices Although the DICOM name is used the projector...

Страница 77: ...s of the projected image are bluish or reddish Adjusting with color temperature 1 Press as to select COLOR TEMPERATURE 2 Press qw or the ENTER button f f The COLOR TEMPERATURE individual adjustment sc...

Страница 78: ...the adjustment does not look suitable you can press the DEFAULT button on the remote control to return the setting for the selected item only to the factory default setting Changing the USER name 1 P...

Страница 79: ...is placed on top of the projector blocking the luminance sensor In such a case this function may not operate properly even if it is set to AUTO f f When the PICTURE menu PICTURE MODE is set to DICOM S...

Страница 80: ...urce when the brightness level of the video signal being input goes under the value set in LIGHTS OUT SIGNAL LEVEL Select an item from 0 5s 4 0s 5 0s 7 0s or 10 0s 0 5s 4 0s can be selected in increme...

Страница 81: ...BCR or 480 60p RGB Other moving image signals Select RGB or YPBPR HDMI IN 1 terminal HDMI IN 2 terminal HDMI IN 3 terminal DIGITAL LINK LAN terminal 480 60p or 576 50p signal Select AUTO RGB or YCBCR...

Страница 82: ...reen is displayed 3 Press asqw to adjust the position Orientation Operation Adjustment Vertical up and down adjustment Press a The image position moves up Press s The image position moves down Horizon...

Страница 83: ...VE cannot be selected for a 4K video signal resolution of 3 840 x 2 160 or 4 096 x 2 160 f f If an aspect ratio which is different from the aspect ratio for the input signals is selected the images wi...

Страница 84: ...computer is unstable f f There may be no optimal value when the total dot number is shifted f f CLOCK PHASE can be adjusted only when the YCBCR YPBPR signal or the analog RGB signal is input to the CO...

Страница 85: ...s necessary to register and login to PASS to download Setting KEYSTONE or CURVED CORRECTION 1 Press as to select SCREEN ADJUSTMENT 2 Press qw to select KEYSTONE or CURVED CORRECTION 3 Press the ENTER...

Страница 86: ...to select CORNER CORRECTION 3 Press the ENTER button f f The CORNER CORRECTION screen is displayed 4 Press as to select the item to adjust and press the ENTER button f f When LINEARITY is selected pr...

Страница 87: ...ect ratio of the image may change f f The picture quality will degrade more when the correction for SCREEN ADJUSTMENT increases making it harder to focus Install the projector so that the correction w...

Страница 88: ...will degrade when a signal other than the 2 2 pulldown is set as 25p FIXED or 30p FIXED Vertical resolution will degrade BLANKING You can adjust the blanking width if there are noises at the edge of...

Страница 89: ...EN ADJUSTMENT to correct the distortion of the projected image the adjustment areas of NON OVERLAPPED BLACK LEVEL BLACK BORDER LEVEL and OVERLAPPED BLACK LEVEL do not match the actual image area In th...

Страница 90: ...UPPER LOWER LEFT or RIGHT in BLACK BORDER WIDTH 16 Press qw to set the region width of the BLACK BORDER WIDTH adjustment 17 Press as to select UPPER KEYSTONE AREA LOWER KEYSTONE AREA LEFT KEYSTONE ARE...

Страница 91: ...rtical edge blending adjust OVERLAPPED BLACK LEVEL first before making adjustments in Step 12 Adjustment method is same as the procedure of NON OVERLAPPED BLACK LEVEL f f If only horizontal or vertica...

Страница 92: ...e and press the ENTER button DISPLAY LANGUAGE SELECT SET ENTER f f Various menus settings adjustment screens control button names etc are displayed in the selected language f f The language can be swi...

Страница 93: ...nge between 0 1 and 2 048 1 The lower limit varies depending on the color to be adjusted Note f f Operation when correcting the adjustment color When the correction color same as the adjustment color...

Страница 94: ...d automatically without pressing the AUTO SETUP CANCEL button on the remote control on each occasion if you input unregistered signals frequently at meetings etc 1 Press as to select AUTO SIGNAL 2 Pre...

Страница 95: ...ly unless a still image containing clear blacks and whites is input COMPUTER IN Set the COMPUTER IN terminal Switching the slice level of an input synchronization signal 1 Press as to select COMPUTER...

Страница 96: ...he computer or video device in use HDMI IN Set this item in accordance with the video signal input to the HDMI IN 1 terminal HDMI IN 2 terminal or the HDMI IN 3 terminal Setting SIGNAL LEVEL in HDMI I...

Страница 97: ...tch each time you press the button DEFAULT Standard setting SCREEN FIT Changes the EDID data according to the SCREEN FORMAT setting USER Set the RESOLUTION and VERTICAL SCAN FREQUENCY items as EDID f...

Страница 98: ...tting EDID SELECT in DIGITAL LINK IN 1 Press as to select DIGITAL LINK IN 2 Press the ENTER button f f The DIGITAL LINK IN screen is displayed 3 Press as to select EDID SELECT of DIGITAL LINK IN 4 Pre...

Страница 99: ...screen is displayed 11 Press qw to select OK and press the ENTER button Note f f Settings in RESOLUTION and VERTICAL SCAN FREQUENCY are displayed in the DIGITAL LINK IN screen f f Setting of the reso...

Страница 100: ...te the screen CLOCKWISE Rotates the screen by 90 clockwise COUNTERCLOCKWISE Rotates the screen by 90 counterclockwise Setting OSD COLOR Set the color of the menu screen OSD 1 Press as to select ON SCR...

Страница 101: ...y hide of the warning message 1 Press as to select ON SCREEN DISPLAY 2 Press the ENTER button f f The ON SCREEN DISPLAY screen is displayed 3 Press as to select WARNING MESSAGE 4 Press qw to switch th...

Страница 102: ...NONE Disables the startup logo display Note f f When USER LOGO is selected the display of the startup logo will be kept for approximately 15 seconds f f To create and register the USER LOGO image use...

Страница 103: ...ep 10 is displayed 12 Press as to select RED GREEN or BLUE 13 Press qw to adjust the level Item Operation Adjustment Range of adjustment RED Press w Red becomes darker 31 31 Factory default setting 0...

Страница 104: ...8 when the lens is at the tele end T for the best color unevenness correction SHUTTER SETTING Set the operation of the shutter function Setting FADE IN or FADE OUT 1 Press as to select SHUTTER SETTING...

Страница 105: ...o output audio while the shutter function is in use shutter closed set the PROJECTOR SETUP menu AUDIO SETTING IN SHUTTER to ON P TIMER Set and operate the presentation timer function Setting the mode...

Страница 106: ...ected image is paused and audio is turned off regardless of the playback of the external device 1 Press as to select FREEZE 2 Press the ENTER button f f Press the MENU button or the RETURN button to c...

Страница 107: ...separately from the projectors with other ID numbers f f Refer to Setting ID number of the remote control x page 69 for how to set the ID number on the remote control PROJECTION METHOD Set the project...

Страница 108: ...The screen becomes brighter The runtime becomes shorter 30 1 100 Press q The screen becomes darker The runtime becomes longer 1 It should be noted that the picture quality tends to deteriorate as the...

Страница 109: ...imer is displayed when the signal input is not present for 30 seconds and the light source is turned off and goes into standby after cooling when the time set in TIMER has elapsed OFF Disables the pow...

Страница 110: ...BY MODE is fixed to NORMAL when the PROJECTOR SETUP menu SCHEDULE is set to ON f f QUICK STARTUP cannot be set when STANDBY MODE is set to ECO f f When QUICK STARTUP is set to ON the power consumption...

Страница 111: ...Press the ENTER button f f The DATE AND TIME screen is displayed 3 Press as to select TIME ZONE 4 Press qw to switch TIME ZONE Setting the date and time manually 1 Press as to select DATE AND TIME 2 P...

Страница 112: ...e forced to NORMAL when the PROJECTOR SETUP menu ECO MANAGEMENT STANDBY MODE is set to ECO and SCHEDULE is set to ON Changing the setting to ECO is not available The STANDBY MODE setting will not chan...

Страница 113: ...ted device Model No ET YFB100G ET YFB200G is connected to the projector its input name is automatically reflected from INPUT1 to INPUT10 When an item that does not reflect the input name is selected i...

Страница 114: ...function or the shutter synchronization function is used Set this item in all the linked projectors excluding the projector set as the MAIN f f When anything other than OFF is selected the diagnostic...

Страница 115: ...when all of the following conditions are fulfilled g g All the projectors to be linked are connected in a loop with the daisy chain connection Maximum 64 projectors g g MODE on only one projector that...

Страница 116: ...Press as to select EMULATE 4 Press the ENTER button f f The EMULATE screen is displayed 5 Press as to select an item OFF Does not use existing control command for the projector D3500 D3500 series D400...

Страница 117: ...s the ENTER button LENS Perform the setting and operation regarding the projection lens LENS TYPE When the projector is used for the first time or when the projection lens is replaced confirm the LENS...

Страница 118: ...lens will move to the home position f f To cancel select CANCEL Note f f PROGRESS is displayed in the menu during lens calibration The operation cannot be canceled during calibration f f INCOMPLETE is...

Страница 119: ...ECO Setting audio output while using the shutter function 1 Press as to select AUDIO SETTING 2 Press the ENTER button f f The AUDIO SETTING screen is displayed 3 Press as to select IN SHUTTER 4 Press...

Страница 120: ...AL LINK FILTER COUNTER Check the runtime of the filter and set the cleaning replacement cycle of the filter Also the runtime of the filter can be reset 1 Press as to select FILTER COUNTER 2 Press the...

Страница 121: ...isconnect the external device switch off the projector and then switch on the projector STATUS Display the status of the projector 1 Press as to select STATUS 2 Press the ENTER button f f The STATUS s...

Страница 122: ...address up to two addresses set in E mail set up page x page 155 by pressing the ENTER button while the STATUS screen is displayed f f There may be items that are displayed and items that are not disp...

Страница 123: ...ch time you press the button ON Enables the CEC function OFF Disables the CEC function Operating a CEC compatible device Operate the CEC compatible device connected to the HDMI IN 1 terminal HDMI IN 2...

Страница 124: ...Disables the power link control from the projector to the CEC compatible device Select this when you do not want the power status of the CEC compatible device to link with the power status of the proj...

Страница 125: ...s the ENTER button f f The INITIALIZE screen is displayed 4 Press as to select an item to initialize ALL USER DATA Returns all setting values including REGISTERED SIGNAL NETWORK E MAIL LOGO IMAGE and...

Страница 126: ...PATTERN item f f The items will switch each time you press the button Menu screen Color bar vertical Displays a test pattern with the menu screen Select a desired test pattern Menu screen Color bar ho...

Страница 127: ...d signal Registered signals can be renamed 1 Press asqw to select the signal of which name is to be changed 2 Press the ENTER button f f The REGISTERED SIGNAL STATUS screen is displayed f f The memory...

Страница 128: ...ERED SIGNAL STATUS screen is displayed 3 Press the ENTER button f f The REGISTERED SIGNAL SETUP screen is displayed 4 Press as to select LOCK IN RANGE 5 Press qw to switch the item f f The items will...

Страница 129: ...to Step 3 f f A list of sub memories registered to the signal currently input is displayed f f The FUNCTION button on the remote control can be used instead of as when SUB MEMORY is selected from the...

Страница 130: ...CURITY PASSWORD 2 Press qw to switch the item f f The items will switch each time you press the button OFF Disables the security password entry ON Enables the security password entry Note f f This ite...

Страница 131: ...tch each time you press the button OFF Enables the menu operation ON Disables the menu operation Note f f This function is set to OFF as the factory default setting or after the PROJECTOR SETUP menu I...

Страница 132: ...ss as to select APPLY and press the ENTER button f f The confirmation screen is displayed 8 Press qw to select OK and press the ENTER button Enabling disabling any button 1 Press as to select CONTROL...

Страница 133: ...or approx 10 seconds f f When the setting has completed the menu screen will disappear To operate continuously press the MENU button to display the main menu f f Even when you set button operations on...

Страница 134: ...nal DIGITAL LINK output supported device Model No ET YFB100G ET YFB200G connected to the DIGITAL LINK LAN terminal f f When ETHERNET TYPE is set to LAN DIGITAL LINK the DIGITAL LINK LAN terminal and t...

Страница 135: ...able transmitter is not supporting the long reach communication method even if DIGITAL LINK MODE is set to LONG REACH DIGITAL LINK STATUS Display the DIGITAL LINK connection environment 1 Press as to...

Страница 136: ...nnected set IP ADDRESS SUBNET MASK and DEFAULT GATEWAY IP ADDRESS Enter the IP address when a DHCP server is not used SUBNET MASK Enter the subnet mask when a DHCP server is not used DEFAULT GATEWAY E...

Страница 137: ...istrator account PASSWORD POLICY Display the policies about the password for the administrator account 1 Press as to select ADMINISTRATOR ACCOUNT 2 Press the ENTER button f f The ADMINISTRATOR ACCOUNT...

Страница 138: ...hat is if it is left blank the network function of this projector cannot be used Set a password before using the web control function or the communication control including operation with application...

Страница 139: ...n Note f f For restrictions on character strings that can be set for password refer to PASSWORD POLICY x page 137 f f The user name and password of the administrator account can also be changed on the...

Страница 140: ...ected TM Set to ON to control with Crestron Connected of Crestron Electronics Inc AMX D D Set to ON to control with the controller of AMX Corporation Setting this function to ON enables detection thro...

Страница 141: ...ress the ENTER button f f The PASSWORD CONFIRM screen is displayed 11 Enter the password entered in Step 8 12 After entering the password press asqw to select OK and press the ENTER button f f The PJL...

Страница 142: ...ETUP 4 Press qw to switch the item f f The items will switch each time you press the button OFF Disables the Art Net function ON 2 X X X Enables the Art Net function and sets the IP address to 2 X X X...

Страница 143: ...shift in the horizontal direction LENS V SHIFT Adjusts the lens shift in the vertical direction LENS FOCUS Adjusts the focus LENS ZOOM Adjusts the zoom POWER Controls the power status SHUTTER Control...

Страница 144: ...144 ENGLISH Chapter 5 Operations This chapter describes how to use each function...

Страница 145: ...JLink protocol Refer to Using the PJLink function x page 183 for details f f Art Net Setting of the projector can be operated by the DMX controller or application software using the Art Net protocol R...

Страница 146: ...ub between the twisted pair cable transmitter and the projector f f To transmit the Ethernet and serial control signals using the DIGITAL LINK LAN terminal set the NETWORK menu ETHERNET TYPE to DIGITA...

Страница 147: ...fault setting DHCP OFF IP ADDRESS 192 168 0 8 SUBNET MASK 255 255 255 0 DEFAULT GATEWAY 192 168 0 1 DNS1 DNS2 None Operating the computer 1 Turn on the power of the computer 2 Perform the network sett...

Страница 148: ...n be used for setting To use the web control function a web browser is required Confirm that the web browser can be used in advance OS Compatible browser Windows Internet Explorer 11 0 Microsoft Edge...

Страница 149: ...projector from multiple computers f f Access will be locked for few minutes when an incorrect password is entered three times consecutively f f Some items on the projector setting page use the JavaScr...

Страница 150: ...isplayed by clicking this item 3 Projector control The Projector control page is displayed by clicking this item 4 Detailed set up The Detailed set up page is displayed by clicking this item 5 Set up...

Страница 151: ...lays the temperature status of light source 2 18 LIGHT Displays the lighting status and runtime of the light source 19 SELF TEST Displays the self diagnosis information 20 PROJECTOR RUNTIME Displays t...

Страница 152: ...ount f f Check Access error log and Mail error log periodically Basic control page Click Projector control Basic control 1 2 3 4 6 5 1 POWER Turns off on the power 2 SHUTTER Switches the status of the...

Страница 153: ...at the right of the control page LENS page Click Projector control Detail control LENS 4 5 3 2 1 1 HOME POSITION Moves the projection lens to the home position 2 SHIFT Click asqw to adjust the lens sh...

Страница 154: ...turn to the original screen Click the Next button to display the setting confirmation screen Click the Submit button to update the setting Note f f When you use the Forward and Back functions of your...

Страница 155: ...ion authentication when using the command control function DISABLE Connect to the projector in non protected mode Connection authentication is not performed ENABLE Connect to the projector in protecte...

Страница 156: ...ting for the temperature warning mail A temperature warning E mail is sent when the temperature exceeds this value 8 7 9 8 7 Network security Crestron tools Network security Crestron tools 7 E MAIL AD...

Страница 157: ...page Settings related to the ECO management function of the projector can be made Click Detailed set up ECO management set up 1 2 3 4 6 8 7 5 1 LIGHT POWER Displays the LIGHT POWER setting 2 AMBIENT...

Страница 158: ...degF Light temperature1 25 degC 77 degF Light temperature2 25 degC 77 degF PROJECTOR RUNTIME 7 H POWER ON 16 times LIGHT RUNTIME 7 H LIGHT ON 16 times Current status MAIN VERSION 0 16 SUB VERSION 0 0...

Страница 159: ...the IPID of the control system 3 Port Set the port number of the control system 4 Submit Update the setting Set up password page for administrator account Click Set up password 1 2 3 4 1 Administrator...

Страница 160: ...projector will become impossible if the user name or password for Administrator is changed If the user name or password for Administrator is changed update the registration information of the applicat...

Страница 161: ...ser account The password of the standard user account can be changed 1 2 4 3 1 Old Password Enter the current password 2 New Password Enter the desired new password Up to 16 characters in single byte...

Страница 162: ...age x page 159 of the web control screen Note f f The data cloning function will not operate when the models of the projectors are different For example data of PT MZ880 can be copied to other PT MZ88...

Страница 163: ...rd is the password set in the SECURITY menu SECURITY PASSWORD CHANGE Initial password as the factory default awsqawsq f f While data is being copied the light source indicator LIGHT the temperature in...

Страница 164: ...f CEC compatible device enable the HDMI CEC function f f Projector Set the PROJECTOR SETUP menu HDMI CEC to ON x page 123 Note f f After switching on the CEC compatible device switch on the projector...

Страница 165: ...OWER ON OFF f f If the projector is switched off all connected CEC compatible devices are switched off r r When the setting is POWER ON OFF f f If the input channel is HDMI1 HDMI2 or HDMI3 when the pr...

Страница 166: ...by pressing the STATUS button on the remote control and displaying the STATUS screen The firmware version can also be confirmed in the PROJECTOR SETUP menu STATUS 1 3 RETURN EXIT CHANGE ENTER SEND E M...

Страница 167: ...air cable transmitter and the projector Computer used for updating the firmware Prepare a computer compatible with the following OS and equipped with a LAN terminal f f Microsoft Windows 10 Windows 10...

Страница 168: ...mation screen is displayed PT MZ880 MZ780 MZ680 SMZ58C 3 Confirm the status of the projector f f Confirm that the projector to be updated is in the standby mode 4 Confirm the connection status f f Con...

Страница 169: ...tails of the projector f f Enter the details set in the projector to be updated Item Details IP Address The NETWORK menu NETWORK STATUS IP ADDRESS Command Port The NETWORK menu NETWORK CONTROL COMMAND...

Страница 170: ...continue to update the firmware of another projector click Yes The connection setting screen in Step 7 is displayed f f To end the update tool click No 12 Confirm the firmware version f f Turn on the...

Страница 171: ...ENGLISH 171 Chapter 6 Maintenance This chapter describes methods of inspection when there are problems maintenance and replacement of the units...

Страница 172: ...ocedure in Switching off the projector x page 58 Light source indicator LIGHT Temperature indicator TEMP Filter indicator FILTER Light source indicator LIGHT Indicator status Lighting red Blinking red...

Страница 173: ...POWER switch to OFF x page 58 and consult your dealer Note f f If the temperature indicator TEMP is still lit or blinking after taking the measures ask your dealer for repair Filter indicator FILTER...

Страница 174: ...le do not use excessive force when wiping the lens Attention f f The lens may be damaged if you hit with a hard object or wipe with excessive force Handle with care Air filter unit Perform maintenance...

Страница 175: ...Fig 2 1 Wash the air filter unit Fig 1 i Soak the air filter unit in cold or warm water and then lightly rinse it f f Do not use cleaning tools such as brushes f f When rinsing hold the frame of the a...

Страница 176: ...jector is used without attaching the air filter unit the filter indicator FILTER will blink red and a message is displayed on the projected image for approximately 30 seconds f f When the air filter u...

Страница 177: ...ttached the projector will suck in dirt and dust causing a malfunction f f When the projector is used without attaching the air filter unit the filter indicator FILTER will blink red and a message is...

Страница 178: ...Remote control does not respond f f Are the batteries depleted f f Is the polarity of the batteries set correctly 31 f f Are there any obstructions between the remote control and the remote control si...

Страница 179: ...le transmitter and an external device and between the twisted pair cable transmitter and projector correctly done f f Is DIGITAL LINK MODE set to AUTO or DIGITAL LINK Is it set to ETHERNET 134 f f Is...

Страница 180: ...Intake air temperature sensor error 4 H13 Exhaust air temperature sensor error 4 H14 Light source temperature sensor 1 error 4 H16 Light source temperature sensor 2 error 4 F16 Angle sensor error 4 F...

Страница 181: ...in an appropriate operating environment temperature 1 3 Battery replacement is required Consult your dealer 4 If the display does not clear after switching the main power off and on consult your deale...

Страница 182: ...182 ENGLISH Chapter 7 Appendix This chapter describes specifications and after sales service for the projector...

Страница 183: ...nction disabled 20 Shutter function disabled shutter open mute function disabled AVMT Shutter status query audio output status query 21 Shutter function disabled shutter open mute function enabled mut...

Страница 184: ...nk commands without security authentication set the PJLink password to blank The factory default setting of PJLink password is blank f f For specifications related to PJLink visit the website of Japan...

Страница 185: ...47 DIGITAL LINK 48 55 No operation 56 255 r r INPUT SELECT when Art Net CHANNEL SETTING is set to 2 or USER Performance Parameter Default value No operation 0 7 0 COMPUTER 8 15 No operation 16 31 HDM...

Страница 186: ...00 Low speed 32 63 Fine adjustment 64 95 Operation stop 96 127 Lens adjustment Fine adjustment 128 159 Low speed 160 191 High speed 192 223 Execute command action 224 255 r r POWER Performance Paramet...

Страница 187: ...er Default value No operation 0 31 128 OFF 32 95 No operation 96 159 ON 160 223 No operation 224 255 r r COLOR TINT Performance Parameter Default value No operation 0 31 0 Factory default setting 32 6...

Страница 188: ...command format via the SERIAL MULTI SYNC IN terminal For examples of the available commands refer to Control command x page 194 Note f f Setting the password of the administrator account is required x...

Страница 189: ...ination symbol Message ERR1 Undefined control command CR 0x0d ERR2 Out of parameter range ERR3 Busy state or no acceptable period ERR4 Timeout or no acceptable period ERR5 Wrong data length ERRA Passw...

Страница 190: ...1 byte Undefined length 1 byte f f Example The power of the projector is in standby status 00000 CR r r Error response String Details Termination symbol Message ERR1 Undefined control command CR 0x0d...

Страница 191: ...ut to each projector when structuring a multi display screen by combining the projected images from multiple projectors It is also possible to synchronize the shutter operation of the specified projec...

Страница 192: ...JECTOR SYNC For contrast synchronization function for shutter synchronization function 5 GND Earth 6 NC 7 CTS Connected internally 8 RTS 9 NC D Sub 9 pin male Outside view Pin No Signal name Details 5...

Страница 193: ...be sure to wait until 0 5 seconds has elapsed after receiving the response from the projector before sending the next command When transmitting a command which does not need a parameter a colon is not...

Страница 194: ...ut signal RG1 COMPUTER HD1 HDMI1 HD2 HDMI2 HD3 HDMI3 DL1 DIGITAL LINK OSH Shutter control 0 OPEN QSH Shutter status query 1 CLOSE VSE Aspect ratio switch 0 NORMAL 1 4 3 2 WIDE 5 NATIVE QSE Aspect rati...

Страница 195: ...r HDMI3 7 DLINK Other DLINK 8 SHUTTER OFF ON 9 RST SET Controlled by remote control Controlled by external contact Attention f f When controlling make sure to short circuit pins 1 and 9 f f When pins...

Страница 196: ...No Signal name 10 6 11 15 1 5 1 R PR 9 5 V 2 G Y 10 GND 3 B PB 11 GND 4 12 DDC data 5 GND 13 SYNC HD 6 GND 14 VD 7 GND 15 DDC clock 8 GND MONITOR OUT terminal pin assignment and signal name Outside vi...

Страница 197: ...When PICTURE MODE is set to DYNAMIC DYNAMIC CONTRAST is set to 1 or 2 and HDMI signal is input Center to corner zone ratio 1 85 Displayable scanning frequency Horizontal 27 kHz to 135 kHz Vertical 24...

Страница 198: ...2 0 V rms variable output impedance 2 2 k or lower SERIAL MULTI SYNC IN terminal D Sub 9 p x 1 RS 232C compliant for computer control MULTI SYNC OUT terminal D Sub 9 p x 1 REMOTE 1 IN terminal M3 ste...

Страница 199: ...N STANDBY MODE in AUDIO SETTING is set to ON QUICK STARTUP is set to ON and DC OUT terminal supplies power 2 A PT MZ680 Approx 100 W Standard outside dimensions Width 561 mm 22 3 32 Height 224 mm 8 13...

Страница 200: ...cket in combination with the Model No ET PKD120H for High Ceilings or ET PKD120S for Low Ceilings and the Model No ET PKE300B Projector Mount Bracket it is necessary to replace the drop prevention wir...

Страница 201: ...ector bottom view Unit mm inch M6 12 mm 15 32 Screw holes for ceiling mount Screw hole for wire rope r r Dimensions for the screw holes to fix the projector projector bottom view Unit mm inch 476 18 3...

Страница 202: ...840 x 2 160 67 5 30 0 2 297 0 l l 3840 x 2160 60p 3 840 x 2 160 135 0 60 0 2 297 0 l 3 l 3 3 840 x 2 160 135 0 60 0 2 594 0 l 3840 x 2160 50p 3 840 x 2 160 112 5 50 0 297 0 l 3 l 3 3 840 x 2 160 112...

Страница 203: ...projector For the signal without l in the plug and play compatible signal column the resolution may not be selected on the computer even if the projector is supporting it f f Input corresponding to ea...

Страница 204: ...6 5 1600 x 900 50 1 600 x 900 46 4 49 9 96 5 1600 x 900 60 1 600 x 900 55 9 60 0 119 0 l l l l l l l 1600 x 1200 50 1 600 x 1 200 61 8 49 9 131 5 1600 x 1200 60 1 600 x 1 200 75 0 60 0 162 0 l l l l l...

Страница 205: ...emote control 27 69 ID SET button Remote control 27 69 INITIALIZE 125 Initial setting 52 INITIAL STARTUP 110 INPUT RESOLUTION 89 INPUT SELECT button Projector body 30 59 Installation mode 33 L LENS 11...

Страница 206: ...hing off the projector 58 Switching on the projector 51 SYSTEM SELECTOR 80 T Temperature indicator 172 TEST PATTERN 75 126 TEST PATTERN button Remote control 27 67 TEXT CHANGE 131 TINT 77 Troubleshoot...

Страница 207: ...in the European Union If you wish to discard these items please contact your local authorities or dealer and ask for the correct method of disposal Product Information for Turkey only AEEE Y netmeli...

Отзывы: