About your projector
ENGLISH - 19
Preparation
About your projector
Remote control
(18)
(3)
(2)
(4)
(5)
(6)
(7)
(8)
(9)
(10)
(11)
(12)
(13)
(14)
(15)
(16)
(17)
(19)
(20)
(7)
(21)
(22)
(23)
(24)
(25)
(1)
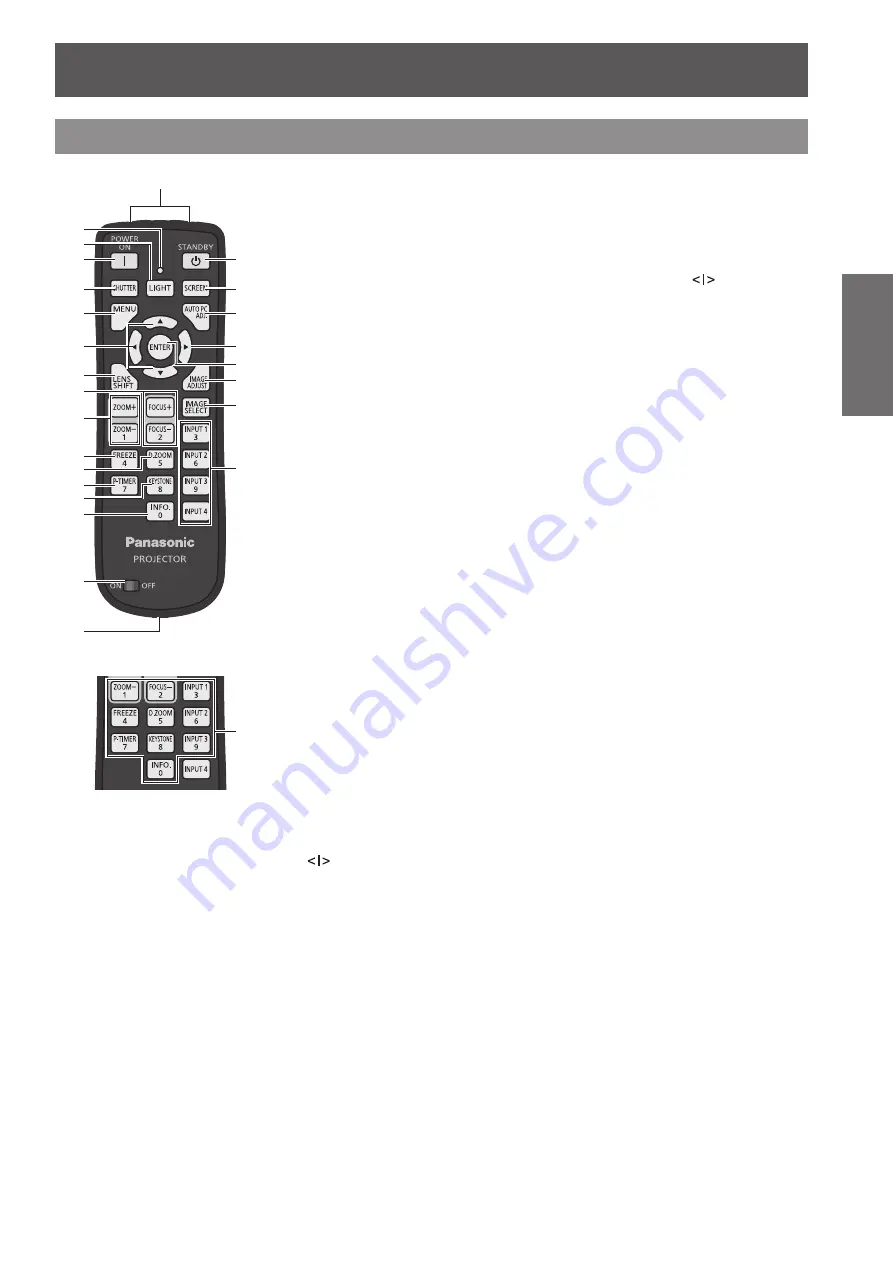
(1) Remote control signal emitters
(2) Remote control indicator
Flashes when you press a button on the remote control.
(3) <LIGHT> button
Press once to light the control buttons for ten seconds.
(4) Power <POWER ON> button
Starts projection when the main power switch on the projector is set to
and in the
standby mode.
(5) <SHUTTER> button
Opens and closes the shutter. (
page 47)
(6) <MENU> button
Displays the menu screen. (
page 50)
(7)
▲▼◀▶
buttons
Move the cursor on the on-screen menu and adjust the settings of the menu.
Also move the image vertically and horizontally in the digital zoom mode or the real mode.
(8) <LENS SHIFT> button
Slides the lens vertically and horizontally to move the position of the projected image
vertically and horizontally. (
page 45)
(9) <FOCUS> button
Adjusts the focus. (
page 46)
(10) <ZOOM> button
Adjusts the zoom of the lens. (
page 46)
(11) <FREEZE> button
Temporarily freezes the projected image. (
page 47)
(12) <D.ZOOM> button
Turns on the digital zoom mode.
(13) <P-TIMER> button
Counts and displays the time elapsed from the press of the button or displays a countdown
from the set time when you press the <P-TIMER> button. (
page 49)
(14) <KEYSTONE> button
Corrects the keystone effect. (
page 48)
(15) <INFO.> button
Displays the state of signals during projection, and current settings. (
page 49)
(16) <ON>/<OFF> switch
Set to <ON> when using the remote control.
Set to <OFF> when not using the remote control for a long period.
(17) Wired remote control terminal
When the remote control is used as a wired remote control, connect this terminal to the
<REMOTE IN> terminal on the projector.
The remote control requires batteries. (
page 24)
(18) Power <STANDBY> button
Sets the projector to the standby mode when the main power switch on the projector is set
to
and in the projecting mode.
(19) <SCREEN> button
Selects the screen size.
If you press the button for at least five seconds, the settings of the [Screen] menu return to
the factory default settings. (
page 49)
(20) <AUTO PC ADJ.> button
Automatically adjusts tracking, total number of dots, horizontal shift, and vertical shift.
(
page 56)
(21) <ENTER> button
Selects an item indicated by the cursor on the on-screen menu.
Also used to enlarge or reduce the image in the digital zoom mode. (
page 50)
(22) <IMAGE ADJUST> button
Displays the [Image adjust] menu to adjust the image. (
page 49)
(23) <IMAGE SELECT> button
Selects the mode from [Image select]. (
page 48)
(24) <INPUT 1> - <INPUT 4> buttons
Selects the input signal to project. (
page 47)
(25) Number (<0> - <9>) buttons
Used to enter PIN codes and remote control numbers.


