


9
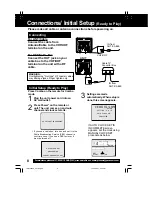
Initial Setup
VIDEO IN
AUDIO IN
POWER
VOL
CH
STOP/EJECT REW/
PLAY/REPEAT FF/
REC
TIMER/FM
ACTION
REC ON TIMER
VIDEO IN
AUDIO IN
POWER
VOL
CH
STOP/EJECT REW/
PLAY/REPEAT FF/
REC
TIMER/FM
ACTION
REC ON TIMER PROG TIMER
PROG TIMER
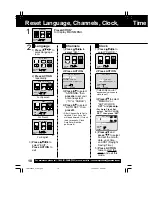
Reset all unit Memory Functions
When moving unit to a new location, or if a
mistake was made in the Initial Setup section.
• Make sure a tape is not inserted in the unit.
Manual Clock Set
If AUTO CLOCK SET was incomplete, manually
set the clock as follows.
SET :
SELECT :
END : ACT I ON
SET CLOCK
DST : ON
SE
SELE CT
MONTH
TH
1 / /
:
1
2
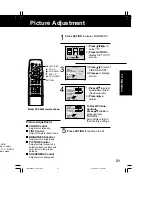
Press ACTION on the Remote to
display SET CLOCK Menu screen.
Press to select the month
and press to set. In the same
manner, select and set the date,
year, time, and DST. (Daylight
Saving Time)
SET :
START : ACT I ON
SET CLOCK
DST : ON
SE
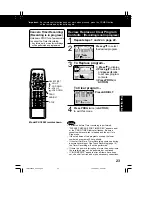
SET COMPLETED
COMPLETED
2 / 6/
2 / 6/
:
2002
2002 WED
WED 12
12 00
00PM
PM
3
Press ACTION twice to start
CLOCK and exit.
3
1
2
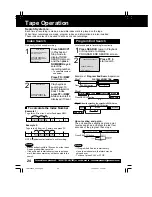
Do “Initial Setup” on page 8.
ady to Play)
POWER
ACTION
SELECT/SET
:CH UP
:CH DOWN
:VOL UP
:VOL DOWN
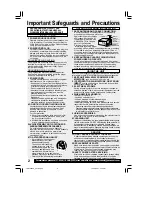
Note to CABLE System Installer
This reminder is provided to call the
CABLE (Cable TV) System Installers
attention to Article 820-40 of the NEC
that provides guidelines for proper
grounding and, in particular, specifies
that the cable ground shall be
connected to the grounding system of
the building, as close to the point of
cable entry as practical.
Turn the unit
Power on.
Press and hold both PLAY and
FF on the unit for more than 5
seconds.
• The power will shut off.
• Please ignore “NO CASSETTE” warning.
*Important: If a remote control button does not work when pressed, press the COMBO button
on the remote and try the button again.
Model PV-C2062 remote shown.
LSQT0582A_P01-09.p65
12/14/2001, 1:05 PM
9
Содержание Omnivision PV-C2542
Страница 22: ...6 1 2 Disassembly Method Fig D2 22 ...
Страница 23: ...Fig D3 23 ...
Страница 24: ...6 1 2 1 Notes in chart 1 Removal of VCR Unit Fig D4 24 ...
Страница 28: ...6 2 2 Inner Parts Location Fig J1 1 28 ...
Страница 29: ...6 2 3 EJECT Position Confirmation Fig J1 2 29 ...
Страница 30: ...6 2 4 Full Erase Head and Cylinder Unit Fig J2 30 ...
Страница 70: ...70 ...
Страница 73: ...11 2 MECHANISM BOTTOM SECTION 73 ...
Страница 74: ...11 3 CASSETTE UP COMPARTMENT SECTION 74 ...
Страница 75: ...11 4 CHASSIS FRAME SECTION 1 75 ...
Страница 76: ...11 5 CHASSIS FRAME SECTION 2 76 ...
Страница 77: ...11 6 PACKING PARTS AND ACCESSORIES SECTION 77 ...
Страница 84: ...121 LSPG1279 PACKING CASE PAPER F 6 84 ...
Страница 97: ...R5317 ERDS2TJ101 CARBON 1 4W 100 97 ...
Страница 99: ...R6045 ERJ6GEYJ102V MGF CHIP 1 10W 1K 99 ...
Страница 118: ...R5401 ERJ6GEYJ561V MGF CHIP 1 10W 560 118 ...
Страница 120: ...R6049 ERJ6GEY0R00V MGF CHIP 1 10W 0 120 ...


