background image

9

 8

安裝方法

詳細情況請查閱安裝說明書。

·

If the fixing screws are too tight, it may cause damage

    of washers and lead to water leakage.

·如果固定螺絲擰得過緊的話,可
  能會導致墊圈受損,引起漏水。

Note

注意

·

After installation, make sure the fixing screws are tight.

·安裝完畢後,請确认固定螺絲已擰緊。

Note

注意

扭鬆轉接器上的螺絲,取下轉接器。

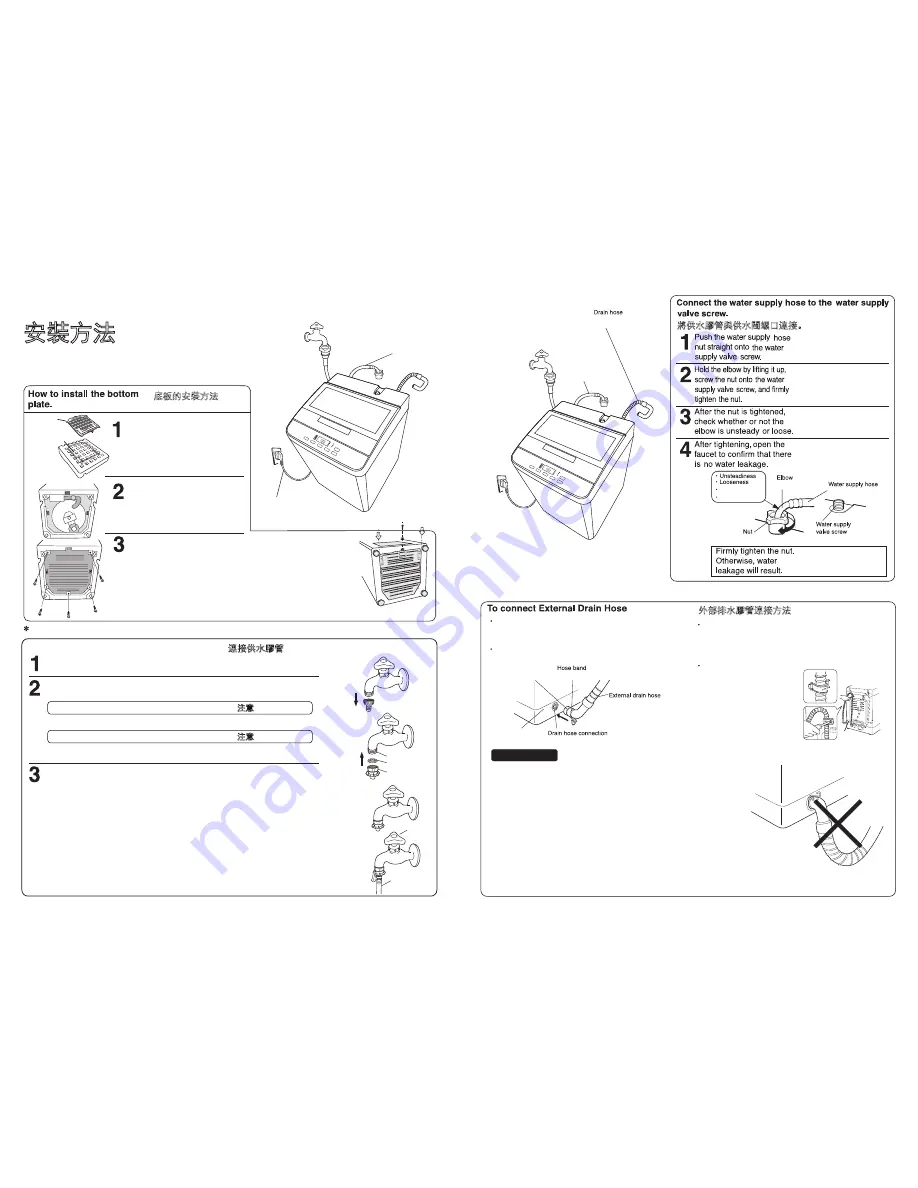
連接供水膠管

    進行下列操作前請先確認供水
膠管的另一側已和洗衣機的供水閥
相連接。
1)將供水膠管和水龍頭的出水口
   相連接。
2)供水膠管連接完畢後,
   打開水龍頭的開關。
3)安裝操作完畢後,請仔細確認
   水龍頭及各安裝部位有否漏水。
4)請務必使用附帶的新供水膠管,
   舊供水膠管不能重複使用。

連接供水膠管

螺絲

墊片

水龍頭轉接器

screw

gasket

water tap adapter

開關

供水膠管

handle

water supply hose

Connect the water supply hose

     Please confirm the other end of the water 

supply hose has been connected to the joint of the washing 

machine before conducting the following operations:

1)Connect the water supply hose and water tap

   adapter or the water tap.

2)Turn on the handle of the water tap after connecting

   the water supply hose.

3)Please confirm carefully whether there is water

   leakage at the water tap and each connecting point 

  after the installation is completed.

4)New hose-sets supplied with the appliance are to 

   be used and old hose-sets should not be reused.

How to Install

See the Installation Manual for details.

To connect the water supply hose

Loosen screws on the adapter and take down 

the adapter.

轉接器

adapter

將水龍頭轉接器,連同墊片,
一同扭緊于水龍頭出水位置。

Fix the water tap adapter, with the gasket, to 

the water tap.

請確保底板安裝妥當。

Please make sure the bottom plate is well mounted.

供水膠管

電源線

Water supply

hose

Power cord

供水膠管

Water supply

hose

Turn the washing machine

over so that its front side is 

down.

使洗衣機前面朝下傾倒。


Align the bottom plate with the 

tabs of the outer edge of the 

frame(3 tabs) and install by 

fastening screws at 5 locations.

(Only for NA-F60A6P )

使底板與洗衣機框的外緣的突

出部分(三處)在一條線上,然
後擰緊

5

個螺釘將其固定。(僅

NA-F60A6P

而言)


裝好底板,然後擰緊

1

個螺

釘將其固定。(僅對

NA-F60A6

而言)


Install the bottom plate by

fastening screws at 1

location. (Only for 

NA-F60A6)

底板的安裝方法

取下包裝上泡沫墊上的底板。  

Remove the bottom plate

adhered on the side cushion 

of the washing machine.

底板

B

包裝上泡沫墊

(NA-F60A6P)

Connect the drain hose securely to the main body of the

washer,ensure that hose rib and base side are flush.and 

move the hose band next to the washer body.

將排水膠管牢靠地連接至洗衣機本體上,確保膠管的凸
筋與底座面平齊,並將膠管的固定環移至洗衣機邊上。

Connect the drain hose to the drain hose connection

of the machine. Fasten the drain hose on the rear side

of body as shown by hose supporter supplied with the 

machine.

連接頭

外部排水膠管

膠管的固定環

將排水膠管連接至本器
的连接頭。如圖所示,
用本機附帶的膠管固定
片將排水膠管固定在機
體背後。

底座面

膠管的凸筋

Hose rib

Base side

To


avoid direct draining due to the fallen water drain hose,the water 

drain hose must be used only after installing into fixing holder and its 

hanging height should not exceed 1 m.

Do


not release the water drain hose lest the water is splashed.

Do not use extended water drain hose.

Do not immerse the U-shaped hose which is on the tail of the drain hose 

in the water.

Be sure not to install the drain hose at a position lower than drain hose 

connection, otherwise, it could lead to difficulties in drainage.

爲了避免排水膠管掉落造成直接排水,請務必將排水膠管嵌入膠管固定片後
再進行使用,且排水膠管的掛靠高度不應超過

1

米。

請勿將排水膠管放倒,以免水灑落。

請勿使用延長排水膠管。
請勿將排水膠管尾部的

U

型管浸沒在水中。

排水膠管安裝時,請勿低於連接頭,如低於連接頭可能會導致排水不暢。


Note

 注意

·

·

·

·

·

·

·

·

·

·

排水膠管

將供水膠管與供水閥螺口連接。

將供水膠管螺母垂直地

頂在供水閥螺口上。

向上托住彎管,將螺母

擰緊在供水閥螺口上。

擰緊螺母后,確認彎管

是否不穩或鬆動。

不穩

鬆動

彎管

供水膠管

螺母

供水閥螺口

請擰緊螺母。否則

會漏水。

外部排水膠管連接方法

擰緊后,打開水龍頭開

關,確認是否有漏水。

If the installation method, operation and check are not followed 

   to instruction, our company will not be responsible for accident 

   or damage caused.

 ■未按本安裝方法設置、運行、點檢引起的事故、損害,本公司概不負責。

Содержание NA-F60A6

Страница 1: ...ese instructions carefully and completely paying special attentions to notes pertaining to your particular model NA F60A6P NA F60A6 Model No Thank you very much for purchasing Panasonic product 非常感謝您購買了Panasonic產品 Fully Automatic Washer Domestic use 全自動洗衣機 家用 中國印刷發行 2016年9月 W9901 9ZS00 Web Site http www panasonic com ...

Страница 2: ...ndicates the compulsory matters to be carried out 這樣的符號 指的是必須實行的事項 CAUTION 安全注意事項 警告 注意 警告 Please follow strictly 請務必遵守 請勿靠近點著的蠟燭 蚊香以及香煙 等火源 否則可能引起火災或機器變形 Keep away from the fire There is a danger of fire or deformation 不要損傷 改造 過度彎曲 扭曲 拉扯或 捆扎電源線 請勿靠近熱源 不要用重物壓 Do not damage modify immoderately bend twist pull or bundle them Do not put them close to heating appliance Do not put anything heavy on them ...

Страница 3: ...蓋在打開的狀態時 脫水桶也持續運轉 造成受傷 Keep away magnetic objects such as magnet from the operation panel The tub may operate even with the lid open resulting in injury 如果在機蓋打開后15秒后洗衣槽仍未停止轉動 請立即關閉洗衣機并聯繫服務人員進行檢查和維修 If the tub does not stop with 15 seconds when the lid is open during spin cycle switch off the washing machine immediately and call a service person Do not wash and spin waterproof sheets and garments E...

Страница 4: ...ing and the setup conditions If the time has been set the amount of time remaining will be displayed Indicates the code which course has been selected Indicates the appropriate water level according to the laundry amount 開始後 顯示剩餘時間的估計值 根據洗滌物的種類和設置狀態 顯示的剩餘時間可能與實際不 同 預約時 顯示幾小時後洗滌完畢 顯示所選擇的程序的代碼 根據衣物量顯示相應的水位 Display window 顯示部 Course Indicator 程序指示燈 The code which course has been selected will be disp...

Страница 5: ...ning screws at 5 locations Only for NA F60A6P 使底板與洗衣機框的外緣的突 出部分 三處 在一條線上 然 後擰緊5個螺釘將其固定 僅 對NA F60A6P 而言 裝好底板 然後擰緊1個螺 釘將其固定 僅對 NA F60A6 而言 Install the bottom plate by fastening screws at 1 location Only for NA F60A6 底板的安裝方法 取下包裝上泡沫墊上的底板 Remove the bottom plate adhered on the side cushion of the washing machine 底板B 包裝上泡沫墊 NA F60A6P Connect the drain hose securely to the main body of the washer ensure...

Страница 6: ... hose should be less than 3 m and the height below 10 cm Otherwise the machine will stop running while in operation Be sure the distance between the machine and the wall is above 5 cm 如要延長外部排水膠管 連接排水膠管時 其長度應在3 m以內 高度在10 cm以下 若太長或太高 運轉途中會停機 本機與墻壁之間應保留5 cm以上的空間 接好排水膠管使其處於排水狀態 連接供水膠管 打開水龍頭 將插頭插入插座 使用完畢後請確認關閉水龍頭 使用完畢後請確認將電源插頭從插座中拔出 Be sure to close the water faucet after the operation Be sure to pull ...

Страница 7: ... Put the laundry in and press the power OFF ON button 按程序鈕選擇 高濃度浸洗 程序 Press the PROGRAM button to select the SOAK course 蜂鳴音響起時 洗滌完成 When the buzzer sounds washing is finished 2 4 3 1 The machine will measure the laundry load by churning the laundry without any water and display the appropriate water level It is suitable for washing stained laundry and the soiled collar and wrist portions of dress ...

Страница 8: ...undry in and press the power OFF ON button 按程序鈕選擇 纖細衣物 程序 Press the PROGRAM button to select the DELICATE course 加入與水位相應 的洗滌劑 關上 洗衣機蓋 並按 下 開始 暫停 鈕 The 39 L water level is displayed 顯示 39 L 水位 What is the DELICATE course 甚麽是 纖細 衣物 程序 當您洗滌毛衣或纖細 衣物之類 It is good for washing wool items 39 49 L間水位可以調節 Water level adjusts from 39 to 49 L Put in appropriate amount of detergent according to the water level...

Страница 9: ... that develops in the tub will vary depending on the usage conditions If mold grows in the tub use a washing tub cleaner sold separately to clean the tub 注意 洗衣槽是否會生出黑菌 因使用環境而異 附著上黑菌時 請使用另售的洗衣槽清潔劑進行洗滌 配合市面上的 衣物專 用氯系漂白劑 進行淨 桶程序 有效抑制洗滌 脫水槽內產生的黑黴 以保持清潔 注意 請不要使用氧系漂白劑和廚房用氯系漂白劑 產生的泡沫過多可能會溢出 保養標準 每月1次左右 運轉時間大約在2小時左右 With chlorine based bleach can be purchased from market this course can help to remove mol...

Страница 10: ...s and the pulsator revolving which avoid the laundry convolved According to the volume and kind of the laundry temperature humidity surroundings it is possible that the laundry may be not dry sufficient Because heater is not used the laundry may be cooler or not dry sufficient 倒入洗衣粉 Put the detergent in the soap case 向外拉開洗衣粉投入盒 Open the soap case 在洗滌物直接接觸洗滌劑的狀態 長時間 下洗滌可 能會造成串色或者脫色 所以請將洗滌劑投入到投入 盒內 洗衣...

Страница 11: ...Note 注意 Note 按 過程 按鈕 可選擇進行指定洗衣程序如脫水 等運行 對另洗的衣物進 行脫水 洗衣水的再利用 清洗水的再利用 不加洗劑 只進 行水洗時 對用洗滌劑浸泡 過的衣物進行清 洗和脫水 洗滌完畢後 留下洗 衣水停止 洗衣槽內有水時 從 排水開始運行 洗滌 清洗完畢後 留下清洗用水 不進行沖洗 而自動 進行洗滌以及脫水 槽內有水時從排水開 始 然後進行清洗 To reuse the wash water To spin the laundry separately To reuse the rinse water To wash the laundry without using detergent To rinse and spin the laundry soaked with detergent 在按下 開始 暫停 鈕的同時 按下電源 關 開 鈕 持續按 下 開始 暫...

Страница 12: ...cy alarm Button operation is not accepted Unplug the power cord and plug it in again after 5 seconds The original course has been cancelled Start again from the beginning When the water is drained Emergency alarm is activated the TUB HYGIENE lamp flashes display U99 and a buzzer sounds Confirm that no child has fallen in the tub What is the Child Lock Mode If an infant opens the lid during the opera...

Страница 13: ...氧系列 漂白劑 Paint the decontamination detergent or oxygen containing series bleach at the spot 污泥 固體污漬 咖喱 辣椒等 Sludge Solid stains Curry chili etc 在污漬處塗上專用洗滌劑或肥皂后用 手搓洗 Paint the dedicated detergent soap or at the spot then Scrub The clothing need to be put in a washing net washing with other clothing Put in bra with metal trunnion ring stockings a store bought washing net 帶有金屬托圈的文胸 絲襪請放在網狀洗衣袋中進行洗滌 防止金屬...

Страница 14: ... washing machine Please clean the filter regularly the filter label behind of washing machine have the operating instruction for the cleaning Recommended cleaning cycle is one year 過濾器注意標貼 Filter label 過濾器 Filter 過濾器注意標貼 拆卸 安裝 保持過濾器開口向右的狀態放入洗 衣機內 打開過濾器前 在下方放置容量 500 ml的容器收集残水 右旋至被擋筋擋住為止 大約需要 旋轉三圈 建議由授權維修部或具有專門技術的人員進行清理過濾器工作 Filter label Disassembly Installation Keep the filter aperture rightward an...

Страница 15: ...THER 其 他 顯示 CL Symptoms Causes Midway during spinning the operation suddenly changes to rinsing If the laundries in the tub bundle to one side the washing machine automatically will unravel them by rinsing Put laundries into the tub as flat as possible During spinning the laundry and the spinner rotate with irregular movements To avoid soap suds building up the washing tub turns slowly and quickly...

Страница 16: ...page 26 for detail Restart by opening and closing the lid If the lid is left open for 5 seconds or more while the tub contains water The Child Lock Mode is activated and the water is draind Unplug the power cord and plug it again after 5 seconds See page 23 for detail Buzzer keeps sounding 顯示屏如果出現下列顯示時 蜂鳴器鳴響 U與數字交替顯示 顯示燈的顯示內容 洗衣機是否不平穩 或者放在傾斜的地面上 將洗衣機蓋開 關之後 會重新開始運轉 洗衣機內的衣物是否都集中到了一邊 請將衣物重新放置均勻 關上洗衣機...

Отзывы: