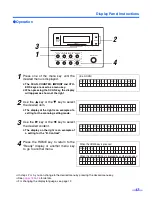
Display Panel Instructions
25
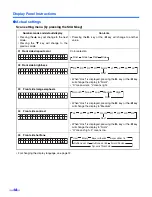
Others setting menu (by pressing the OTHERS key)
Number, mode and default display
• Pressing the
3
key will change to the next
mode.
• Pressing the
4
key will change to the
previous mode.
Contents
• Pressing the
1
key or the
2
key will change to another
value.
01 Checking the version
MX.XX: Displays the mechanical control firmware version.
SX.XX: Displays the Interface firmware version and the size
of expansion memory. If a Interface board is not
installed, the entry will not be displayed.
BX.XX: Displays the post-imprinter firmware version. If a
post-imprinter unit is not installed, the entry will not
be displayed.
02 Setting the buzzer
03 Setting the SCSI ID
When the wide SCSI setting is enable:
When the wide SCSI setting is disable:
• Setting the SCSI ID will be activated after turning the power
off and turning it on again.
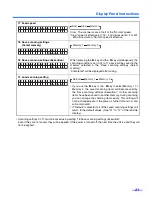
04 Setting the wide SCSI
Sets “Enable” or “Disable”.
• Setting the wide SCSI will be activated after turning the
power off and turning it on again.
05 Setting the transfer rate
When the wide SCSI setting is disable:
When the wide SCSI setting is enable:
• Changes the maximum value of the synchronous transfer
rate of the SCSI interface.
• Lower the synchronous transfer rate to 10 Mbytes/sec. if the
computer has failed to recognize the scanner or the scanner
fails to operate properly.
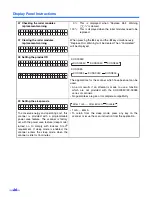
06 Checking the roller cleaning warning
0%: This is displayed when “Clean Roller Warning
≤≤
%”
is cleared.
100%: This is displayed when the roller needs to be
cleaned.
06 Clearing the roller cleaning warning
When pressing the
1
key and the
2
key simultaneously,
“Clean Roller Warning” will be cleared. Then “Completed” will
be displayed.
0 1 . V e r s i o n
M
t
.
t
t
0 2 . B u z z e r
O N
OFF
ON
0 3 . S C S I
I D
N o .
6
2
1
3
13
. . . . .
14
15
0
2
1
3
5
4
6
7
0
0 4 . W i d e
S C S I
E n a b l e
0 5 . T r a n s f e r
R a t e
2 0 M B y t e / s e c
10 MByte/sec
20 MByte/sec
Wide 20 MByte/sec
Wide 40 MByte/sec
0 6 . C l e a n
R o l l e r
W a r n i n g
0 %
0 6 . C l e a n
R o l l e r
W a r n i n g
C l e a r = < >
Содержание KV-SS905C
Страница 6: ...Notice 6 Caution Labels...


