background image

40

RQT7394

Edit

ing

Editing titles/chapters

[HDD]


[RAM]


[DVD-R]

The maximum number of items on a disc

[HDD]

–Titles:

500

–Chapters:

Approximately 1000 per title
(Depends on the state of recording.)

[RAM]


[DVD-R]

–Titles:

99

–Chapters:

Approximately 1000
(Depends on the state of recording.)

[Note]

Once erased, divided or shortened, it cannot be restored to its 

original state. Make certain before proceeding.

You cannot edit during recording, chasing play or transferring 

(dubbing), etc.

Restricted recording information remains even after editing (e.g. 

dividing a title, etc).

Preparation

Press [HDD] or [DVD] to select the drive.

Release protection (

page 58). 

[RAM]

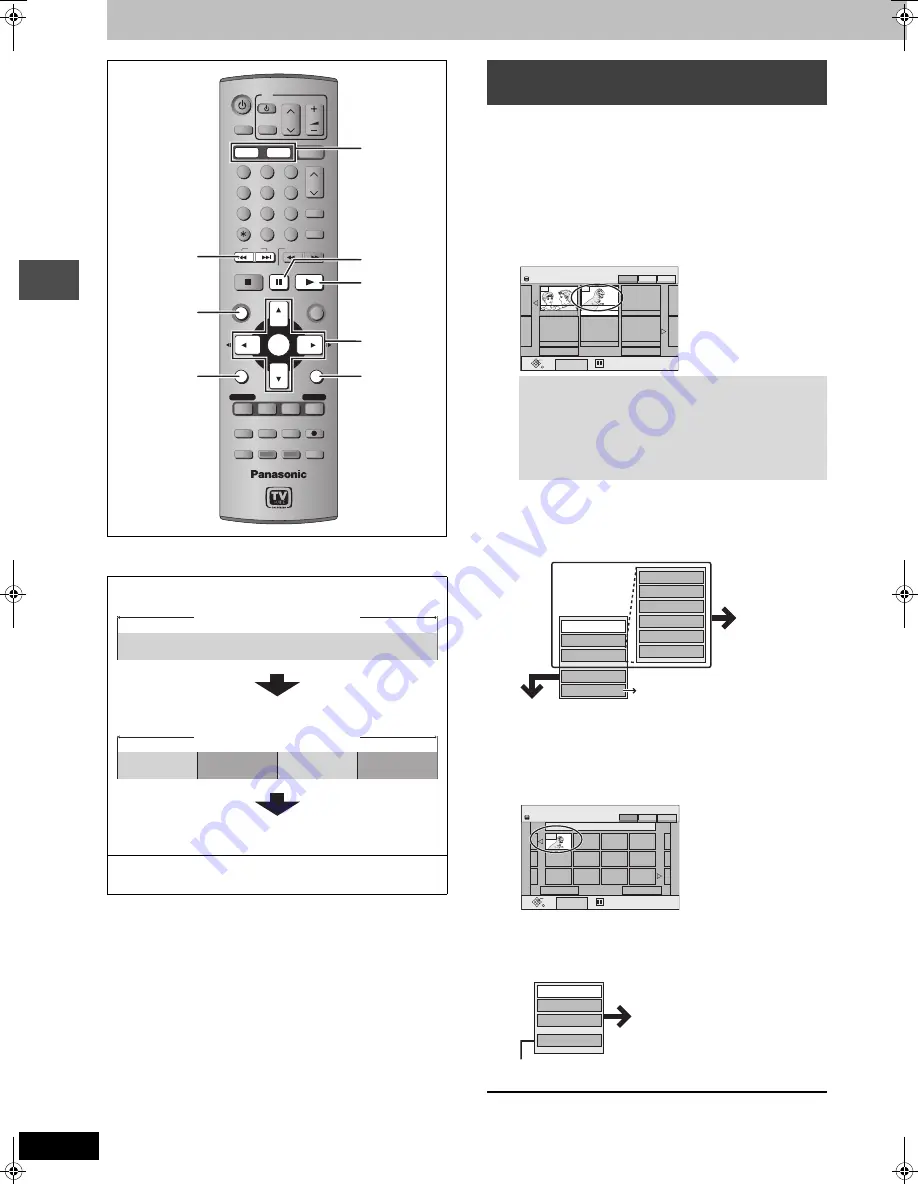
1

Press [DIRECT NAVIGATOR].

2

Press [

3

,

4

,

2

,

1

] to select “VIDEO” 

tab and press [ENTER].

3

Press [

3

,

4

,

2

,

1

] to select the title.

4

Press [SUB MENU], then [

3

,

4

] to 

select the operation and press [ENTER].

If you select “Edit”, press [

3

,

4

] to select the operation and 

press [ENTER].

If you select “Chapter View”

5

Press [

3

,

4

,

2

,

1

] to select the 

chapter.

To start play 

 Press [ENTER].

To edit 

 Step 6.

To show other pages/Multiple editing (

above)

6

Press [SUB MENU], then [

3

,

4

] to 

select the operation and press [ENTER].

You can go back to the Title View.

To exit the screen
Press [DIRECT NAVIGATOR].

To return to the previous screen
Press [RETURN].

Title/Chapter
Programs are recorded as a single title consisting of one chapter.

You can divide a title into multiple chapters. 

[HDD]


[RAM]

(

page 32, Create chapters, 

page 41, Divide Chapter)

You can change the order of chapters and create a play list 
(

page 42). 

[HDD]


[RAM]

Titles are divided into about 5-minute chapters after finalizing 

(

page 60). 

[DVD-R]

POWER

VOLUME

CH

INPUT SELECT

DVD POWER 

TV

TV/VIDEO

1

HDD

SD/PC

DVD

2

3

4

5

6

7

8

0

9

CM SKIP

AUDIO

PAGE

CH

CANCEL

VCR Plus+

SKIP

STOP

PAUSE

PLAY/x1.3

SLOW/SEARCH

FUNCTIONS

ENTER

DIRECT NAVIGATOR

TOP MENU

RETURN

SUB MENU

CHAPTER

SETUP

Info

PROG/CHECK

TV GUIDE

REC MODE

ERASE

REC

STATUS

TIME SLIP

DISPLAY

DUBBING

3


4


2


1


ENTER

1

RETURN

SUB MENU

DIRECT

NAVIGATOR

:


9

;

HDD, DVD

Chapter

Title

Start

End

Chapter

Chapter

Chapter

Chapter

Title

Editing titles/chapters and playing 
chapters

To show other pages
Press [

3

,

4

,

2

,

1

] to select “Previous” or “Next” and 

press [ENTER].

You can also press [

:

9

] to show other pages.

Multiple editing
Select with [

3

,

4

,

2

,

1

] and press [

;

]. (Repeat.)

A check mark appears. Press [

;

] again to cancel.

DIRECT NAVIGATOR

Title View

Select

Play

Previous

02/02

Next

SUB MENU

10 10/27 Mon

007

008

8 10/27 Mon

- - -

- - -

- - -

- - -

HDD

MPEG4 PICTURE

VIDEO

Title View screen

Set up Protection

Cancel Protection

Shorten

Change Thumbnail

Divide Title

Enter Name

Properties

Edit

Chapter View

Table Display

Erase

Refer to “Title 
operations”.

page 30, Switching the Direct 
Navigator appearance

Select

Play

Previous

01/01

Next

SUB MENU

008 8 10/27 Mon

001

---

---

---

---

---

---

---

---

---

---

---

DIRECT NAVIGATOR

Chapter View

HDD

MPEG4 PICTURE

VIDEO

Chapter View screen

Divide Chapter

Combine Chapters

Title View

Erase Chapter

Refer to “Chapter 
operations”.

7394en.book  Page 40  Wednesday, March 30, 2005  9:45 AM

Содержание DMR-E500HS

Страница 1: ...ep this manual for future reference Region number supported by this unit Region numbers are allocated to DVD players and software according to where they are sold The region number of this unit is 1 The unit will play DVDs marked with labels containing 1 or ALL Example 1 ALL 2 4 1 For U S A only The warranty can be found on page 80 For Canada only The warranty can be found on page 81 La referencia...

Страница 2: ...KUNG GEÖFFNET NICHT DEM STRAHL AUSSETZEN VORSICHT Inside of product The lightning flash with arrowhead symbol within an equilateral triangle is intended to alert the user to the presence of uninsulated dangerous voltage within the product s enclosure that may be of suffi cient magnitude to constitute a risk of electric shock to persons CAUTION CAUTION TO REDUCE THE RISK OF ELECTRIC SHOCK DO NOT RE...

Страница 3: ...bbing using the transferring dubbing list 48 Transferring dubbing a finalized DVD R 50 Recording from a video cassette recorder 51 Manual recording 51 DV automatic recording DV AUTO REC 51 Transferring dubbing still pictures 52 Transferring dubbing using the transferring dubbing list 52 Transferring dubbing all the still pictures on a card COPY ALL PICTURES 53 Transferring dubbing MPEG4 MPEG2 titl...

Страница 4: ...sired programs alphabetically or by displaying only the programs in a certain category This service may not be available in some areas Instant play There is no need to rewind or search forward Direct Navigator guides you to the beginning of the recorded video immediately Chasing playback There is no need to wait until recording is complete Without stopping recording you can play the video currentl...

Страница 5: ...ording page 23 Show status messages page 39 Create chapters Green button for television program list page 32 25 HDD DVD SD PC HDD DVD TIME SLIP DRIVE SELECT x1 3 OPEN CLOSE PC CARD EJECT SD CARD POWER CH REC TIME SLIP DV IN AUDIO IN VIDEO IN S VIDEO IN L2 L MONO R POWER SD PC card slots page 34 Connection for camcorder etc page 51 Skip the specified time Display the television image as a picture i...

Страница 6: ...ugged Television Video cassette recorder Camcorder This unit Amplifier Cable TV box To L2 or DV input terminals front page 51 To IN1 L1 input terminals rear From AUDIO OUT terminals or DIGITAL AUDIO OUT terminal From OUT1 or OUT2 terminals To IN3 L3 input terminals rear Via the LAN terminal Computer or other network compatible Panasonic DVD recorder Before moving the unit ensure the disc tray is e...

Страница 7: ... G LINK COMPONENT VIDEO OUT 480p 480i DIGITAL AUDIO OUT PCM BITSTREAM IN1 L1 IN3 L3 R AUDIO L VIDEO S VIDEO OUT1 OUT2 VHF UHF RF IN RF OUT SUB WOOFER CENTER R L FRONT AUDIO OUT jLAN 10 100 5 1ch R SURROUND L VHF UHF RF IN VHF UHF RF OUT AUDIO R AUDIO L VIDEO IN AUDIO R AUDIO L VIDEO OUT OUT IN VHF UHF RF IN COMPONENT VIDEO IN AUDIO IN R L S VIDEO IN VIDEO IN D Cable from wall or antenna signal B T...

Страница 8: ...MPONENT VIDEO OUT 480p 480i DIGITAL AUDIO OUT PCM BITSTREAM IN1 L1 IN3 L3 R AUDIO L VIDEO S VIDEO OUT1 OUT2 VHF UHF RF IN RF OUT SUB WOOFER CENTER R L FRONT AUDIO OUT jLAN 10 100 5 1ch R SURROUND L VIDEO RF S VIDEO R L AUDIO OUT IN VHF UHF RF IN VHF UHF RF OUT AUDIO R AUDIO L VIDEO IN AUDIO R AUDIO L VIDEO OUT OUT IN VHF UHF RF IN COMPONENT VIDEO IN AUDIO IN R L S VIDEO IN VIDEO IN H 75 coaxial ca...

Страница 9: ... side facing up Audio cable This unit Red White Red White To enjoy multi channel surround sound on DVD Video connect an amplifier with a built in decoder displaying these logo marks Use an optical digital audio cable and change the settings in Digital Audio Output page 63 You cannot use DTS Digital Surround decoders not suited to DVD Even if using this connection output will only be from 2 channel...

Страница 10: ... security settings Visit Panasonic s homepage for more information about the Network function of the DVD recorder http panasonic co jp pavc global cs dvd index html Refer to the router s operating instructions or contact your Internet service provider for information about router connections and settings Connecting directly to another network compatible Panasonic DVD recorder Connect this unit dir...

Страница 11: ...e than one piece of software in a combination not intended Advanced knowledge about networks is essential for changing router security settings Please use your judgement before proceeding with any such changes We accept no responsibility for any problems incurred as a result of changing router security settings We are also unable to respond to any inquiries about router usage Connecting a LAN cabl...

Страница 12: ...able TV box on the list IR signal code Make sure your cable TV box is set to the channel that appears on screen and press ENTER Only English is displayed in the TV Guide On ScreenTM system Other languages cannot be displayed TV Guide On ScreenTM system This unit features the TV Guide On ScreenTM system that provides an 8 day rolling list of TV programs available in your area Use the TV Guide On Sc...

Страница 13: ...Timer program recording is only possible manually 1 Press SETUP 2 Press 3 4 to select Set Up and press 1 3 Press 3 4 to select Manual Clock Setting and press ENTER 4 Press 2 1 to select the item you want to change and press 3 4 to change the setting 5 Press ENTER The clock starts 6 Press SETUP DST Daylight Saving Time ON or OFF If you select ON the clock is advanced one hour starting at 2 a m on t...

Страница 14: ...ct Set Up and press 1 3 Press 3 4 to select Remote Control Code and press ENTER 4 Press 3 4 to select the code 1 2 or 3 and press ENTER 5 To change the code on the remote control While pressing ENTER press and hold the numbered button 1 2 or 3 for more than 2 seconds 6 Press ENTER When the following indicator appears on the unit s display Change the code on the remote control to match the main uni...

Страница 15: ...front left speaker and proceeding clockwise Front L _ Center_ Front R Surround LS Surround RS 10 While listening to the test signal Press 3 4 to adjust the volume of the center and surround speakers Adjust the volume of the center and surround speakers so that they sound the same as the front speaker The front speakers cannot be adjusted here No signal is output for the subwoofer To adjust its vol...

Страница 16: ...s will be accepted by this unit Wait about 5 seconds until the highlights appear again To change unit names When more than one network compatible Panasonic DVD recorder is connected on the Home Network you need to give each a unique unit name so that they can be distinguished Factory preset DVD Recorder After step 2 left 1 Press 3 4 to select Unit Name Setting and press ENTER 2 Enter the name page...

Страница 17: ... In step 3 left 1 Press 3 4 to select Add manually and press ENTER 2 Press 3 4 to select MAC Address and press ENTER 3 Press 3 4 2 1 to enter the MAC Address of the unit you want to use as the client and press ENTER To check the MAC Address page 16 step 4 4 Press 3 4 to select Unit Name and press ENTER 5 Enter the name page 46 6 Press 3 4 to select Add and press ENTER You can manually add up to 4 ...

Страница 18: ...el Double click Network Connections 2 Right click the Local Area Connection icon and click Properties A message may appear below the icon such as Bridge Connections or Network Bridge 3 Select Internet Protocol TCP IP and click Properties 4 Check the IP address setting Please make a note of the IP address Subnet mask Default gateway and Preferred DNS server settings These will be needed during DVD ...

Страница 19: ...ame set of digits as the computer s Default gateway page 18 step 4 DNS Server Enter the same set of digits as the computer s Preferred DNS server page 18 step 4 Example Make a note of this IP address You will need it when operating this unit from the computer page 56 4 Press 3 4 to select Set and press ENTER Once the connection has been correctly established Now connected to the Local Area Network...

Страница 20: ...4 GB 12 cm 5z 2 8 GB 8 cm 3z RAM Video Still pictures MPEG4 Re writable discs for backup use You can record approximately up to 8 hours on a single sided disc and 16 hours on a double sided disc page 23 Recording modes and approximate recording times You can view the title being recorded from the beginning Chasing playback Time Slip page 24 Scratch and dust resistant cartridge discs and large capa...

Страница 21: ...sfer dub video titles already recorded on the HDD or DVD RAM to a card by converting to MPEG4 format page 54 Compatible with FAT 12 or FAT 16 We recommend using a Panasonic SD card You cannot use SD cards that exceed 2 GB We recommend using this unit to format a card before recording page 59 68 You may not be able to use the card if formatted on a computer 1 Includes miniSDTM Cards A miniSDTM adap...

Страница 22: ...V box In order to play a DVD R recorded using this unit on another playback source the disc must first be finalized page 60 POWER VOLUME CH INPUT SELECT DVD POWER TV TV VIDEO 1 HDD SD PC DVD 2 3 4 5 6 7 8 0 9 CM SKIP AUDIO PAGE CH CANCEL VCR Plus SKIP STOP PAUSE PLAY x1 3 SLOW SEARCH FUNCTIONS ENTER DIRECT NAVIGATOR TOP MENU RETURN SUB MENU CHAPTER SETUP Info PROG CHECK TV GUIDE REC MODE ERASE REC...

Страница 23: ...is better when using EP 6H than when using EP 8H Note When recording to DVD RAM using EP 8H mode play may not be possible on DVD players that are compatible with DVD RAM In this case use EP 6H mode FR Flexible Recording Mode The unit automatically selects a recording rate between XP and EP 8H that will enable the recordings to fit in the remaining disc space with the best possible recording qualit...

Страница 24: ...recording within the remaining disc space The recording mode becomes FR mode e g Preparation Select the channel to record Press HDD or DVD to select the recording drive 1 While stopped Press FUNCTIONS 2 Press 3 4 2 1 to select FLEXIBLE RECORDING and press ENTER 3 Press 2 1 to select Hour and Min and press 3 4 to set the recording time You can also set the recording time with the numbered buttons Y...

Страница 25: ...recording drive is DVD and there is not enough remaining space recording automatically switches to the HDD page 27 Relief Recording 4 Press TV GUIDE Returns to the television screen The unit is not off To save power turn the unit off by pressing Í DVD POWER When using the cable TV box make sure the cable TV box is turned on To check change or delete the program page 27 To utilize TV Guide On Scree...

Страница 26: ...n timer recording page 27 To cancel recording when recording has already begun Press then ENTER within 5 seconds You can also press and hold on the main unit for more than 3 seconds to stop recording Entering PlusCode number is an easy way of timer recording You can find them in TV listings in newspapers and magazines You can enter up to 8 days in advance VCR Plusi system works only after this uni...

Страница 27: ...ESSAGES SCHEDULE R R RW RW R SET TIMER RECORD Sat 1 00pm NWBG Once REMOVE FREQUENCY INFO 87 NWBG SP HDD R 1 00 1 55 Channel or program name a program name that was set for timer recording using TV Guide On ScreenTM system or VCR Plusi system that was listed in the program list Recording mode page 23 Recording drive Frequency page 25 26 Notes on timer recording F lights on the unit s display to ind...

Страница 28: ... the same program are displayed together in one column In this case press 3 4 to select a program name and press ENTER Each broadcast of the program is then displayed separately Press 3 4 to select the desired program Functions of Action Buttons The SCHEDULE screen displays programs registered for recording or as a Favorite separately on the list In addition to being able to review the list you ca...

Страница 29: ... channels 1 Press 2 2 Press DUBBING Blue to move up or CHAPTER Green to move down Repeat steps 2 3 as necessary 4 Press TV GUIDE Review options menu Selecting the TV Guide On ScreenTM system start up pattern 1 Press 3 4 to select Review options and press ENTER 2 Press 3 4 to select the option and press ENTER On Turns on auto start up Off Turns off auto start up The MESSAGES screen is where additio...

Страница 30: ... the title and press ENTER You can also select titles with the numbered buttons To show other pages Press 3 4 2 1 to select Previous or Next and press ENTER You can also press 9 to show other pages To exit the screen Press DIRECT NAVIGATOR Direct Navigator screen icons When a menu screen appears on the television DVD A DVD V Press 3 4 2 1 to select the item and press ENTER Some items can also be s...

Страница 31: ... to normal speed This does not work if the setting is Off in Search Audio PLAY k1 3 page 63 Slow motion HDD RAM DVD R DVD A Motion picture parts only DVD V VCD While paused press 6 or 5 On the main unit press and hold D or E The speed increases up to 5 steps Press 1 PLAY to restart play Forward direction only VCD The unit will pause if slow motion play is continued for 5 minutes Frame by frame HDD...

Страница 32: ...c is in the disc tray while DVD drive is selected When the recording mode is XP and Audio for XP Recording is set to LPCM page 63 When DVD R High Speed Recording is set to On page 62 Editing operations during play Erase HDD RAM DVD R 1 Press ERASE 2 Press 2 1 to select Erase and press ENTER A title cannot be restored once it is erased Make certain before proceeding You cannot erase while recording...

Страница 33: ...1 T 1 TOTAL 1 111 MENU 0 9 No GROUP No Selected group G Group No T Track No in the group TOTAL Track No Total tracks in all groups Using the tree screen to find a group Tips for making MP3 discs Discs must conform to ISO9660 level 1 or 2 except for extended formats Compatible compression rate between 32 kbps and 320 kbps Compatible sampling rate 16 kHz 22 05 kHz 24 kHz 32 kHz 44 1 kHz and 48 kHz M...

Страница 34: ... or be playable MOTION JPEG is not supported POWER VOLUME CH INPUT SELECT DVD POWER TV TV VIDEO 1 HDD SD PC DVD 2 3 4 5 6 7 8 0 9 CM SKIP AUDIO PAGE CH CANCEL VCR Plus SKIP STOP PAUSE PLAY x1 3 SLOW SEARCH FUNCTIONS ENTER DIRECT NAVIGATOR TOP MENU RETURN SUB MENU CHAPTER SETUP Info PROG CHECK TV GUIDE REC MODE ERASE REC STATUS TIME SLIP DISPLAY DUBBING HDD DVD HDD DVD SD PC TIME SLIP DRIVE SELECT ...

Страница 35: ...le number of higher folders recognizable you can switch them using 2 1 Picture protected Picture in which the number of prints is set DPOF page 44 68 0001 Folder 103__DVD 0002 0003 0004 0005 0006 0007 0008 DCIM 002 101__DVD 003 102__DVD DCIM 100__DVD 004 103__DVD 001 100__DVD DIRECT NAVIGATOR Picture JPEG View SD CARD MPEG4 PICTURE 002 101__DVD 003 102 DVD DCIM 100__DVD DCIM 001 100__DVD 11 10 6 5...

Страница 36: ...ng date may differ from that of the actual data Files that have been recorded on other devices may not be correctly displayed on this unit playback may not be possible or the picture or file name may be incorrect Similarly files recorded on this unit may not be correctly displayed on other devices POWER VOLUME CH INPUT SELECT DVD POWER TV TV VIDEO 1 HDD SD PC DVD 2 3 4 5 6 7 8 0 9 CM SKIP AUDIO PA...

Страница 37: ...ress D or E Each press increases the number of skips CM Skip HDD RAM SD PC Mobile hard disk only Play restarts from approximately a minute later Press CM SKIP Repeat play HDD RAM SD PC Mobile hard disk only 1 Press DISPLAY 2 Press 1 twice and press 3 4 to select Title Title is played repeatedly To cancel repeat play press 3 4 to select OFF in step 2 Press DISPLAY again to clear the on screen menus...

Страница 38: ...h Menu Item Setting Disc menu Setting the disc content Sound track HDD RAM DVD R The disc s audio attributes appear DVD A DVD V Select the audio and language below Audio attribute Language Subtitle HDD RAM DVD R Only discs that contain subtitle on off information DVD A DVD V Turn the subtitle on off and select the language below Language Subtitle on off information cannot be recorded using this un...

Страница 39: ...You can turn the recommended settings for 3D NR and Integrated DNR on and off Progressive page 69 Select ON to enable progressive output Select OFF if the picture is stretched horizontally When progressive output is on closed captions cannot be displayed Transfer When Progressive above is set to ON Select the method of conversion for progressive output to suit the type of material being played pag...

Страница 40: ...tle into multiple chapters HDD RAM page 32 Create chapters page 41 Divide Chapter You can change the order of chapters and create a play list page 42 HDD RAM Titles are divided into about 5 minute chapters after finalizing page 60 DVD R POWER VOLUME CH INPUT SELECT DVD POWER TV TV VIDEO 1 HDD SD PC DVD 2 3 4 5 6 7 8 0 9 CM SKIP AUDIO PAGE CH CANCEL VCR Plus SKIP STOP PAUSE PLAY x1 3 SLOW SEARCH FU...

Страница 41: ...ER 3Press 2 1 to select Divide and press ENTER To confirm the division point Press 3 4 to select Preview and press ENTER The unit plays 10 seconds before and after the division point To change the division point Restart play and press 3 4 to select Divide then press ENTER at the point you want to change Note The divided titles retain the name and CPRM property page 68 of the original title Video a...

Страница 42: ... 40 to create a play list Transferring dubbing page 47 a play list will create a title Play lists are not recorded separately so this doesn t use much capacity Editing play lists doesn t modify the recorded data Creating play lists POWER VOLUME CH INPUT SELECT DVD POWER TV TV VIDEO 1 HDD SD PC DVD 2 3 4 5 6 7 8 0 9 CM SKIP AUDIO PAGE CH CANCEL VCR Plus SKIP STOP PAUSE PLAY x1 3 SLOW SEARCH FUNCTIO...

Страница 43: ...revious 01 01 Next SUB MENU 01 Create 10 27 Mon 0 30 HDD Play List View screen Copy Enter Name Change Thumbnail Create Properties Edit Chapter View Erase Refer to Play list operations PLAY LIST Chapter View Select Previous 01 01 Next SUB MENU 01 10 27 Mon 0 30 001 002 Play HDD Chapter View screen Move Chapter Divide Chapter Combine Chapters Erase Chapter Play List View Add Chapter Refer to Chapter...

Страница 44: ... to select Erase and press ENTER Once erased the recorded contents are lost and cannot be restored Make certain before proceeding When erasing a folder even the files not containing still pictures will also be erased if they are inside the folder This does not apply to folders under the folder concerned Set up Protection Cancel Protection HDD RAM SD PC If set this will protect the still picture or...

Страница 45: ...ple editing Select with 3 4 2 1 and press Repeat A check mark appears Press again to cancel Mobile hard disk only To select the MPEG4 titles in another folder page 37 Select Play Previous 002 002 Next SUB MENU 10 10 27 Mon 007 008 8 10 27 Mon DIRECT NAVIGATOR Title View SD CARD MPEG4 PICTURE MOL005 MOL003 Set up Protection Cancel Protection Enter Name Properties Edit Table Display Erase Refer to M...

Страница 46: ...sc 40 SD PC Characters Folder of still pictures 36 SD Characters MPEG4 title 44 Network function Characters Unit name 16 POWER VOLUME CH INPUT SELECT DVD POWER TV TV VIDEO 1 HDD SD PC DVD 2 3 4 5 6 7 8 0 9 CM SKIP AUDIO PAGE CH CANCEL VCR Plus SKIP STOP PAUSE PLAY x1 3 SLOW SEARCH FUNCTIONS ENTER DIRECT NAVIGATOR TOP MENU RETURN SUB MENU CHAPTER SETUP Info PROG CHECK TV GUIDE REC MODE ERASE REC ST...

Страница 47: ...ions and play lists cannot be registered on the same transferring dubbing list Titles or play lists cannot be transferred dubbed from DVD RAM to the HDD You can transfer dub your favorite titles and play lists to an archive disc Transferring dubbing a play list will create a title When you want to re edit finalized content on a DVD R etc When you want to play a transferred dubbed disc on other equ...

Страница 48: ...e and press ENTER 3 Press 3 4 to select Destination and press ENTER The same drive as the transfer dubbing source cannot be selected 4 Press 3 4 to select the drive and press ENTER 5 Press 2 to confirm 4 Press 3 4 to select Mode and press 1 1 Press 3 4 to select Format and press ENTER 2 Press 3 4 to select Video and press ENTER 3 Press 3 4 to select Recording mode and press ENTER 4 Press 3 4 to se...

Страница 49: ...and press Repeat Press ENTER to register to the list A check mark appears Press again to cancel When you switch between the Video and Play List tab the check mark is cancelled Add Move Erase Erase all Titles and play lists that can be transferred dubbed in high speed mode to DVD R page 62 Title with One time only recording restriction Titles erased from the HDD by One time only recording restricti...

Страница 50: ...are recorded until the set time After the last title on the disc has finished playing the top menu is recorded until the set time is reached To stop transferring dubbing Press You can also press and hold RETURN for 3 seconds to stop transferring dubbing If stopped partway transferring dubbing will be up to that point To return to the previous screen Press RETURN Note The screen on the right screen...

Страница 51: ... Press To record programs to fill up the remaining space on the disc page 24 Flexible Recording To adjust the audio recording level 1 Before recording commences press and hold AUDIO for more than 3 seconds 2 Press 3 4 to select L R To individually adjust a level press 3 4 to select L left or R right 3 Press 2 1 to adjust the audio recording level and press ENTER Set the level to neutral again afte...

Страница 52: ...till pictures HDD RAM SD PC You can use SD Memory Cards with capacities from 8 MB to 1 GB page 21 1 While stopped Press FUNCTIONS 2 Press 3 4 2 1 to select DUBBING and press ENTER If you are not going to change the registered list press 4 several times page 53 step 7 3 Press 3 4 to select Dubbing direction and press 1 1 Press 3 4 to select Source and press ENTER 2 Press 3 4 to select the drive and...

Страница 53: ...multiple number of higher folders recognizable you can switch them using 2 1 3 Press 3 4 to select Copy from and press 2 1 to select the drive 4 Press 3 4 to select Copy to and press 2 1 to select the drive 5 Press 3 4 2 1 to select Copy and press ENTER To stop transferring dubbing Press and hold RETURN for 3 seconds To return to the previous screen Press RETURN To show other pages Press 3 4 2 1 t...

Страница 54: ...bbing list page 55 One Touch transfer dubbing is not possible Digital broadcasts that allow One time only recording cannot be converted to MPEG4 Motion pictures encoded in the MPEG2 or MPEG4 format which have been taken by a SD Video Camera digital video camera etc can be stored on HDD or DVD RAM MPEG2 titles transferred dubbed to HDD or DVD RAM will be treated as video titles Use the transferring...

Страница 55: ...in the most information You may still be able to transfer dub even if the Dubbing List has exceeded Current capacity when the video images contain little movement 6 Press 3 4 to select SET and press ENTER The transferring dubbing list is registered 7 Press 3 4 to select Start dubbing and press ENTER When transferring dubbing the MPEG2 title to 5k high speed recording compatible DVD RAM 1 Press 3 t...

Страница 56: ...cording begins on the DVD recorder operations from the computer are interrupted When you playback MPEG4 titles Should the computer be able to simultaneously connect to both the DVD recorder and the Internet an audio decoder will automatically be installed should this be necessary If the installation does not start 1 Start Windows Media Player Click start All Programs Accessories Entertainment Wind...

Страница 57: ...ck view slow motion and frame by frame will not work Audio is not output during search To exit the network function and operate the units directly On the client Press RETURN The server will switch off if left for 30 minutes On the server 1 Press RETURN A message appears on the television connected to the server 2 Press 2 1 to select Yes and press ENTER Title View screen icon Useful functions on th...

Страница 58: ... Disc Name and press ENTER page 46 Entering text The disc name is displayed in the FUNCTIONS window With a finalized DVD R the name is displayed on the Top Menu To exit the screen Press RETURN several times To return to the previous screen Press RETURN Setting the protection Title Select Set up Protection in step 4 on page 40 Still picture Select Set up Protection in step 4 on page 44 Folder of st...

Страница 59: ... Press 3 4 2 1 to select DISC SETTING or CARD SETTING and press ENTER 3 Press 3 4 to select Format or Format disc and press ENTER 4 Press 2 1 to select Yes and press ENTER 5 Press 2 1 to select Start and press ENTER A message appears when formatting is finished 6 Press ENTER Note To stop formatting RAM Press RETURN You can cancel formatting if it takes more than 2 minutes The disc must be reformat...

Страница 60: ...DVD R recorded on other manufacturer s equipment If you finalize a recorded DVD R on Panasonic equipment other than this unit the background selected as TOP MENU may not display DVD R finalized on this unit may not be playable on other players due to the condition of the recording Visit Panasonic s homepage for more information about DVDs http www panasonic com playDVD R To exit the screen Press R...

Страница 61: ...ing Set the TV Guide On ScreenTM system Antenna System 2 Select to suit the type of antenna you are using TV CATV Auto Channel Setting 1 page 65 j Preset Channel Captions 2 page 66 j Manual Channel Captions 2 page 66 j Set Up Off Timer Select how long the unit remains on when it is not being used 2 hr 6 hr Off Remote Control Code page 14 Set Code 1 Set Code 2 Set Code 3 Auto Clock Setting 1 page 6...

Страница 62: ... MTS page 63 You cannot transfer dub titles to a MultiMediaCard if you select XF or SF SD Card Capacity Set according to the capacity of the card you are using MPEG4 data recorded to the HDD will be divided to match the card s capacity setting It can then be transferred dubbed to the card 8 MB 16 MB 32 MB 64 MB 128 MB 256 MB 512 MB 1 GB 2 GB Video 3 D Y C Separation On Reduces noise by separating ...

Страница 63: ...l recording may not work properly Bitstream When connecting to equipment displaying the Dolby Digital logo PCM When connecting to equipment not displaying the Dolby Digital logo DTS Bitstream When connecting to equipment displaying the DTS logo PCM When connecting to equipment not displaying the DTS logo Audio for XP Recording Choose the audio type when recording or transferring dubbing with XP mo...

Страница 64: ... is played in the letterbox style Network Network Function Select whether to use the network function Enable Disable TCP IP Settings Set this unit s IP address and other settings There is usually no need to do anything manually Automatic DHCP Manual When automatic setting fails press ENTER to set the following settings manually IP Address Subnet Mask Default Gateway DNS Server Unit Name Setting Yo...

Страница 65: ...ard Time l GMT j7 PST Pacific Standard Time l GMT j8 AST Alaska Standard Time l GMT j9 HST Hawaii Standard Time l GMT j10 For other areas xx hr If the Auto Clock Setting does not start automatically select Auto Clock Setting from the Set Up tab If the time was not set correctly use manual clock setting page 13 or time zone adjust 6 Press ENTER The unit configures channels according to the Antenna ...

Страница 66: ...e channel number press CANCEL Repeat steps 4 and 5 to enter other channels 6 Press ENTER 3 Press 3 4 to select Manual Channel Captions and press ENTER 4 Press 3 4 to select the channel and press 1 Channels are only displayed if they contain a station and if preset captions have not been added 5 Press 3 4 to select the first character and press 1 You can choose from the following characters A Z 0 9...

Страница 67: ...Compatible media PC Card Slot A PC Card adaptor conforming to PC Card Standards ATA Flash PC card PC Card adaptor SD Memory Card 1 xD Picture Card Microdrive MultiMediaCard CompactFlash SmartMedia MEMORYSTICK Mobile hard disk Format FAT12 FAT16 Image file format JPEG conforming to DCF Design rule for Camera File system sub sampling 4 2 2 or 4 2 0 TIFF Uncompressed RGB chunky DPOF Compatible Number...

Страница 68: ...ecord or edit Folder This is a place on the hard disk or memory card where groups of data are stored together In the case of this unit it refers to the place where still pictures JPEG TIFF or MPEG4 are stored Formatting Formatting is the process of making media such as DVD RAM recordable on recording equipment You can format the HDD DVD RAM and memory cards on this unit Formatting erases irrevocab...

Страница 69: ...ctures A common format for storing high quality images on digital cameras and other devices VBR Variable bitrate This is a method of video recording that adjusts the bit rate according to video signal Language code list Enter the code with the numbered buttons Abkhazian 6566 Afar 6565 Afrikaans 6570 Albanian 8381 Ameharic 6577 Arabic 6582 Armenian 7289 Assamese 6583 Aymara 6588 Azerbaijani 6590 Ba...

Страница 70: ...ords and plays high speed recording compatible discs This unit does not record or play DVD RW Please tell me about CD R and CD RW compatibility with this unit This unit plays CD R CD RW discs audio recording discs which have been recorded under one of the following standards CD DA MP3 and Video CD Close the session or finalize the disc after recording You cannot write to a CD R or CD RW with this ...

Страница 71: ...s Setting channels that cannot be received to OFF in the CHANNEL EDITOR screen may increase the amount of information displayed 29 What kind of information might be seen in the MESSAGES screen Useful Product Related Information PRI such as alerting the user to new features or data available through the TV Guide On ScreenTM system This feature may not be active in all viewing areas Can I record one...

Страница 72: ...is a non recordable disc The unit cannot record on the disc you inserted Insert a DVD RAM or unfinalized DVD R You inserted an unformatted DVD RAM Format the disc with this unit 59 This disc is not formatted properly The operation is prohibited by the unit or disc Cannot connect to the network The router etc is not properly connected Please check the LAN cable connection and router s AC power supp...

Страница 73: ...e actual recording time is used after recording or editing the DVD R 200 times or more While searching the elapsed time may not display correctly Even if you erase recorded content from the DVD R there is no increase in disc space Television reception worsens after connecting the unit This can occur because the signals are being divided between the unit and other equipment It can be solved by usin...

Страница 74: ...the unit s safety devices may have been activated Reset the unit as follows Press POWER Í I on the main unit to switch the unit to standby If the unit doesn t switch to standby press and hold POWER Í I on the main unit for about 10 seconds The unit is forcibly switched to standby Alternatively disconnect the AC power supply cord wait one minute then reconnect it 22 30 HDD activation is slow The HD...

Страница 75: ...nnect a cable TV box the antenna cable is connected to this unit s RF IN terminal The television program list was temporarily unavailable in your area Wait another 24 hours or Re do setup The television program list is not available in your area Set the unit using Auto Channel Setting Note that you can only manually set timer recording after you set the unit using Auto Channel Setting Consult your...

Страница 76: ...ong set up the TV Guide On ScreenTM system again The cable company has not yet informed industry sources of their channel line up changes Use the CHANNEL EDITOR feature to make adjustments 29 29 Two stations are received on certain channels morning and evening programs differ Such situations occur more frequently on cable TV Split channels occur when the cable provider may not have an adequate num...

Страница 77: ...nnot format The disc is dirty Use a special cleaner and wipe clean You tried formatting a disc that is not compatible with this unit 79 20 Cannot create chapters Cannot mark the start point or the end point during Shorten operation The unit writes the chapter division information to the disc when you turn it off or remove the disc The information is not written if there is an interruption to the p...

Страница 78: ...tre closest to you The network function will not run When using a wireless router operations may be being affected by local signal conditions weak radio waves or the network environment Turn off the DVD recorder operated via the Network Check the router setting DHCP server and the security settings etc Read the router s operating instructions for further information There may be limits to your usa...

Страница 79: ...ecoverable HDD recording time remaining This unit records using a VBR Variable bit rate data compression system to vary recorded data segments to match video data segments which may cause differences in the displayed amount of time and space remaining for recording If the remaining amount of time is insufficient erase any unwanted titles to create enough space before you start recording Erasing a ...

Страница 80: ...damage that is attributable to acts of God THERE ARE NO EXPRESS WARRANTIES EXCEPT AS LISTED UNDER LIMITED WARRANTY COVERAGE THE WARRANTOR IS NOT LIABLE FOR INCIDENTAL OR CONSEQUENTIAL DAMAGES RESULTING FROM THE USE OF THIS PRODUCT OR ARISING OUT OF ANY BREACH OF THIS WARRANTY As examples this excludes damages for lost time travel to and from the servicer loss of media or images data or other recor...

Страница 81: ...S FOR A PARTICULAR PURPOSE IN NO EVENT WILL PANASONIC CANADA INC BE LIABLE FOR ANY SPECIAL INDIRECT OR CONSEQUENTIAL DAMAGES In certain instances some jurisdictions do not allow the exclusion or limitation of incidental or consequential damages or the exclusion of implied warranties so the above limitations and exclusions may not be applicable WARRANTY SERVICE For product operation and information...

Страница 82: ... de TV por cable a esta unidad también tendrá que conectar el IR Blaster para que esta unidad pueda controlar los canales del receptor de TV por cable Coloque el IR Blaster delante del sensor de señales del receptor de TV por cable Conexión con un televisor y videograbadora A indica accesorios incluidos indica accesorios no incluidos B Televisión C Cuando conecte utilizando estos terminales asegúr...

Страница 83: ...y las listas de programas no se hayan descargado completamente si conecta un receptor de TV por cable déjelo encendido antes de utilizarlo con algunos receptores de TV por cable el mando a distancia de los mismos podrá encender y apagar el receptor de TV por cable y el televisor Utilizar esta función apagado del receptor de TV por cable impedirá que el grupo de canales sea descargado Si se muestra...

Страница 84: ...nus 38 Status messages 39 PC card 21 PCM Down Conversion 63 Picture 34 Play list 42 Progressive 39 69 Properties MPEG4 title 45 Play list 43 Still picture 35 Title 41 Protection Card 58 Cartridge 58 Disc 58 Folder 44 MPEG4 title 45 Still picture 44 Title 41 Quick View 31 Ratings level 62 Recording DV automatic recording 52 Flexible Recording 24 Mode 23 Relief 27 Timer 25 27 Re initialize settings ...

Отзывы: