


8
RQT6559
Ge
tt
in
g
st
a
rte
d
Disc information
!?
≥
This unit is not compatible with:
–
12-cm (5
z
), 2.6- and 5.2-GB DVD-RAM
–
3.95- and 4.7-GB DVD-R for Authoring
–
DVD-RAM not recorded following the Video Recording Standard
–
Unfinalized DVD-R recorded on other equipment
≥
This unit is compatible with the Content Protection for Record-
able Media (CPRM) system so you can record broadcasts that
allow one copy, such as some CATV broadcasts, onto 4.7 GB/9.4
GB DVD-RAM (these are CPRM compatible). It is not possible to
record onto DVD-R.
≥
We recommend using Panasonic discs as they have been con-
firmed to be compatible with this unit. Other discs may not perform
correctly.
≥
Do not allow the disc to become dirty or scratched. Fingerprints,
dirt, dust, scratches or deposits of cigarette smoke on the record-
ing surface may make it impossible to use the disc for recording.
≥
DVD-RAM recorded on this unit may not be compatible with
other DVD players, including some Panasonic players. Con-
sult the manual for the player to determine compatibility with
these DVD-RAM discs.
≥
This unit is compatible with both non-cartridge and cartridge
DVD-RAM, but the write-protect tabs on cartridge-type discs give
better protection to your recordings (
➜
page 19).
≥
Picture aspect ratios, regular 4:3 or widescreen 16:9, are recorded
as they are received.
≥
Discs with programs recorded in PAL already cannot be recorded
on using this unit.
≥
In order to play a DVD-R recorded using this machine on
another playback source, the disc must first be finalized
(
‹
page 34).
≥
Once a DVD-R is finalized, it becomes DVD-Video.
≥
You can record onto the available space on the disc and perform
editing functions, such as giving titles to discs and programs and
erasing programs before finalizing.
≥
You cannot record over parts that have been recorded.
≥
It takes about 30 seconds for the unit to complete recording man-
agement information after recording finishes.
≥
This unit optimizes the DVD-R for each recording. Optimizing is
carried out when you start recording after inserting the disc or
turning on the unit. Recording onto the disc may become impossi-
ble if optimizing is carried out too many times.
≥
Play may be impossible in some cases due the condition of the
recording.
≥
The video is recorded in a 4:3 aspect irrespective of the video sig-
nal input.
≥
Discs with programs recorded in PAL already cannot be recorded
on using this unit.
≥
The producer of the material can control how DVD-Video and
Video CDs are played. This means that you may not be able to
control play of a disc with some operations described in these
operating instructions. Read the disc’s instructions carefully.
≥
This unit can play CD-DA (digital audio) and Video CD format
(Video CD Format 2.0 or above), audio CD-R and CD-RW that
have been finalized upon completion of recording.
It may not be able to play some CD-R or CD-RW due to the condi-
tion of the recording.
≥
This unit cannot record onto CD-R or CD-RW.
≥
Audio format
≥
DVD-Video with a region number other than “1” or “ALL”
≥
Some DVD-RAM (
➜
left)
≥
Some DVD-R (
➜
left)
≥
PAL discs
≥
DVD-ROM
≥
DVD-RW
≥
DVD-Audio
≥
+RW
≥
CD-ROM
≥
CDV
≥
CD-G
≥
Photo CD
≥
CVD
≥
SVCD
≥
SACD
≥
MV-Disc
≥
PD
≥
Divx Video Disc, etc.
Discs you can use for recording and
play
DVD-RAM
4.7 GB/9.4 GB, 12 cm (5
z
)
2.8 GB, 8 cm (3
z
)
DVD-R
4.7 GB for General Ver. 2.0
DVD-RAM
DVD-R
Play-only discs
DVD-Video
Audio CD
Video CD
DVD-Video
Dolby Digital (
➜
page 57)
This unit can play Dolby Digital in stereo (2
channels). Connect an amplifier with a built-
in Dolby Digital decoder to enjoy surround
sound.
DTS Digital Surround (
➜
page 57)
Connect this unit to equipment that has a
DTS decoder to enjoy DVDs with this mark.
Discs that cannot be played
The manufacturer accepts no responsibility and offers no
compensation for loss of recorded or edited material due
to a problem with the unit or disc, and accepts no respon-
sibility and offers no compensation for any subsequent
damage caused by such loss.
Examples of causes of such losses are
≥
A disc recorded and edited with this unit is played in a DVD
recorder or computer disc drive manufactured by another
company.
≥
A disc used as described above and then played again in this
unit.
≥
A disc recorded and edited with a DVD recorder or computer
disc drive manufactured by another company is played in this
unit.
9
Ge
tt
in
g
st
a
rte
d
STEP
1
The remote control
RQT6559
Disc handling
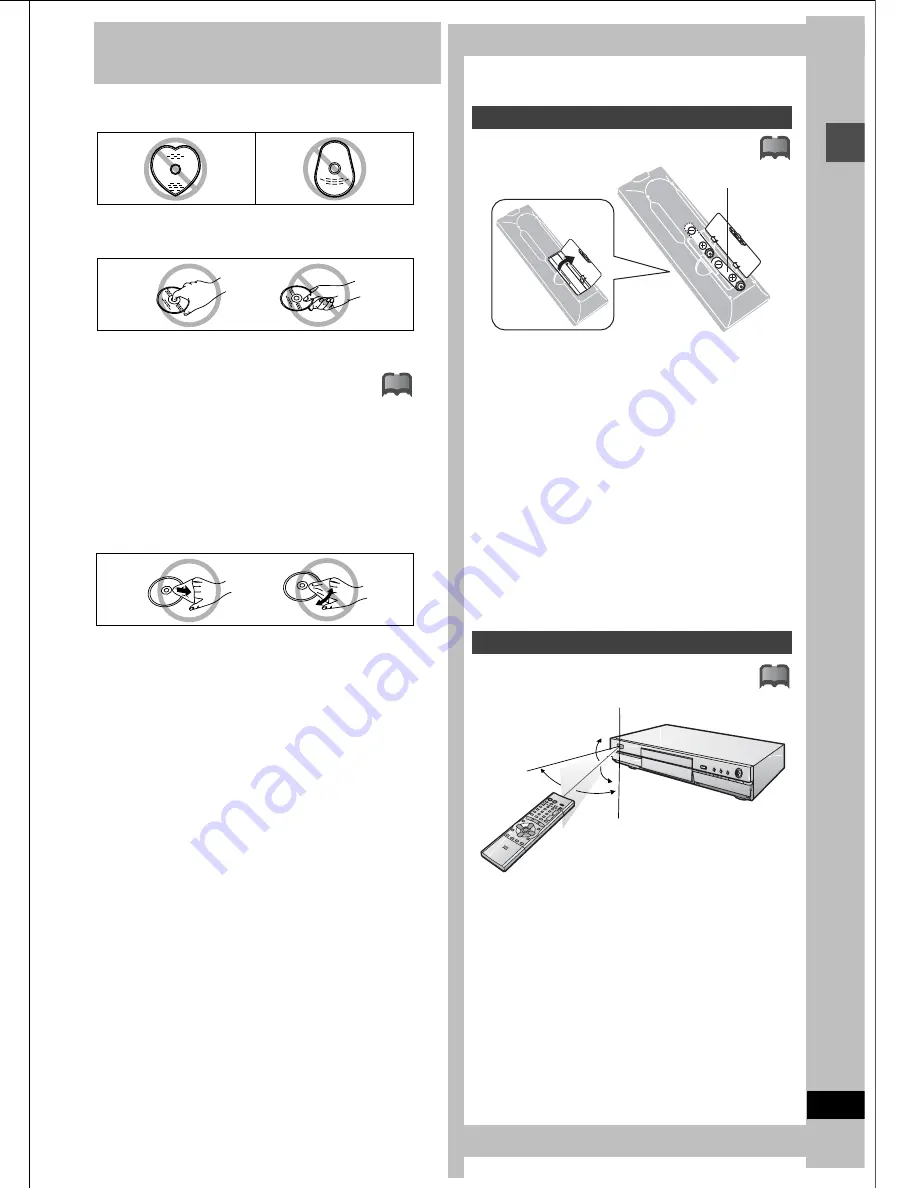
Do not use irregularly shaped discs, such as heart-shaped.
(These can damage the unit.)
∫
How to hold a disc
Do not touch the recorded surface.
∫
If there is dirt or condensation on the disc
Moisture may condense on discs after they are brought inside
from the cold.
DVD-RAM and DVD-R
Clean only with the DVD-RAM/PD disc cleaner available as an
optional accessory, part number LF-K200DCA1.
Do not use cleaners or cloths for CDs to clean DVD-RAM and
DVD-R.
DVD-Video, CD, Video CD
Wipe with a damp cloth and then wipe dry.
∫
Handling precautions
≥
Do not write on the label side with a ball-point pen or other writ-
ing instrument.
≥
Do not use record cleaning sprays, benzine, thinner, static elec-
tricity prevention liquids or any other solvent.
≥
Do not attach labels or stickers to discs. (Do not use discs with
exposed adhesive from tape or left over peeled-off stickers.)
≥
Do not use scratch-proof protectors or covers.
≥
Do not use discs printed with label printers available on the mar-
ket.
≥
Do not use discs that are badly warped or cracked.
∫
Do not place or store discs in the following
places
≥
Locations exposed to direct sunlight
≥
Humid or dusty locations
≥
Locations directly exposed to a heat vent or heating appliance
≥
Insert so the poles (
i
and
j
) match those in the remote control.
≥
Do not use rechargeable type batteries.
Do not:
≥
mix old and new batteries.
≥
use different types at the same time.
≥
heat or expose to flame.
≥
take apart or short circuit.
≥
attempt to recharge alkaline or manganese batteries.
≥
use batteries if the covering has been peeled off.
Mishandling of batteries can cause electrolyte leakage which can
damage items the fluid contacts and may cause a fire.
Remove if the remote control is not going to be used for a long
period of time. Store in a cool, dark place.
[Note]
If you cannot operate the unit or television using the remote con-
trol after changing the batteries, please re-enter the codes
(television
➜
page 15, main unit
➜
page 50).
Aim at the sensor, avoiding obstacles, at a maximum range of 7 m
(23 feet) directly in front of the unit.
!?
Batteries
Use
!?
R6, LR6, AA, UM-3
!?
Í
/ I
POWER
OPEN/CLOSE
WARP
TOP
RETURN
REC
ENTER
Remote control signal sensor
7 m (23 feet) directly
in front of the unit
30
x
30
x
20
x
20
x
Содержание DMR-E30S
Страница 1: ......
Страница 2: ...9...
Страница 4: ...9...
Страница 6: ...9...
Страница 8: ...9...
Страница 10: ...9...
Страница 12: ...9...
Страница 14: ...9...
Страница 16: ...9...
Страница 18: ...9...
Страница 20: ...9...
Страница 22: ...9...
Страница 24: ...9...
Страница 26: ...9...
Страница 28: ...9...
Страница 30: ...9...
Страница 32: ...9...
Страница 34: ...9...
Страница 36: ...9...
Страница 38: ...9...
Страница 40: ...9...
Страница 42: ...9...
Страница 44: ...9...
Страница 46: ...9...
Страница 48: ...9...
Страница 50: ...9...
Страница 52: ...9...
Страница 54: ...9...
Страница 56: ...9...
Страница 58: ...9...
Страница 60: ...9...
Страница 62: ...9...
Страница 64: ...9...
Страница 66: ...9...
Страница 68: ......


