background image

Music

VQT4W79

52

Playing music

[HDD]


[USB_HDD]


[USB]

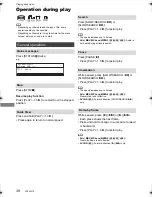
Press [STOP

].

Press [PAUSE

;

].

• Press  [PLAY/

a

1.3

1

] to restart play.

Press [SLOW/SEARCH

6

] or 

[SLOW/SEARCH

5

].

• Press  [PLAY/

a

1.3

1

] to restart play.

Press [SKIP

:

] or [SKIP

9

].

Refer to “Repeat Play” or “Random” in Play menu 
(

>

64).

Refer to “Sound Effects” in Sound menu (

>

65).

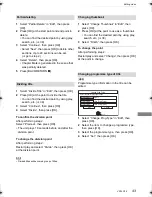
Photos stored on the “Album” of the HDD can be 
played back as slideshow during playback of the 
music.

While playing the music
Press the red button.

To end the slideshow

Press [BACK/RETURN

].

How to create the photo album

Refer to “Add to Album”. (

>

48)

To play music continuously even if the Power 
off link works

Refer to “Playing music continuously even after 
turning off power to the TV”. (

>

63)

Operations during music play

Stop

Pause

Search

Skip

Repeat Play/Random

Sound Effects

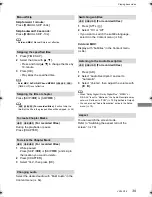
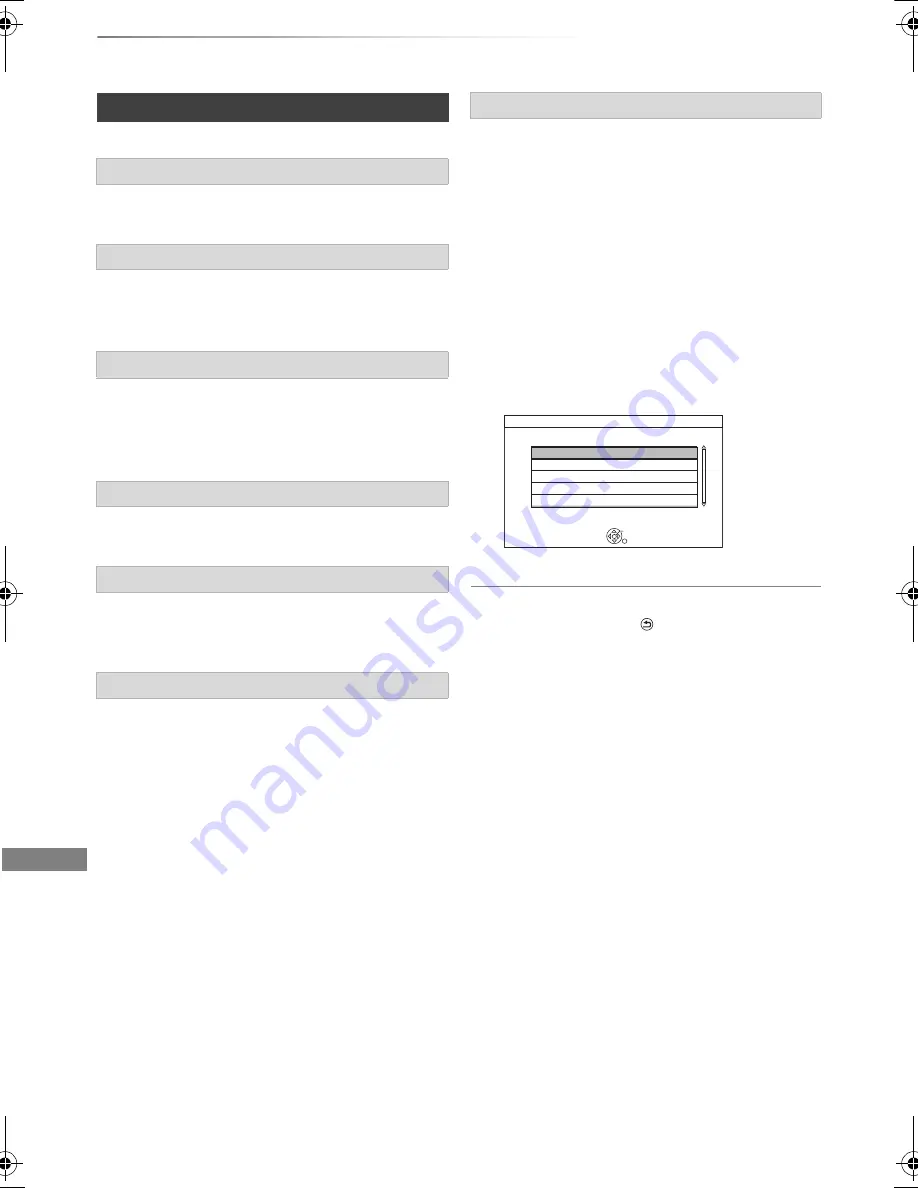
Displaying photos (Slideshow)

• To change the photos to display

1 While slideshow playing

Press [OPTION].

2 Select “Select Photo Album”, then press 

[OK].

3 Select the album, then press [OK].

e.g.,

Please select the album to start slideshow.

RETURN

OK

While playing music a photo slideshow 
can be displayed.

Select Photo Album

Sample Photos

Album 1

Album 2

Album 3

Album 4

DMR-HWT230EB_eng.book  52 ページ  2013年4月11日 木曜日 午後3時9分

Содержание Diga DMR-HWT230

Страница 1: ... before using this product and save this manual for future use This HDD Recorder is for viewing and recording free to view channels only It does not receive pay TV or encrypted channels HDD Recorder Model No DMR HWT230 DMR HWT130 Model number suffix EB denotes UK model Web Site http www panasonic europe com EB ...

Страница 2: ...a damaged mains plug or socket outlet The mains plug is the disconnecting device Install this unit so that the mains plug can be unplugged from the socket outlet immediately CAUTION Placement Place this unit on an even surface To reduce the risk of fire electric shock or product damage Do not install or place this unit in a bookcase built in cabinet or in another confined space Ensure this unit is...

Страница 3: ... of March 2013 These may be subject to change Do not use AC mains lead with other equipment Caution for AC Mains Lead Fuse cover Figure A Figure B Figure A Figure B Fuse 5 ampere Fuse 5 ampere Supplied accessories Remote control HWT230 N2QAYB000764 HWT130 N2QAYB000780 1 pc Batteries for remote control 2 pcs AC mains lead K2CT2YY00098 1 pc RF coaxial cable K1TWACC00003 1 pc Indemnity concerning rec...

Страница 4: ...ing back video Playing titles on the HDD 33 DIRECT NAVIGATOR VIDEO screen 33 Playing titles on the media 36 Operation during play 38 General operations 38 3D video playback 40 Editing video Deleting recorded titles 41 Editing recorded titles 42 Copying video Copying titles 45 Photo Playing photos 46 DIRECT NAVIGATOR PHOTO screen 46 Photo play option 47 Slideshow settings 47 Editing photos 48 Copyi...

Страница 5: ...ration 80 Displays 81 TV screen and video 81 Sound 82 Recording timer recording and copying 82 Play 83 Edit 83 Photo 83 USB 84 TV Guide 84 Broadcast 84 VIERA Link 84 Network 85 Reset 85 Messages on the unit s display 86 When you experience problems with Easy Network Setting 88 Reference Specifications 90 Licenses 93 Index 95 About descriptions in these operating instructions These operating instru...

Страница 6: ...sonic video camera etc It can be played back only after copying to the HDD 55 With certain recording states and folder structures the play order may differ or playback may not be possible Playable Recordable contents Media type Standard symbol Playable contents Recordable contents Built in hard disk drive HDD HDD Video AVCHD AVCHD 3D JPEG MPO 3D photo MP3 External hard disk drive USB HDD 7 USB_HDD...

Страница 7: ...FAT16 FAT32 and NTFS file system The USB HDD over 2 TB is not usable This unit supports USB 2 0 High Speed Although this unit can use USB 3 0 devices as USB 2 0 devices in certain cases USB 3 0 devices cannot be used due to differing connector shape larger current ratings etc Use of USB 2 0 devices is recommended This unit does not recognize USB HDDs other than those in which the size of one secto...

Страница 8: ...it supports USB 2 0 High Speed This unit does not guarantee connection with all USB devices Do not touch the terminal surface of the SD cards Notes for the SD cards Compatible SD card SD Memory Card from 8 MB to 2 GB FAT12 and FAT16 formats SDHC Memory Card from 4 GB to 32 GB FAT32 format SDXC Memory Card 48 GB 64 GB exFAT format Using miniSD card or microSD card Mini type and micro type cards can...

Страница 9: ...ing instrument and is easily susceptible to damage Therefore be careful of the following points while the unit is turned on especially during operation otherwise the HDD and the recorded content may be damaged Do not subject the unit to any vibration and shock Do not remove the AC mains lead from the household mains socket This unit cannot save backup the HDD titles to media You have to be very ca...

Страница 10: ...ration buttons 16 C Channel select 22 Change pages in the DIRECT NAVIGATOR screen etc D Show the VIERA Connect screen 59 E Switching to the radio channel list 22 F HWT230 Start up a video communication 59 G Exit the menu screen H Show the TV Guide screen 23 I Show the FUNCTION MENU screen 21 J Return to previous screen K Show subtitles 24 39 L Show Digital teletext 24 M Show NETFLIX screen 59 N To...

Страница 11: ...t straight out 5 Remote control signal sensor Angle Approx 20 up and down 30 left and right Distance Within approx 7 m in front of the unit Pull to flip down the front panel SD card USB memory Display Display 1 Drive HDD or SD indicator 2 Copying indicator 3 USB port indicator 4 SD card slot indicator 5 Remote control signal indicator 6 Timer recording indicator This indicator lights up when the t...

Страница 12: ...ptional Refer to VIERA Connect Enjoying Internet Service 59 HWT130 To connect the Wireless LAN Adaptor optional Refer to Network connection 15 About HDMI cable Use the High Speed HDMI cables Non HDMI compliant cables cannot be utilized It is recommended that you use Panasonic s HDMI cable When outputting 1080p signal please use HDMI Cables 5 0 meters or less Basic connections HDMI VHF UHF RF IN Th...

Страница 13: ...r amplifier receiver compatible with VIERA Link When using a TV or an amplifier receiver that does not display ARC compatible on the HDMI terminal it is necessary to connect the TV and the amplifier receiver with a digital audio cable to enjoy the TV audio on the amplifier receiver When the unit is not to be used for a long time To save power unplug it from the household mains socket This unit con...

Страница 14: ...nect the TV and the amplifier receiver with a digital audio cable to enjoy the TV audio on the amplifier receiver When you do not want the audio to be output from the TV set HDMI Audio Output to Off 66 73 HDMI IN HDMI HDMI HDMI cable Amplifier receiver TV HDMI cable ARC compatible ARC compatible 3D programmes can be played back when this unit is connected to a 3D compatible TV This connection only...

Страница 15: ... etc For up to date compatibility information on your Wireless router refer to http panasonic jp support global cs This site is in English only The unit is not compatible with public wireless LAN services Network connection Precautions of Wireless LAN connection The following limits are in place regarding the usage of this unit You must be aware of these limits before using this unit Panasonic wil...

Страница 16: ...TV operation buttons right Select and enter buttons To return to the previous screen To exit the screen FUNCTION MENU 21 Setup 66 TV operation buttons Brand Code Brand Code AIWA 35 BENQ 58 59 BRANDT 10 15 CENTREX 66 CURTIS 05 DESMET 05 ELEMIS 05 FINLUX 61 Panasonic 01 02 03 04 AKAI 27 30 BEKO 05 71 72 73 74 BUSH 05 DAEWOO 64 65 DUAL 05 FERGUSON 10 34 FISHER 21 MITSUBISHI 05 19 20 47 METZ 05 28 79 ...

Страница 17: ...ODE e g 1 Select the item then press OK 2 Select the character then press OK Repeat this step 3 Press BACK RETURN 4 Repeat steps 1 3 to enter all data 5 Press BACK RETURN to exit from the Owner ID Data Entry screen 5 Enter the new PIN for parental control The default PIN is 0000 1 Enter the new 4 digit PIN with the number buttons Make a note of the PIN you have decided on in case you forget it 2 P...

Страница 18: ...dly press 1 right on the remote control until 01 OID is displayed on the unit s display 3 Press OK on the remote control The PIN is not displayed To confirm that channels have been tuned correctly Refer to Using Channel List 22 To change PIN for parental control Refer to PIN Entry 77 To change the region for Channel Sorting Refer to Channel Sorting by Region 69 If tuning is cancelled partway throu...

Страница 19: ...unction Remote Recording function Internet Connection Test OK RETURN Easy Network Setting Settings and tests for connection required for home network and the Internet will be conducted First please select a connection mode LAN cable connection Connect a LAN cable to the unit and select Wired Wireless LAN connection Select Wireless Current setting Wired Wired Wireless Connection method to wireless ...

Страница 20: ...s Refer to the operating instructions of the hub or router If you set Home Network function or Remote Recording function to On the setting for Quick Start is fixed to On Do not use this unit to connect to any wireless network for which you do not have usage rights During automatic searches in a wireless network environment wireless networks SSID for which you do not have usage rights may be displa...

Страница 21: ...yback Contents TV Guide Video Photo Music BACK RETURN Press OK Press e g FUNCTION MENU list FUNCTION MENU Playback Contents Video 33 Video AVCHD 37 Video MP4 37 Photo 46 Music 51 TV Guide 23 Timer Recording 30 Network Home Network DLNA Client 57 Home Network Media Renderer 58 Network Service 59 Remote Recording 31 When the SD card drive is selected Others Copy Video AVCHD 54 Copy Video MPEG2 55 Co...

Страница 22: ...ase enter the 4 digit PIN with the number buttons by following the on screen instructions PIN can be changed via PIN Entry 77 You can select from the list of channel names 1 Press OK 2 Select the channel then press OK To edit the channel list Refer to Channel List 68 Encrypted channels cannot be watched Instructions for operations are generally described using the remote control 10 Press CH W X to...

Страница 23: ...9 While watching a programme Press STATUS Channel information appears 1 Set timer 31 2 Current Category 3 Programme with Guidance information for parental control 70 Child Lock for Playback 4 Audio Description 5 Subtitle 6 Digital teletext 7 Multiple audio To show detailed information Press STATUS again To hide the information screen Press EXIT To change Category Press the blue button To switch be...

Страница 24: ...available depending on the type of audio format When Dolby Digital Dolby Digital Plus MPEG or HE AAC is set to Bitstream the Audio Description may not work Set them to PCM 72 Digital Audio Output You can also set Audio Description active in the Setup menu 70 When TEXT appears in channel information 23 1 Press TEXT 2 Use 3 4 2 1 number buttons or colour buttons etc according to on screen instructio...

Страница 25: ...en When recording of the watching programme is started When two programmes simultaneous recording is started When performing PAUSE LIVE TV or REWIND LIVE TV for more than 8 hours This may vary depending on the HDD free space These functions do not work in the following cases When the clock is not set While recording two programmes simultaneously While copying While watching a programme being recor...

Страница 26: ...not be copied from built in HDD to the media other than USB HDD This unit can record two programmes being broadcasted at the same time 1 Select the channel to record 2 Press REC Recording starts REC1 or REC2 will light on the unit s display 3 Select Automatic Stop then press OK One touch recording OTR Recording stops automatically when the programme ends You can also select Recording Time or Conti...

Страница 27: ...the titles previously recorded to the HDD Operation during Recording To check the recording programme To stop recording REC2 HDD REC1 OTR AUTO 5 Recording programme displayed on the TV Recording programme not displayed on the TV Stop Recording Yes No Recording of this programme is in progress Stop this recording OK RETURN 1 Stop Recording 2 recordings are in progress Which recording would you like...

Страница 28: ...lect Change then press OK 2 Follow the on screen instructions Operation during Recording Refer to Operation during Recording 27 This operation will only record to built in HDD This unit can record two programmes being broadcasted at the same time 1 Press GUIDE TV Guide screen appears 2 Select the programme then press the red button The timer icon F red is displayed If on screen instructions are di...

Страница 29: ...tart and stop times can be controlled by the broadcaster e g delayed start This is indicated by Guide Link in the Timer Recording screen 30 The Guide Link function may not work if you manually change the start time or the stop time over 10 minutes Series Timer Recording You can record all the episodes of a series by setting just one timer recording To check the schedule of the series On the Select...

Страница 30: ...it a timer programme 32 Operation during Recording Refer to Operation during Recording 27 Select the items and change the items Recording recommended programme Recommendation Booking Selection Screen TUE 01 01 2013 19 40 RETURN OK Drama TUE 01 01 2013 20 00 21 00 View Single Timer Rec Series Timer Rec Delete Recommended Series Info SAT 10 03 19 45 20 00 Recommendation List Manually programming tim...

Страница 31: ... This unit will always be connected to the Internet when this function is activated Please note that a regular maintenance or unexpected trouble may interrupt the service and that the service content may be changed or revoked and operation menu screens may be changed with or without a prior notice Day Date You can select Date or Weekly by pressing the green button Timer recording from channel info...

Страница 32: ...01 SAT 01 01 OK OK OK RETURN Page Up Page Down Turn Timer Off Resolve overlap Total 3 32 Timer Recording 30 30 HDD Remain TUE 01 01 2013 8 05 Delete Info e g Screen icons F Red Timer recording standby is activated Grey Timer recording standby is deactivated Currently recording programme A part or all of the programme will not be recorded since the programme is overlapping Programme overlapping can...

Страница 33: ...port AVCHD Movie Not Viewed DIRECT NAVIGATOR All USB HDD Playback Last Stopped Beginning Where do you want to start playback from OK RETURN DIRECT NAVIGATOR VIDEO screen Screen icons Currently recording programme Protected title Title was not recorded due to recording protection t Title cannot be played When data is damaged etc Grouped titles Title has not yet been played Title is recorded using a...

Страница 34: ...the red button 2 Select PHOTO or MUSIC then press OK Select the title then press STATUS 1 On the Grouped Titles screen Select the item marked with Tab Switching to the PHOTO or MUSIC screen Showing Information Switching the appearance 1 Press OPTION 2 Select Grouped Titles or All Titles then press OK Grouped Titles Two or more titles recorded in the daily weekly series timer recording mode are bun...

Страница 35: ...ng All the titles in the group are released Select Release then press OK Remove Selected titles are removed from the group Select Remove then press OK Changing the group name Playback from Chapter View Regarding chapters You can divide a title into multiple chapters Each section between the division points Chapter Marks becomes a chapter Chapter Creation This unit can create chapters automatically...

Страница 36: ...en is not displayed display it by performing the following operation 1 While stopped Press OPTION 2 Select Drive Select then press OK 3 Select the media then press OK For data files only 1 Insert the media Depending on the type of the media play starts from the specified position or the screen appears 2 When the menu screen etc appears Select the item or title then press OK Repeat this step if nec...

Страница 37: ... screen Folder Titles Move to the parent folder OK RETURN Page 0001 0003 Parent Folder Videos Video USB Folder 01 Folder 02 video01 mkv video02 mkv video03 mkv video04 mkv Page Up Page Down DIRECT NAVIGATOR AVCHD screen DIRECT NAVIGATOR Video AVCHD RETURN Date Day Time Title Name Rec time 0 30 41 Page 01 01 OPTION No 01 01 5 00 02 01 9 30 03 01 10 00 03 01 11 30 01 01 SUN MON TUE TUE SUN 9 00 OK S...

Страница 38: ...Y a1 3 1 to restart play While paused press SLOW SEARCH 6 or SLOW SEARCH 5 Press PLAY a1 3 1 to restart play The speed increases up to 5 steps Xvid MKV MP4 and MPEG2 USB_HDD USB Slow motion is not effective AVCHD SD Forward direction SLOW SEARCH 5 only While paused press 2 2 or 1 1 Each press shows the next frame Press and hold to change in succession forward or backward Press PLAY a1 3 1 to resta...

Страница 39: ... Yes then press OK Select the desired audio with Multi Audio in the Content menu 64 HDD USB_HDD For recorded titles 1 Press STTL 2 Select On or Off If you want to switch the subtitle language select it in the Content menu 64 Xvid and MKV Display with Subtitles in the Content menu 64 HDD USB_HDD For recorded titles 1 Press AD 2 Select Audio Description and set to Automatic 3 Select Volume then adju...

Страница 40: ...y Side Half programme types Please refrain from viewing 3D images if you do not feel well or are experiencing visual fatigue In the event that you experience dizziness nausea or other discomfort while viewing 3D images discontinue use and rest your eyes Depending on the connected TV the video being played back might switch to 2D video due to changes in resolution etc Check the 3D setting on the TV...

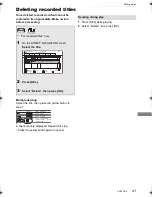
Страница 41: ...le playing 2 Select Delete then press OK For recorded titles only 1 On the DIRECT NAVIGATOR screen Select the title 2 Press DEL 3 Select Delete then press OK Time Remaining 45h54m HDD Page Select Grouped Titles VIDEO OPTION Start Time Prog Type Rec Time Play RETURN PHOTO MUSIC Drama Sport AVCHD Movie Not Viewed DIRECT NAVIGATOR Channel Date Title Name Titles All Delete Page Up Page Down Movie 9 00...

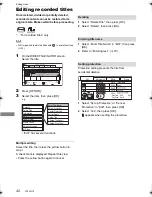
Страница 42: ...le from accidental deletion 3 Select the item then press OK e g Edit has several functions Time Remaining 45h54m HDD Page Select Grouped Titles VIDEO OPTION Start Time Prog Type Rec Time Play RETURN PHOTO MUSIC Drama Sport AVCHD Movie Not Viewed DIRECT NAVIGATOR Channel Date Title Name Titles All Delete Page Up Page Down Movie 9 00 0h01m 04 10 04 10 29 10 29 10 Set up Protection Cancel Protection ...

Страница 43: ...ss OK at the start point and end point to delete You can find the desired point by using play search etc 38 3 Select Continue then press OK Select Next then press OK to delete other sections Up to 20 sections can be set go to step 2 4 Select Delete then press OK Chapter Mark is generated in the scene that was partially deleted 5 Press BACK RETURN Dividing title 1 Select Divide Title in Edit then p...

Страница 44: ...lect the point where you want to start a new chapter while viewing the title 1 Press the green button 2 Press OK at the point you want to divide Repeat this step 3 Press BACK RETURN to go to Chapter View screen To delete the chapter 1 Select the chapter then press DEL Multiple editing Select the chapter then press the yellow button A check mark is displayed Repeat this step Press the yellow button...

Страница 45: ...DIRECT NAVIGATOR If the DIRECT NAVIGATOR screen of photo or music is displayed press the red button then select VIDEO 3 Select the title then press the yellow button A check mark is displayed Repeat this step Press the yellow button again to cancel 4 Press the blue button 5 Select Yes then press OK If you select No you can change the selection right 6 Set other settings then press OK e g right Set...

Страница 46: ... All tab only Press PAUSE 3 Select the photo then press OK Press 2 1 to display the previous or next photo HDD Page Select Slideshow Calendar PHOTO OPTION 03 01 2012 29 10 2012 25 02 2013 15 03 2013 0002 0002 Copy OK RETURN VIDEO MUSIC 8 12 18 4 DIRECT NAVIGATOR Date Event Name Photos All Album 1 Album 2 Album 3 Album 4 3D Page Up Page Down CH Tab DIRECT NAVIGATOR PHOTO screen Screen icons Tab Alb...

Страница 47: ... rotated photos will not be stored depending on the media This function is not available during the 3D photo playback Information Information shooting date etc is shown Slideshow settings Start Slideshow You can start a slideshow Interval You can set up the time until the next photo is to display Transition Effect Effect for the next photo to display can be set Repeat Play You can set up to play b...

Страница 48: ... Calendar PHOTO OPTION 03 01 2012 29 10 2012 25 02 2013 15 03 2013 0002 0002 Copy OK RETURN VIDEO MUSIC 8 12 18 4 DIRECT NAVIGATOR Date Event Name Photos All Album 1 Album 2 Album 3 Album 4 3D Page Up Page Down CH Edit Add to Album HDD 1 Select the destination album then press OK 2 Press OK Combine Events HDD Select Yes then press OK Remove from Album HDD Select Yes then press OK Enter Album Name ...

Страница 49: ..._HDD SD USB HDD 1 On the DIRECT NAVIGATOR screen To copy the event Select the event then press the blue button To copy the photo 1 Select the event then press OK 2 Select the photos to copy then press the blue button To select multiple events or photos Press the yellow button when selecting the event or photo A check mark is displayed Repeat this step Press the yellow button again to cancel 2 When...

Страница 50: ...ss and hold BACK RETURN for 3 seconds While copying no other operations can be performed Timer recordings will not proceed All tracks in the folder will be copied Tracks recorded to HDD in one operation will be regarded as one album For data files only MP3 1 Insert or connect the media The menu screen appears 36 2 Select Play Copy Music MP3 then press OK Playback will start Using the tree screen t...

Страница 51: ...um 2 Select the album then press OK 3 Select the track then press OK My Favourites Tracks registered in My Favourites Select the track then press OK Registering a track to the My Favourites Up to 99 tracks While the track list screen is displayed Select the track then press the green button Playlists 1 Select the playlist then press OK 2 Select the track then press OK DIRECT NAVIGATOR Music Menu M...

Страница 52: ...w Press BACK RETURN How to create the photo album Refer to Add to Album 48 To play music continuously even if the Power off link works Refer to Playing music continuously even after turning off power to the TV 63 Operations during music play Stop Pause Search Skip Repeat Play Random Sound Effects Displaying photos Slideshow To change the photos to display 1 While slideshow playing Press OPTION 2 S...

Страница 53: ...ts Select the playlist then press OK New playlist cannot be added Up to 999 tracks can be registered to each playlist 1 On the DIRECT NAVIGATOR screen Press OPTION e g 2 Select the item then press OK e g while selecting an Album Editing operations will change depending on the screen DIRECT NAVIGATOR Music Menu MUSIC OK RETURN Please select to access music Artists Frequently Played Albums Total Tra...

Страница 54: ...d This unit cannot copy the titles in the HDD to the media Be careful when deleting the original title on the media USB connection cable optional Copying HD Video AVCHD 1 Connect the video camera or insert the media Make the video camera ready for data transfer The menu screen appears 36 3 Select the title then press the yellow button A check mark is displayed Repeat this step Press the yellow but...

Страница 55: ...tems to the copying list 1 Select the title then press the yellow button Repeat this step to select titles 2 Press OK Delete Selected titles are deleted Select the title then press the yellow button before step 2 Repeat this step to select titles Select Yes then press OK Move Change the order of items on the copying list Select the title to move before step 2 Select the destination then press OK 4...

Страница 56: ...their respective operating instructions DLNA function compatible software should be installed For more details refer to the Panasonic website left Preparation When DLNA Server Function is deactivated make the settings 66 75 Home Network Settings 2 Select the item then press OK The titles with access restriction e g copy restriction signals sent from broadcasters are not available for this function...

Страница 57: ... than stated above can be played back Using this unit as Client 2 Select Home Network DLNA Client in Network then press OK A list of equipment connected via the network is displayed This list can be updated by pressing the red button 4 Select the item then press OK Menu structure will be different depending on the equipment Select the contents by repeating the operation Convenient functions can be...

Страница 58: ... OK 3 Operate the Digital Media Controller compatible equipment To exit from Home Network Media Renderer screen Press BACK RETURN Depending on the contents and the connected equipment playback may not be possible Items displayed in grey on the display cannot be played back by this unit This unit can be played back via connected equipment only when controlled using Digital Media Controller Dependin...

Страница 59: ...service may be discontinued either temporarily or permanently without notice Therefore Panasonic will make no warranty for the content or the continuity of the services All features of websites or content of the service may not be available Some contents may be inappropriate for some viewers Some contents of VIERA Connect may only be available for specific countries and may be presented in specifi...

Страница 60: ...ss OK 3 Select SD Card Management in Others then press OK 4 Select Format Card then press OK 5 Select Yes then press OK 6 Select Start then press OK 7 Press OK The contents are deleted when you format a card even if you have set protection Do not disconnect the AC mains lead while formatting This can render the card unusable When a card has been formatted using this unit it may not be possible to ...

Страница 61: ...nit with optional USB HDD Only one USB HDD For recorded titles can be connected at the same time Do not connect additional HDDs using a USB hub For details about connection method refer to the instructions supplied with the USB HDD Please use the following procedure to disconnect Disconnecting without following this procedure may result in the loss of recorded content from the USB HDD or the inter...

Страница 62: ...all USB HDD Registrations 71 If you register a USB HDD all the content already recorded on the USB HDD will be deleted It is not possible to play back the content on the USB HDD whose registration has been cancelled You can check the registration number of the USB HDD on the DIRECT NAVIGATOR 33 Registering the USB HDD 4 Select Yes then press OK If you have already registered eight USB HDDs it will...

Страница 63: ...trol 3 or later This function allows you to immediately start recording the programme that you are viewing on the TV Refer to the TV operating instructions for operation This function is available with the TV that supports HDAVI Control 3 or later You can operate this unit using the TV remote control Refer to the operating instructions of the TV about the buttons that you can use This function is ...

Страница 64: ...ar the Playback menu Press BACK RETURN 5 Select the setting Some items can be changed by pressing OK Content Play Picture Sound Other Audio Channel LR Multi Audio eng MPEG Subtitle Language eng Menu Item Setting e g Content Video The original video recording method MPEG 4 AVC etc appears Soundtrack Show or change the soundtrack Subtitles Turn the subtitle on off and change the language depending o...

Страница 65: ...propriately converts it Video Select this setting when the content is distorted if Auto is selected Film Select this if the edges of the film content appear jagged or rough when Auto is selected However if the video content is distorted as shown in the illustration to the right then select Auto Sound Sound Effects This function is effective when Digital Audio Output is set to PCM 72 Re master 1 Re...

Страница 66: ...items cannot be selected or changed Setup OK RETURN Tuning HDD USB HDD Picture Sound Display Connection Network Others Menu list Tuning Favourites Edit 68 Channel List 68 Auto Setup 69 Channel Sorting by Region 69 Manual Tuning 69 Update Channel List 69 Signal Condition 69 New Channel Message 69 Child Lock 70 Child Lock List 70 Freeview Players 70 Preferred Multi Audio 70 Multi Audio 70 Audio Desc...

Страница 67: ...n Setting 74 Double Speed Mode Setting 2 4GHz 74 IP Address DNS Settings 74 Proxy Server Settings 74 Network Service Settings 74 Lock 74 Automatic Volume Control 74 Remote Recording Function Settings 75 Remote Recording function 75 Device ID 75 Initialize Device Password 75 Home Network Settings 75 Home Network function 75 Setting device name 75 Registration type for remote devices 75 Remote devic...

Страница 68: ... all Selectfavourites RETURN Add Select channel All DVB Channels Favourites 1 Page down Page up 1 2 3 5 7 8 6 4 To delete channels Select the channel in the Favourites column then press OK Yellow Delete all channels To change the name of the Favourites list 1 Press the red button in the Favourites column 2 Press 3 4 2 1 to select a character then press OK Repeat this step to enter other characters...

Страница 69: ...ecking the signal strength and signal quality displays 2 Press OK to start scan The set channel is displayed in the table Update Channel List You can update the channel list to the latest one Signal Condition You can check the quality and strength of signals Press CH W X to select the channel Signal Quality Green bar Good Yellow bar Poor Red bar Bad The channels you can receive are affected by wea...

Страница 70: ...subtitle language for broadcast If the selected language is not available then the original language will be selected HDD USB HDD Child Lock for Playback You can restrict playback of the following titles Titles that are recorded with guidance information Titles restricted by Child Lock List left Titles with icon in DIRECT NAVIGATOR etc PIN is required to change 22 REWIND LIVE TV Turn on off the RE...

Страница 71: ...ration has been cancelled Picture Still Mode Select the type of picture shown when you pause play Field Select if jittering occurs when Automatic is selected The picture is coarser Frame Select if small text or fine patterns cannot be seen clearly when Automatic is selected The picture is clearer and finer Seamless Play The segments can be played back seamlessly When Off is selected frame dropping...

Страница 72: ... noise When using the DIGITAL AUDIO OUT terminal there are following restrictions on Dolby Digital Dolby Digital Plus When Bitstream is selected Dolby Digital Plus audio is output as Dolby Digital When PCM is selected audio is output as Down mixed 2ch PCM Audio Delay Mis sync between the video and audio is corrected by delaying the audio output Display On Screen Information Select the time until t...

Страница 73: ... TV TV System Set in accordance with the TV System for the connected TV HDMI Connection HDMI Video Format You can only select items compatible with the connected equipment If Automatic is selected the output resolution best suited to the connected TV 1080p 1080i 720p or 576p 480p is automatically selected To enjoy High Quality Video up converted to 1080p you need to connect the unit to 1080p compa...

Страница 74: ...nt connection settings The current connection settings and status are displayed Connection status Current status Network name SSID Wireless type 802 11n 2 4GHz 20MHz Authentication type Encryption type AES Connected Reception e g IP Address DNS Settings Check the connection of the network or set the IP address and DNS To set the IP address and DNS 1 Set IP Address Auto assignment and DNS IP Auto a...

Страница 75: ...nction If On is selected the setting for Quick Start is fixed to On 76 If Off is selected the setting for Remote Recording function is fixed to Off above This cannot be set to On if the connection with the wireless broadband router is not encrypted in the wireless connection Setting device name It is also possible to change the name of this unit on the network Select from a preset list Select the ...

Страница 76: ...On 70 Off cannot be selected Automatic Standby after OTR On This unit is turned to standby mode when it is not operated for approximately 5 minutes after completing Automatic Stop or Recording Time 26 Automatic Standby after Copy On This unit is turned to standby mode when it is not operated for approximately 5 minutes after completing copy 55 RF OUT Aerial Signal Set whether to output the broadca...

Страница 77: ...he number buttons Make a note of PIN in case you forget it e g 3 Press OK OK Remember the PIN PIN Entry 0 0 0 0 System Update Software Update in Standby When you set this unit to standby mode software firmware updates 78 are downloaded automatically at the time you have specified Software Update Now Broadcast Refer to Software Firmware Update 78 Software Update Now Internet Refer to Software Firmw...

Страница 78: ...start when the unit is turned to standby mode e g When FINISH is displayed update of the software firmware has completed It may take up to a few hours until the update is completed depending on the network or broadcast environment The timer recording always takes preference over the software Firmware download if the timer recording is scheduled to start the downloading will be performed at the nex...

Страница 79: ... screen mode is switched to Normal in the following situations when you change the channel when you start or end the playback of a title when you switch the unit on or to standby mode When TV Aspect 73 is set to 4 3 or Letterbox the Zoom effect is disabled The HOLD function deactivates all buttons on the unit and remote control Press and hold OK and BACK RETURN simultaneously until X HOLD appears ...

Страница 80: ...it Regular HDD rotating sounds Poor reception due to atmospheric conditions Image disturbance during search Interruptions in reception due to periodic broadcasting breaks When you switch the unit on or to standby mode there may be an unexpected sound General operation The unit does not work Check the connections 12 One of the unit s safety devices may have been activated Reset the unit as follows ...

Страница 81: ...There is a lot of image lag when playing video Set HD optimizer in the Picture menu to Off 65 Set Audio Delay 66 72 Picture may not be seen when more than 4 devices are connected with HDMI cables Reduce the number of connected devices The picture may be distorted or a black screen may appear between scenes recorded with different aspect ratios Set Deep Colour Output 66 73 or Contents Type Flag 66 ...

Страница 82: ...ected The timer recording programmed via VIERA Connect does not work properly Timer recording programmed via VIERA Connect will be recorded with the same conditions as those of manual timer recording and some functions such as Guide Link 29 does not work The same video is displayed in each left and right half of the screen This is a 3D programme of the Side by Side type Change the setting as follo...

Страница 83: ...ection takes a long time When there are a lot of folders and files it may sometimes take a long time Photos do not play back normally The images that were edited on the PC such as Progressive JPEG etc may not play back 91 Auto Renewal Recording does not work properly The programme will not be overwritten in the following cases the programme is protected any programme is being played back or copied...

Страница 84: ...amme information There was a programme change or TV Guide information from a broadcast station was possibly not correctly transmitted If signal quality is bad the TV Guide system may not be able to receive any data Picture regularly breaks up on some channels Adjust the reception with Manual Tuning 66 69 Picture very infrequently breaks up on some or all channels Electrical atmospheric interferenc...

Страница 85: ...sition or angle of your Wireless router If there is no improvement connect to a wired network and perform the Easy Network Setting 19 again To return all the settings to the factory preset Perform Shipping Condition or Default Settings 66 77 Network You cannot play contents properly from DLNA compatible equipment on the network There may be some video that cannot be played back on DLNA compatible ...

Страница 86: ...failure or the AC plug was disconnected while the unit was on The unit is carrying out its recovery process Wait until the message disappears There are already 32 timer programmes Delete unnecessary timer programmes 32 The USB device is drawing too much power Remove the USB device Update of the software firmware is started You cannot operate the unit until the update is complete 78 Software firmwa...

Страница 87: ... not support copyright protection The unit fails to operate properly Press Í I on the main unit to switch the unit to standby mode Now press Í I on the main unit again to turn the unit on The HOLD function is activated 79 There is something unusual The service number displayed after H and F depends on the unit s condition Reset the unit as follows 1 Disconnect the plug from the household mains soc...

Страница 88: ...in An authentication error or a time out error occurred A device error occurred HWT130 Connection of Wireless LAN Adaptor If the problem is not solved consult your dealer Easy Network Setting Home Network Connection Check Display Check the following 1 LAN cable connection or Wireless setting Fail Connection of the LAN cables 15 Settings of the hub and router 2 IP address setting Fail 3 Connection ...

Страница 89: ...not find the server B019 Primary DNS and Secondary DNS settings of IP Address DNS Settings 66 74 No connection could be made to the server B020 The server may be busy or the service may have been suspended Please wait a few moments and then try again Settings of Proxy Server Settings 66 74 and the router ...

Страница 90: ...gital Max 5 1ch Dolby Digital Plus Max 5 1ch MPEG 2ch HE AAC Max 5 1ch Digital audio out Optical terminal PCM Dolby Digital MPEG 1 pc HDMI terminal PCM Dolby Digital Dolby Digital Plus MPEG HDMI Output 19 pin type A 1 pc This unit supports HDAVI Control 5 function Internal HDD capacity HWT230 1 TB HWT130 500 GB Other terminals USB Port Type A 2 pcs SD Card Slot 1 pc LAN Ethernet Port 1 pc 10BASE T...

Страница 91: ...are automatically divided every 8 hours JPEG MPO Playable media HDD SD Card USB device Compatible pixels Between 34k34 and 8192k8192 pixels Sub sampling is 4 2 2 or 4 2 0 Files JPEG conforming DCF Design rule for Camera File system MPO conforming MPF Multi Picture Format Maximum numbers of folders and files This unit is not compatible with Motion JPEG or Progressive JPEG MP3 Playable media HDD USB...

Страница 92: ...media SD Card USB device MPEG 4 AVC H 264 Up to High Profile Level 4 2 Video resolution Up to 1920k1080 MPEG 4 AAC LC Sampling rate 8 kHz to 48 kHz Number of audio channel 1 or 2 SD Video Standard Definition Playable media SD Card USB device Codec MPEG 2 File Format SD Video format used on Standard Definition Camera Panasonic and some other s SD Video Entertainment Video Profile HD Video High Defi...

Страница 93: ...from a video provider licensed to provide AVC VC 1 Video No license is granted or shall be implied for any other use Additional information may be obtained from MPEG LA LLC See http www mpegla com SDXC Logo is a trademark of SD 3C LLC The S logo and SkypeTM are trade marks of Skype VIERA Connect is a trademark of Panasonic Corporation The Wi Fi CERTIFIED Logo is a certification mark of the Wi Fi A...

Страница 94: ...plied warranty of MERCHANTABILITY or FITNESS FOR A PARTICULAR PURPOSE At least three 3 years from delivery of products Panasonic will give to any third party who contacts us at the contact information provided below for a charge no more than our cost of physically performing source code distribution a complete machine readable copy of the corresponding source code covered under LGPL Contact Inform...

Страница 95: ...nections 12 DIGITAL AUDIO OUT terminal 14 HDMI cable 12 13 Network 15 Copy Music 50 Copy Photo 49 Copy Video 45 HD Video AVCHD 54 SD Video MPEG2 55 D Delete Music 53 Photo 48 Video 41 Delete all photos HDD 70 Delete all titles HDD 70 USB HDD 71 Digital text MHEG 24 DIRECT NAVIGATOR Music 51 Photo 46 Video 33 DLNA Client 57 Media Renderer 58 Server 56 75 E Easy Network Setting 19 74 Easy setting 17...

Страница 96: ...rmat 70 Media information 6 HDMI cable 12 HOLD function 79 J JPEG 46 91 M Manual Tuning 69 Media HDD 6 SD Card 6 8 USB HDD 6 USB memories 6 8 Media Renderer 58 Menu screen 36 MKV 92 Playback 36 MPEG2 55 92 MPO 46 91 MP3 50 91 Multiroom TV Streaming 56 Music Copy 50 Delete 53 Edit 53 Playback 50 N Network Connection 15 DLNA Client 57 DLNA Server 56 75 Setting 74 Software Firmware Update 78 VIERA Co...

Страница 97: ... 42 Q Quick Start 76 R Recording 26 Recording quality 91 Recording time 91 Timer recording 28 Recording quality 91 Remote control 10 HOLD function 79 Manufacturer and Code No 16 Remote control code 76 TV operation 16 Remote Recording 31 Reset 77 83 85 REWIND LIVE TV 25 70 S SD Card Format 60 Media information 6 8 miniSD microSD 8 SD Video MPEG2 Copy 55 Setting Auto Setup 17 69 Easy Network Setting...

Страница 98: ... 70 Manual Tuning 69 Signal condition 69 TV Guide Operation 23 Timer recording 28 TV System 73 U Unit s display Messages 86 USB HDD Cancellation of all USB HDD Registrations 71 Delete all titles 71 Disconnection 61 71 Format 71 Media information 6 Registration 61 71 USB memories Media information 6 8 V Video Copy 45 Delete 41 DIRECT NAVIGATOR 33 Edit 42 Playback 33 36 Protection 42 Recording 26 VI...

Страница 99: ...vent any potential negative effects on human health and the environment which could otherwise arise from inappropriate waste handling For more information about collection and recycling of old products and batteries please contact your local municipality your waste disposal service or the point of sale where you purchased the items Penalties may be applicable for incorrect disposal of this waste i...

Страница 100: ...to date service from Freeview it is important for Freeview customers to retune from time to time How do I re tune my Freeview Box The below instructions are a quick reference If you have any problems check your instruction manual or ask a friend or family member to show you how Alternatively go to your local electrical retailer contact your manufacturer or visit freeview co uk retune Re tuning onl...

Отзывы: