


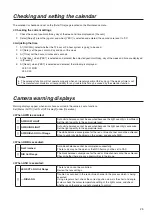

10
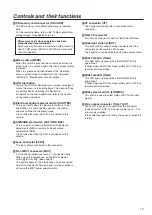
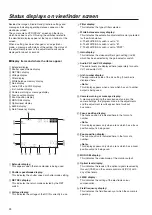
Controls and their functions
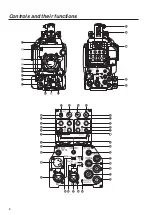
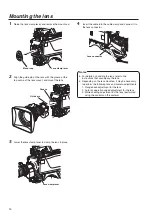
Lens mount (Bayonet type)
This is where the lens is mounted.
Lens clamp lever
The lens is inserted into the lens mount
, and this lever
is then turned to clamp the lens in place.
Lens cable, mic cable clamps
These are used to clamp the lens cable and mic cable in
place.
D
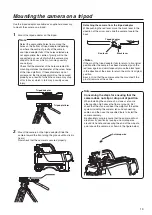
Tripod mount
Before securing the Studio Handy Camera to a tripod,
attach the tripod adaptor (SHAN-TM700) which is
available as an optional accessory.
E
Shoulder pad
This is used when the Studio Handy Camera is to be
carried on the shoulder.
It can be adjusted to position it more toward the front or
more toward the back.
F
Slide lock release lever
This is held down while it is used to adjust the front/back
position of the shoulder pad
E
.
Use it to adjust the position of the shoulder pad so that
the camera can be operated more easily while it is being
carried on the shoulder.
G
Shoulder strap fitting
This enables the shoulder belt to be attached.
H
Optical cable clamp
This enables the optical fibre multi cable to be clamped.
I
Camera No. plate holder
This enables the accessory camera No. plate to be
attached.
J
Optical fibre connector
(AK-HC3500AE: OPS2402-R made by Tajimi)
(AK-HC3500AES: EDW.3K.93C.TLC made by
LEMO)
This is used to connect with the CCU (camera control
unit) using the optical fibre multi cable. When it is not in
use, cover it with its protective cap.
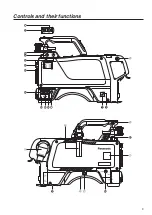
Camera power switch [POWER]
Use this to select the camera power input (power
supplied from the CCU or from an external power supply
input connector) and turn the power OFF.
CCU: When connecting this unit to the CCU, supply
power from the CCU and turn the power ON.
EXT: When connecting the external DC power supply
to this unit, supply power from the external power
supply and turn the power ON.
Middle position:
Turn the power OFF.
Power LED
This lights up green when power is supplied to the
camera.
Green light ON:
The camera power is ON.
Red light ON:
The camera power is OFF while connected to the CCU
whose power is ON.
Light OFF:
The camera power is OFF while not connected to the
CCU, or while connected to the CCU whose power is
OFF.
Power circuit breaker [BREAKER]
This shuts off the power in the event of an overcurrent
while the DC 12 V power supply is used.
To reset the circuit breaker, eliminate what caused it to
trip, and then press the circuit breaker button.
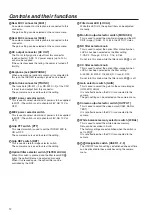
INCOM connectors 1, 2 [INCOM1, INCOM2]
The INCOM or headset plugs are connected here.
INCOM1 MIC ON/OFF switch [MIC1 TALK]
This is the INCOM1 MIC ON/OFF selector switch.
INCOM1 level control [INCOM1 LEVEL]
This is used to adjust the INCOM1 receiving volume level.
INCOM2 MIC ON/OFF switch [MIC2 TALK]
This is the INCOM2 MIC ON/OFF selector switch.
INCOM2 level control [INCOM2 LEVEL]
This is used to adjust the INCOM2 receiving volume level.
9
INCOM1 PGM1 level control [INCOM1 PGM1]
This is used to adjust the INCOM1 and PGM1 mixing
level.
INCOM1 PGM2 level control [INCOM1 PGM2]
This is used to adjust the INCOM1 and PGM2 mixing
level.
INCOM2 PGM1 level control [INCOM2 PGM1]
This is used to adjust the INCOM2 and PGM1 mixing
level.
INCOM2 PGM2 level control [INCOM2 PGM2]
This is used to adjust the INCOM2 and PGM2 mixing
level.
Содержание AK-HC3500AES
Страница 8: ...8 Controls and their functions...
Страница 9: ...9 Controls and their functions...
Страница 44: ...44 External dimension drawings Unit mm 360 260 105 135...
Страница 47: ...47 Memo...


