background image

8 (E)

ENGLISH

Parts and their functions

=

PAUSE STILL button

Press to initiate rec-pause or still-picture playback.
When the unit remains in the pause or still-picture
playback mode for more than a prescribed period of
time, it is automatically set to the stop mode in
order to protect the tape.
When the PROGRAM switch is at the MENU
position, this button functions as the SHIFT (

3

)

button to select the items on the setting menu
screen.
When the PROGRAM switch is at the CLK POS
position, the button moves the screen display
position upward.

>

TIME MODE buttons

Press to select the recording time mode.

3H

:

3-hour recording mode

9H

:

9-hour recording mode

12H

:

12-hour recording mode

18H

:

18-hour recording mode

24H

:

24-hour recording mode

48H

:

48-hour recording mode

72H

:

72-hour recording mode

96H

:

96-hour recording mode

120H :

120-hour recording mode

180H :

180-hour recording mode

240H :

240-hour recording mode

360H :

360-hour recording mode

480H :

480-hour recording mode

960H :

960-hour recording mode

When the PROGRAM switch is at the MENU
position, these buttons function as the SET (+) and
(–) buttons to select the settings for the setting
menu items.

?

RESET button

Press while the counter value is shown on the
display tube by the COUNTER button to reset the
CTL counter.
When the camera number is shown on the display
tube by the COUNTER button during playback, this
button is used to switch the monitor screen
between 1-screen playback and 4-screen playback.

@

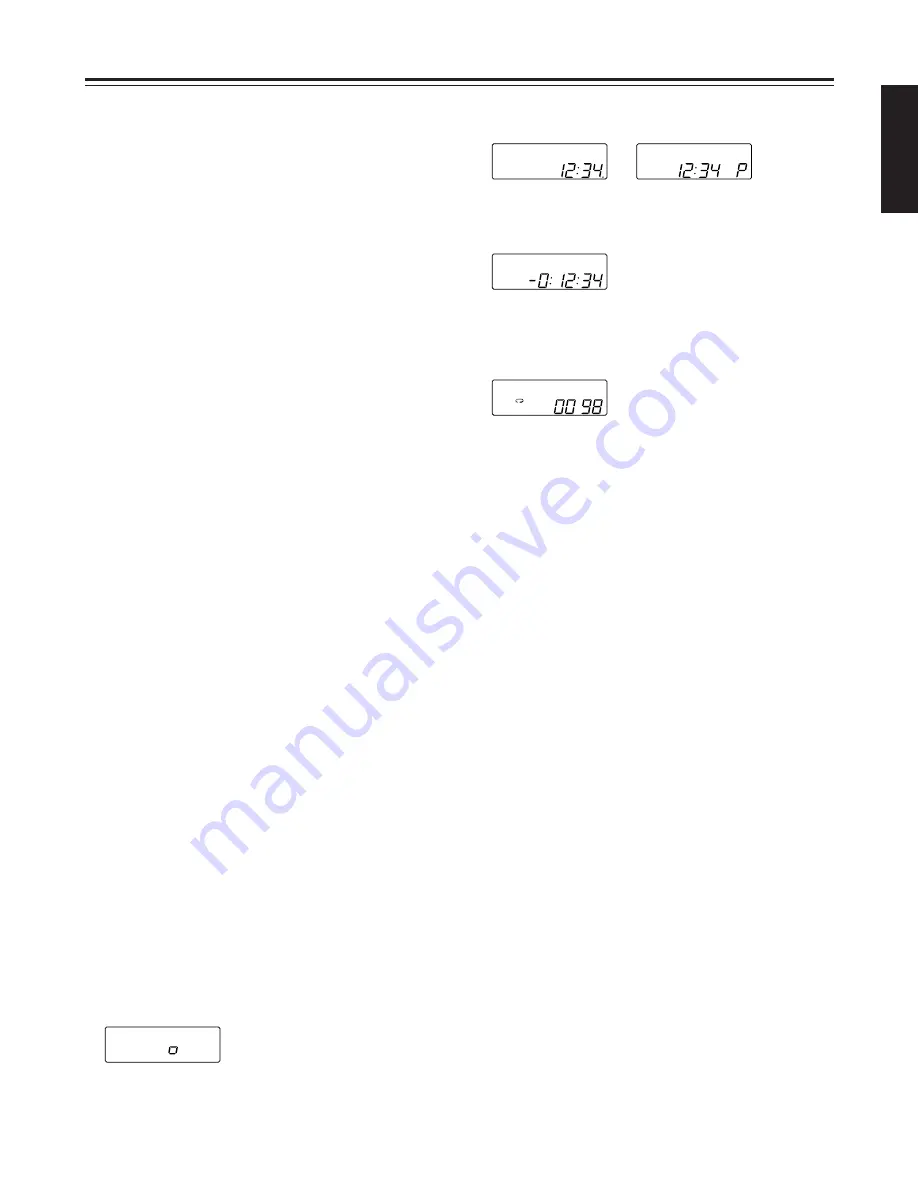
COUNTER button

Used to switch the display mode on the display
tube.
Each time the COUNTER button is pressed, the
mode is switched as follows.

Camera number display:

The current camera number is displayed.

CAMERA

1

7

2

8

5

6

12

11

9

4

3

10

Clock display:

The current time is displayed.

24-hour display

12-hour display

Counter display:

The tape counter is displayed.

Pass display:

This indicates the number of times (passes) repeat
recording has been performed when repeat
recording has been set.

A

SEARCH button 

Press to select the search mode.
Each time this button is pressed in the counter
display mode, the search mode is switched, and
one of the following mode lamps lights on the
display tube:

M :

Memory stop mode

AS :

Alarm search mode

When the SEARCH button is pressed while the
time is displayed on the display tube by the
COUNTER button, the time search mode is set,
and “S” lights on the display tube.

B

:00 button

Press to set the seconds digits of the time to “00.”
The seconds are reset to “00” when this button is
pressed while the display shows 0 to 29 seconds,
and they are carried up to 1 minute and set to “00”
when it is pressed while the display shows 30 to 59
seconds.

C

PROGRAM switch

Used to display the menu and adjust the time.
Keep this switch at OFF for normal operation.

MENU:

The setting menu screen is displayed.
When the switch is set to the MENU position
while holding down the STOP button, the alarm
screen or power loss screen appears.

CLK POS:

Set the switch to this position when adjusting the
time or adjusting the screen display position.

PASS

COUNT

 TIME

 TIME

Содержание AG-DTL1E

Страница 1: ...Before attempting to connect operate or adjust this product please read these instructions completely Model AG E Digital Time Lapse Video Cassette Recorder ESPAÑOL ENGLISH DEUTSCH FRANÇAIS ITALIANO ...

Страница 2: ... this mains lead are coloured in accordance with the following code Green and Yellow Earth Blue Neutral Brown Live Caution for AC Mains Lead As the colours of the wires in the mains lead of this appliance may not correspond with the coloured markings identifying the terminals in your plug proceed as follows The wire which is coloured GREEN AND YELLOW must be connected to the terminal in the plug w...

Страница 3: ...HE RISK OF FIRE OR SHOCK HAZARD DO NOT EXPOSE THIS EQUIPMENT TO RAIN OR MOISTURE CAUTION TO REDUCE THE RISK OF FIRE OR SHOCK HAZARD AND ANNOYING INTERFERENCE USE THE RECOMMENDED ACCESSORIES ONLY Operating precaution Operation near any appliance which generates strong magnetic fields may give rise to noise in the video and audio signals If this should be the case deal with the situation by for inst...

Страница 4: ...cording connections 35 Tape end output connections 36 Auto OFF output connections and recording output connections 36 External timer input connections 36 Time setting connections 37 External timer input connections 37 Terminal signal levels 38 Setting menus 39 Setting method 39 Menu page P1 TIME DATE PRESET screen 40 REC LOCK screen 40 HOUR METER screen 40 Menu page P2 DISPLAY screen 41 REC LOSS I...

Страница 5: ... the TV monitor screen into four parts all of the four pictures can be played back at the same time on the respective parts of the screen Date time search function The recording date and time month day hours minutes can be selected to initiate a search of the recorded data Alarm search function Recorded data that includes alarm recordings can be searched 3 hours 9 hours 12 hours 18 hours 24 hours ...

Страница 6: ... moment before the button was pressed are played back and then the recording mode is restored It takes about 10 seconds for the playback picture to appear 5REC button Press this to start recording 6 EJECT REC REVIEW MECHANISM REC POWER USE S VHS CASSETTE TAPE ONLY PUSH OPEN 1 2 4 3 5 M A S ALARM REC y m SUM TIME COUNT CAMERA PASS HIGH FRAME d TIME MODE H REMAIN LOCK EXT INT 1 7 2 8 5 6 12 11 9 4 3...

Страница 7: ... been set S Lights when the time search mode has been set The lamp flashes while a search is in progress ALARM Lights during an alarm recording Flashes upon completion of the alarm recording REC Lights during recording or rec pause Video operation mode displays Playback Reverse playback REC Recording recording monitoring REC Rec pause Still picture flashes during frame playback frame feed Fast for...

Страница 8: ...as the PAGE button to select the setting menu screen When the PROGRAM switch is at the CLK POS position the button switches between the date display and time display PLAY button Press to play back the tape in the forward direction When the PROGRAM switch is at the MENU position this button functions as the PAGE button to select the setting menu screen When the PROGRAM switch is at the CLK POS posi...

Страница 9: ...creen playback and 4 screen playback COUNTER button Used to switch the display mode on the display tube Each time the COUNTER button is pressed the mode is switched as follows Camera number display The current camera number is displayed CAMERA 1 7 2 8 5 6 12 11 9 4 3 10 Clock display The current time is displayed 24 hour display 12 hour display Counter display The tape counter is displayed Pass di...

Страница 10: ...al operations can be conducted REC Normal operations are suspended after recording has commenced and LOCK lights on the display tube REC REVIEW button operations are acknowledged EREW C button Press in the stop mode to rewind the tape When this button is pressed during playback or still picture playback the tape is reviewed F B FF button Press in the stop mode to fast forward the tape When this bu...

Страница 11: ...ording 6S VIDEO OUT connector 4P This is used to connect the unit to a device equipped with an S video input connector 7Terminal section 8EXT SW IN VIDEO OUT connector BNC The same video signals are output as the signals from the VIDEO OUT connector 9 When EXT SW IN is selected as the EXT SWITCHER MODE setting on menu screen P7 the connector can be made to serve as an input connector of the extern...

Страница 12: ...o adjust the figures 3Press the PAGE or PAGE button to display the P1 TIME DATE PRESET screen The flashing items are ones that can be set 5Upon completion of the settings set the PROGRAM switch to the OFF position The setting menu screen is cleared from the TV monitor and the normal mode is restored Setting the date and time Before operating the unit perform the following initial settings 2 1 2 1 ...

Страница 13: ...it When the clock is running up to 30 seconds fast or slow 2 1 2 1 6 5 3 4 3 4 3 4 H H 1 2 4 3 1Set the power switch to ON 3The minute and second digits of the time are reset to 00 00 when the RESET button is pressed in synchronization with the time signal etc They are reset to 00 00 when the button is pressed while the display shows 0 to 14 minutes They are carried up to 1 hour and set to 00 00 w...

Страница 14: ...and the minutes digits flash 3Press the SET or SET button to set the minutes digits 4Press the PAGE or PAGE button The current date appears and the date digits flash 6Upon completion of the settings set the PROGRAM switch to the OFF position 5Press the SET or SET button to set the date digits Simple date and time adjustment If the date and time are wrong follow the steps below to adjust them ...

Страница 15: ...layed automatically here The recording time mode is set here Fixed at OFF Setting the recording time mode and number of cameras 4Follow the steps below to set the recording time mode and number of cameras OUse the 4 3 2 and 1 SHIFT buttons to move the flashing part to the item whose setting is to be changed OPress the and SET buttons to change the setting 2 1 2 1 6 5 3 4 3 4 3 4 H H 1 2 7 3 5 4 6 ...

Страница 16: ...selected the recording time mode which was set using the TIME MODE button on the front panel is used for recording When a type from RT1 to RT7 is selected the recording time mode which was set by RT1 to RT7 is used for recording Notes OWhen RT7 is selected for the REC TYPE item setting frame recording will be forcibly performed regardless of the FIELD FRAME item setting ORecording is possible at 5...

Страница 17: ... 20 15 84 18 48 21 12 120H 0 61 1 640 3 28 6 56 9 84 13 12 16 40 19 68 22 96 26 24 180H 0 41 2 440 4 88 9 76 14 64 19 52 24 40 29 28 34 16 39 04 240H 0 31 3 240 6 48 12 96 19 44 25 92 32 40 38 88 45 36 51 84 360H 0 21 4 840 9 68 19 36 29 04 38 72 48 40 58 08 67 76 77 44 480H 0 16 6 440 12 88 25 76 38 64 51 52 64 40 77 28 90 16 103 04 960H 0 08 12 840 25 68 51 36 77 04 102 72 128 40 154 08 179 76 2...

Страница 18: ...o 4 Frame recording and field recording With frame recording the image of one camera is recorded in two fields and after leaving a fixed interval the image of the next camera is recorded With field recording the image of one camera is recorded in one field and after leaving half of the interval for frame recording the image of the next camera is recorded The gaps between the recorded images are sh...

Страница 19: ...tch between 16 cameras for recording Notes OWhen connecting line locked cameras select ON for the LL CAMERA item setting on the setting menu shown on the P7 VIDEO OUT SEQUENCE screen The images on the monitor will shake fractionally this is normal and not indicative of malfunctioning OThis unit does not contain a compensation circuit Install a compensator when the total length of the cables coaxia...

Страница 20: ... the frame switcher and set the frame switcher to the multi screen display 4 in 1 9 in 1 or 16 in 1 screens etc 3Connect the 16 camera outputs of the frame switcher to CAMERA IN connectors 1 through qV on the unit 4Connect the video output of the frame switcher to the EXT SW IN VIDEO OUT connector on the unit 5Connect the TV monitor to the VIDEO OUT connector on the unit 6Select EXT SW IN as the M...

Страница 21: ...amera setting columns CAMERA SELECT on the setting menu shown on the P3 RECORDING T MODE CAMERA screen RECORDING T MODE CAMERA P3 REC T C CAMERA SELECT TYPE MODE NO C1 C3 C5 C7 C9 C11 C13 C15 C2 C4 C6 C8 C10 C12 C14 C16 RT0 OFF 8 Y Y Y Y N N N N RT1 OFF 16 Y Y Y Y Y Y Y Y RT2 OFF 16 Y Y Y Y Y Y Y Y RT3 OFF 16 Y Y Y Y Y Y Y Y RT4 OFF 16 Y Y Y Y Y Y Y Y RT5 OFF 16 Y Y Y Y Y Y Y Y RT6 OFF 16 Y Y Y Y ...

Страница 22: ...n the still picture playback mode the tape is played back one frame at a time 4Press the PLAY button again to return to normal playback 5To stop the playback press the STOP button 2 1 2 1 6 5 3 4 3 4 3 4 H H 2 4 5 3 1 CAMERA 1 7 2 8 5 6 4 3 3Press the CAMERA buttons to set the playback camera Note Press the or tracking button if block shaped video noise appears during playback in the 3 hour mode T...

Страница 23: ...monitored by pressing the CAMERA button during playback When monitoring the pictures recorded by specific cameras on the four screens in the 4 in 1 screen display mode Switching between the cameras In the 1 screen display mode In the 4 in 1 screen display mode 2 2 6 3 1C01 C02 C03 C06 Four camera numbers are enclosed in squares on the camera number display of the display tube and the square corres...

Страница 24: ...ode is established Press the SEARCH button again if AS has lit 4Press the REW button if the counter reading is higher than 0 00 00 conversely press the FF button if it is lower a negative value than 0 00 00 5The counter reading approaches 0 00 00 and the tape is automatically set to the stop mode This function serves to rewind or fast forward the tape to the 0 00 00 counter position and then autom...

Страница 25: ...lowing steps to set the recording mode to be established when an alarm signal is input OUse the 4 and 3 SHIFT buttons to move the flashing part to the item whose setting is to be changed OPress the and SET buttons and change the setting Notes OAlarm recording and sensor recording are selected using the MODE item Select OFF as the MODE item setting if recording is not to be performed when an alarm ...

Страница 26: ... an alarm signal is input Once alarm recording is initiated ALARM flashes on the display tube When the STOP button is pressed the display is cleared and recording stops OWhen OFF or SENSOR is selected as the MODE setting on the menu screen shown on P4 ALARM SENSOR REC the alarm recording function does not work Note When alarm recording is completed the operation prior to the alarm signal input is ...

Страница 27: ...ALL screen and POWER LOSS MEMORY screen displays are cleared OWhen the RESET button is pressed while the ALARM RECALL screen is displayed the memory can be cleared but the POWER LOSS MEMORY screen is not cleared The following display appears when alarm recording was never performed or when the primary power supply was never shut off 1Set the POWER switch to ON 2Set the PROGRAM switch to the MENU p...

Страница 28: ...e 2Press the COUNTER button to establish the counter display mode 4While the unit is in the stop fast forward or rewind mode press the REW or FF button The first alarm recording section is searched in the direction corresponding to the button pressed and the unit is set to the still picture playback mode 3Press the SEARCH button Check that AS lights on the display tube and that the alarm search mo...

Страница 29: ...m whose setting is to be changed OPress the and SET buttons to set the figure 5Press the PLAY button or REV PLAY button The recording section with the designated date and time is now searched Notes OThe tape comes to a stop at its end or start if no recording section with the date and time was found as a result of the search OWhen the tape is stopped during recording it will stop at the border bet...

Страница 30: ...e ones that can be set 4Take the following steps to set the timer recording mode OUse the 4 3 2 and 1 SHIFT buttons to move the flashing part to the item whose setting is to be changed OPress the and SET buttons and change the setting PROGRAM TIMER P8 TIMER START END REC TYPE PGM1 0 00 0 00 RT0 OFF 16 PGM2 0 00 0 00 RT0 OFF 16 PGM3 0 00 0 00 RT0 OFF 16 PGM4 0 00 0 00 RT0 OFF 16 PGM5 0 00 0 00 RT0 ...

Страница 31: ...ER MODE button and turn off the INT lamp on the display tube 5Use the 4 3 2 and 1 SHIFT buttons to move the flashing part to the day of the week SUN through SAT item on the INTERNAL WEEKLY TIMER screen 6Press the and SET buttons and set the programmes PGM1 PGM8 registered on the PROGRAM TIMER screen for the days of the week concerned OTwo programmes each one on the top line and the other on the bo...

Страница 32: ...free set timer overlaps the time zone programmed using the weekly timer the free set timer takes precedence 2 1 2 1 6 5 3 4 3 4 3 4 H H INT 4 2 5 6 3 INT lamp FREE SET TIMER P9 MONTH DAY SET 1 2 3 4 5 6 7 8 9 10 11 12 1Finish setting the weekly timer and daily timer 2Set the PROGRAM switch to the MENU position The setting menu screen now appears on the TV monitor 3Press the PAGE or PAGE button to ...

Страница 33: ...ogrammes Actual recording operation 0 00 PGM5 72H PGM5 72H 24H 72H 72H DLY PGM8 24H 8 00 9 00 10 00 12 00 17 00 23 00 0 00 6 00 Recording on Friday Friday programmes Actual recording operation PROGRAM TIMER P8 TIMER START END REC TYPE PGM1 9 00 17 00 RT1 18H 04 PGM2 9 00 9 00 RT3 48H 02 PGM3 10 00 12 00 RT2 9H 06 PGM4 0 00 0 00 RT0 OFF 16 PGM5 23 00 6 00 RT4 72H 04 PGM6 10 00 11 00 RT0 OFF 16 PGM7...

Страница 34: ...T SWITCHER MODE VIDEO OUT 5Use the 4 and 3 SHIFT buttons to move the flashing part to the EXT TIMER IN item and press the and SET buttons to select OFF as the item s setting 6Upon completion of the settings set the PROGRAM switch to the OFF position The setting menu screen is cleared from the TV monitor and the normal mode is restored 7Press the TIMER MODE button on the front panel and set it to t...

Страница 35: ...off the EXT lamp on the display tube 8Set the external timer Recording will start automatically when the unit s power is turned on by the control signal sent from the external timer When using an external timer connected to the terminal section on the unit s rear panel control exercised at the EXT TIMER connector 1Connect the external timer to the terminal section on the unit s rear panel and turn...

Страница 36: ...ut to ALARM IN 2 alarm recording or sensor recording is performed External interface Firmly twist or solder here When connecting or disconnecting the cord press this part down using a regular screwdriver Solid wire 0 4 to 1 2 mm diameter Twisted wire 0 3 to 1 25 mm The diameter of the strands must be 0 18 mm or more OFailure to twist the end of the cord firmly can cause short circuiting Alarm reco...

Страница 37: ...g is started by the signal from the external timer External timer 1 2 GND IN REC IN GND TIME ADJ IN TAPE END OUT RESET ALARM EXT TIMER OUT IN OUT WARNING REC OUT Auto OFF output connections and recording output connections The auto OFF output and recording output connections are the same Select between them using ERROR WARN REC OUT on the menu screen shown on P7 TERMINAL OUTPUT SELECT Auto OFF out...

Страница 38: ...2 GND IN REC IN GND TIME ADJ IN TAPE END OUT RESET ALARM EXT TIMER OUT IN OUT WARNING REC OUT External timer input connections A second time lapse recorder unit can be used as an external timer or the external switch for setting the time OUsing the EXT TIMER OUT item on the menu screen shown on P7 TERMINAL OUTPUT SELECT set the start time START and end time END at which the control signals are to ...

Страница 39: ... OPEN ALARM OUT Ground output The output format is set using the ALARM SENSOR OUT item on the menu screen shown on P7 TERMINAL OUTPUT SELECT V OH 11 0 V to 13 0 V V OL 0 0 V to 0 6 V 4 7 kΩ pull up resistor 12V output V OH V OL Terminal Remarks Signal level TIME ADJ IN Ground input V IH 4 0 V to 5 0 V V IL 0 0 V to 0 6 V T S 100 ms T V IH V IL TAPE END OUT Ground output When REPEAT has been select...

Страница 40: ...items are ones that can be set 5Press the and SET buttons to change the setting 6Upon completion of the settings set the PROGRAM switch to the OFF position The setting menu screen is cleared from the TV monitor and the normal mode is restored 2 1 2 1 6 5 3 4 3 4 3 4 H H POWER TRACKING TIMER MODE STILL LOCK REV PLAY PLAY STOP SHIFT SHIFT PAGE PAUSE STILL TIME MODE CAMERA SEQUENCE COUNTER SEARCH SET...

Страница 41: ...ting the date and time 01 1 2000 SAT 0 00 00 REC LOCK screen Menu item Description of function MODE For setting the operation lock mode during recording ON During recording all the buttons and switches with the sole exception of the REC REVIEW button are made non operational OFF Even during recording all the buttons and switches can be operated The underlining indicates the factory mode setting HO...

Страница 42: ...sed to display the time DATE For setting whether to display the date on the monitor screen ON The date is displayed on the monitor screen OFF The date is not displayed on the monitor screen TIME For setting whether to display the time on the monitor screen ON The time is displayed on the monitor screen OFF The time is not displayed on the monitor screen T MODE For setting whether to display the re...

Страница 43: ...rd week 4TH 4th week LST Last week SUN SAT Factory mode setting LST SUN MONTH For setting the month at which summer time is due to start 1 12 Factory mode setting 3 TIME For setting the time at which summer time is due to start The minutes cannot be set 1 00 22 00 Factory mode setting 2 00 END For setting the day and time when summer time ends WEEK For setting the week and day of the week when sum...

Страница 44: ...3H 9H 12H 18H 24H 48H 72H 96H 120H 180H 240H 360H 480H 960H Note When OFF is selected as the recording time mode the mode will accord with the setting of the TIME MODE button on the sub panel C NO The number of cameras set for the CAMERA SELECT item appears in this column CAMERA SELECT For selecting Y yes or N no to determine whether or not a particular camera number is to be used Y The camera wil...

Страница 45: ...Recording for 3 minutes 5 0min Recording for 5 minutes 10min Recording for 10 minutes CONTINUE Recording continues until the tape end MANUAL Recording is performed only while an alarm signal is input BUZZER For setting whether the buzzer is to sound during alarm recording or sensor recording ON The buzzer sounds It stops when any one of the function buttons is pressed OFF The buzzer does not sound...

Страница 46: ...e tape end position is reached after alarm recording or sensor recording has been performed STOP The unit is set to the stop mode at the tape end position The tape is ejected when EJECT has been selected as the TAPE END MODE setting CONTINUE The unit continues with the operation selected as the TAPE END MODE setting regardless of whether an alarm signal is input EJECT OPERATION For setting the EJE...

Страница 47: ...zer is to sound when the tape end position is about to be reached The buzzer is stopped when any button is pressed ON The buzzer sounds at the position which was set for the LEVEL item OFF The buzzer does not sound The underlining indicates the factory mode setting REC REVIEW screen Menu item Description of function AUTO For setting automatic REC REVIEW This function plays back the recording after...

Страница 48: ...s to sound when the unit is kept in the stop mode for a prolonged period of time The buzzer is stopped when any button is pressed OFF The buzzer does not sound 5min The buzzer sound when the unit is kept in the stop mode for 5 minutes 10min The buzzer sound when the unit is kept in the stop mode for 10 minutes 20min The buzzer sound when the unit is kept in the stop mode for 20 minutes 30min The b...

Страница 49: ...while it is between 0 and 15 minutes when signals are input The hour is carried up and the minutes are set to 00 while the setting is between 45 and 59 minutes when signals are input The underlining indicates the factory mode setting TERMINAL OUTPUT SELECT screen Menu item Description of function ALARM SENSOR OUT For setting how the control signals are to be output to the component connected to AL...

Страница 50: ...e processing of the black burst signal when switching the video signals which are output from the video signal output connector ON The black burst signal is instantly output when the video signal is switched OFF The black burst signal is not output when the video signal is switched LL CAMERA For setting the synchronization system of the connected cameras ON Line lock type of cameras OFF Internal s...

Страница 51: ...GM1 PGM8 START For setting the recording start time for recording to be performed using the unit s internal timer 0 00 23 59 END For setting the recording end time for recording to be performed using the unit s internal timer 0 00 23 59 REC TYPE For setting the recording type for recording to be performed using the unit s internal timer RT0 RT7 The underlining indicates the factory mode setting IN...

Страница 52: ...Y TIMER screen are set for the desired dates 12 days worth Menu item Description of function MONTH For setting the month of the desired date 1 12 Note Set if the month is not going to be registered appears for MONTH DAY and SET SET For selecting the programme which was set using the weekly timer SUN SAT P_OFF POWER OFF mode throughout the day DAY For setting the day of the desired date 1 31 The un...

Страница 53: ...it 8bit STOP BIT For setting the stop bit STOP 1 STOP 2 PARITY For setting the parity ODD EVEN NON BAUD RATE For setting the communication speed bps 1200 2400 4800 9600 19200 The underlining indicates the factory mode setting Setting menus USER ID REC screen Menu item Description of function The user ID max 8 numerals is set on this screen By setting the user ID here it will be recorded onto the r...

Страница 54: ...pe has not been inserted correctly or it has not been ejected 2 to 5 seconds or so after the EJECT button has been pressed The power is automatically turned off E 3 This appears when the loading or unloading operation is not completed even after 2 to 5 seconds or so have elapsed The power is automatically turned off E 4 This appears when the rotational speed of the cylinder motor is abnormally low...

Страница 55: ...number display mode and press the RESET button Is the counter display in the camera number display mode Set the PROGRAM switch to OFF to release the unit s operation mode from recording or pause Then set the PROGRAM switch back to MENU and proceed with menu operation Setting menu cannot be changed Is recording or pause temporary stop now in effect as the unit s operation mode Menu operations canno...

Страница 56: ...as been selected as the BUZZER item setting on the setting menu P6 TAPE REMAIN screen and the approach of the tape end position has been detected The buzzer will stop sounding when any function button is pressed ALARM SENSOR REC ON has been selected as the BUZZER item setting on the setting menu P4 ALARM SENSOR REC screen and the fact that alarm recording or sensor recording was being performed ha...

Страница 57: ...or when the unit is moved to a room immediately after the heater was turned on OWhen the unit is suddenly moved from an air conditioned location to a hot or very humid location After the unit is moved to such a location leave the unit or tapes standing for about 10 minutes before turning on the power If condensation has formed on the unit the error message d lights on the counter display and the c...

Страница 58: ... NORMAL Better than 50 dB B W COLOUR Camera inputs BNC a16 1 0 V p p 75 Ω loop through 75 Ω ON OFF unbalanced S VIDEO OUT 4P Luminance signal 1 0 V p p Chrominance signal 0 300 V p p burst level 75 Ω unbalanced External switcher input video output BNC 1 0 V p p 75 Ω unbalanced VIDEO OUT BNC 1 0 V p p 75 Ω unbalanced AUDIO S N ratio 42 dB 3 hour mode A weighted Frequency response 70 Hz to 7 kHz 3 h...

Страница 59: ......

Страница 60: ...Matsushita Electric Industrial Co Ltd Central P O Box 288 Osaka 530 8691 Japan F1000W Printed in Japan VQT8823 E ...

Отзывы: