background image

6

Palmgren Operating Manual & Parts List

81110

OPERATION (CONTINUED)

Replace abrasives when they become loaded (glazed) or frayed.

When grinding metal, move workpiece across  abrasive to 
prevent heat build-up.

Never attempt wet sanding. If workpiece becomes too hot to
handle, cool it in water.

POSITION BELT TABLE

Refer to Figures 8 and 11.

The belt table (Ref. No. 54) can be tilted from 0° (at right angle to
the table) to 45°. To adjust belt table position:

Unlock the handle (Ref. No. 58) on the right side of table.

Set the belt table to any angle between 0° and 45° using the
scale.

Lock the handle to secure belt table position.

WORK STOP

Refer to Figure 11.

The work stop (Ref. No. 23) can be used instead of the belt table.

Remove belt table from the belt housing (Ref. No. 34) by loos-
ening and removing handle (Ref. No. 58).

Mount workstop using bolt (Ref. No. 22) and washer (Ref. No. 21)
which are located on belt housing.

ADJUSTING BELT HOUSING

Refer to Figures 9, 11 and 12.

The belt housing (Figure 11, Ref. No. 34) can be positioned at a full
vertical position, a full horizontal position, or at any angle in
between which is convenient for the sanding operation.

To adjust belt housing position:

Loosen and remove four knobs (Figure 12, Ref. Nos. 18 and 21).

Remove dust hoods (Figure 12, Ref. Nos. 19 and 20).

Loosen hex nuts (Figure 11, Ref. No. 8).

Move to the rear of the sander.

Gently push belt housing to move to the desired angle.

A positive stop bolt (Figure 12, Ref. No. 26) is provided to stop
the belt housing at the full horizontal position.

Tighten both hex nuts (Figure 11, Ref. No. 8) to secure belt
housing position.

Replace dust hoods using the knobs.

HORIZONTAL BELT SANDING

Refer to Figures 9 and 11.

Adjust the belt housing to full horizontal position as described
in the above section, “Adjusting Belt Housing”.

Remove the belt table by removing handle(Ref. No. 58).

Install work stop as described in “Work Stop”.

Idler drum (Ref. No. 44) can be used as a contact drum to sand
curved surfaces. (Removing belt guard [Ref. No. 50] will be
required.)

ABRASIVE BELT FINISHING

Finishing flat surfaces: Hold workpiece firmly with both hands;
keep fingers away from abrasive belt.

Use work stop. Work stop is used to position and secure work
being sanded. Keep end butted against work stop and move
work evenly across abrasive belt. Use extra caution when finish-
ing very thin pieces.

Finishing long pieces: remove work stop. Apply only enough
pressure to allow abrasive belt to remove material.

Finishing curved edges: Finish outside curves on flat portion of
abrasive belt. Finish inside curves on idler drum portion of
abrasive belt.

Finishing end grain: It is more convenient to finish ends of long
workpieces with the abrasive belt in a vertical position.

Move work evenly across the belt.

For accuracy use miter gauge.

Adjust belt table angle for beveled work.

USING MITER GAUGE

Refer to Figure 12.

The miter gauge is used on either the disc or belt table. Use the
miter gauge for securing the work and holding the proper
angle while sanding.

Adjust angle by repositioning the miter gauge (Ref. No. 5).
Loosen the knob (Ref. No. 2) to reposition miter gauge.

Tighten the knob to secure miter gauge position.

Miter gauge assembly has a positive stop set-up for 90° and 45°
on either side.

To use the positive stop, loosen the knob, retract the indexing
pin (Ref. No. 16), turn the miter gauge slightly, slide in indexing
pin and turn the miter gauge until the edge of the screw (Ref.
No. 12) is stopped by the indexing pin.

Check accuracy of miter gauge scale (Ref. No. 9).

Use a combination square to adjust miter gauge square to disc.
Scale should be at zero. Loosen screw (Ref. No. 7) and reposition
scale if necessary.

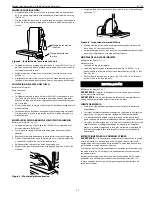
Figure 8 - Attach Belt Table

Table Lock Handle

Figure 9 - Horizontal Belt Sanding

Содержание 81110

Страница 1: ...operating manual parts list 81110 6 x 10 BELT DISC SANDER Read carefully and follow all safety rules and operating instructions before first use of this product 36137 00 0612...

Страница 2: ...the instructions and precautions before operating tool CAUTION Always follow proper operating procedures as defined in this manual even if you are familiar with use of this or similar tools Remember...

Страница 3: ...d on location Sander needs to be set on a flat level surface Make sure there is ample room for moving the workpiece through the entire cut There must be enough room that nei ther the operator nor the...

Страница 4: ...e unit on voltages which are not within the range may cause overheating and motor burnout Heavy loads require that voltage at motor terminals be no less than the voltage specified on nameplate Power s...

Страница 5: ...to prevent unautho rized use of the tool To replace the key press key into the slot on the locking rocker To use the sander witha 240V power supply have a qualified electrician rewire motor and attach...

Страница 6: ...usting Belt Housing Remove the belt table by removing handle Ref No 58 Install work stop as described in Work Stop Idler drum Ref No 44 can be used as a contact drum to sand curved surfaces Removing b...

Страница 7: ...ISHING Abrasive disc sanding is well suited for finishing small flat surfaces and convex edges Move workpiece across down side left of abrasive disc Abrasive disc moves fastest and removes more materi...

Страница 8: ...metal Sparks could ignite debris and cause a fire Be certain motor is kept clean and is frequently vacuumed free of dust Use soap and water to clean painted parts rubber parts and plastic guards LUBR...

Страница 9: ...circuit in motor or loose connections 2 Low voltage 3 Incorrect fuses or circuit breakers in power line 4 Motor overloaded Applying too much pressure to workpiece Not tracking properly CORRECTIVE ACT...

Страница 10: ...ion for Sander 30 31 55 54 53 52 51 50 49 22 9 21 58 57 56 23 21 22 21 18 19 20 17 16 15 14 13 12 29 6 32 33 34 6 6 32 6 48 28 27 26 25 24 11 10 9 8 5 6 7 36 45 46 6 7 44 43 7 6 45 37 38 39 40 41 42 4...

Страница 11: ...36010 00 1 32 Cam 03063 00 2 33 Knob 03059 00 2 34 Belt Housing 03061 00 1 35 Adjusting Nut 03067 00 2 36 5 16 Flat Washer R 3 37 Spring 03068 00 2 38 1 4 20 x 1 1 4 Set Screw 2 39 1 4 20 Hex Nut 2 4...

Страница 12: ...e 12 Replacement Parts Illustration for Cabinet 2 1 34 41 23 33 32 22 29 31 35 37 36 38 39 25 55 54 30 18 18 21 19 20 25 22 23 24 26 27 28 29 11 10 12 13 14 15 16 17 3 4 5 6 7 8 9 47 46 52 46 46 23 47...

Страница 13: ...00 1 25 10 24 x 3 8 Socket Head Bolt 8 26 1 2 13 x 6 Hex Head Bolt 1 27 1 2 13 Hex Nut 1 28 5 16 18 x 3 Socket Head Bolt 4 29 5 16 Flat Washer W 9 30 Base 36138 00 1 31 Disk Cover Bracket 03083 00 1...

Страница 14: ...Metal forming equipment 2 years Accessories 1 year The obligation of Palmgren is limited solely to the repair or replacement at our option at its factory or authorized repair agent of any part that sh...

Страница 15: ...e la mesa de la correa 6 x 101 8 Inclinaci n de la mesa de la correa 20 a 45 Di metro del canal del polvo de la correa 4 Velocidad de la correa 1940 PPM Di metro del disco 10 Dimensiones de la mesa de...

Страница 16: ...herramienta aplicaci n y limitaciones espec ficas Maneje la pieza de trabajo correctamente Prot ja las manos de posi bles lesiones Desconecte la m quina si se atasca La cortadora se atasca cuando pen...

Страница 17: ...co Use un guante de protecci n y gire el disco manualmente para verificar que ste gire libremente y sin ninguna interferencia MONTAJE DE LA GUIA DE INGLETES Refi rase a las Figuras 11 y 12 Parte neces...

Страница 18: ...l voltaje adecuado Use la tabla para determinar el tama o m nimo del cord n de exten si n A W G Use cordones de extensi n de cables con enchufes del tipo de conex i n a tierra de tres puntas y recept...

Страница 19: ...sa de la correa TOPE FUNCIONAL Refi rase a la Figura 11 El tope funcional Ref No 23 se puede utilizar en lugar de la mesa de la correa Remueva la mesa de la correa de la caja de la correa Ref No 34 Pa...

Страница 20: ...y remueva cuatro manilla Ref No 49 en la parte posterior de la lijadora Remueva la cubierta de la correa Ref No 48 Remueva manilla y puntal Ref Nos 2 y 3 Desmonte la correa vieja del tambor de impuls...

Страница 21: ...damente Cierre la puerta del gabinete y f jela con la manilla Monte el disco de aluminio y apriete el tornillo sin cabeza para fijarlo Monte la puerta de recolecci n de polvo y la placa de cubierta de...

Страница 22: ...4 El motor tiene carga excesiva Se est aplicando demasiada presi n en la pieza de trabajo El alineamiento no est correcto 1 Revise la energ a para ver si tiene el voltaje apropiado 2 Inspeccione toda...

Страница 23: ...de soporte 2 a os Prensas de husillo 2 a os Equipos de formado met lico 2 a os Accesorios 1 a o La obligaci n de Palmgren est limitada nicamente a la reparaci n o el reemplazo a nuestra discreci n en...

Страница 24: ...NOTES NOTAS...

Отзывы: