Ovention Double MiLO2-16 Скачать руководство пользователя страница 9

Form No. OVMILOM-0718

9

OPERATION

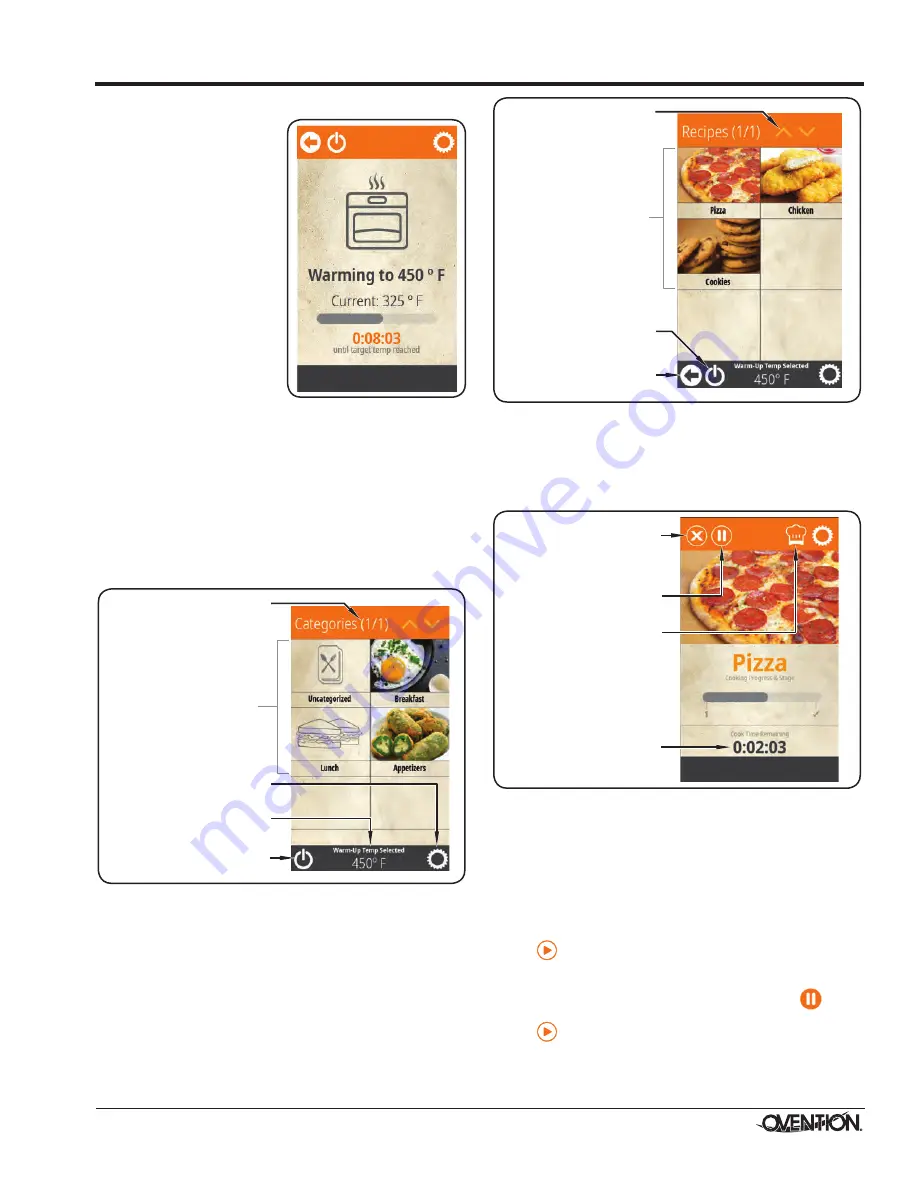
 6. Touch the desired setpoint temperature on the 

touchscreen. 


• The IR elements, air 

blowers, and cooling 
fans will start up. Allow 
20–30 minutes for the 
oven to reach setpoint 
temperature.


•  The touchscreen shows 

the selected setpoint 
temperature, the current 
chamber temperature, 
and the time remaining 
for warmup.

When the oven reaches 
setpoint temperature, the 
Categories screen appears on 
the touchscreen. The oven is 
now ready for cooking.

Cooking

Use the following procedures to cook food product in the 
Double MiLO oven. The procedures are the same for each 
oven chamber/touchscreen combination, and they operate 
independently.

NOTE: If the oven door is left open for more than 15 seconds 

during a cooking sequence, a “Close Door” pop up will 
appear on the touchscreen.

  1. Make sure the oven chamber has reached setpoint 

temperature. The Categories screen will appear on the 
touchscreen.

Touch to shut

down oven.

Touch to access

Settings screen.

Touch desired Category

to access Recipes.

Indicates oven

setpoint temperature.

Indicates number of

Category screens

available.

Categories Screen

NOTE: The Categories and Recipes shown are for example 

only. Depending on the configuration of the oven, these 
screens will show either sample items or customer-
specific, preloaded items.

  2. Open the oven door, and place the pan/tray with food 

product into the oven chamber. 

CAUTION! BURN 

HAZARD—Always use a paddle, pan gripper, or other 
utensil to load and unload food product.

  3. Touch the desired category on the touchscreen. The 

Recipes screen will appear.

Touch to shut

down oven.

Touch to return to

previous screen.

Use arrows to scroll

through multiple

Recipes screens.

Touch desired Recipe

to start cooking

sequence.

Recipes Screen

  4.  Touch the desired recipe on the touchscreen. 


• The oven chamber illuminates and the cooking 

sequence begins.


•  The touchscreen changes to the Cooking screen and 

shows the remaining cook time for the selected recipe.

Touch to pause

 the cooking sequence.

Touch to show

settings for active

menu item.

Touch to cancel cooking

sequence. Touchscreen

returns to the Recipes

screen.

Indicates remaining

cook time.

Cooking Screen


•  If the selected recipe contains any Cook Events, the 

Cooking screen will change to show the name of the 
recipe cooking as well as a countdown to the Cook 
Event. When the Cook Event occurs, the cooking 
sequence pauses and the Cook Event screen will appear 
on the touchscreen. Open the oven door, remove the 
pan/tray with food product, complete the action on the 
food product, place the pan/tray with food product back 
into the oven chamber, close the oven door, and touch

on the Cook Event screen to continue the cooking 

sequence. See “Programming a Cook Event” in this 
section for a detailed description of Cook Events.


• To pause a cooking sequence, touch

. The 

touchscreen will show “COOKING PAUSED”. Touch

to resume the cooking sequence.


•  When the cooking sequence is finished, the touchscreen 

shows “[Recipe] DONE” and an audible alert sounds.

continued...

Содержание Double MiLO2-16

Страница 1: ...el seguimiento de las instrucciones contenidas en este manual puede resultar en un serio lesi n o muerte Este manual contiene importante informaci n sobre seguridad concerniente al mantenimiento uso...

Страница 2: ...ructions appearing in this manual be read prior to installation or operation of the oven Important Owner Information 2 Introduction 2 Important Safety Information 3 Model Description 4 Model Designati...

Страница 3: ...e correct voltage size and plug configuration If plug and receptacle do not match contact a qualified electrician to determine and install proper voltage and size electrical receptacle Unit must be gr...

Страница 4: ...screen a GFCI switch and a Control Reset switch For each touchscreen a dedicated USB port allows the uploading of pre programmed recipes installation of software updates and the opportunity for servic...

Страница 5: ...e of the unit See the label for the serial number and verification of unit electrical information Plug Configurations Units are equipped with an electrical cord and plug appropriate for the electrical...

Страница 6: ...or Open Depth F MiLO2 16 29 735 mm 32 5 8 828 mm 34 15 16 887 mm 27 1 2 698 mm 24 1 8 612 mm 41 5 8 1058 mm SPECIFICATIONS Dimensions Specification Label on right side of unit A B C D E F Front View S...

Страница 7: ...e two cooking racks from packaging 5 Inspect the oven for freight damage such as dents in the housing or inside the oven chambers If damaged inform the freight company immediately CAUTION DO NOT lift...

Страница 8: ...es Recipes procedure in this section for instructions on creating recipes and categories Startup Use the following procedure to start up each oven chamber 1 Make sure the unit is plugged into a proper...

Страница 9: ...AZARD Always use a paddle pan gripper or other utensil to load and unload food product 3 Touch the desired category on the touchscreen The Recipes screen will appear Touch to shut down oven Touch to r...

Страница 10: ...fans will operate until the oven chamber temperature drops below 140 F 60 C Upper Chamber GFCI Switch Lower Chamber GFCI Switch Control Reset Switches Off CAUTION Do not turn off GFCI switches or unpl...

Страница 11: ...he arrows to scroll through the desired tab b Touch the desired image to select then touch to save and return to the Now Editing screen 4 Touch the category name to edit a Use the keypad that appears...

Страница 12: ...dicates the vents are open for that stage 6 Touch to save the recipe settings and return to the Edit Recipes screen 7 When all recipe editing is complete touch twice to return to the Categories screen...

Страница 13: ...e desired setpoint temperature To edit an existing setpoint a Touch the desired setpoint to edit The setpoint will be highlighted b Touch the name to edit the setpoint name using the keypad that appea...

Страница 14: ...dure requires access to password protected screens and should be performed by authorized personnel only NOTE USB drive must have a capacity of 64 GB or less 1 Slide the cover away from the USB port ne...

Страница 15: ...an the unit daily CAUTION Do not turn off GFCI switches or unplug unit immediately after use Internal fans must cool oven to avoid damage to electrical components NOTICE Use non abrasive cleaners and...

Страница 16: ...t each end of the drip tray with the slots directly below each side of the oven door c Lower the tabs on the drip tray into the slots on the oven 12 Reinstall the cooking racks See INSTALLATION sectio...

Страница 17: ...clean using a damp non abrasive cloth and allow to air dry 6 Reinstall the upper and lower crumb trays into each oven chamber To install the crumb trays in each oven chamber a Open the oven door b Ins...

Страница 18: ...f position Move GFCI switch es to the I On position Crumb tray s installed incorrectly or missing Reinstall crumb tray s Refer to MAINTENANCE section for installation procedure IR Element pack or air...

Страница 19: ...ven OVNTN PDL Metal Paddle M1718 PG Round Panini Grill Pan OVNTN PS11X16 Pizza Screen 11 x 16 279 x 406 mm OVNTN PS12 Round Pizza Screen 12 305 mm OVNTN PS16 Round Pizza Screen 16 406 mm Metal Paddle...

Страница 20: ...ning products Product misuse tampering or misapplication improper installation lack of or improper cleaning or application of improper voltage 2 LIMITATION OF REMEDIES AND DAMAGES Ovention s liability...

Отзывы: