background image

41

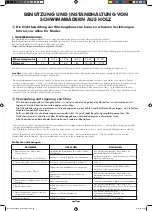
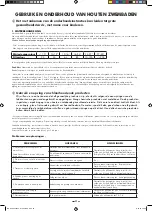
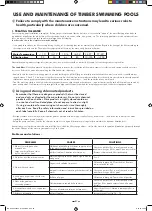
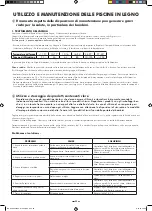
USE AND MAINTENANCE OF TIMBER SWIMMING POOLS

i


 Failure to comply with the maintenance instructions may lead to serious risks to 
health, particularly where children are concerned.

1. TREATING THE WATER 

Your swimming pool installation is complete!  Before you get into the pool for the first time, it is essential to “prepare” the water. Bathing often leads to 
a good deal of pollution caused by things like vegetation, earth, dust, sweat, saliva, hair, grease, etc. The swimming pool water must be protected from 
these substances in order to avoid various micro-organisms developing.   

In order to do this, a few simple rules may be applied:

-  It is a good idea to have the filter running during the day, as it is bathing that causes most of the pollution. Regulate the timing of the filter according to 

the temperature of the water. The higher the temperature of the water, the more easily bacteria will grow. 

Water Temperature

< 10°

10-12°

12-16°

16-24°

24-27°

27-30°

Filtration time

2h

4h

6h

8h

10-12h

-> 20h

Generally speaking, whatever type of system you have, any impurities should be removed if the pool is cleaned regularly using the filter.


The sand filter

: When the amount of impurities in the sand increases, the circulation of the water becomes less efficient and consequently the pressure 

increases. Refer to the notes on maintaining the filtration unit for cleaning it. 

-  Analyse the water in your swimming pool: it is a worth checking the pH level (degree of acidity or alkalinity of the water) every week. It should always 

range between 7.2 and 7.6. An incorrect pH level may result in the water treatment products working less efficiently, may accelerate the development of 
chloramines (causing unpleasant odours and irritation of the mucous membranes…) and the corrosion of any metal parts.. 

-  Treat the water regularly: a weekly disinfectant treatment (bromine, chlorine and active oxygen…) against bacteria will avoid all the problems caused by 

poor quality water. One treatment every fortnight with an algaecide effectively combats the initial appearance and further development of algae.

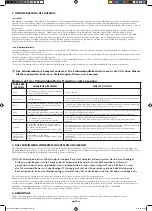
i


Using and storing chlorinated products


Remember that these are dangerous products that must be stored 

and used only as directed by the manufacturers. Do not mix chemical 

products with each other. Store products in tightly closed containers 

in a cool and well ventilated place; do not expose to direct sunlight. 

If using a container for measuring out chemicals, rinse thoroughly 

after each use. Read the safety information and instructions provided on 

each label carefully. Keep all chemicals out of reach of children..

-  Everyday remove as much dirty matter from the pool as possible with a fishing net (fallen leaves, dead insects…) and clean the surface of the water 

regularly to remove greasy deposits.

-  Empty the pump container. Just like the skimmer container, it is a good idea to empty it regularly to maintain the optimum filtration level.

Annual treatment: In order to have clean water all the time, clean the filter, change about ⅓  to ½ of the water in the pool and look after it properly through 
the winter. Change all the water in your pool every 3 to 4 years.

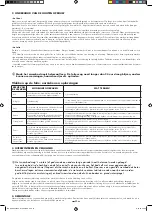
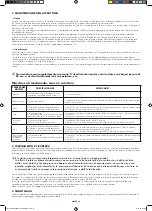
Problems and solutions :

PROBLEMS

CAUSES

SOLUTIONS

1. Water clear with greenish or   

    brownish tint. 

    Large number of brown stains    

    on the sides of the pool. 

Oxidation of metallic salts (iron or copper) present 

in the water used to fill the pool

Check the pH level. Put in a calcium and metal 

stabiliser when you fill the pool. Clean out the filter. 

Remove sediment and filter continuously.

pH level too low. Corrosion of metal parts.

2. Water has a yellow or brownish tint

Water being used to fill the pool is high in iron or 

manganese

See  1.

3. Water milky and cloudy

Organic and colloidal impurities

Chlorinate thoroughly. Clean the filter. Remove 

sediment and filter well.

Inorganic substancesincreasing the hardness of the 

water

Check the pH level. Put in a calcium and metal 

stabiliser when you fill the pool.

4.  Slimy green deposits on the sides of 

the pool

Build up of algae

Chlorinate thoroughly. Treat with an algaecide

5. Sides of the pool have an 

    uneven appearance

Calcium deposits caused by hard water

Check the pH level. Put in a calcium and metal 

stabiliser. If the pool is empty clean with a pool 

descaler.

6.  Irritation to skin and eyes, unpleasant 

odour

Presence of combined chlorine (chloramine) 

Adjust the pH level. Chlorinate thoroughly. Put in 

fresh water

7

.

 Evidence of corrosion

pH level too low

Increase the pH level to 7.0 – 7.4

NOTICE 500x800 - H140-2018/1.indd   42

11.04.18   09:59

Содержание Ubbink Linea 500x800

Страница 1: ... outsideliving com Export Outside Living Industries Nederland B V Postbus 15 NL 1800 AA Alkmaar Berenkoog 87 NL 1822 BN Alkmaar Tel Sales 0031 0 72 5 671 661 Tel 0031 0 72 5 671 671 Fax 0031 0 72 5 671 673 E Mail sales outsideliving com F Outside Living Industries France SARL 17 Rue de la Baignerie F 59000 Lille Tel adv 0033 0 3 20 17 93 93 Fax adv 0033 0 3 20 17 93 94 E Mail adv outsideliving com...

Страница 2: ...tage Montageanleitung Opbouwinstructie Note of assembly Prospecto de montaje Avviso di montaggio 500x800 H140 cm PISCINES ZWEMBADEN POOLS SWIMMING POOLS PISCINAS PISCINE NOTICE 500x800 H140 2018 1 indd 2 11 04 18 09 58 ...

Страница 3: ...treten Ihres Schwimmbades zu verhindern Bitte lassen Sie im unbeaufsichtigten Becken oder in der unmittelbaren Nähe kein Spielzeug zurück Halten Sie das Wasser bitte dauerhaft klar und rein Bitte lagern Sie die Produkte für die Behandlung des Wassers außerhalb der Reichweite von Kindern Bitte verwenden Sie im Schwimmbad keine schneidenden oder spitzen Gegenstände dies kann zu Beschädigungen der Sc...

Страница 4: ...running or boisterous games around the edges of the pool do not allow any child who is not a strong swimmer and is unaccompanied to get into the pool without a life jacket on it is a good idea to remove the outside wooden ladder each time you have finished using your pool so that there is no unsupervised access do not leave any toys near or in the pool if it is not being supervised keep the water ...

Страница 5: ...ioni di salvataggio e soprattutto quelle specifiche per i bambini vietate i tuffi o i salti in presenza di bambini piccoli vietate la corsa e i giochi vivaci ai bordi della piscina non autorizzate l accesso alla piscina senza giubbotto di salvataggio ad un bambino che non sappia nuotare bene e che non sia accompagnato in acqua pensate di togliere la scala di legno esterna dopo ogni utilizzo al fin...

Страница 6: ...oration due à un branchement défectueux le matériel démonté ou réparé par un tiers la casse des pièces socle de pompe couvercle de pré filtre embout cannelé l utilisation de la pompe à sec ou son immersion inondation du local technique par exemple La garantie échoit si le câble électrique et ou la fiche sont remplacés déposés ou endommagés 2 Liner Garantie 2 ans dans les conditions d un usage norm...

Страница 7: ...en Anschlusses von Dritten ausgebaute oder reparierte Ausrüstung Bruch von Teilen Pumpensockel Vorfilterabdeckung Schlauchanschluss trockene Verwendung der Pumpe Die Garantie erlischt wenn das Stromkabel und oder die Steckdose ersetzt ausgebaut oder beschädigt werden 2 Schwimmbadfolie 2 Jahre Garantie unter normalen Nutzungsbedingungen Nicht garantiert sind Einrisse Löcher Risse Flecken Behandlung...

Страница 8: ...of gerepareerd het stukgaan van onderdelen voetstuk van pomp deksel van voorfilter geribbeld mondstuk het laten functioneren van de pomp zonder water De garantie vervalt als de elektrische kabel en of stekker zijn vervangen verwijderd of beschadigd 2 Liner 2 jaar garantie bij normaal gebruik Niet onder de garantie vallen winkelhaken gaten scheuren vlekken behandelingsproducten direct in het water ...

Страница 9: ... parts pump stand pre filter cover grooved end fitting using the pump when it is empty or immersing the pump e g if the pump house is flooded The warranty is not valid if the electric cable and or the plug are replaced removed or damaged 2 Liner 2 year warranty under normal conditions of use The following are not covered by the warranty rips holes tears stains treatment products put straight into ...

Страница 10: ...de las piezas base de la bomba cubierta de prefiltro racor acanalado el uso de la bomba en seco o su inmersión inundación del local técnico por ejemplo La garantía expira si el cable de alimentación o el enchufe se han sustituido desmontado o dañado 2 Revestimiento 2 años de garantía en condiciones normales de uso No están garantizados los desgarrones agujeros desgarraduras manchas productos de tr...

Страница 11: ... convalidare la garanzia La nostra garanzia si limita alla sostituzione dei pezzi difettosi Non implica in nessun caso la richiesta di indennizzo o di danni ed interessi La garanzia generale non si applica nei seguenti casi Utilizzazione del materiale non conforme alle nostre istruzioni Danni provocati da una errata manipolazione durante e dopo il montaggio o qualsiasi modifica apportata agli elem...

Страница 12: ...chtung Plane Alarm Absperrung Halfingebouwde installatie op betonnen bodemplaat LET OP veiligheidsvoorziening verplicht afdekzeil alarm hek Half buried installation on concrete slab NOTE Compulsory safety equipment tarpaulin alarm barrier Instalación semienterrada en hormigón ATENCIÓN Dispositivo de seguridad obligatorio toldo alarma barrera Installazione semi interrata su lastra in cemente ATTENZ...

Страница 13: ...backfilling Principe de la piscine Enterrée ou semi enterrée Avant de débuter le montage assurez vous que vous disposez bien de l ensemble des pièces IMPORTANT Si vous choisissez d enterrer ou semi enterrer votre piscine veillez à positionner votre pompe et le groupe de filtration au même niveau que le bas de la piscine dans un local fermé et étanche Pour le bon fonctionnement du groupe de filtrat...

Страница 14: ...riers de votre piscine Celle ci permet d éviter l écrasement des rainures du bois c est pourquoi on l appelle pièce martyre Sie finden in Ihrem Frachtstück ein Stück Holz von etwa 30 cm Länge das zwischen Hammer und den Bohlen Ihres Beckens zu setzen ist Es ermöglicht Beschädigungen der Nuten des Holzes zu vermeiden deshalb wird es Schlagklotz genannt In het geleverde pakket zult u een houten hulp...

Страница 15: ...e le feutre de protection pour le sol 4b Découper le feutre de protection à l aide d un cutter ou d une paire de ciseau 4c Mettre en place le liner par une température extérieure comprise entre 20 et 25 C 4d Faire coïncider les coins du liner avec les angles de la piscine 4e Accrocher le liner dans la lèvre du rail 4f Positionner sur tout le pourtour du bassin le jonc de blocage Démarrer en milieu...

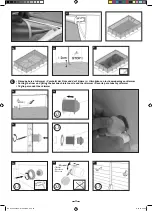
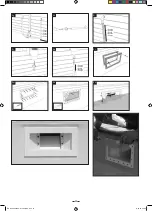
Страница 16: ...Wandmitte 4g Die Schwimmbadfolie maximal spannen 4h Füllen Sie Wasser bis zu einer Höhe von etwa 2 cm ein 4i Entfernen Sie die vorhandenen Falten und befüllen Sie mit Wasser 5a Beginnen Sie mit der Wasserbefüllung des Schwimmbads 5b Unterbrechen Sie die Wasserbefüllung unterhalb der Staudüse 5c Bringen Sie die Staudüse auf der Innenseite des Schwimmbads an 5d Schneiden Sie die Schwimmbadfolie auf ...

Страница 17: ...anbrengen van de zwembadrand uit vurenhout Trappen Installeren van de automatische vuilzuiger 4a Leg het beschermvilt op de bodem 4b Snijd het beschermvilt op maat met behulp van een stanleymes of een schaar 4c Plaats de liner bij een buitentemperatuur die tussen de 20 en 25ºC ligt 4d Zorg ervoor dat de hoeken van de folie overeenkomen met de hoeken van het zwembad 4e Haak de folie in de uitsparin...

Страница 18: ...pine coping The ladders Installing the automatic pool cleaner 4a Put the ground protection felt in place 4b Cut out the felt underlay using a Stanley knife or a pair of scissors 4c Put the liner in place when the outdoor temperature is between 20 C and 25 C 4d Fit the corners of the liner into the corners of the pool 4e Hook the liner on to the lip of the track 4f Position the locking strip around...

Страница 19: ...tico 4a Colocar el fieltro protector para el suelo 4b Cortar el fieltro de protección con un cúter o unas tijeras 4c Colocar el revestimiento 4d Hacer coincidir los bordes del revestimiento con los ángulos de la piscina 4e Enganchar el revestimiento al labio del riel 4f Colocar por todo el contorno de la piscina el perfil de bloqueo Empezar en el centro de la pared 4g Tensar el revestimiento al má...

Страница 20: ...agliare il feltro di protezione con una taglierina o un paio di forbici 4c Sistemare il rivestimento 4d Far coincidere gli angoli del rivestimento con quelli della piscina 4e Agganciare il rivestimento sul labbro della rotaia 4f Posizionare su tutto il perimetro della vasca la giunzione di bloccaggio Iniziare al centro della parete 4g Tendere al massimo il rivestimento 4h Mettere l acqua per un al...

Страница 21: ...b Thickness 200 mm hormigón Espesor 200 mm lastra in cemento Spessore 200 mm 1572 1505 1572 4648 6000 70 7518 4508 8958 4 5 8958 70 1572 1505 1505 1505 1572 7658 9000 Dalle Béton Ep 200 mm Bodenplatte 200 mm stark betonnen Dikte 200 mm Betonnen fundering Thickness 200 mm hormigón Espesor 200 mm lastra in cemento Spessore 200 mm NOTICE 500x800 H140 2018 1 indd 21 11 04 18 09 58 ...

Страница 22: ...er Seitenwände Opbouw van de wanden Erecting the sides of the pool Montaje de la pared Montaggio delle pareti PS2 PS2 PS2 PS2 PS2 PS2 PS2 PS2 PS2 PS2 PS2 PS2 P S 1 P S 1 P S 1 P S 1 PS1 4x PS2 12x NOTICE 500x800 H140 2018 1 indd 22 11 04 18 09 58 ...

Страница 23: ...eau et les diagonales ruban 10 m A B Unbedingt die Richthilfe der Lagerböcke Schnur und die Diagonalen 10 m Band kontrollieren A B Het is noodzakelijk de uitlijning van de keggen kalklijn en diagonalen snoer van 10 meter te controleren A B To imperatively check alignment of wedges chalk line and diagonals 10 m ribbon A B Controle siempre el alineamiento de los calzos cordel y las diagonales cinta ...

Страница 24: ...23 OK NO 2ème CAS MÖGLICHKEIT 2 2e MOGELIJKHEID 2nd CASE 2º CASO 2 CASO 1h 1h 1i 1i 1i P 1j NOTICE 500x800 H140 2018 1 indd 24 11 04 18 09 58 ...

Страница 25: ...24 1k 1n 1o 1p 150 360 360 360 150 2 cm 1q 1r 1m 1l PF R C2 R C1 NOTICE 500x800 H140 2018 1 indd 25 11 04 18 09 59 ...

Страница 26: ...ntage der Wandverstärkungen und Konsolen Plaatsen van de versterkingsrand en de draagsteunen Positioning the supports and the brackets Colocación de refuerzos y consolas Posa dei rinforzi e delle mensole A 2a NOTICE 500x800 H140 2018 1 indd 26 11 04 18 09 59 ...

Страница 27: ... x2 3 Préparation des parois Vorbereitung der Seitenwände Voorbereiden van de wanden Preparing the sides of the pool Preparación de las paredes Preparazione delle pareti 3a 3b 3c 3d x3 NOTICE 500x800 H140 2018 1 indd 27 11 04 18 09 59 ...

Страница 28: ...27 Ø 3 mm OK NO 3e 3f 3g C 3h 3i NOTICE 500x800 H140 2018 1 indd 28 11 04 18 09 59 ...

Страница 29: ...lies und Schwimmbadfolie Aanbrengen van vilt en folie Installing the felt underlay and the liner Instalación del fieltro y del revestimiento Installazione del feltro e del rivestimento x2 3j x3 3k 4d 4c 20 et 25 C NOTICE 500x800 H140 2018 1 indd 29 11 04 18 09 59 ...

Страница 30: ... van instroomopening en skimmer Cutting the liner and fitting the backwash inlet nozzle and the skimmer Recorte para tobera y skimmer Taglio per condotto e skimmer 5a 5b 5c 4g 4i x3 5e 5f TEFLON Teflon Band Teflon reep 5d x3 x3 x3 x3 NOTICE 500x800 H140 2018 1 indd 30 11 04 18 09 59 ...

Страница 31: ...30 Filtre Filter Filter Filtro Filtro 5g 5h 5i 5j 5k 5l Pompe Pumpe Pomp Bomba Pompa Pompe Pumpe Pomp Bomba Pompa 5m 5n 5o NOTICE 500x800 H140 2018 1 indd 31 11 04 18 09 59 ...

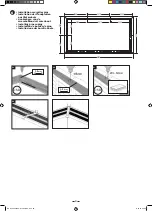
Страница 32: ... margelles pins Installation der Randplatten aus Kiefernholz Aanbrengen van de zwembadrand uit vurenhout Installing pine coping Instalación de bordes de pino Installazione dei bordiin abete DMP 6c 6b 5 8 mm 6d 70 cm DMP 6a 5 8 mm NOTICE 500x800 H140 2018 1 indd 32 11 04 18 09 59 ...

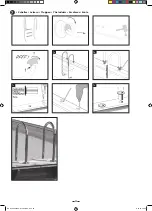
Страница 33: ...7 Echelles Leitern Trappen The ladders Escaleras Scale MARGELLE RENFORT VERSTÄRKUNGSRAN DPLATTE BOVENRAND VERSTERKINGSRAND BORDE DE REFUERZO BORDO RINFORZO 7c 7d NOTICE 500x800 H140 2018 1 indd 33 11 04 18 09 59 ...

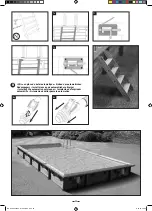
Страница 34: ... Einbau des automatischen Bodensaugers Installeren van de automatische vuilzuiger Installing the automatic pool cleaner Instalación del aspirador automático Sistemazione della spazzola automatica 8a 8b NOTICE 500x800 H140 2018 1 indd 34 11 04 18 09 59 ...

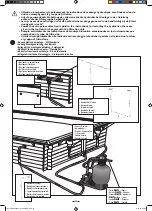
Страница 35: ...alida WASTE Desagües Uscita WASTE Scarichi Vanne 1 4 de tour Absperrhahnr Ventiel 1 4 omwenteling 1 4 turn valve Válvula de corte Valvola 1 4 di giro Attention à respecter scrupuleusement les indications de montage hydraulique mentionnées dans la notice accompagnant le groupe de filtration Auf die gewissenhafte Einhaltung der Hinweise für die hydraulische Montage in der Anleitung achten die der Fi...

Страница 36: ...utilisés et stockés exclusivement selon les indications des fabricants Ne pas mélanger les produits chimiques entre eux Entreposer les produits emballages bien fermés dans un local frais et aéré ne pas les exposer directement au soleil En cas d utilisation d un récipient pour les dosages le rincer soigneusement après chaque utilisation Lire attentivement les consignes de sécurité et modes d emploi...

Страница 37: ...illissement accéléré de la ligne d eau sous l influence du soleil et des produits oxydants 1 corriger le pH faire un traitement choc et filtrer en continu pendant 48H faire un nettoyage mécanique 2 passer un détartrant et brosser les tâches puis aspirer le dépôt Oranges brunes 1 présence d algues mortes 2 eau chargée en oxyde de fer cuivre 1 brosser les parois du bassin et aspirer les dépôts 2 bai...

Страница 38: ...n Die Chemikalien in gut verschlossenen Verpackungen an einem kühlen und belüfteten Raum lagern sie nicht dem direkten Sonnenlicht aussetzen Falls ein Behälter für die Dosierungen verwendet wird ihn nach jeder Benutzung sorgfältig ausspülen Die Sicherheitshinweise und die auf dem Etikett angegebenen Verwendungsarten aufmerksam lesen Alle Chemikalien außerhalb der Reichweite von Kindern aufbewahren...

Страница 39: ...ieren eine Schockbehandlung durchführen und während 48 h fortlaufend filtern eine maschinelle Reinigung durchführen 2 ein Entkalkungsmittel einführen und die Flecken abbürsten die Ablagerung dann absaugen Orange braun 1 Vorhandensein von toten Algen 2 mit Eisenoxid Kupfer belastetes Wasser 1 die Wände des Beckens abbürsten und die Ablagerungen absaugen 2 den pH Wert und die Wassertemperatur senken...

Страница 40: ...emische producten niet met elkaar Sla de producten in gesloten verpakking op in een koele en voldoende geventileerde ruimte Stel ze niet aan direct zonlicht bloot Als u een kopje glas of iets anders gebruikt om hoeveelheden af te meten spoel dit dan goed schoon na elk gebruik Lees zorgvuldig de veiligheidsvoorschriften en gebruiksaanwijzingen op elk etiket Houd alle chemische producten buiten bere...

Страница 41: ... toe laat het filter continu lopen gedurende 48 uur en voer een mechanische schoonmaak uit 2 pas een anti aanslagmiddel toe verwijder de vlekken met een borstel en zuig de aanslag op Oranje bruin 1 aanwezigheid van dode algen 2 het water heeft hoog gehalte aan ijzer en koperoxide 1 reinig de wanden met een borstel en zuig de aanslag op 2 verlaag de pH waarde en de watertemperatuur verwijder de vle...

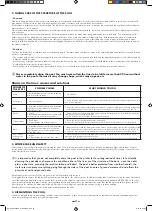
Страница 42: ...s that must be stored and used only as directed by the manufacturers Do not mix chemical products with each other Store products in tightly closed containers in a cool and well ventilated place do not expose to direct sunlight If using a container for measuring out chemicals rinse thoroughly after each use Read the safety information and instructions provided on each label carefully Keep all chemi...

Страница 43: ... sun and oxidising products 1 Correct the pH level Carry out a high power cleaning treatment and run the filter for 48 hours non stop have the pool cleaned by machine 2 Use a descaler brush the stains then vacuum the deposits Orange brown 1 Dead algae 2 Water contains iron oxide or copper 1 Brush the sides of the pool and vacuum the deposits 2 Lower the pH level and the temperature of the water br...

Страница 44: ...espectivos y no deben mezclarse con otros productos químicos Almacene los productos en envases herméticamente cerrados en un lugar fresco y ventilado y no los exponga a la luz solar directa En caso de utilizar un recipiente dosificador enjuáguelo cuidadosamente tras cada uso Lea atentamente las instrucciones de seguridad y los modos de empleo indicados en las etiquetas Mantenga los productos quími...

Страница 45: ... presencia de algas 2 envejecimiento acelerado de la superficie del agua debido al sol o a los productos oxidantes 1 corregir el pH hacer un tratamiento intensivo y filtrar continuamente durante 48 h y completar con una limpieza mecánica 2 aplicar un producto disolvente y cepillar las manchas luego aspirar los depósitos Anaranjadas marrones 1 presencia de algas muertas 2 agua rica en oxido de hier...

Страница 46: ...i dei produttori Non mischiare tra di loro i prodotti chimici Depositare i prodotti con gli imballaggi ben chiusi in un locale fresco a areato e non esporli alla luce diretta del sole In caso di utilizzo di un recipiente per i dosaggi risciacquarlo con cura dopo ogni utilizzo Leggere con attenzione le disposizioni di sicurezza e le modalità d impiego indicate su ciascuna etichetta Tenere tutti i p...

Страница 47: ...otto l influsso del sole e dei prodotti ossidanti 1 correggere il pH fare un trattamento drastico e filtrare di continuo per 48 ore effettuare una pulizia meccanica 2 passare un disincrostante e spazzolare le macchie poi aspirare il deposito Arancioni brune 1 presenza di alghe morte 2 acqua ricca di ossido di ferro rame 1 spazzolare le pareti della vasca e aspirare i depositi 2 diminuire il pH e l...

Страница 48: ...47 NOTICE 500x800 H140 2018 1 indd 48 11 04 18 09 59 ...

Отзывы: