


Chapter 3
Servicing Server Module Components
3-27
7. Update the system with the BIOS/ILOM firmware package you downloaded
earlier.
This will ensure that both the BIOS and ILOM firmware (which are packaged and
tested together) are at a supported level.
Refer to the corresponding ILOM supplement for your server for details on
updating firmware.
3.5
Replacing the Motherboard Assembly
(FRU)
The motherboard is shipped installed in an empty server module chassis. Do
not
remove the motherboard from the server module chassis. Instead, remove
components from the old server module chassis assembly, and install these
components into the new motherboard and server module chassis assembly.
Note –
The server module motherboard assembly is a FRU and must be replaced
only
by qualified service technicians. Contact your Sun Service representative for
assistance.
■
If you are replacing a motherboard that is not dead, obtain the BIOS and ILOM
versions and download the system software release package (combined
BIOS/ILOM) that incorporates those versions. A system software release package
can be downloaded from:
http://support.oracle.com
.
■
If you are replacing a dead motherboard, obtain the ILOM version and download
the system software release package (combined BIOS/ILOM) that incorporates
that version. A system software release package can be downloaded from:
http://support.oracle.com
.
■
Before removing the motherboard, backup the FRUID information. See
“How to
Back Up FRU Information” on page 3-38
.
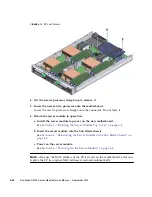
1. Prepare the server module for service.
a. Power off both server module compute nodes.
See
Section 2.4, “Powering Off the Server Module” on page 2-4
.
b. Remove the server module from the Sun Blade chassis. Place it on a flat
surface.
See
Section 2.5, “Removing the Server Module From the Sun Blade Chassis” on
page 2-7
.
Содержание Sun Blade X6275
Страница 1: ...Sun Blade X6275 Server Module Service Manual Part No Part No 820 6849 16 September 2013 Rev A ...
Страница 26: ...1 16 Sun Blade X6275 Server Module Service Manual September 2013 ...
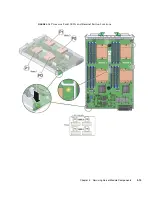
Страница 47: ...Chapter 3 Servicing Server Module Components 3 7 FIGURE 3 3 DIMM Numbering and Position ...
Страница 54: ...3 14 Sun Blade X6275 Server Module Service Manual September 2013 FIGURE 3 7 Replacing Flash Modules ...
Страница 59: ...Chapter 3 Servicing Server Module Components 3 19 FIGURE 3 10 Processor Fault LEDs and Remind Button Locations ...
Страница 61: ...Chapter 3 Servicing Server Module Components 3 21 FIGURE 3 11 Removing a Processor ...
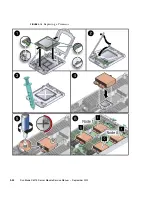
Страница 64: ...3 24 Sun Blade X6275 Server Module Service Manual September 2013 FIGURE 3 12 Replacing a Processor ...
Страница 72: ...3 32 Sun Blade X6275 Server Module Service Manual September 2013 FIGURE 3 14 Removing the RTC Batteries ...
Страница 80: ...3 40 Sun Blade X6275 Server Module Service Manual September 2013 ...
Страница 86: ...4 6 Sun Blade X6275 Server Module Service Manual September 2013 ...
Страница 90: ...A 4 Sun Blade X6275 Server Module Service Manual September 2013 FIGURE A 1 BIOS Utility Menu Tree ...
Страница 107: ...Appendix A BIOS Screens A 21 FIGURE A 29 BIOS Setup Utility Chipset FIGURE A 30 BIOS Setup Utility Chipset CPU Bridge ...
Страница 112: ...A 26 Sun Blade X6275 Server Module Service Manual September 2013 ...
Страница 116: ...Index 4 Sun Blade X6275 Server Module Service Manual September 2013 ...


