


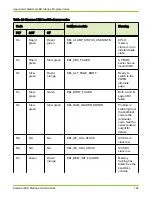


4 In the Bricks overview pane, highlight the name of the Brick that you want to
modify.
5 (Optional) To identify physically the Brick you intend to rename, select
Actions > Identify and, use the Identify dialog to flash the LEDs on the front
and back of the selected Brick.
6 After you have confirmed the physical Brick, select Actions > Modify Name.
7 In the Modify Brick dialog, click Components.
8 In the Brick Name field, type the new name of the selected Brick.
9 Click OK.
Result:
The physical name of the Brick should now match the logical name.
10 Repeat this procedure for each Brick in the system.
11 After ensuring that all Bricks in the system have matching physical and
logical names, remove the temporary prefix “t” from each Brick name in the
GUI.
Related concepts
•
About Component Placement for One Slammer and FC Bricks
•
About Component Placement for One Slammer and SATA Bricks
•
About Component Placement for Two or Three Slammers and FC Bricks
•
About Component Placement for Four Slammers and 64 Bricks
Chapter 7 Initial Configuration
Rename the Bricks
150