background image

Cabling for HA Deployments

The information and instructions in this section explain how to cable an HA node.

Rear Panel HA Cabling

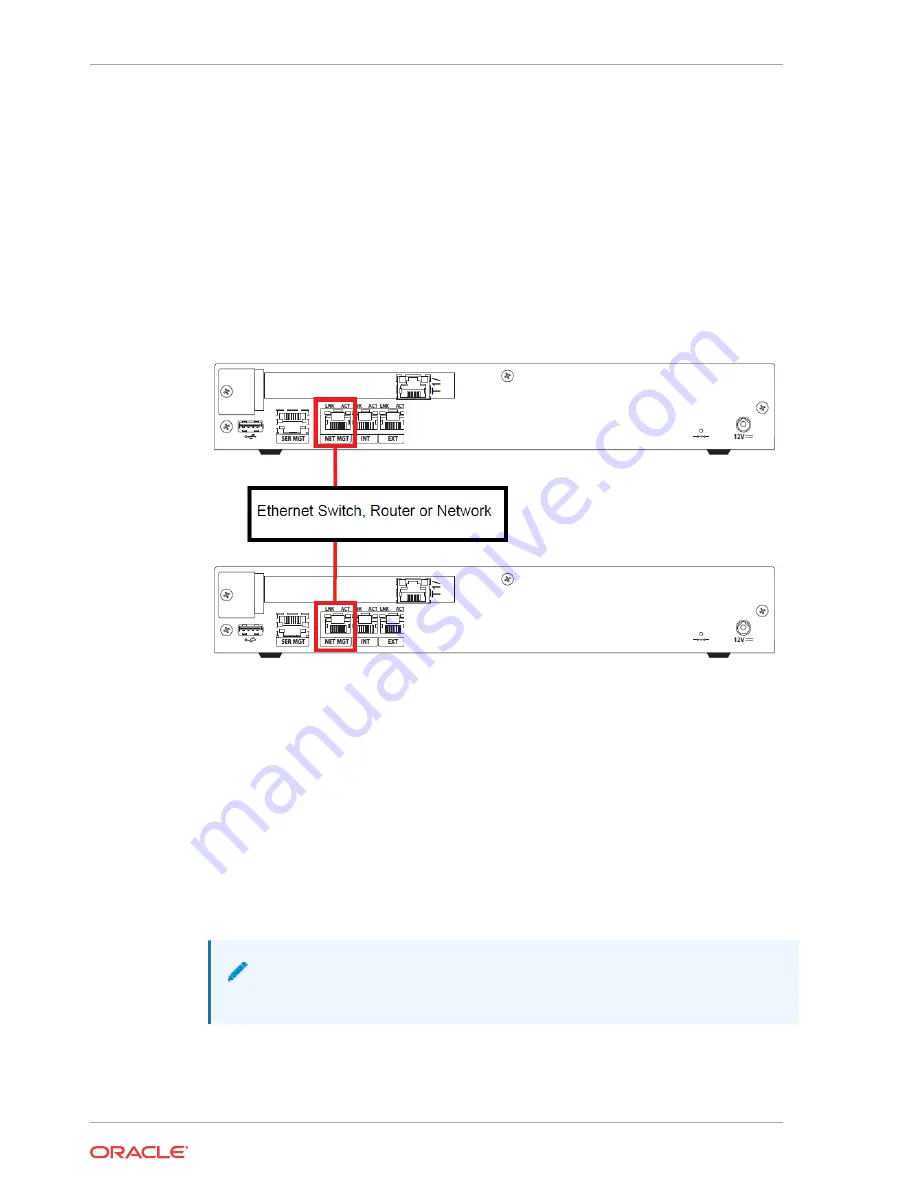
Use one LAN connection for each device for HA redundancy support for the two members of
an HA node.

Figure 3-12    HA-Sharing Ports

To cable the Acme Packet 1100 in an HA configuration using single rear interface support:

1.

Insert one end of an Ethernet cable into the NET MGT port on the rear panel of each Acme
Packet 1100. The release tab on the RJ45 jack clicks into place when you insert it properly
into the chassis port.

2.

Insert the other end of the Ethernet cable into an Ethernet switch. Refer to the
configuration procedures located in the HA Nodes chapter of the Acme Packet
Configuration Guide.

AC Power Cord Installation Procedure

This section describes how to install an AC power cord.

Note:

Use a 15 Amp fused circuit for each AC power supply.

Install the AC power cord according to local procedures for equipment with external power
supplies. Ensure that the power cord is routed away from the cables attached to the Acme

Chapter 3

Cabling the Acme Packet 1100 System

3-12

Содержание Acme Packet 1100

Страница 1: ...Oracle Acme Packet 1100 Hardware Installation and Maintenance Guide Release 1 0 February 2018...

Страница 2: ...ictions applicable to the programs No other rights are granted to the U S Government This software or hardware is developed for general use in a variety of information management applications It is no...

Страница 3: ...Precautions 1 1 Battery Warning 1 2 ESD Safety 1 2 Precautions 1 2 2 Component Overview Chassis 2 1 Mounting Hardware 2 1 System Processor 2 1 Processor Module CPU 2 1 System Control Panels 2 1 Front...

Страница 4: ...7 Installing the Wall Brackets 3 7 Table Top Shelf Installation of the Chassis 3 9 Cabling the Acme Packet 1100 System 3 9 Cabling the T1 E1 Port 3 10 Cabling the SER MGT Console Port 3 10 Cabling Ne...

Страница 5: ...cket 1100 System Specifications 6 1 Chassis Mounting Flanges Physical Specifications Optional 6 2 AC Power Supply Specifications 6 2 Power Supply Input Circuit Fuse Requirements 6 2 Environmental Spec...

Страница 6: ...ations Audience This guide is written for network administrators and telecommunications equipment installers and technicians It provides information related to the hardware components features install...

Страница 7: ...n in Chapter 4 about cabling the T1 E1 port Removed the section in Chapter 6 entitled Removing and Installing the Chassis Cover July 2015 Added information on using Telnet and Secure Shell SSH for con...

Страница 8: ...fety Precautions To ensure general safety follow the safety precautions listed in this section Fan Module To avoid overheating the system do not block the air inlets or the fan module or otherwise obs...

Страница 9: ...t Use caution when using electrically conductive tools around the Acme Packet 1100 Remove jewelry before working on the Acme Packet 1100 Battery Warning Note RISK OF EXPLOSION IF BATTERY IS REPLACED B...

Страница 10: ...proper grounding Use a grounded ESD wrist strap when working on the Acme Packet 1100 to prevent static discharge To avoid damaging ESD sensitive hardware discharge all static electricity from your bod...

Страница 11: ...ware The Acme Packet 1100 can be mounted in a variety of ways that are explained in the chapter on installation of the chassis System Processor Processor Module CPU The Acme Packet 1100 processor modu...

Страница 12: ...The states and meanings of the PWR LED include green indicates the Acme Packet 1100 is powered on off indicates the Acme Packet 1100 is not powered on OK LED The bi colored OK LED is a high availabili...

Страница 13: ...h as firmware and system upgrades and for remote access by customer service representatives The USB port is for Acme Packet use only and is not to be used by the customer unless directed by a customer...

Страница 14: ...rnet Port The NET MGT 10 100 Mbps Ethernet port allows for configuring the Acme Packet 1100 and for providing high availability HA for the chassis Two Acme Packet 1100s can connect from their respecti...

Страница 15: ...ted port These LEDs are explained in the following subsections Link LED The link LED glows orange when a link has been established between the link partner device and the SBC Activity LED The activity...

Страница 16: ...nlet port on the rear of the chassis powers up the chassis Different country specific AC power cords are available for connection to electrical power outlets for use with the AC power supply Cooling C...

Страница 17: ...sed transcoding capabilities with an optional Digital Signal Processor DSP module installed inside the chassis Note DSP modules may not be installed in existing Acme Packet 1100 in the field even by O...

Страница 18: ...Box Acme Packet 1100 chassis Accessory Kit AC power cords AC power supply Options Flanges for Rack Mounting Brackets for Wall Mounting Installation Tools and Parts The following tools and parts are re...

Страница 19: ...quipment should be maintained Particular attention should be given to supply connections other than direct connections to the branch circuit for example use of power strips Pre installation Note The A...

Страница 20: ...rnet standard IEEE 802 3 Other Safety Guidelines When preparing to install your Acme Packet 1100 Ensure that the equipment rack is securely bolted to the floor and that the equipment rack and componen...

Страница 21: ...list is located outside of the shipment box 5 Confirm that all of the components listed in the shipping box contents are present and in good condition If you discover that any of the parts are missing...

Страница 22: ...ace to the chassis with 2 screws washers and to the rack with 4 screws washers The following subsections explain how to mount your Acme Packet 1100 in a cabinet style 2 or 4 post equipment rack Instal...

Страница 23: ...ssis into a 2 or 4 post chassis rack The flange mounts should be attached to the Acme Packet 1100 as described in the previous procedure To prevent overheating ensure that there is enough room for app...

Страница 24: ...rs on each wall bracket The following subsections explain how to mount your Acme Packet 1100 on a wall or other vertical surface Installing the Wall Brackets The following procedure describes how to i...

Страница 25: ...ver to hand tighten each screw to secure the wall bracket to the chassis 6 Ensure that there is enough room to access the front and back panel of the chassis for purposes of reviewing front back panel...

Страница 26: ...rdy enough to support the weight of the Acme Packet 1100 Ensure that there is enough room to access the front and back panel of the chassis for purposes of reviewing front back panel LEDs and insertin...

Страница 27: ...ut arrangement voltage level and line capacitance than an RJ45 To create a physical T1 or E1 connection to the Acme Packet 1100 T1 E1 port use the top rear port marked T1 E1 for a permanent connection...

Страница 28: ...ocument with respect to the INT EXT and NET MGT ports Network Management Cabling Procedure To connect Ethernet cables to the network management ports 1 Locate the Ethernet cables you plan to connect t...

Страница 29: ...release tab on the RJ45 jack clicks into place when you insert it properly into the chassis port 2 Insert the other end of the Ethernet cable into an Ethernet switch Refer to the configuration proced...

Страница 30: ...nector located on the power supply 4 Connect the 12V connector on the power supply to the 12V power inlet connector on the back panel of the Acme Packet 1100 5 Route the AC power cord through your rac...

Страница 31: ...ection to the Acme Packet 1100 you need to configure the terminal hardware and software appropriately Ensure that your terminal is configured with the settings presented in the following table Table 4...

Страница 32: ...or of the console connection will begin to display information Initial Login Once you have established the console connection and powered on the Acme Packet 1100 you are ready to log in and begin conf...

Страница 33: ...ssword and press return The system prompt ends with a pound sign instead of a closed angle bracket to let you know are in superuser mode Password ORACLE 4 You can now begin configuring your Acme Packe...

Страница 34: ...Shutting down the system is appropriate when you are replacing a physical interface card storage device power supply or are uninstalling the Acme Packet 1100 Shutting Down the Acme Packet 1100 1 In su...

Страница 35: ...ocedures 2 Save any configuration changes you have made in the ACLI by typing save config and then press Enter ORACLE save config Save Config received processing waiting 1200 for request to finish Req...

Страница 36: ...able operation a file system check is performed upon the next power up This check may take several minutes to complete and should not be interrupted Forcing Switchover for HA Nodes When performing har...

Страница 37: ...1 9090 1 peer s on 2 socket s SML STIC 2 v3 Standby health 100 max silence 1050 last received from 169 254 1 2 on wancom0 1 Switchover log Jun 25 19 03 02 029 Active to BecomingStandby Jun 25 19 04 5...

Страница 38: ...cfg version Running configuration version is 5 NETNETSBC2 4 Initiate a switchover on one chassis by typing notify berpd force and pressing Enter at the ACLI prompt NETNETSBC1 notify berpd force 5 Wait...

Страница 39: ...he procedure to reinstall the Acme Packet 1100 in an equipment rack see the chapter on System Installation in this document Cooling System Maintenance This section explains how to service the cooling...

Страница 40: ...4 0 lbs 1 81 kg Ports Four 10 100 Mbps Ethernet copper ports RJ 45 connector dedicated to WAN LAN management and reserved functions One T1 E1 port for PSTN fallback Onboard Transcoding QoS Measurement...

Страница 41: ...e External field replaceable Power Supply Input Circuit Fuse Requirements Table 6 4 Acme Packet 1100 Power Supply Input Circuit Fuse Requirements cont Power Circuit Fuse Rating Power cable size 120 VA...

Страница 42: ...cme Packet 1100 Connector Specifications cont Specification Description RJ45 Management Ethernet Ports The 3 x 8 pin RJ45 10 100 Ethernet ports are compliant with IEEE s 802 3 802 3u 802 1q and 802 3a...

Страница 43: ...dware components to ensure they are functioning properly If it encounters a fault condition it will report alarms in these categories Hardware temperature Fan speed Environmental sensor Power supply V...

Страница 44: ...Alarm Information cont Alarm Name Alarm ID Alarm Severity Cause s Example Log Message Graphic Display Window Message ENVIRONME NTAL SENSOR FAILURE 65539 CRITICAL The environmental sensor component can...

Страница 45: ...link up Slot 0 port 1 UP X LINK ALARMS LINK DOWN ALARM GIGPORT 131076 MINOR GigE S0P1 link down Slot 0 port 1 DOWN X LINK ALARMS Management Ethernet Link Alarms The following table lists the managemen...

Отзывы: