[Wpisz tekst]
40
[Wpisz tekst]
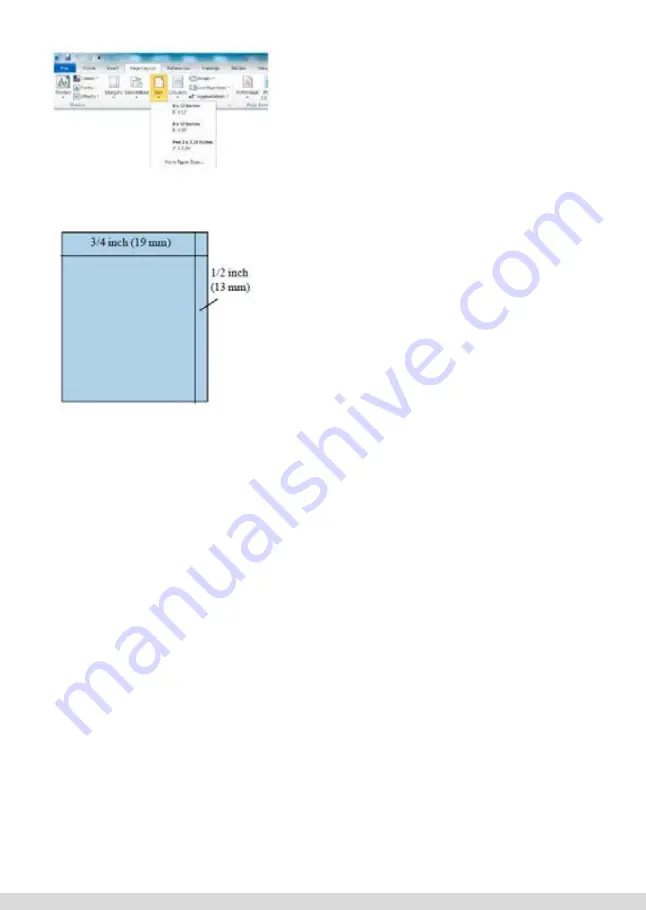
Otworzyć zakładkę Układ Strony i wybrać Rozmiar.
Wybrać 8 x 12 cali. Ważne jest, aby rozmiar strony
w pliku był taki sam jak rozmiar strony w
sterowniku.
Marginesy w
obszarze
drukowania
Uwaga: Ważne jest, aby nie umieszczać informacji w
pliku w następujących marginesach: 1/2 cala (13
mm) po prawej stronie i 3/4 cala (19 mm) od góry.
Jeśli w obrębie tych marginesów znajdzie się jakaś
informacja, wówczas światło gotowości błyśnie 7
razy, sygnalizując „Błąd marginesu”. Aby
zlikwidować komunikat błędu należy wcisnąć
przycisk Reset, usunąć informacje z obszaru
marginesów i wysłać plik ponownie
[Wpisz tekst]
40
[Wpisz tekst]
Otworzyć zakładkę Układ Strony i wybrać Rozmiar.
Wybrać 8 x 12 cali. Ważne jest, aby rozmiar strony
w pliku był taki sam jak rozmiar strony w
sterowniku.
Marginesy w
obszarze
drukowania
Uwaga: Ważne jest, aby nie umieszczać informacji w
pliku w następujących marginesach: 1/2 cala (13
mm) po prawej stronie i 3/4 cala (19 mm) od góry.
Jeśli w obrębie tych marginesów znajdzie się jakaś
informacja, wówczas światło gotowości błyśnie 7
razy, sygnalizując „Błąd marginesu”. Aby
zlikwidować komunikat błędu należy wcisnąć
przycisk Reset, usunąć informacje z obszaru
marginesów i wysłać plik ponownie
Go to Page Layout Tab and select Size. Select
8 x 12 Inches. It is important that the page
size in the file is the same as the page size in
the driver.
MARGINS IN PRINTABLE AREA
Note: It is important not to place information in the
file within the following margins: 1/2 inch (13 mm) on
the right side and 3/4 inch (19 mm) from the top. If
there is any information placed within these margins,
the Ready light will blink 7 times indicating a “Margin
Error”. Press Reset to cancel the Error message, remo-
ve the information from this area and resend the file.
Use Rotate feature in the driver as a work around if you
need to print within this margin area.
There is more information later in this document that describes all of the features in the
driver. To rotate in image, select “Yes” in the Printer Features Rotate Tab. The image will
appear the same on the screen, but the print will be rotated 180 degrees on the item. If
you prefer, you can also rotate the information within the file. In either case, make sure
that the page size in the file and driver are the same.
Caution: If you neglected to select Foil Xpress Direct as your printer, you will get the
following Microsoft Word warning message: “ One or more margins are set outside the
printable area of the page.” Select Ignore - otherwise Word will add margins, and this
will effect the placement of your image on the page.
Setting the Page Size in Corel Draw:
In the Property Bar, set horizontal page size to 8” (203 mm) and vertical page size 12”
(305 mm). Page Size will change from “Letter” to “Custom”.
Note: Under the Layout Tab in Foil Xpress Direct Printing Preferences, select “Portrait”
as the orientation before sending the file to the printer.
PLACING TEXT AND GRAPHICS ON A PAGE
There are no special requirements for placing text or graphics in either Word or Corel
Draw when using Foil Xpress Direct. Make sure, however, that image print resolution is at
least 600 x 600 dpi or higher.
63


