13
E102894#1
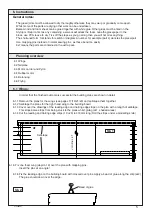
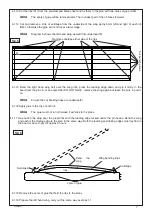
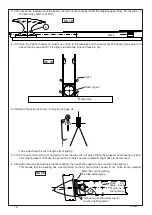
6.3.21 Double a ruber band and slide it on to the tube fuselage.
Insert the wire skids (5) under the band as shown in Sk.21.
6.3.22 Place the fuselage and skids and on a flat surface.
Make sure the tailplane is square and the skids
bend backwards Glue the skids in position.
Leave to dry ensuring that everything is square
6.3.23 Once dry, cut off the rubber band and bind the skids, directly behind the bend, on to the tube.
Cover the thread with glue.
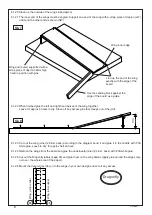
6.3.24 Glue the tail fin to the tailplane. Fix in place with two pins.
Ensure that it lies square in the middle of the pylons. Sk.22.
6.3.25 Glue the rear skid (17) in place as shown , leave to dry.
6.3.26 Remove the distance pieces (11) from the pre-stamped blasa sheet and glue them in place between the Py-
lons, under the dowel (12) strengtheners. (sk.22).
6.3.27 Shape/sand the 8mm lower part of the Pylons to fit in with the contours of the fuselage (sk.22/ drawing pat-
tern skids, page 35)
6.3.28 Fill in and glue the name/ address label to one of the Pylons sk.22
6.3.29 Set the propellor and bearing into the fuselage. Build up a supporting layer of glue behind the plastic bea-
Sk. 21
Sk. 22
11
Tail fin
Tailplane
Rear side skid
Shape bottom of
the Pylons
Glue
name/
address label here
Содержание Dragonfly 102.894
Страница 18: ...18 E102894 1...
Страница 20: ...20 E102894 1...
Страница 22: ...22 E102894 1...
Страница 24: ...24 E102894 1...
Страница 26: ...26 E102894 1...
Страница 28: ...28 E102894 1...
Страница 29: ...29 E102894 1 Fuselage 1 Scale 1 1 S a n d i n g Pylon support 6 level Pylon support 6 under neath approx 1 mm...
Страница 30: ...30 E102894 1...
Страница 31: ...31 E102894 1 Fuselage 2 Scale 1 1...
Страница 32: ...32 E102894 1...
Страница 33: ...33 E102894 1 Fuselage 3 Scale 1 1 Top Bottom...
Страница 34: ...34 E102894 1...

