12
E102894#1
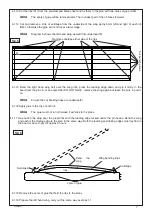
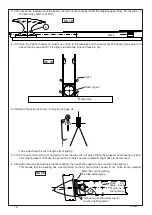
6.3.16 Loosen the fuselage from the board, then turn it over and lay it with the tailplane uppermost. Pin the tube t o
the board as shown (sk.18/19)
6.3.17 Glue the Pylons (dowels on inside) as shown to the fuselage and the carrier (6) The bead of glue must run
above the line (see sk.19). Fix either side with two pins and leave to dry.
6.3.18 Bend the skids as shown in the plan on page 35.
The skids should be cut to length after bending.
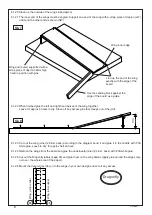
6.3.19 Cut a second card ring (2) and push it over the tube (do not glue). Place the propellor and bearing in place.
This must be exact an fit use the pencil line to help see where material might have to be removed.
6.3.20 Add some glue behind the propellor bearing, then push the support tube in so that it lies tight (2).
This means that the bearing has a second stop so that it cannot twist. Leave to dry. Once its dry carefully
Sk. 18
Sk. 19
Sk. 20
6
6
Block
Pylon
Bead of glue
Marked line
Slide the card ring along
the tube without glue
The bearing and the card ring (2)
must be tight together!
Once
dry
apply bead
of glue as a
strenghtener
Содержание Dragonfly 102.894
Страница 18: ...18 E102894 1...
Страница 20: ...20 E102894 1...
Страница 22: ...22 E102894 1...
Страница 24: ...24 E102894 1...
Страница 26: ...26 E102894 1...
Страница 28: ...28 E102894 1...
Страница 29: ...29 E102894 1 Fuselage 1 Scale 1 1 S a n d i n g Pylon support 6 level Pylon support 6 under neath approx 1 mm...
Страница 30: ...30 E102894 1...
Страница 31: ...31 E102894 1 Fuselage 2 Scale 1 1...
Страница 32: ...32 E102894 1...
Страница 33: ...33 E102894 1 Fuselage 3 Scale 1 1 Top Bottom...
Страница 34: ...34 E102894 1...

