background image

7

E102894#1

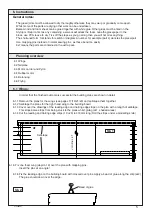
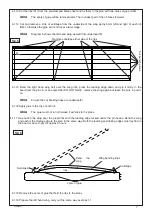
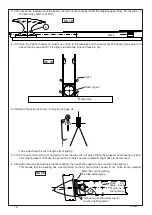
6.1.13 Cut the ribs (21) from the pre-stamped balsa sheet and fix them to the plan with two drops of glue (Sk6) 

    Note:  

The spots of glue will be removed later. The roundest part of the rib faces forward.

6.1.14 Cut and remove a strip of sellotape from the underside of the wing aprox 5mm left and right of each rib 

(Sk5), otherwise the glue will not stick at a later stage.


Note: 

  Diagram 5 shows the left hand wing viewed from underneath!!!

6.1.15  Bend  the  right  hand  wing  half  over  the  wing  ribs,  press  the  leading  edge  down  and  pin  it  firmly  to  the     

board (set the pins in at an angle Sk6) DO NOT GLUE -remove the wing again but leave the pins in positi-

on.

    Note:  

Ensure the cut bending lines are underneath!

6.1.16 Apply glue to the top of each rib 

    Note:  

The glue must not run otherwise it will stick to the plans

6.1.17 Re-position the wing over the glued ribs with the leading edge tucked under the pin heads. Bend the wing 

and anchor the trailing edge to the plan in the same way. Both the leading and trailing edges must lay flat on 

the board. Leave to dry for approx 5 hours.

6.1.18 Remove the spots of glue that hold the ribs to the plans

6.1.19 Prepare the left hand wing, carry out the same way as steps 1.1

Sk. 5

Sk. 6

Remove sellotape either side of the ribs 

Cut bending lines

FL

Bend 

the 

wing

ribs

Sellotape

Sellotape

Wing bending lines

spots of glue

Содержание Dragonfly 102.894

Страница 1: ...deco strips rubber bands sanding block glasspaper Making time as group project approx 10 hours Recommended for children aged 12 and above by B Elsner Please Note The OPITEC range of projects is not i...

Страница 2: ...th a modelling knife Joining Use PVA or other non solvent glue 2 3 Material Tube recycled paper Card spiral wound Working Cut to length with a fine saw use PUK range or similar Joining Glue Finish Var...

Страница 3: ...sa parts 1 2 x 100 x 310 mm 6 7 8 9 10 11 21 23 Propellor Bearing Plastic 1 240 x 360 mm 14 Wings Depron 2 3 x 114 x 410 mm 18 Beech dowel 4 3 x 500 mm 19 20 fixing Rubber bands 5 40 mm 29 joiner Card...

Страница 4: ...pron 3 x 55 x 25 18 Wing r l 2 Depron 3 x 114 x 410 19 Leading edge 2 Beech dowel 3dia x 410 20 Trailing edge 2 Dowel 3dia x 410 21 Wing ribs 8 Balsa pre stamped 2 x 7 x 112 22 Wing ends 2 Depron 3 x...

Страница 5: ...gs 6 2Tailplane 6 3 Motor carrier and Pylon 6 4 Rubber motor 6 5 Balancing 6 6 Flying 6 1 Wings In order that the finished outcome is successful the building steps are shown in detail 6 1 1 Remove the...

Страница 6: ...eading edge of the wing along the middle of the sellotape and rock it forwards and then back wards finally forwards once more so that the sellotape covers the leading edge sk4 Carry out the same proce...

Страница 7: ...n angle Sk6 DO NOT GLUE remove the wing again but leave the pins in positi on Note Ensure the cut bending lines are underneath 6 1 16 Apply glue to the top of each rib Note The glue must not run other...

Страница 8: ...white glue Leave to dry for approx half an hour 6 1 24 Remove the wings from the board and glue the underneath joiner 24 Ext pack with PVA white glue 6 1 25 Cut out the Dragonfly labels page 25 and gl...

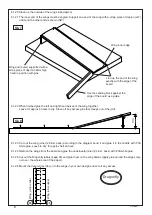
Страница 9: ...n plan from underneath with a needle knot and glue The wings are complete now 6 2 Tailplane and fin TP Tailplane TF Tail fin 6 2 1 Cut the TP 15 and TF 16 and TF keel 17 out of the Depron sheet with a...

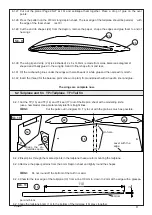
Страница 10: ...rt is enough The support is always the top even when the tube is upside down leave to dry Fix the fuselage plan page 29 along with the tube to the building board 6 3 8 Lay the tube 1 with the Pylon su...

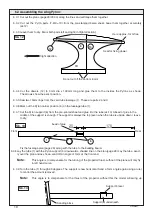
Страница 11: ...board plan with pins sk 17 6 3 13 Lay the fuselage tube 1 on to the tailplane boom Place 2 scrap pieces of Depron foam under the front carrier 6 so that the tube lies exactly on the tail boom 6 3 14 C...

Страница 12: ...ending 6 3 19 Cut a second card ring 2 and push it over the tube do not glue Place the propellor and bearing in place This must be exact an fit use the pencil line to help see where material might hav...

Страница 13: ...with two pins Ensure that it lies square in the middle of the pylons Sk 22 6 3 25 Glue the rear skid 17 in place as shown leave to dry 6 3 26 Remove the distance pieces 11 from the pre stamped blasa s...

Страница 14: ...or holder dowel 4 3dia x 40mm through the knotted end of the rubber loop and bind it as shown in sk 25 6 4 4 Hang the other end of the loop in the hook on the propellor and bind it again as in sk 25 E...

Страница 15: ...correctly The model is ready for flying now 6 6 Flying 6 6 1 Gliding The Dragonfly is a light rubber powered model and is deisigned for flying on calm days with light winds Always fly into the wind O...

Страница 16: ...The model should find its own flight pattern If the model flies with an up and down motion the propellor angle must be altered by adding card between the bearing and the end of the tube see Sk 29 If...

Страница 17: ...17 E102894 1 Pattern for the Right hand wing Scale 1 1 Wing bending lines Wing tip strip 23 Wing tip 22 Wing outer edge Ribs 21 Cut the flap only at the top Cut through here Drops of glue Sellotape...

Страница 18: ...18 E102894 1...

Страница 19: ...19 E102894 1 Wing pattern for right hand wing Scale 1 1 45 RF with bending lines Centre of gravity Leading edge 19 Trailing edge 20 Ribs 21 Wing inner side...

Страница 20: ...20 E102894 1...

Страница 21: ...21 E102894 1 Wing pattern for the left hand wing Scale 1 1 Wing bending lines Wing tip strip 23 Wing tip 22 Wing outer edge Ribs 21 cut he flap only at the top cut through here Drop of glue Sellotape...

Страница 22: ...22 E102894 1...

Страница 23: ...23 E102894 1 Wing pattern for the left hand wing Scale 1 1 45 LV Wing bending lines centre of gravity Leading edge 19 Trailing edge 20 Rips 21 Wing inner side...

Страница 24: ...24 E102894 1...

Страница 25: ...25 E102894 1 Pattern for parts 15 16 17 and 22 Scale 1 1 Dragonfly Dragonfly 22 17 16 cut through here Bend left or right to correct flight pattern...

Страница 26: ...26 E102894 1...

Страница 27: ...27 E102894 1 Patterns for parts 15 16 17 and 22 Scale 1 1 22 15 If you find this model please contact Name Street Town Tel Fax...

Страница 28: ...28 E102894 1...

Страница 29: ...29 E102894 1 Fuselage 1 Scale 1 1 S a n d i n g Pylon support 6 level Pylon support 6 under neath approx 1 mm...

Страница 30: ...30 E102894 1...

Страница 31: ...31 E102894 1 Fuselage 2 Scale 1 1...

Страница 32: ...32 E102894 1...

Страница 33: ...33 E102894 1 Fuselage 3 Scale 1 1 Top Bottom...

Страница 34: ...34 E102894 1...

Страница 35: ...teps 2 3 and 4 the legs can be held together 1 Bend the steel wire in the middle as shown 2 Bend as shown in the pattern 3 Bend the curve in sta ges 4 Cut the ends to equal length Keel Round off the b...

Отзывы: