background image

Operating the System

67

Eagle Operator Manual

OPEX Corporation

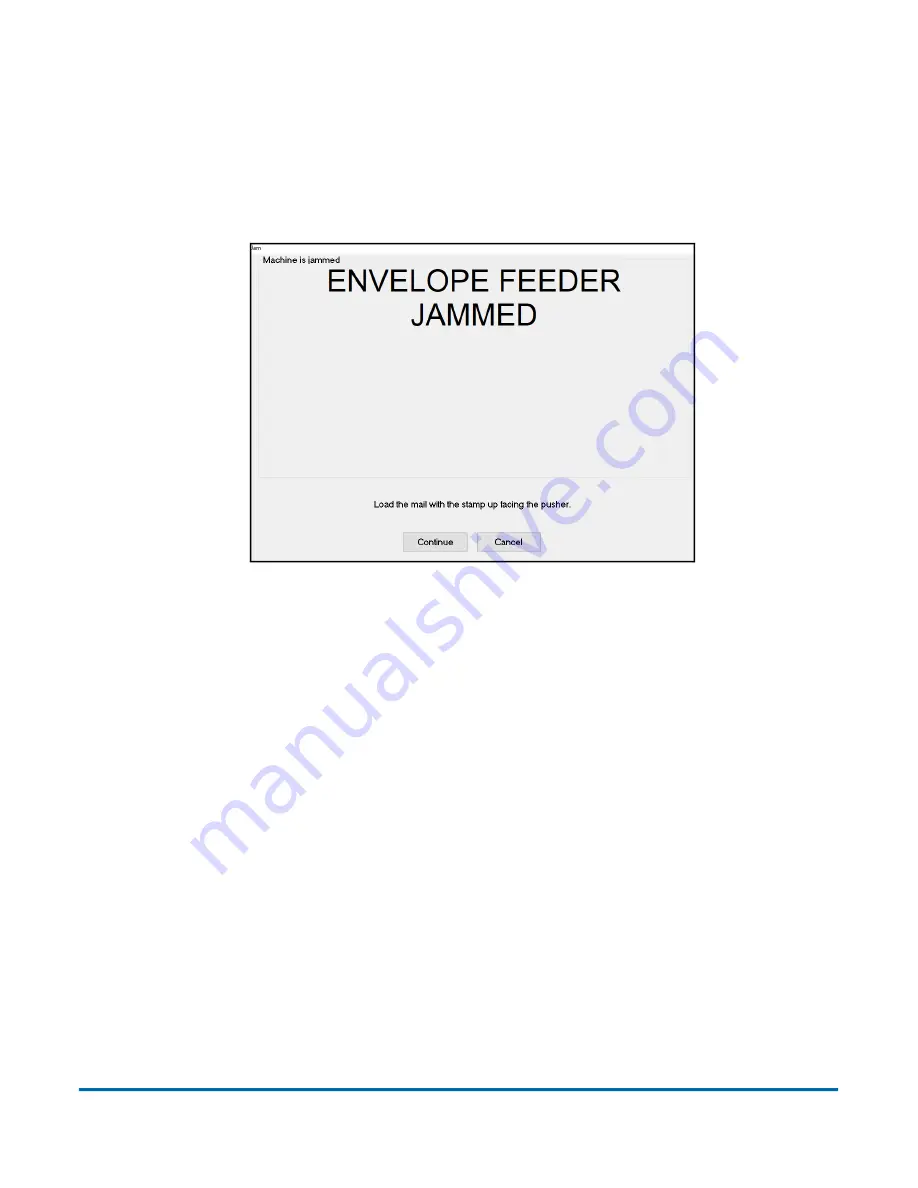
 4.5.6. Clearing jams

From time to time, you will experience the inevitable paper jam. When a jam 

occurs, the system will alert you as to where the jam has taken place. Clear the 

jam, press the white On button to reset the interlock system, and press 

Continue

 on the dialog box (Figure 4-22) to continue running the job.

Figure 4-22: Jam dialog box

Tips for clearing jams

-  Don’t rush

Develop good habits in clearing jams to maintain the 

sequence integrity of the document and check. If you fail to do this, you can 

be sure you will hear from the supervisor in Remittance Processing. Speed 

is of no use without quality. You will improve with practice; thoroughly 

trained operators average under 20 seconds to clear a jam and get the 

machine running again.

-  Clear only the actual jam

Remember that the machine will clear the 

paper path automatically. You only have to deal with the actual crunch. 

Check “dead zones” where an envelope may not be positively controlled by 

the belts.

-  Match up each check and document

Doing this will greatly reduce the 

possibility of mis

-

matching checks and documents. Looking through 

batches of “finished work” manually wastes time.

Содержание Eagle Remittance Processor

Страница 1: ...ished or stored in a database or retrieval system other than for its intended use without the express written consent of OPEX Corporation September 2021 Eagle Operator Manual WARNING Read this manual...

Страница 2: ...ial number of the product ready see Product Label on page 14 For other inquiries OPEX Corporation 305 Commerce Dr Moorestown NJ 08057 4234 USA Tel 1 856 727 1100 Fax 1 856 727 1955 https www opex com...

Страница 3: ...History Doc Rev Date Changes click blue text to go to that page 21 01 Sept 27 2021 Complete overhaul of existing manual This includes bringing it up to modern formats updating to the current version o...

Страница 4: ...ns 13 2 3 Machine Labels 14 2 3 1 Product Label 14 2 3 2 Pinch Point Caution Label 15 2 4 Enclosed paper path 16 2 5 Interlock system 17 Chapter 3 Overview 3 1 What Does It Do 20 3 2 Module Descriptio...

Страница 5: ...ob 55 4 5 4 Using the Run screen 59 4 5 5 Stopping and Resuming a Job 66 4 5 6 Clearing jams 67 Chapter 5 Maintenance 5 1 Cleaning the System 74 5 1 1 Acetone 74 5 1 2 Alcohol 74 5 1 3 Detergent based...

Страница 6: ...erview 88 A 2 Creating a report 89 A 2 1 Overall System Performance Measures 91 A 2 2 Performance Details 93 A 2 3 Overall Jam Data 94 A 2 4 Jam Stop Information 94 A 3 Backing Up Statistics 95 A 3 1...

Страница 7: ...1 Eagle Operator Manual 1 Introduction 1 1 About the Manual 8 1 1 1 Manual navigation aids 8 1 2 Safety Message Conventions 9...

Страница 8: ...ual will be updated to reflect equipment design changes part number changes or to correct errors a table detailing the document revision history can be viewed on page 3 Be sure to retain the latest el...

Страница 9: ...equipment DANGER Indicates a hazardous situation that if not avoided will result in death or severe injury The use of this signal word is limited to the most extreme situations WARNING Indicates a haz...

Страница 10: ...10 Introduction Eagle Operator Manual OPEX Corporation This page is intentionally blank...

Страница 11: ...perator Manual 2 Safety 2 1 Safety Guidelines 12 2 2 Emergency Stop Buttons 13 2 3 Machine Labels 14 2 3 1 Product Label 14 2 3 2 Pinch Point Caution Label 15 2 4 Enclosed paper path 16 2 5 Interlock...

Страница 12: ...lts on machine Do not attempt to bypass any safety device or otherwise render the door interlock mechanisms non functional Do not attempt to reach into the machine mail pathways while the machine is p...

Страница 13: ...o stop the machine in an emergency If necessary push the nearest e stop and the machine will stop immediately To restart the machine pull the e stop out clear the machine and press the white On button...

Страница 14: ...afety hazards and provide important information about the machine 2 3 1 Product Label Location Module 1 inside the door where the host computer is located see Table 2 1 Purpose Identifies product elec...

Страница 15: ...dicates a potential pinch hazard The pinch hazard symbols are placed throughout the machine in places where there is the potential for the operator to get a finger or other article squeezed between tw...

Страница 16: ...velope check and document through the machine is protected by clear acrylic doors Figure 2 2 These doors allow you to see the machine in operation without risk of injury The machine will not start up...

Страница 17: ...agnetic interlocks have been installed on the front doors of the Eagle machine Figure 2 3 and Figure 2 4 The interlock system will shut the machine down whenever a cover is lifted or a door is opened...

Страница 18: ...18 Safety Eagle Operator Manual OPEX Corporation This page is intentionally blank...

Страница 19: ...nput Output and Control Locations 22 3 3 1 Input Locations 22 3 3 2 Output Locations 24 3 3 3 Control Locations 26 3 4 Operator Station 29 3 4 1 Host Computer 30 3 5 The Paper Path 31 3 5 1 Jobs 39 3...

Страница 20: ...chapter 3 5 The Paper Path on page 31 1 As envelopes enter the machine from the conveyor the Eagle first outsorts any that contain metal or are too thick to process 2 The envelope is cut open and its...

Страница 21: ...appen in Module 2 The conveyor s feeder is attached to this module and it also houses part of the cutter path the content imagers MICR reader and the orientation sequencing areas This module is someti...

Страница 22: ...ed to interact with as part of a run For these diagrams inputs and outputs refer to physical envelopes checks and documents going into or being taken out of the machine 3 3 1 Input Locations Figure 3...

Страница 23: ...e up for outsort rates of up to 15 The Buffer Feeder Lever on top allows you to disengage it This can be useful when clearing jams Content drop slot This was designed to fill a role similar to the Con...

Страница 24: ...tor Manual OPEX Corporation 3 3 2 Output Locations Figure 3 4 Output Locations descriptions on next page Stacker bins Trash bin Reunite bin Singulator pit Content reunite Reject bin 0 Outsort bin 1 Ou...

Страница 25: ...ieces that do not meet the job s expectations Reject bin 0 Stubs and checks are sent here when there is a problem with imaging MICR reads OCR reads or orientation Reunite bin When the envelope and con...

Страница 26: ...wing pages B C B A B B A C Host On Off Panel Machine Start Stop Panel Bin Panel Each bin On Off Start Resume Stop Cancel Status Light Standby light E stop Illuminated display Bin light button Report p...

Страница 27: ...te On button will blink continuously Once the interlock condition is satisfied you must press the button before the Eagle can start or resume Machine Start Stop Panels The Eagle monitors the paper pat...

Страница 28: ...s See Operator Station on page 29 for more details Keyboard Tray The keyboard and mouse for the host computer are in a tray that slides out of Module 3 The touch screen is normally adequate for normal...

Страница 29: ...m are accessible from the operator station Figure 3 6 From this station the operator is within easy reach of the touch screen monitor outsort bins reunite bins refeeders and the main feeder Figure 3 6...

Страница 30: ...oftware to manage operators run jobs and create system efficiency reports The keyboard and mouse are located in the drawer beneath the reunite sorting area The Eagle Host computer is located in the ca...

Страница 31: ...piece is placed in front of another imaged oriented and stacked This section describes how the Eagle converts your mail from envelope to image Refer to Figure 3 8 The process is as follows Step 1 Qua...

Страница 32: ...ring device TMD looks like a miniature wringer from an old fashioned washing machine The TMD and metal detector Figure 3 9 qualify each envelope that passes come out of the feeder Envelopes which do n...

Страница 33: ...nual OPEX Corporation Step 2 Cutting As each envelope proceeds through the cutting station Figure 3 10 the leading edge top and bottom of the envelope are cut The trailing edge of the envelope is not...

Страница 34: ...ed out into one long piece of paper Extracted contents are sent to one paper path while the envelope is directed on a separate path Figure 3 11 A thickness check is then performed on each paper path E...

Страница 35: ...nt the check and document are right on top of each other just as they were in the envelope The Eagle singulates separates the contents of the envelope so that one piece goes first and the other follow...

Страница 36: ...an perform many functions that previously had to be done off line Character Amount Recognition CAR and Legal Amount Recognition LAR Accounts Receivable Conversion ARC and Check 21 decisions can be mad...

Страница 37: ...14 Any check or document that enters the paper path backwards can be flipped end for end so it faces the right way as it enters the stacker Any check or document that enters the paper path upside dow...

Страница 38: ...properly sequenced and oriented the machine stacks them in the appropriate stacker bins Figure 3 15 Your machine may be configured with 2 3 or 4 stacker modules with 8 bins per module The last bin in...

Страница 39: ...length of 7 75 inches and a document length of up to 7 5 to provide a good fit within the envelope Shorter envelopes and documents will enhance throughput rates longer envelopes will degrade the thro...

Страница 40: ...elope as it feeds into the system This is not an optimal situation because the jam rate in the extractor will likely be higher at the reverser causing overall productivity to degrade A quality envelop...

Страница 41: ...tor with an Entry level account will only be able to run jobs User A User level account will allow an operator to run jobs and create statistical system efficiency reports Supervisor A Supervisor leve...

Страница 42: ...dge opposite the stamp Plastic windows within 2 of the edge opposite the stamp will increase reunites due to static attraction Long flaps Allowed up to from bottom edge Envelopes with Attached Bangtai...

Страница 43: ...t they must not have the same magnetic profile as the check OCR Single font per document OCR A OCR B E13B and others up to 3 lines with a maximum of 80 characters per line Paper Thickness Variation Al...

Страница 44: ...verview Eagle Operator Manual OPEX Corporation Table 3 5 Environmental Specifications Sound Level 84 5 dB average Ambient Temperature 60 85 F Humidity 40 95 relative humidity BTU Output 24 125 BTU 34...

Страница 45: ...pening the Host software 47 4 3 Navigating the Host software 48 4 4 Closing the Host software 49 4 5 Running Jobs 50 4 5 1 Selecting a job 50 4 5 2 Loading envelopes 53 4 5 3 Starting the job 55 4 5 4...

Страница 46: ...on will light up and the standby light will remain solid The machine will begin its power up routine and the computer and monitor will come on Note If the ON button is flashing this means an interlock...

Страница 47: ...start it manually Open the Host software 1 If the Host software is not already running double click on the Eagle icon on the desktop OR click Start Programs OPEX Eagle to open it 2 The Host software...

Страница 48: ...ccess the various functions of the software Figure 4 3 Explorer bar The buttons on the Explorer bar may change depending on what function the software is performing The following four buttons always a...

Страница 49: ...his returns you to the opening screen Exit Host Closes the Host software and return to the Windows desktop Shutdown Close the Host software and shut down the Host computer To close the Host software 1...

Страница 50: ...the job and clearing jams 4 5 1 Selecting a job 1 Click OPEX Job Select 2 Select the job you want to run in the Job Select screen and click Select Figure 4 5 Figure 4 5 Job Select screen If the job yo...

Страница 51: ...run type 4 5 1 1 1 Normal extraction The Normal extraction run type will run the job as it was originally set up Envelopes will feed from the main feeder and contents will be imaged and sent to the n...

Страница 52: ...type for what you plan on running Table 4 1 Refeeder run types Singles in refeeder Singles transactions include one stub followed by one check These are the most commonly run refeeder transactions The...

Страница 53: ...n a stack on the conveyor as shown in Figure 4 7 and Figure 4 8 Make sure the envelopes are facing the proper direction as per the job parameters If possible load the entire conveyor with envelopes No...

Страница 54: ...the conveyor until the job is completed 4 5 2 1 Refeeder modes When running in one of the refeeder modes the Eagle will feed documents and checks from the content refeeder as opposed to feeding envelo...

Страница 55: ...Click one of the following buttons on the Run screen to begin the run Run 1 Runs one envelope Run 5 Runs five envelopes Run 25 Runs twenty five envelopes Continuous Runs envelopes until the feeder is...

Страница 56: ...foreign object and be outsorted before being opened at all Some envelopes that are not opened properly will be outsorted because the contents could not be removed Other envelopes will open correctly b...

Страница 57: ...t to do with it Outsort bins Bin 1 Bin 2 Envelopes that do not meet the job s expectations Envelopes sent to Bin 1 cannot be run through the machine again envelopes sent to Bin 2 may be placed back on...

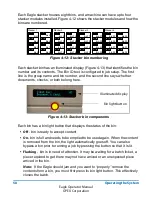
Страница 58: ...gain When the content is removed from the bin the light automatically goes off You can also bypass a bin prior to running a job by pressing the button so that it is lit Flashing bin is in need of atte...

Страница 59: ...several tabs which will display different sets of information in the main window Figure 4 14 Run screen 4 5 4 1 Stats tab The Stats tab displays statistical information from the current job This infor...

Страница 60: ...asures This section displays the following information Input Number of envelopes the system has started to process Feed Rate Number of envelopes per hour the system is currently feeding The formula fo...

Страница 61: ...o clear a jam This number is fixed at 20 seconds 4 5 4 1 2 Time Figure 4 16 Time The Time section Figure 4 16 displays information about the time it is taking the system to process the job This inform...

Страница 62: ...pieces were reunited and sent to the Reunite bin Rejects Pieces that were rejected Clean Mail Pieces that were successfully processed 4 5 4 2 Outsorts tab The Outsorts tab displays the possible reaso...

Страница 63: ...B for the bitonal image Press the up and down arrow keys to cycle checks and documents and press the right and left arrows to see the front and back of the image 4 5 4 5 Groups tab The Groups tab disp...

Страница 64: ...e bin 4 5 4 7 Rejects tab The Rejects tab displays all the possible reject reasons and how many pieces were rejected for each of those reasons See Rejects on page 102 for more information 4 5 4 8 IEM...

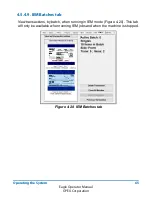
Страница 65: ...erator Manual OPEX Corporation 4 5 4 9 IEM Batches tab View transactions by batch when running in IEM mode Figure 4 20 This tab will only be available when running IEM jobs and when the machine is sto...

Страница 66: ...Figure 4 21 Cancel replaces the Run buttons The Cancel button stops the job The feeder stops bringing new envelopes into the machine and the Eagle finishes processing any pieces that are currently on...

Страница 67: ...tegrity of the document and check If you fail to do this you can be sure you will hear from the supervisor in Remittance Processing Speed is of no use without quality You will improve with practice th...

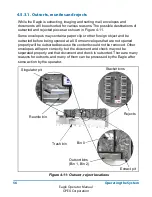
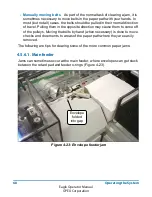
Страница 68: ...Pulling them in the opposite direction may cause them to come off of the pulleys Moving the belts by hand when necessary is done to move checks and documents to areas of the paper path where they are...

Страница 69: ...the System 69 Eagle Operator Manual OPEX Corporation To clear jams here pull the lever away from the paper path as shown in Figure 4 24 and remove the misfed envelopes Figure 4 24 Clearing envelope fe...

Страница 70: ...s at the buffer feeder turn the switch to the jam clear pass thru position as shown in Figure 4 25 and remove the misfed envelopes Figure 4 25 Buffer feeder control switch in the jam clear pass thru p...

Страница 71: ...ne is stopped Figure 4 26 Clearing refeeder jams 4 5 6 4 Stacker modules Use the jam clearing tool to turn certain pulleys Figure 4 27 in the stacker modules and free documents from the paper path Thi...

Страница 72: ...72 Operating the System Eagle Operator Manual OPEX Corporation Figure 4 28 Jam clearing tool in its holder Outsort bin 1 Jam clearing tool...

Страница 73: ...n and Air Filtration System Maintenance 78 5 2 1 Pickup locations 78 5 2 2 Air Scrubber Unit 79 5 2 3 Power and electrical safety 79 5 2 4 Maintenance 79 5 3 Managing Operator Accounts 81 5 3 1 Creati...

Страница 74: ...remove grease or lubricant from them Use only isopropyl or rubbing alcohol on the Eagle Denatured alcohol is much stronger and more hazardous Do not use denatured alcohol for any reason Exercise care...

Страница 75: ...y wiping down the mechanism with a cloth moistened with water 5 1 4 Shift maintenance Shift operators should perform the following duties Vacuum all areas of the paper path Pay special attention to Fe...

Страница 76: ...utsort TMD area Figure 5 2 Remove any tape paper or other obstructions from the TMD rollers and surrounding area Figure 5 2 Outsort TMD area Inspect each cutter Figure 5 3 Remove any paper chips that...

Страница 77: ...X Corporation Clean the singulator tires Figure 5 4 Figure 5 4 Singulator tires Check the extract area Figure 5 5 for tape paper scrap etc Check the envelope and content TMD rollers for debris and rem...

Страница 78: ...al benefits include improved machine functionality maintainability and appearance 5 2 1 Pickup locations Refer to Figure 5 6 Dust pickup locations are provided where paper handling causes shear betwee...

Страница 79: ...ol Panel 5 2 3 Power and electrical safety The dust collection system is powered by 120VAC 60Hz It draws about 3 5 amps on the High setting 5 2 4 Maintenance The only routine maintenance required is c...

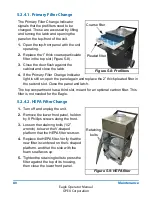
Страница 80: ...2 thick pleated filter in the second slot Close the panel and latch The top compartment has a third slot meant for an optional carbon filter This filter is not needed for the Eagle 5 2 4 2 HEPA Filter...

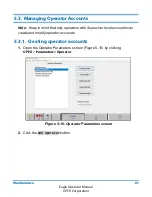
Страница 81: ...ep in mind that only operators with Supervisor level accounts can create and modify operator accounts 5 3 1 Creating operator accounts 1 Open the Operator Parameters screen Figure 5 10 by clicking OPE...

Страница 82: ...information 5 3 2 Modifying deleting operator accounts 1 Open the Operator Parameters screen by clicking OPEX Parameters Operator 2 Highlight the operator account you wish to modify and click Modify...

Страница 83: ...ds to be replaced Note Check the expiration date of the new cartridge you plan to use The Eagle printer cartridges when stored in sealed containers have a shelf life of two years from the date of manu...

Страница 84: ...e print head will extend forward for you to replace the cartridge Figure 5 13 Figure 5 13 Extended print head 3 Lift the latch that holds the printer cartridge in position Figure 5 14 and remove the c...

Страница 85: ...cartridge in the old cartridge s place 5 Press the Replaced Right Left Printer Cartridge button on the screen Figure 5 15 Figure 5 15 Replacement confirmation 6 Click Yes when asked to reset the prin...

Страница 86: ...y purging the heads to improve print quality To purge the print heads press the Purge button for the appropriate head on the ink cartridge maintenance screen Figure 5 12 on page 83 Note After purging...

Страница 87: ...1 Statistics Overview 88 A 2 Creating a report 89 A 2 1 Overall System Performance Measures 91 A 2 2 Performance Details 93 A 2 3 Overall Jam Data 94 A 2 4 Jam Stop Information 94 A 3 Backing Up Stati...

Страница 88: ...summary of several runs over a certain period of time Summary Report An individual report will be available after you have run any job To create an individual report select OPEX Statistics Individual...

Страница 89: ...ure A 2 Figure A 2 Report Criteria 2 For a summary report use the list on the left to select which job s you want to include Select All Jobs to include all the jobs run on this machine 3 The next list...

Страница 90: ...er s memory Read thru previous runs To find runs deleted from the current list of jobs and operators For example if a job file was deleted from the job name frame it is still stored in the stats file...

Страница 91: ...s by run Export saves the report as a txt file Print sends the report to the report printer Table A 1 Overall System Performance Measures Term Description Input Number of envelopes to enter the paper...

Страница 92: ...operator was clearing a jam The formula for the Jam Clear Time is Reference Feed Rate This calculation approximates the feed rate if jams are cleared in the time designated by the Reference Jam Clear...

Страница 93: ...t with the Run screen open without a job running Outsorts The Outsorts section of the Performance Details lists the number of envelopes that the Eagle could not process and the reasons why These reaso...

Страница 94: ...Any time the Eagle is halted due to a problem which could have been avoided by the operator i e feed empty no bin available etc Stop Index Table A 4 Jam Stop Information Term Description Reorder Gate...

Страница 95: ...s 2 In the Backup Statistics for field use the up and down arrow to select the year of statistics you want to backup 3 Select the appropriate quarter of the year or the entire year 4 Click Backup loca...

Страница 96: ...96 Eagle Operator Manual OPEX Corporation This page is intentionally blank...

Страница 97: ...B Eagle Operator Manual B Outsorts Reunites and Rejects B 1 Outsorts 98 B 2 Reunites 100 B 3 Rejects 102...

Страница 98: ...parameter Thin Outsort The outsort TMD determined that average thickness of an envelope was less than the full envelope Average Thickness Low job parameter Thick Outsort The outsort TMD determined tha...

Страница 99: ...than one report for an envelope to the main control board Damage Outsort The envelope OCS detected a damaged envelope Mark Outsort Could mean that envelope OCS either detected or did not detect a mar...

Страница 100: ...te sensor is not tripped Everything went on content path When the Content TMD sensor is tripped but the Envelope TMD sensor is not tripped Everything went on envelope path When the Envelope TMD sensor...

Страница 101: ...non stamp half too thin The Envelope TMD determines the envelope non stamp half is too thin to fit thickness parameters Envelope non stamp half too thick The Envelope TMD determines the envelope non...

Страница 102: ...n control board Unknown MICR Profile The content MICR could not recognize the profile of the magnetic ink on the check in a pair MICR Found Two Statements The content MICR found no MICR ink on either...

Страница 103: ...G Eagle Operator Manual Glossary G 1 List of Acronyms 104 G 2 List of Terms 105...

Страница 104: ...d MICR and OCR data such as account and check numbers and CAR information MICR Magnetic Ink Character Recognition Used by the system to read the magnetic ink letters numbers and symbols found on docum...

Страница 105: ...mittance piece included with the check that details the customer s account payment information Grayscale Image format where all pixels are processed as a shade of gray i e gray level Gray levels range...

Страница 106: ...106 Eagle Operator Manual OPEX Corporation Transaction One or more stubs followed by one or more checks Transaction Boundary A term used to indicate the beginning or end of a single transaction...

Страница 107: ...ness challenges for both today and tomorrow Our scalable Warehouse Document and Mail Automation solutions improve workflow accelerate change and drive efficiencies in infrastructure We are a family ow...

Страница 108: ...OPEX Corporation 305 Commerce Drive Moorestown NJ 08057 4234 USA http www opex com...

Отзывы: