background image


OMRON 

NS Series Quick Start Manual 

Page 24 
 

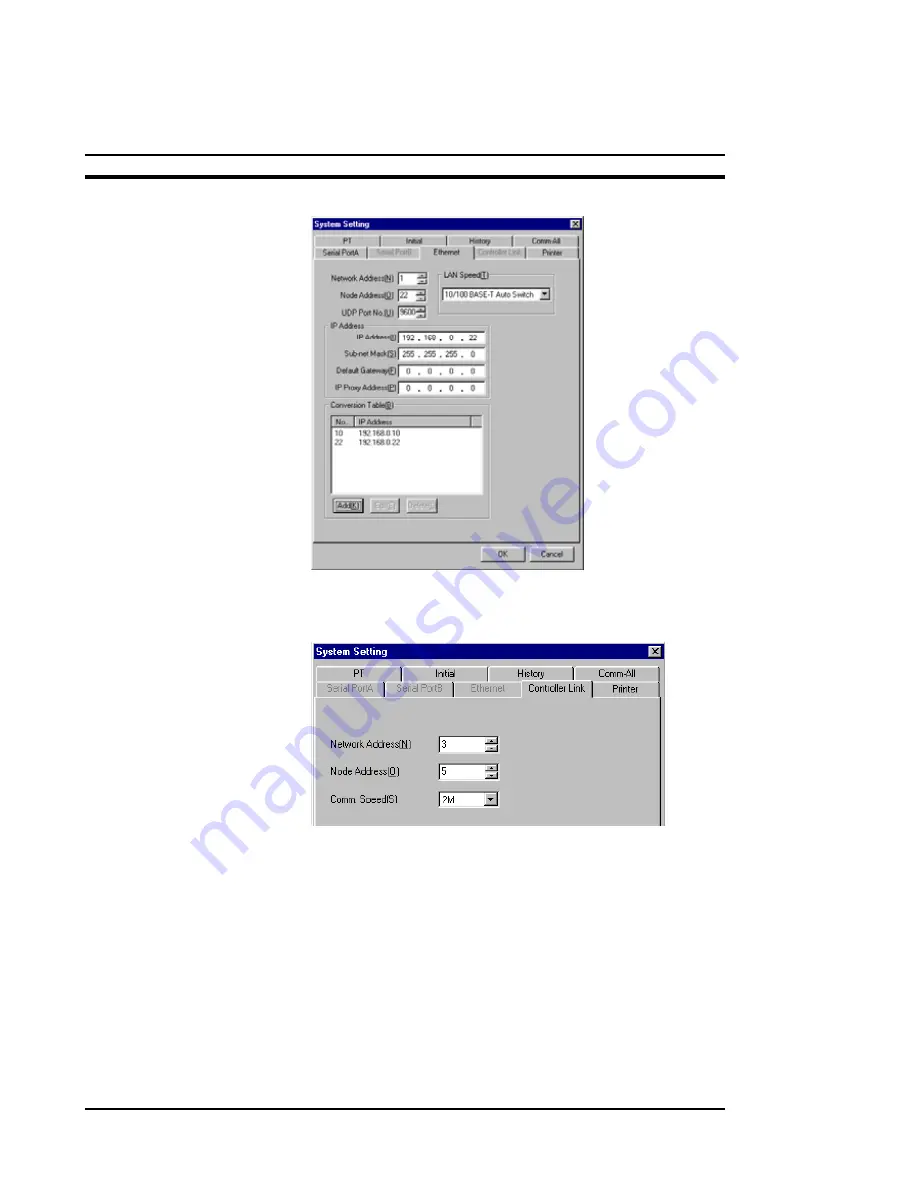
and the IP address have to be entered. 


9.  When the Controller Link (CLK) is enabled in the [Comm-All] tab, 

the Controller Link settings can be configured. There are settings 
for the network and node numbers. Also the communication 
speed must be set the same as the rest of the CLK network. 


Содержание NS10

Страница 1: ...NS Series Quick Start Manual ...

Страница 2: ...ed stored in a retrieval system or transmitted in any form or by any means mechanical electronic photocopying recording or otherwise without the prior written permission of OMRON All copyright and trademarks acknowledged No patent liability is assumed with respect to the use of the information contained herein Moreover because OMRON is constantly striving to improve its high quality products the i...

Страница 3: ...le screen 13 3 1 Creating a New Project 13 3 2 Project Screen properties 14 3 3 Explanation of NS Terminal memory 17 3 3 1 The Internal Memory B W 17 3 3 2 The System Memory SB SW 17 3 4 System Settings 20 3 5 Host Registration 25 3 6 Creating a screen 26 3 6 1 Screen Object list 27 3 6 2 Screen example 30 4 How to debug a project 35 4 1 Transferring Data to from NS 36 4 1 1 Before Connecting 36 4...

Страница 4: ...ner may not operate properly Installation Procedure 1 2 3 1 Start up Windows 95 98 NT Me 2000 or XP 2 Close all applications before executing installation Execute the following files from the NS Designer CD ROM according to the OS being used and then restart the computer Windows 95 a Execute CDROM Update 401comupd exe and then restart the computer b Execute CDROM Update DCOM English dcom95 exe and...

Страница 5: ... Next Button The window will not be displayed if FinsGateway Ver 3 0 has been installed 9 The window to specify the folder in the Start Menu in which to register a shortcut for the program will be displayed Specify a folder in the Windows Start Menu folder for creating a shortcut to FinsGateway The following folder is displayed as the default location for creating shortcut keys Start Menu Programs...

Страница 6: ...st of the RS232 RS422 communication can be PLC PC or Bar Code Reader Ethernet and CLK are used for bus communication and the purposes of use are almost unlimited In addition there is possibility to attach the video board to the NS12 the NS10 and the NS8 It can be used for view the live video image from Vision Systems camera or surveillance camera Also e g logged data and screen data can be saved i...

Страница 7: ...tausing the MemoryCard MemoryCardConnector Usedtoconnect thememory cardfor storing and transmitting screendata log data andsystemprograms Serial Port BConnector Usedtoconnect thehost NS Designer andBar CodeReader Uses anRS 232C 9 pinconnector USBSlaveConnector This is aUSBTypeB connector It cannot beusedwithNSVer 5 0systems USBHost Connector Usedtoconnect to printers It is aUSBType Aconnector FGTe...

Страница 8: ...oryCard MemoryCard Connector Used to connect the memorycar d for storing and transmitting screen data log data andsystem programs Serial Port B Connector Used to connect the host NS Designer and Bar Code Reader Uses an RS 232C 9 pin connector USB Slave Connector This is a USB Type B connector It cannot be used with NS Ver 5 0 systems USB Host Connector Used to connect to printers It is a USB Type ...

Страница 9: ... Supply Input Terminals Used to connect the power supply Ethernet Connector Used to connect the Ethernet cable Uses a 10Base T 100Base T 8 pin modular plug USB Slave Connector This is a USB Type B connector It cannot be used with NS Ver 5 0 sy stems FG Terminal Used to prevent malfunctions due to noise interference 2 4 Starting the PT for the First Time Always perform the following operations when...

Страница 10: ...K Button 6 Select the PT Settings tab Set the time and date 7 Press the date display area under the heading Calendar Check A dialog box will be displayed Input the date in yyyy mm dd format Example Enter January 1st 2000 as 2000 1 1 8 Press the time display area under the heading Calendar Check A dialog box will be displayed Input the time using a 24 hour clock in hours minutes seconds format Exam...

Страница 11: ...ort A 1 1 NT Link 1 N NT Link See note For connecting the NS Designer or Bar Code Reader Serial port B 1 1 NT Link 1 N NT Link See note For connecting the NS Designer or Bar Code Reader Ethernet interface FINS communications For connecting the NS Designer Note NT Link can be set on either normal or high speed communications Note NT Link 1 N may only be configured for 1 serial port The following th...

Страница 12: ...e read more specific instructions from NS Series Setup Manual V083 E1 xx section 3 6 or NS Series Operation Manual V074 E1 xx First the data has been transferred from NS Designer to the Memory Card By turning ON pin 6 of the DIP switch and using a startup program the PT is set to read screen data from a Memory Card Note System data can only be transferred using a Memory Card ...

Страница 13: ... and how to download it to the PT 3 1 Creating a New Project Start the NS Designer program Before creating screens you need to create a project which will contain the screens 1 2 3 1 Create a new project Select File New Project 2 Specify the PT model and System Version Select the right model and system version click on OK button 3 Choose the screen creating procedure Select New Screen and click on...

Страница 14: ...t This can be anything Set a number of labels Screens can contain several languages Project Properties is the only place to specify different languages This setting will affect the whole project 1 Click of Switch Label tab 2 Set the number of languages e g 2 for No of labels 3 Set first language for Label Name of Switch No 0 4 Set second language for Label Name of Switch No 1 1 2 3 4 ...

Страница 15: ...Select Language tab Japanese or English 3 Click on OK button Confirmation dialog will be displayed Click on Yes 4 Save the project 1 Create a new folder 2 Input a file name 3 Click on Save button 5 Confirmation dialog will be displayed Click on Yes to all button 6 The screen will be closed when saving a project Dialog box to open a screen will be displayed automatically Open the screen again by cl...

Страница 16: ...gs are in the Size Pop up tab The Screen type can be Normal or Pop up Screen You can check the Use as Pop up Screen if you want the screen to be displayed on top of the current screen Note that the first screen should be normal screen so do not check this option at this time 9 Click on the Background Others tab Then click on the Set Color button 1 2 Check this if you want to use these settings als...

Страница 17: ... by the user Bit memory is used to signal pieces of information that indicate ON OFF status for functional object addresses and control flags The word memory in a PT is indicated by W The size of this memory is 32 768 words Addresses from W0 to W32767 can be read and written by the user Word memory is used to store all numeral and character string data including data for allocated addresses for fu...

Страница 18: ...B19 Control Prohibit input SB20 to SB23 Reserved SB24 Notification control Video Capture SB25 Control Starts Printing SB26 Control Stops Printing SB27 Control Test Pattern Printing SB28 Control Printer head cleaning SB29 Control Update Printer Status SB30 Notification Printer Busy Status SB31 Notification Notification of Printer Error SB32 Notification control Alarm event history initialization SB...

Страница 19: ...up screen 3 display position Y coordinate SW10 Notification control Display label number SW11 Reserved SW12 Reserved SW13 Control Password number for input prohibit clear SW14 Notification Current time min s SW15 Notification Current date and time day hour SW16 Notification Current date year month SW17 Notification Current day day of the week SW18 Notification No of generated alarms and events SW1...

Страница 20: ... can be set to OFF or Display Erased and then start up time can be between 1 255 minutes 3 Initial tab includes settings for initial screen system memory and video input You can use the default settings Section 3 3 includes the explanation of system memory By clicking the System Memory List button the memory list window will open There are four pages of fixed system memory settings By selecting ch...

Страница 21: ...OMRON NS Series Quick Start Manual Page 21 ...

Страница 22: ...r in the NS terminal Serial port A and B can communicate with PLC or Bar Code Reader If communication is not needed choose None For example when Serial Port A setting is PLC the specific settings about serial port A are in the Serial PortA tab You can set all communications at the same time but then there is no guarantee the quality of the connection The communication speed may be slower or errors...

Страница 23: ...tB tab has the serial port B settings When you choose the Bar Code Reader as serial port A communication in the Comm All tab the protocol can be set to match communication setting of the connected bar code reader 8 When Ethernet is enabled in the Comm All tab the settings can be configured There are normal network node and UDP Port number settings IP address settings but also conversion table In t...

Страница 24: ...s have to be entered 9 When the Controller Link CLK is enabled in the Comm All tab the Controller Link settings can be configured There are settings for the network and node numbers Also the communication speed must be set the same as the rest of the CLK network ...

Страница 25: ...ion procedure So the Host Name specifies the PLC name of communication destination 1 2 3 1 Select Settings Register Host 2 Register a host Select the first line and click on Edit 3 The default setting is SerialA You can set your own host name if you want All other settings are fixed for this entry and can not be altered 4 To add a new host click on Add button write any Host Name and set the networ...

Страница 26: ...n ignore this section 3 5 Host Registration 3 6 Creating a screen When creating a new screen the grid setting will help to put a screen object on the right place To open the grid settings select Layout Grid All the viewed toolbars can be chosen from View Toolbars Snap to Grid means that the screen objects will snap to closest grid dot Display Grid means that the grid dots will be displayed on the ...

Страница 27: ...double click on the object In the menu there are normal edit f ti t b t l The properties of the object can also be set by double clicking on the object The property window will then appear 3 6 1 Screen Object list Here are the short expalanations of the functions for further information please refer to NS Series Programming Manual V073 E1 xx Icon Function ON OFF Button Controls the ON OFF status o...

Страница 28: ...from the specified address and input data from a keyboard List Selection Displays the registered character strings in a list for selection Thumbwheel Switch Numerically displays the word data from the specified address and increment and decrement the data when increment decrement buttons are pressed Analogue Meter Displays graphs in three colors in circles semi circles or quarter circles for the w...

Страница 29: ...from PLC preset recipe data such as instructions for manufacturing process Video Display Displays pictures imported from visual devices such as a Video camera or vision system Frame Switches the specified rectangle area frame Table Displays functional objects in a table format Fixed objects are from left Rectangle displays a rectangle Circle Oval displays a circle or ellipse Line displays a line P...

Страница 30: ...creen or click on New Screen button see below 3 6 2 Screen example 3 6 2 1 ON OFF Button Select the ON OFF Button object and draw the button on the screen Then double click on it The properties window will appear Project buttons from left Create a New Project Open Project Save Project Screen buttons from left Create a New Screen Open existing Screen Save the Screen 1 2 3 4 ...

Страница 31: ...select any communications in the System Setting window there are no Hosts in the Host Name list This programming example will use only the internal memory not any PLC communications 5 Select the PT Memory as the Host Name 6 Select the Internal Memory as the Area Type 7 Then type or click the address in Number section e g 10 Note that when the Internal Memory B is selected there is no need to set W...

Страница 32: ...you can click on the OK button to close ON OFF Button properties window 3 6 2 2 Bit Lamp Next select the Bit Lamp object draw it on the screen and double click on it The Bit Lamp property window will appear 1 First choose the Lamp Type Double lined Circle 2 Then set the Display Address by pressing Set button or type directly in the address field B10 This address is the same bit address which we al...

Страница 33: ...he object from Functional Object list draw it on the screen and double click on it In the General tab you can configure the following settings 1 Display Type is set to Decimal 2 Storage Type is set to UINT unsigned 1 word That means that now the numeral range can be between 0 65535 see the mark 3 4 Format is set to 4 integer and 0 decimal 5 The address where this object writes to and reads from is...

Страница 34: ...e rest of the settings should be as default so click the OK button Now the example screen is ready and it should resemble the following More advanced programming instructions are included in to the NS Series Programming Manual V073 E1 xx 1 2 3 4 5 ...

Страница 35: ... selecting the Start Test from Current Screen the Test Tool will open the screen which was opened in the NS Designer Clicking on Start button the Test Tool will start and functions can be tested by clicking on the objects which are just made on the screen There is also the Address list in the Test Tool window that shows the current values of the addresses Display types and contents can be change I...

Страница 36: ...e right mouse button on the icon and select Settings 3 Set the following settings when connecting to serial communications a Click the Basic tab and select Services from the directory tree at the left of the screen b Select Serial Unit under Service Settings and then click the Start button c Select Networks Networks and Units from the directory tree at the left of the screen d Double click Units C...

Страница 37: ...Before you click the Connect button make sure that the cable is connected 3 After the Connect button is pressed the PT screen should change to Connection Completed screen If not check the cable connections and settings refer the FinsGateway settings in section 4 4 1 Then try to connect again 1 2 3 4 ...

Страница 38: ...in the project as the target data to transfer Click the Select Update Screen button to select only transfer of the screens between the PT Memory Card and your computer that have changed since the last transfer This setting is particularly useful for correcting and updating screen data repeatedly 6 Click the Button to send data to the PT Memory Card from the computer and click the Button to send da...

Страница 39: ... displayed at the transfer tool Click the Yes Button to restart the PT Click the No Button to return to the Screen Data Transfer Dialog Box and continue transferring screens Even if the No Button was pressed the PT Restart Confirmation Dialog Box will be displayed again when the Screen Data Transfer Dialog Box is exited The PT will be restarted if the Yes Button is pressed but if the No Button is ...

Страница 40: ...isplayed at the bottom right of the screen and the PT will be in standby status until a normal connection is possible To change the communications settings select the System Menu and change the settings The system menu can be displayed by pressing two of the four corners of the touch panel simultaneously There are many settings in the PT s System Menu Many of those are the same as System Settings ...

Страница 41: ... screens and components from other projects When editing existing screen objects the fastest way to edit addresses and colors is simply edit them directly on the toolbar see the picture below In the Test mode each time you double click on a screen where no object is registered the test window style changes To display a menu bar make a double click three times When a menu bar is displayed you can e...

Страница 42: ... by using a memory card the screen data can be transferred faster than with Ethernet Before using Memory Card functions please read more specific instructions from NS Series Setup Manual V083 E1 xx section 3 6 For e g the first time downloading you can make yourself the RS232C connection cable between the computer and the PT Below are the wiring instructions for the cable Computer RS 232C D9 pin m...

Страница 43: ...nications independent of the network and an EventMemory that allows shared data including data link Host Indicates the PC FA computer or personal computer functioning as the control device and interfaced with the NS series PT Initialize Process whereby some memory areas are cleared system setup is checked and default values are set Macro macro programming Indicates the programming language that ca...

Страница 44: ... PT In this manual indicates an NS series Programmable Terminal Serial Communication Indicates the industry standard RS 232C or RS 422 485 communication method System data Indicates the data what is part of the PT s operating system The Systems Data can be update only from the CF card word A unit of data storage in memory that consists of 16 bits All data areas consist of words Some data areas can...

Отзывы: