zipldr_setup&operations
www.OmniTurn.com
(541) 332-7004
(541)-332-1018 fax
Fast... Precise... A
ff
ordable...
Zip Loader Setup & Operations
Omni
Turn
Page 33 of 44
InPlace
SET-UP
Home Stop
Shuttle
Front Stop
4
ZipLoader
2PART MODE
(Qualify Face)
Locate shuttle at Front Stop.
Set InPlace Switch to light.
Locate Home Stop to just clear part in vee.
Set Home Switch to light when shuttle
is at Home stop.
Hard Stop on table should push
Program starts with part in collet.
Push-rod
Spindle Liner
2
9
(for D-L Collet)
Collet Bushing
Pusher
(Slightly larger than part)
(Same size as bar)
3
Hard Stop
Dead-Length Collet not
necessary if diameter of
stock is held very close.
Part in Dead-Length Collet
1
Put part in collet at correct length.
part back slightly.
Restrainer
8
(On table)
7
5
Home
Home Switch
6
InPlace Switch
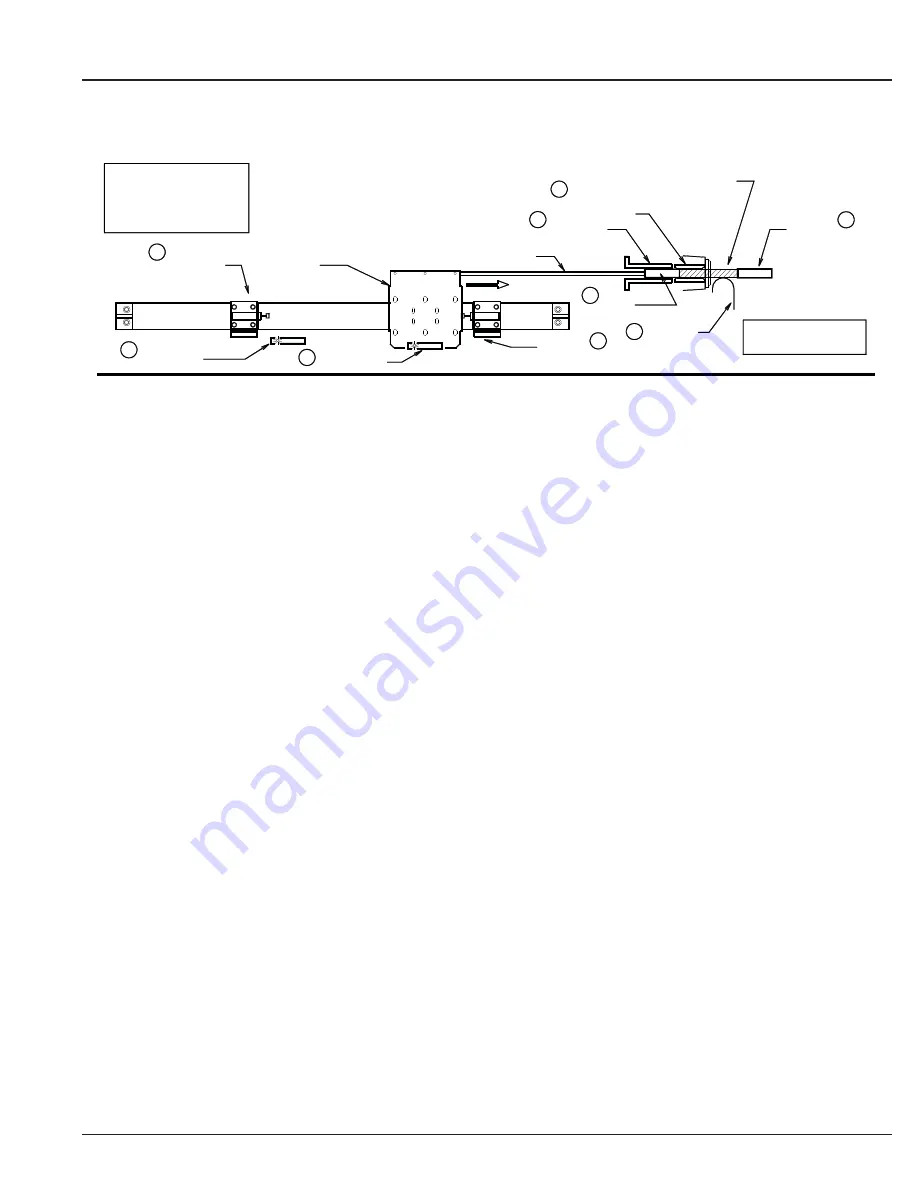
2Part Mode (M53): Qualify Face
Component Parts and Setup
Refer to the illustration above.
1. Hard Stop:
This is a hard stop mounted at a tool position on the tooling plate (table) of the Omni-
Turn. The “Restrainer” (8) stops the new part after finished part is ejected; use the hard stop to press
against face of new part. Stop should push part back against pusher to insure location.
2.
Spindle Liner:
The liner should be .020 - .040 larger than the bar to insure vibration-free operation
and reliable feeding.
3.
Pusher:
The pusher should be about the same size as the bar. The Pusher rides on the ‘vee’ of the
Loader and guides the bar into the liner. It is pressed onto the push-rod and held by a barb.
4.
Home Stop:
The Home Stop is clamped to the Rodless Cylinder with cap-screws. It mounts a shock
absorber that the shuttle contacts when at “home”. For shortest cycle times set the Home Stop so that
the Pusher just clears the end of the part when at Home.
5. Home Sensor:
The Home Sensor must light when the shuttle is at the Home Stop with the shock
absorber compressed. The sensor is held in place with a tiny screw. Do not over-tighten the screw as
this may damage the sensor.
6. InPlace Sensor:
The InPlace Sensor must light when the shuttle is at Front Stop(7). This sensor
releases the CNC to locate Hard Stop(1) at face of part. After Front Stop has been set (with part in
collet), slide InPlace Sensor from right until it lights. Slide another .050” or so to insure that it will light.
Do not over-tighten.
7. Front Stop:
The adjustable Front Stop is set so that when the shuttle is pushing against it, the part in
collet is correctly located for machining. (Z-Axis offsets are used to achieve precise length). If desired,
use M49 from MDI to push against front stop; M44 stops pushing.
8. Restrainer:
The spring-steel Restrainer should be located in X to provide just enough friction to limit
over-travel of the next part. The Hard Stop is used to push the part back to qualify face.
9. Collet Bushing:
If Dead-Length collet is required, the liner must be shortened because the i.d. of D-L
collet is smaller than standard. Make a delrin bushing from 3/4 stock and put it in collet to guide part.
NOTE:
Early Zip Loaders have combine “End of Bar” and “In Place” sensors, for a total of four.
More detailed information regarding this optional mode of operation is available from the factory.


