background image

173

9

C

a

m

e

ra

 S

e

tti

n

g

s

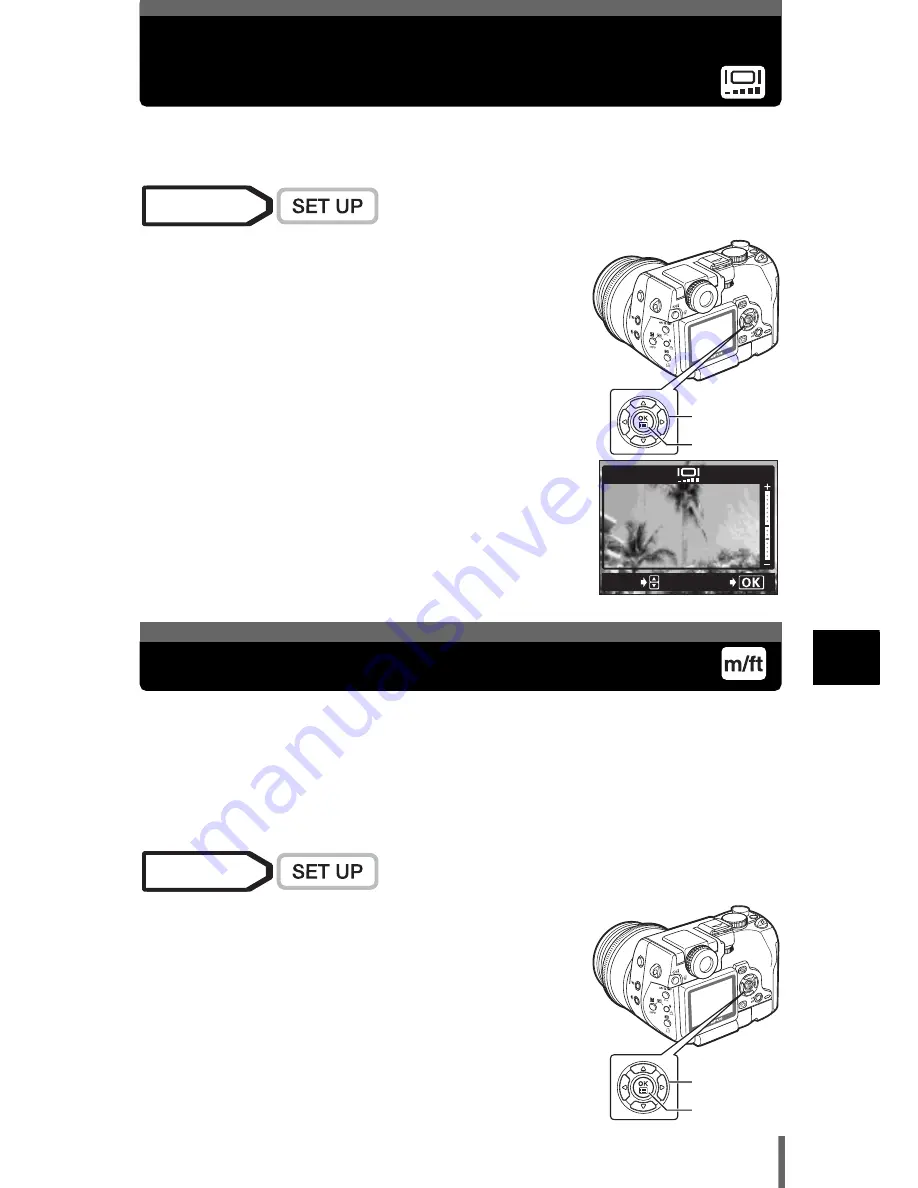
Adjusting the brightness of the monitor 
and viewfinder

This function lets you adjust the brightness of the monitor and viewfinder.
The brightness of the monitor and viewfinder can be adjusted separately.

1

Select SETUP   

s

, and press 

d

.

g

“Menu basics” (P.38)

2

Press 

ac

 to adjust the brightness of the 

monitor or viewfinder, and when you have 
set the desired level, press 

e

.

• Pressing 

a

 brightens the monitor or viewfinder, 

and pressing 

c

 darkens it.

The measurement unit can be selected from either meters or feet in the manual 
focus mode.

m

At long ranges, the camera measures in meters, and at short ranges in 
centimeters.

ft

At long ranges, the camera measures in feet, and at short ranges in inches.

1

Select SETUP   m/ft   m or ft, and press 

e

.

g

“Menu basics” (P.38)

Mode  dial

Arrow pad

OK button

ADJUSt

GO

Measurement units

Mode  dial

Arrow pad

OK button

Содержание 8080 - CAMEDIA C Wide Zoom Digital Camera

Страница 1: ...FERENCE MANUAL Click Here Explanation of digital camera functions and operating instructions Explanation of how to download images between your digital camera and PC DIGITAL CAMERA PC CONNECTION OPERATION MANUAL CAMERA OPERATION MANUAL ...

Страница 2: ...er service life Keep this manual in a safe place for future reference We recommend that you take test shots to get accustomed to your camera before taking important photographs Screen and camera illustrations shown in this manual were produced during the developmental stages and may differ from those of the actual product DIGITAL CAMERA REFERENCE MANUAL C 8080 Wide Zoom ...

Страница 3: ...th the European requirements for safety health environment and customer protection CE mark cameras are intended for sales in Europe For customers in USA Declaration of Conformity Model Number C 8080 Wide Zoom RM 2 Remote control Trade Name OLYMPUS Responsible Party Olympus America Inc Address 2 Corporate Center Drive Melville New York 11747 3157 U S A Telephone Number 1 631 844 5000 Tested To Comp...

Страница 4: ... P 16 P 29 P 46 P 59 P 70 P 102 P 121 P 145 P 166 P 176 P 186 Introduction of the camera s functions Contents Names of parts P 4 P 9 Basic Photography Advanced Photography To get that particular shot using various effects or for fine tuning the settings For playing back and editing pictures Settings that make the camera easier to operate Specifications Glossary of terms P 221 P 223 Index P 226 Mis...

Страница 5: ...t recognized card check 26 Adjusting the viewfinder 27 Attaching the lens hood 27 Holding the camera 28 Changing the angle of the monitor 28 2 Using the buttons and menus 29 Direct buttons and menus 29 Direct buttons 31 Direct button basics 31 Functions that can be set using the direct buttons 33 Using the menus 37 Menu basics 38 Shortcut menus 40 Mode menus 42 3 Shooting basics 46 Shooting mode 4...

Страница 6: ...range 74 FULLTIME AF A reliable time saving way to focus 75 P AF Changing the auto focus mode 76 Changing the position of the AF target mark 77 AF illuminator 78 Manual focus 79 Metering 81 Spot metering Center weighted metering Selecting the metering area 81 Changing the position of the metering target mark 82 Multi metering Metering the exposure at more than one point MULTI 83 AE Lock Locking th...

Страница 7: ...eset1 white balance 110 Preset2 white balance 110 Custom white balance 111 One touch white balance 111 White balance compensation 112 Saving a custom white balance 113 SHARPNESS 114 CONTRAST 115 HUE 116 SATURATION 117 SCENE MODES 117 NOISE REDUCTION 118 Histogram Displaying the luminance distribution of still pictures 119 7 Playback 121 Viewing still pictures 121 QUICK VIEW 122 Picture rotation 12...

Страница 8: ...ustom button 155 Using the custom button 156 SHORT CUT 157 Setting the shortcut menu 158 Using the shortcut menu 159 MY MODE SETUP Setting a function in My Mode 160 CONTROL PANEL Using the monitor as a control panel 163 VOLUME Adjusting the playback volume 165 9 Camera Settings 166 Formatting cards 166 Selecting a language for on screen display 167 Setting the date and time 168 Setting the warning...

Страница 9: ... Printing pictures 188 Easy printing 189 PRINT MULTI PRINT 190 ALL PRINT 193 ALL INDEX mode PRINT ORDER mode 195 Trim the picture 197 Exiting direct printing 198 If an error code is displayed 199 Miscellaneous 200 Error codes 200 Troubleshooting 201 List of menus 208 List of factory default settings 215 List of items by shooting mode 217 Camera maintenance 219 How to replace the battery CR2025 of ...

Страница 10: ...nnector gP 187 Flash gP 59 Self timer Remote control button Y gP 89 90 Viewfinder gP 27 Control dial gP 31 33 150 QUICK VIEW button gP 122 OK Menu button e gP 37 Arrow pad acbd gP 37 121 Card button CF xD gP 23 Card cover gP 22 Card access lamp gP 50 Monitor g P 28 50 Erase button S gP 51 143 AEL button AEL gP 85 Remote control receiver gP 90 Monitor button f gP 50 Connector cover g134 187 ...

Страница 11: ...5 White balance button WB gP 109 Exposure compensation button F gP 64 108 Information display button INFO gP 135 AF Macro MF button AF MF gP 79 87 88 Protect button 0 gP 142 Flash mode button gP 59 Rotation button y gP 123 Metering button 4 gP 81 Print button gP 178 Diopter adjustment ring gP 27 Speaker Tripod socket Strap eyelet gP 16 The metal clip of the strap eyelet is not shown in detail in t...

Страница 12: ...osure compensation Exposure differential 2 0 to 2 0 3 0 to 3 0 P 108 P 72 5 Battery check e f P 14 6 Green lamp P 50 7 Flash stand by Camera movement warning Flash charge Lights Blinks P 50 59 8 Macro mode Super macro mode Manual focus MF P 87 P 88 P 79 9 Noise reduction O P 118 F5 6 F5 6 1 200 1 200 04 00 04 00 04 00 0 0 0 0 3264 2448 3264 2448 F5 6 F5 6 0 0 0 0 1 1 200 200 2 2 2 2 2 2 2 2 Still ...

Страница 13: ...rk Metering target mark P 50 P 81 82 18 Number of storable still pictures Remaining recording time 30 04 00 P 104 P 55 19 AE lock AE memory B C P 85 20 Metering mode 5 4 P 81 21 ISO ISO50 ISO100 ISO200 ISO400 etc P 107 22 White balance 2 3 5 4 w to z 1 CWB1 to CWB4 V P 109 P 111 23 White balance compensation B1 to B7 R1 to R7 P 112 24 Scene modes i l m P 117 25 Hue I 5 to 5 P 116 Saturation 6 5 to...

Страница 14: ...3 Print reservation number of prints Movie 10 n P 178 P 128 4 Sound record H P 100 101 128 5 Protect 9 P 142 6 Record mode RAW TIFF SHQ HQ SQ1 SQ2 P 102 7 Resolution 3264 2448 2048 1536 640 480 320 240 etc P 104 8 Aperture value F2 4 to F8 0 P 70 9 Shutter speed 8 to 1 4000 P 71 10 Exposure compensation 2 0 to 2 0 P 108 11 White balance WB AUTO 2 3 5 4 w to z 1 V P 109 P 111 12 ISO ISO50 ISO100 IS...

Страница 15: ...d on or while the camera is in use e f BATTERY EMPTY is displayed Lights green Goes off after a while Blinks red Remaining power level high Remaining power level low If you intend to use the camera for a long period of time charge the battery as soon as possible Remaining power level exhausted Charge the battery F5 6 F5 6 1 1 200 200 3264 2448 3264 2448 0 0 0 0 Battery check indication Memory gaug...

Страница 16: ...avoided Useful information and hints that will help you get the most out of your camera g Reference pages describing details or associated information Set the mode dial to any of the marks shown here The buttons for the function and their location are clearly illustrated This shows control dial operations Follow the arrows to perform menu operations For details on operating procedures see Menu bas...

Страница 17: ...the ring and stopper as indicated by the arrows 5 When you have decided how long you want the strap to be pull on the strap in the stopper A to make sure it is securely fastened 6 Attach the strap to the other eyelet following Steps 3 to 5 Be careful with the strap when you carry the camera as it can easily catch on stray objects causing injury or damage Attach the strap correctly as shown above s...

Страница 18: ... Align the battery with the guideline on the charger and insert the battery into the charger as far as it goes Meaning of the charge lamp indications Lights red Charging Lights green Charging is completed Blinks red Charging failure The battery charges in approximately 5 hours The charging time may differ according to the amount of power left in the battery Use only the specified charger The batte...

Страница 19: ...attery when correctly loaded J Removing the battery Press the battery lock in the direction of the arrow A The battery is ejected Keeping your hand over the battery to stop it falling out turn the camera right way up and remove the battery 4 Close the battery compartment cover 5 Slide the battery compartment lock from to Battery compartment lock Battery compartment cover Battery lock A The amount ...

Страница 20: ... Use an AC adapter designed to operate on the AC voltage in the area the camera is being used Consult your nearest Olympus dealer or Service center for details Power battery holder The optional power battery holder allows you to shoot for longer than when using the lithium ion battery Be sure to remove the battery compartment cover pushing to the direction of the arrow when attaching the power bat...

Страница 21: ... remove or load the battery or connect or disconnect the AC adapter while the camera is turned on Doing so could affect the camera s internal settings or functions The battery consumption may vary according to the shooting conditions etc Power is consumed continuously during the conditions described below This discourages the power to last longer When the monitor is turned on Repeated zoom adjustm...

Страница 22: ...MB Index area You can write down the card s contents Contact area Comes into contact with the camera s signal read contacts CompactFlash CF optional CompactFlash is a large capacity solid state flash memory card You can use commercially available cards The camera may not function normally with some types of CompactFlash cards Microdrive optional You can use Microdrive that supports CF Type II Comp...

Страница 23: ...may be damaged or the card may become jammed If the card is not inserted fully it may not be able to record data CompactFlash Microdrive Hold the card straight and insert it correctly into the rear slot as shown Set the eject button in the down position 4 Close the card cover securely until it clicks Removing the card xD Picture Card Push the card all the way in to unlock it then let it return slo...

Страница 24: ...ould destroy the data stored on the card Once destroyed data cannot be restored Switching cards The card currently in use is indicated in the viewfinder or on the monitor Choose the card you want to record the picture on before taking the picture The factory default setting is the xD Picture Card If only one card is inserted that card is automatically selected Card selection can also be made in Pl...

Страница 25: ...e camera in the car while driving along a bumpy road etc where the camera will be badly shaken Precautions regarding Microdrive Do not write on the label Do not remove the label Do not over wrap labels It is advisable to keep Microdrive in its case for storage or transportation Microdrive may become hot if used for an extended period of time Care should be taken when handling Microdrive Do not tak...

Страница 26: ... mode with the camera turned on or off 4 Press the power switch again to turn the camera off TIPS Setting the date and time Pictures are saved with the date and time when they were taken g Setting the date and time P 168 Selecting a language for on screen display You can select the language in which illustrations and explanations are displayed on the monitor g Selecting a language for on screen di...

Страница 27: ...ttings return to the factory default settings If the card is not recognized card check When the power is turned on the camera checks the card automatically If there is no card in the camera or a card that is not supported by this camera is inserted the following screen is displayed All data stored on the card is erased when the card is formatted Monitor indication Corrective action NO CARD There i...

Страница 28: ...shines directly on the lens flare or ghosting may occur To prevent this happening attach a lens hood 1 Fit the lens hood matching the lens hood indicator with the indicator on the lens 2 Turn the lens hood in the direction of the arrow as far as it goes The lens hood cannot be attached or detached when the lens cap is on The lens cannot be retracted with the lens hood attached backwards Viewfinder...

Страница 29: ...y For the best results hold camera at right position so that flash is positioned higher than the lens You can change the angle of the monitor This is useful for taking low angle shots where the viewfinder or monitor is hard to see 1 Take hold of the monitor as shown in the illustration and pull it out 2 To take low angle shots position the monitor in the up position as shown The monitor can be pos...

Страница 30: ...he various shooting and playback settings Functions that can be set using the direct buttons can also be set using the menus Ex 1 To select a metering mode Using the direct button Using the menus Press 4 Press e to display the menu then select MODE MENU CAMERA tab ESP 5 The setting screen is displayed on the monitor Turn the control dial while holding down 4 to select a metering mode Press ac to s...

Страница 31: ...ettings Press e Select FLASH MODE Select w Select Q FLASH Select SLOW The same setting screen is displayed using the direct button or the MODE MENU Arrow pad Control dial OK button Flash mode button FLASH MODE AUtO SLO W SEt CARD PIC CAMERA FLASH MODE AUtO AUtO OFF OFF AF AF ESP ESP ESP MF AF FLASH MODE w AUtO AUtO 0 0 0 0 IN IN FLASH SLOW SLOW1 SLOW1 GO SEt SELECt FLASH MODE w AUtO AUtO 0 0 0 0 I...

Страница 32: ...ng down to select the flash mode The setting screen is displayed on the monitor At the moment you release your finger from the button the flash mode setting is made If the operation guide is displayed at the bottom of the screen you can select further options 2 Press e while holding down to display the menu Release the direct button after the menu is displayed The menu for changing the current set...

Страница 33: ... the bottom of the screen you can select further options Ex When the Y self timer remote control button is used Turn the control dial while holding down Y to change the setting If you select the operation guide is displayed Pressing e while holding down B displays the screen for selecting the time that remote control is activated OFF OFF OFF SEt Operation guide ...

Страница 34: ... red eye reduction fill in flash SLOW slow synchronization and flash off Control dial Control dial This means to turn the control dial while holding down the direct button to make function settings Control dial 2 0 2 0 SEt F5 6 F5 6 1 1 200 200 The histogram display can be set gP 119 You can select the various options available in FLASH MODE w flash intensity control Q FLASH external flash and SLO...

Страница 35: ...m ESP spot metering 5 multi metering 5MULTI and center weighted metering 4 Control dial B self timer remote control button gP 89 90 Activates the self timer or remote control function Control dial 0 0 AF MF AF MF SEt MOVE When the AF MODE is set to SPOT the AF target mark can be moved gP 77 You can select the various options available in FOCUS MODE AF MODE FULLTIME AF and P AF mode gP 74 75 76 ESP...

Страница 36: ...vates the function registered on the custom button See Custom button P 154 for details of how to register a function and use the button QUICK VIEW button gP 122 Displays the last picture taken on the monitor AEL AE Lock button gP 85 Fixes the exposure The lock function is alternately activated and canceled each time you press the button WB PRESEt1 PRESEt2 CUStOM AUtO SEt The screen for setting the...

Страница 37: ...res from accidental erasure INFO information display button gP 135 Displays the shooting information and histogram y rotation button gP 123 Rotates pictures 90 degrees clockwise or counterclockwise print button gP 178 Stores print reservation data on the card S erase button gP 143 144 Erases a selected picture ...

Страница 38: ...to the setting screens Display operational buttons at the bottom of the screen The functions registered in the shortcut menus can also be accessed from the MODE MENU You can change the shortcut menus in any mode other than nq modes g SHORT CUT P 157 Categorizes the settings into tabs Displays the associated menu items when a tab is selected by pressing ac Display operational buttons at the bottom ...

Страница 39: ...ON ON ON NORMAL NORMAL ALL RESEt DIAL REC VIEW SHUttER SOUND BEEP 1Press e to display the top menu then press d Top menu CAMERA tab PICTURE tab CARD tab E tab 2Press ac to select a tab then press d Press b to return to the tab selection screen CARD CAM PICtURE CONtRASt WB SHARPNESS SCENE MODES AUtO AUtO NORMAL NORMAL HQ HQ a a a c c c d d b FLASH MODE AUtO AUtO OFF OFF AF AF ESP ESP ESP MF AF PIC ...

Страница 40: ...o complete setting Press e again to exit the menu The green frame moves to the selected item b or e 3Press ac to select the item you want to set then press d To return to select an item pressb or e ESP MULtIMEtERING FLASH MODE CARD PIC CAMERA ESP AF MF ESP MULtIMEtERING FLASH MODE CARD PIC CAMERA ESP AF MF a c a c d CARD PIC CAMERA FLASH MODE AUtO AUtO OFF OFF AF AF ESP ESP ESP MF AF FLASH MODE AU...

Страница 41: ...gle frame shooting i high speed sequential shooting j sequential shooting k AF sequential shooting and 7 auto bracketing P 92 Selects whether to record sound when shooting a movie P 101 Selects the ISO value from AUTO or in the range of ISO 50 to ISO 400 P 107 Digitally enhances the maximum optical zoom P 58 Factory default setting n mode for movies P A S M r m l j i mode for still pictures MODE M...

Страница 42: ... Creates an indexed view of a movie in 9 frames P 131 EDIT Edits a movie P 132 Displays guidelines on the image P 136 Copies pictures to and from cards Lets you select whether to copy all frames or only a selected frame P 141 Adds sound to a still picture already taken P 137 MODE MENU 8 MOVIE PLAY COPY MODE MENU For movies For still pictures m MOVIE PLAY 8 COPY R ...

Страница 43: ...metering P 81 j Selects a shooting mode from o single frame shooting i high speed sequential shooting j sequential shooting k AF sequential shooting and BKT auto bracketing P 92 B Selects the self timer or remote control function P 89 90 ISO Selects the ISO value from AUTO or in the range of ISO 50 to ISO 400 P 107 DIGITAL ZOOM Digitally enhances the maximum optical zoom P 58 NOISE REDUCTION Reduc...

Страница 44: ...ether to keep the current camera settings when you turn off the power P 145 REC VIEW Displays the picture on the monitor while recording it to a card P 147 BEEP Sets the beep sound used for button operations and adjusts the volume P 148 SHUTTER SOUND Sets the sound made when the shutter button is pressed and adjusts the volume P 149 DIAL Changes the control dial arrow pad and direct button functio...

Страница 45: ...ect whether to copy all frames or only a selected frame P 141 The EDIT tab is not displayed during movie playback CARD tab CARD SETUP Erases all image data stored on the card or formats a card P 144 166 E tab ALL RESET Selects whether to keep the current camera settings when you turn off the power P 145 BEEP Sets the beep sound used for button operations and adjusts the volume P 148 VOLUME Adjusts...

Страница 46: ...ound volume during playback P 165 G Selects the number of frames in the index display P 126 SETUP tab W Selects a language for on screen display P 167 X Sets the date and time P 168 8 Sets the beep sound used for warnings and adjusts the volume P 169 SLEEP Sets the time from the moment the camera was last operated until it enters sleep mode P 169 FILE NAME Changes how file names are assigned P 170...

Страница 47: ... mode can be adjusted manually Program shift Program shift allows you to change the combination of aperture value and shutter speed set by the camera without altering the exposure Press ac to change the aperture value and the shutter speed that determines an appropriate exposure Ps is displayed on the monitor in the program shift mode To cancel the program shift mode do one of the following If the...

Страница 48: ... in which both the subject and the background are in focus g Aperture priority shooting P 70 S Shutter priority shooting Allows you to set the shutter speed manually The camera sets the aperture automatically Set the shutter speed according to the subject and the type of effect you want g Shutter priority shooting P 71 Aperture F number is decreased Aperture F number is increased Setting the shutt...

Страница 49: ... of 8 min of long exposure g Manual shooting P 72 r My Mode Allows you to save your favorite settings as your own personal mode and use these customized settings when taking pictures Current settings can also be saved for retrieving by this mode g MY MODE SETUP Setting a function in My Mode P 160 g Using My Mode P 73 n Movie record This function allows you to record movies The camera automatically...

Страница 50: ...tures of landscapes and other outdoor scenes Both the foreground and the background are in focus Since blues and greens are vividly reproduced in this mode it is excellent for shooting natural scenery The camera automatically sets the optimal shooting conditions j Sports shooting Suitable for capturing fast moving action such as sports without blur Even a fast moving subject will be clear and shar...

Страница 51: ...mp blinks while the picture is stored on the card You can check the picture you have taken by pressing the QUICK VIEW button g QUICK VIEW P 122 Indication Meaning mark Lights Flash stand by The flash fires when the shutter release button is pressed all the way Blinks If the flash has popped up flash is charging Remove your finger from the shutter button and wait until the lamp goes off If the flas...

Страница 52: ... is not stored on the card REC CANCEL is not displayed in sequential shooting mode or when several pictures are taken in succession In this case select CANCEL ONE or CANCEL ALL CANCEL ONE The picture displayed on the monitor is erased without being stored on the card All other pictures are stored on the card CANCEL ALL None of the pictures taken is stored on the card TIPS The subject cannot be foc...

Страница 53: ...viewfinder P 173 The viewfinder or monitor is hard to see When you point the camera lens toward a bright subject smears lines like beams of light may appear on the image in the viewfinder or on the monitor This does not affect recorded pictures To check the area the camera is focusing on If you press f while pressing the shutter button halfway the area you are focusing on is enlarged Pressing f on...

Страница 54: ...hat the green lamp lights steadily When the focus and exposure are locked the green lamp lights steadily The AF target mark moves to the focus position When the green lamp blinks the focus and exposure are not locked Release your finger from the shutter button re position your subject and press the shutter button halfway again 3 Keeping the shutter button pressed halfway recompose your shot 4 Pres...

Страница 55: ... the focus lock function by pressing the shutter button halfway then return the camera to the horizontal position while keeping the button pressed halfway and take the picture If the subject still cannot be focused on use the manual focus g Manual focus P 79 Green lamp blinks the subject cannot be brought into focus The green lamp lights but the subject cannot be brought into focus Subject with lo...

Страница 56: ...picture You can use the zoom lever to enlarge your subject 3 Press the shutter button fully to start recording The focus and zoom are locked During movie recording N lights red 4 Press the shutter button again to stop recording When the remaining recording time has been used up recording stops automatically When there is space in the card memory the remaining recording time is displayed and the ca...

Страница 57: ... movies P 101 Depending on the card the remaining recording time may drop rapidly during recording Try using the card again after formatting it g Formatting cards P 166 When R is set to ON the movie is recorded with the focus that was set when the shutter button was pressed in Step 3 If the distance to the subject changes focus may be compromised In n mode the flash and manual focus MF cannot be u...

Страница 58: ... zoom with the digital zoom zoom magnification can be increased to a maximum of approximately 15 Camera movement is likely to occur at higher magnifications Stabilize the camera with a tripod etc to avoid camera movement Using the optical zoom 1 Turn the zoom lever Mode dial Zoom lever Wide angle Turn the zoom lever toward W to zoom out Telephoto Turn the zoom lever toward T to zoom in ...

Страница 59: ...rn the zoom lever toward T The white area of the zoom indicator indicates the optical zoom If the digital zoom is set to ON a red area appears on the zoom indicator When you reach the limit of the optical zoom the digital zoom is enabled In n mode the maximum digital zoom magnification is 2 5 Pictures taken with the digital zoom may appear grainy Mode dial Arrow pad OK button Zoom lever Mode dial ...

Страница 60: ...changes in the sequence shown below The selectable flash modes may differ depending on the shooting mode 3 Press the shutter button halfway lights when the flash is ready to fire 4 Press the shutter button fully to take the picture Flash working range W max Approx 0 8 5 8 m 2 6 19 ft T max Approx 0 2 4 0 m 0 7 13 1 ft Mode dial Flash pop up button Control dial Flash mode button FLASH MODE AUtO SLO...

Страница 61: ...en a conversion lens is attached to the camera vignetting may occur To take flash pictures use an external flash Auto flash No indication The flash fires automatically in low light or backlight conditions Red eye reduction flash The light from the flash may make the subject s eyes appear red in the picture The red eye reduction flash mode significantly reduces this phenomenon by emitting pre flash...

Страница 62: ... use of a tripod is recommended to prevent your pictures from being blurred by camera movement Slow synchronization SLOW1 SLOW2 HSLOW1 The slow synchronization flash is designed for slow shutter speeds Normally when shooting with a flash shutter speeds cannot go below a certain level to prevent camera movement But when shooting a night scene background fast shutter speeds can make the background t...

Страница 63: ... M mode P m l j i mode 4 sec 1st curtain with red eye reduction H SLOW1 This mode is for when you want to use slow synchronization yet also reduce the red eye phenomenon For instance when shooting a person against a brightly lit night background A normal flash might make the person s eyes red but 1st curtain with red eye reduction lets you capture the background correctly and reduce the red eye ph...

Страница 64: ...Press e while holding down 2 Press ac to select SLOW then press d 3 Press ac to select SLOW1 HSLOW or SLOW2 then press e Press e again to exit the menu Mode dial Arrow pad OK button Flash mode button GO SELECt FLASH MODE w FLASH SLOW SLOW1 SLOW2 SLO W ...

Страница 65: ... turning the control dial while holding down and F at the same time TIPS The flash intensity can be set in 1 3EV steps or 1 2EV steps g EV STEP Setting exposure adjustment increments P 153 The flash adjustment effect may not be sufficient if the shutter speed is faster than 1 300 Mode dial Control dial Flash mode button F Exposure compensation button Turning to the left decreases the light emissio...

Страница 66: ...o the hot shoe on the top of the camera To use the external flash together with the built in flash the FL BK01 flash bracket optional and FL CB02 bracket cable optional are required This section explains how to use the FL 20 when attached to the hot shoe 1 Slide the shoe cover off in the direction of the arrow and attach the external flash For instructions on how to attach the flash refer to the m...

Страница 67: ... to TTL AUTO Be sure to attach the flash to the camera before turning the flash on 5 Select the flash mode by turning the control dial while holding down g Flash shooting P 59 If close up pictures are overexposed try using the built in flash by itself When the built in flash and the external flash are used together the built in flash is used as the compensating light source This means that if the ...

Страница 68: ...anual for the external flash 2 Select M mode Adjust the shutter speed and aperture g Manual shooting P 72 Remember that a slow shutter speed can produce blurred images For the best results we recommend that you set the shutter speed from 1 200 to 1 300 seconds 3 Turn on the external flash Be sure to attach the flash to the camera before turning the flash on 4 Set the mode that automatically contro...

Страница 69: ...ISO of the external flash are set to the same conditions as those on the camera depending on the photographic conditions it is possible that the correct exposure may not be obtained anyway In such a case adjust the auto F value or ISO value on the external flash unit or calculate the distance in the manual mode and use it that way 5 Use a flash whose illuminating angle covers the angle of view of ...

Страница 70: ... the interval between shots will be longer if a high emission level is set AUTO The setting is automatically changed to Fill in flash HSLOW The setting is automatically changed to SLOW1 1 Press e while holding down 2 Select Q FLASH SLAVE and press d g Menu basics P 38 3 Press ac to select an emission level from 1 to 10 then press e 4 Press e repeatedly until the menu disappears Mode dial Arrow pad...

Страница 71: ...to flash mode or the fill in flash mode the shutter speed is fixed at 1 30 sec in the maximum wide angle or 1 125 sec in the maximum telephoto angle and will not go slower Mode dial Control dial Turn to the right to increase the aperture value F number Turn to the left to decrease the aperture value F number F2 4 F2 4 3264 2448 3264 2448 F2 4 1 1 4000 4000 15 15 3264 2448 3264 2448 appears The ima...

Страница 72: ... on the monitor The actual shutter speed range of the camera is 16 to 1 4000 sec but the speed is displayed in the range of 15 to 1 4000 on the monitor To avoid camera movement you are recommended to use a tripod when taking pictures requiring a slow shutter speed Mode dial Control dial Turn to the right to set a faster shutter speed Turn to the left to set a slower shutter speed 1 1 50 50 3264 24...

Страница 73: ...t appears with the bar indicating the current exposure differential Aperture value f2 4 to f8 0 Shutter speed 15 to 1 4000 TIPS To take long exposure bulb shots 1 Turn the control dial to the left to set the shutter speed to BULB 2 The shutter remains open as long as the shutter button is held down The maximum bulb length is 8 minutes Using the remote control prevents camera from shaking due to pr...

Страница 74: ...t whether to use one of the 8 customized My Mode settings that you have saved 1 In the top menu select MODE MENU CAMERA MY MODE MY MODE 1 to MY MODE 8 and press e g Menu basics P 38 Press e again to exit the menu Only the settings in MY MODE 1 have already been saved You cannot select MY MODE 2 to MY MODE 8 if no settings have been saved in them g MY MODE SETUP Setting a function in My Mode P 160 ...

Страница 75: ...the AF target mark 1 Press e while holding down AF MF In MF or MF mode the menu is not displayed when e is pressed 2 Press ac to select AF MODE then press d 3 Press ac to select iESP or SPOT then press e Press e again to exit the menu If you select SPOT for the AF MODE P AF is automatically set to OFF g P AF Changing the auto focus mode P 76 In n mode the AF MODE is fixed to iESP The setting canno...

Страница 76: ...apshots 1 Press e while holding down AF MF In MF or MF mode the menu is not displayed when e is pressed 2 Press ac to select FULLTIME AF then press d 3 Press ac to select ON or OFF then press e Press e again to exit the menu In n mode FULLTIME AF does not operate when R movie is set to ON Battery consumption increases when FULLTIME AF is used Mode dial Arrow pad OK button AF MF AF Macro MF button ...

Страница 77: ...tection system and the phase difference detection system Focusing is performed faster than when OFF is selected 1 Press e while holding down AF MF In MF or MF mode the menu is not displayed when e is pressed 2 Press ac to select P AF then press d 3 Press ac to select ON or OFF then press e Press e again to exit the menu When the subject is within 80 cm 2 6 ft of the camera the camera focuses using...

Страница 78: ...rk to the area you want to focus on In MF or MF mode the AF target mark does not move when the arrow pad is pressed 3 Take the picture Torestorethe AF target mark to itsoriginal position in the center press e while holding down AF MF on the right screen Turning the camera off or changing the shooting mode will return the AF target to the center position The AF target mark cannot be moved when the ...

Страница 79: ...tor fires automatically lighting up the subject Factory default setting is ON To turn the AF illuminator off follow the procedure below 1 Select SETUP AF ILLUMINATOR OFF and press e g Menu basics P 38 Even when the AF illuminator is lit the auto focus may still not be able to focus properly on subjects within 80 cm 2 6 ft of the camera Mode dial Arrow pad OK button AF illuminator Note ...

Страница 80: ...ng operation the area in the middle is enlarged This lets you check whether the focus is correct The distance indicator on the left of the monitor is for reference only When the indicator is moved to less than 0 8 m 2 6 ft the display automatically switches to the 20 cm 8 to 80 cm 2 6 ft display 3 Take the picture The focus is locked at the distance you have set Mode dial Arrow pad OK button AF MF...

Страница 81: ...cus is locked at the same distance as when you performed focus lock Set to AF to return to auto focus Even if you move the cursor to the top of the distance indicator focusing is not possible at Adjust the cursor position by pressing ac How to take pictures very close to the subject In super macro MF mode pictures as close as 5cm from the subject can be taken with manual focus Turn the control dia...

Страница 82: ...ti metering 5MULTI Meters the brightness of the subject at up to 8 different points to set the optimal exposure based on the average brightness This method is useful with a high contrast subject g P 83 Center weighted metering 4 Meters the brightness over a wide area with emphasis on the center of the screen This method is used when you do not want to let the brightness of the surrounding area aff...

Страница 83: ...d to move the metering target mark to the area you want to meter 3 Take the picture To restore the metering target mark to its original position in the center press e while holding down 4 in Step 2 Turning the camera off or changing the shooting mode will return the metering target to the center position Mode dial Arrow pad OK button Control dial 4 Metering button ESP MULtI ESP MOVE MOVE F5 6 F5 6...

Страница 84: ...nt to meter and press the AEL AE Lock button The brightness is metered at up to 8 different points The multi metering bar appears Additional metering is ignored after the 8th reading To perform metering again press the AEL button for more than 1 second to display C Press the AEL button again to cancel the metering values Mode dial Control dial 4 Metering button ESP ESP MULtI AEL button F5 6 F5 6 1...

Страница 85: ...average values obtained by metering at 2 points These values are recalculated every time another metering point is added The average for the 2 metering points The average is always shown at the center of the bar Indicates how much the present exposure you are metering differs from the average exposure value The present exposure can be fixed by pressing the shutter button halfway The present exposu...

Страница 86: ...ur shot again with the sky in the frame and take the picture 1 Compose the picture where you want to lock the metered value exposure then press the AEL button The metered value is saved If you want to lock a different exposure press the AEL button again to cancel AE lock Each time you press the AEL button AE lock is engaged and canceled repeatedly 2 Position the AF target mark on the subject you w...

Страница 87: ...cancel the AE memory AE lock was canceled Do not operate any of the buttons or the mode dial after performing AE lock Doing so will cancel AE lock The camera had emerged from sleep mode or the power was turned off AE lock is not available when multi metering is enabled Set the metering method to ESP 5 or 4 g Metering P 81 AE lock is not available when a menu is displayed on the screen g Menu basic...

Страница 88: ...2 6 ft However in the mode focusing is performed quickly 1 Turn the control dial while holding down AF MF and select If you use the flash in macro shooting shadows may be noticeable and the correct exposure may not be achieved Normal shooting Macro shooting Mode dial Control dial AF MF AF Macro MF button AF MF AF MF SEt Note ...

Страница 89: ...in correct focus Set the camera to super macro MF and use manual focus 1 Turn the control dial while holding down AF MF and select MF 2 When you release your finger from the AF MF button the distance indicator is displayed on the monitor During operation the area in the middle is enlarged This lets you check whether the focus is correct 3 Press ac to adjust the focus Pressing e locks the focus pos...

Страница 90: ...tter button halfway locks the focus and exposure The self timer remote control lamp lights for approximately 10 seconds then starts blinking After blinking for approximately 2 seconds the picture is taken To stop shooting while in n mode press the shutter button fully again To cancel the self timer press B The self timer mode is automatically canceled after one shot If self timer shooting is attem...

Страница 91: ...ontrol device at the remote control receiver on the camera 4 Press the shutter button on the remote control device The focus and exposure are locked and the self timer remote control lamp blinks before taking the picture You can set the time until the picture is taken g Changing the time until remote control is activated P 91 To shoot in bulb mode press and hold down the shutter button on the remo...

Страница 92: ...tive signal distance may be reduced or shooting may not take place To shoot sequential shots using the remote control device press and hold the shutter button on the remote control device If the camera does not receive the remote control signal properly sequential shooting may stop Changing the time until remote control is activated You can select the time from when the shutter button on the remot...

Страница 93: ...ocus is locked at the first frame The sequential shooting speed varies depending on the record mode setting Approx 17 frames in HQ mode can be taken in sequence k Adjusts the focus 1 frame at a time The AF sequential shooting speed is slower than normal sequential shooting 7 g Auto bracketing P 93 High speed sequential and AF sequential shooting 1 In the top menu select MODE MENU CAMERA j i j or k...

Страница 94: ...top menu select MODE MENU CAMERA j BKT and press d g Menu basics P 38 2 Select the exposure Press ac to select 0 3 0 7 or 1 0 then press d When the exposure adjustment is set to 1 2 EV steps select from 0 5 1 0 and 1 5 g EV STEP Setting exposure adjustment increments P 153 3 Select the number of pictures Press ac to select 3 or 5 then press e In some combinations of picture size and record mode on...

Страница 95: ... max except in S and M mode exposure is decreased when shooting a dark subject to prevent camera movement For auto bracketing in modes other than S mode shooting is automatically set to 1 30 sec if the shutter speed was other than 1 30 sec for an exposure differential of 0 If the battery power is low and the battery check blinks during sequential shooting shooting stops and the camera starts savin...

Страница 96: ...tom 3 Take pictures so that the edges overlap Focus exposure and white balance are set by the first picture Do not select an extremely bright subject such as the sun for the first picture You cannot adjust the zoom after the first picture Panorama shooting is possible for up to 10 pictures Mode dial Arrow pad OK button Connecting pictures from bottom to top Connecting pictures from left to right K...

Страница 97: ...he flash sequential shooting i j k 7 and program shift modes are not available Images are saved in JPEG format when PANORAMA shooting is performed in the TIFF mode The size of the image does not change PANORAMA shooting is not available when the record mode is set to RAW If the mode dial is operated during PANORAMA shooting the camera cancels the PANORAMA mode and returns to normal shooting The ca...

Страница 98: ...ress e g Menu basics P 38 2 Press ac to select the guidelines then take the picture 3 Press e to exit guideline shooting The guidelines on the screen disappear and the camera returns to the normal shooting mode TIPS You can display the guidelines in the playback mode too g Displaying guidelines P 136 The guidelines do not appear on the resulting picture Mode dial Arrow pad OK button CANCEL SELECt ...

Страница 99: ...NU CAMERA FUNCTION BLACK WHITE or SEPIA and press e g Menu basics P 38 Press e again to exit the menu White balance white balance compensation hue and saturation cannot be used in black white or sepia shooting Mode dial Arrow pad OK button ISO DIGItAL ZOOM NOISE REDUCtION FRAME ASSISt FUNCtION PANORAMA OFF 8 BLACK WHItE SEPIA CARD PIC CAMERA Note ...

Страница 100: ... compose your pictures 1 In the top menu select MODE MENU CAMERA FRAME ASSIST ON or OFF and press e g Menu basics P 38 Press e again to exit the menu The vertical and horizontal lines are displayed on the monitor The frame is not displayed in the following cases During panorama or guideline shooting Mode dial Arrow pad OK button F5 6 F5 6 1 1 200 200 3264 2448 3264 2448 Note ...

Страница 101: ...ck of still pictures and movies with sound During playback sound is output from the speaker The volume can be adjusted g VOLUME Adjusting the playback volume P 165 Sound can be added later to still pictures Recorded sound can also be changed g Recording sound P 137 If the camera is more than 1 m 3 3 ft away from the source of the sound sound may not be recorded clearly It is not possible to take a...

Страница 102: ...3 Recording starts at the same time as shooting When R is set to ON the focus and optical zoom are locked during movie recording If R is set to OFF you can use both the optical zoom and digital zoom during movie recording If the camera is more than 1 m 3 3 ft away from the source of the sound sound may not be recorded clearly Mode dial Arrow pad OK button O N OFF GO SELECt Note ...

Страница 103: ...ession In record modes other than TIFF image data are compressed The higher the compression the less clear the image will be Resolution and picture size on a computer screen When a picture is transferred to a computer the size of the picture on the computer screen varies depending on the computer s monitor setting For instance a picture taken in 1024 768 resolution is the same size as the screen i...

Страница 104: ... using ordinary software or make print reservations Pictures taken in the RAW data format can be edited on this camera g RAW editing P 140 3 2 Resolution The image aspect ratio is normally 4 3 If the aspect ratio is changed to the image can be printed at a photo lab without losing the image borders is not available in n mode Check the shooting range on the monitor before taking the picture Record ...

Страница 105: ...IFF 3264 2448 Uncompressed TIFF 22 9 22 9 3264 2176 20 3 20 3 2592 1944 14 4 14 4 2288 1712 11 2 11 2 2048 1536 9 0 9 0 1600 1200 5 5 5 5 1280 960 3 5 3 5 1024 768 2 3 2 3 640 480 0 9 0 9 SHQ 3264 2448 Low compression JPEG 3 9 3 8 3264 2176 3 4 3 4 HQ 3264 2448 High compression 2 0 1 7 3264 2176 1 7 1 2 SQ1 2592 1944 HIGH 3 6 3 6 NORMAL 1 2 1 2 2288 1712 HIGH 2 8 2 8 NORMAL 1 0 0 9 2048 1536 HIGH ...

Страница 106: ...the time listed in the Movie Record Modes table Selecting a record mode 1 Turn the control dial while holding down K to select the record mode The record mode changes in the sequence shown below Still Picture Record Modes Movie Record Modes 2 If you selected a still picture record mode press e while holding down K to display the screen for selecting the resolution 3 If you selected TIFF SHQ or HQ ...

Страница 107: ...JPEG format you can select SHQ HQ SQ1 or SQ2 for the record mode but you cannot select a resolution Pictures are recorded in the resolution currently set for each record mode 1 Turn the control dial while holding down K to select RAW 2 While holding down K press e 3 Press ac to select OFF SHQ HQ SQ1 or SQ2 then press e K Record mode button Control dial Arrow pad OK button JPEG DUPLICAtE SEttING OF...

Страница 108: ...ERA ISO and press d g Menu basics P 38 If ISO is displayed on the top menu as a shortcut menu press the arrow pad in the same direction as the arrow shown next to ISO g SHORT CUT P 157 1 In the top menu press b to select ISO 2 Press ac to choose the most suitable ISO value then press e AUTO is not available in A S or M mode Press e again to exit the menu Higher ISO settings produce more electrical...

Страница 109: ...akes these subjects closer to their real shades For the same reason adjust toward when shooting dark subjects Pressing F when histogram is set to F ON displays the histogram in the viewfinder or on the monitor If you press e while pressing F the menu for changing the histogram setting is displayed g Histogram Displaying the luminance distribution of still pictures P 119 You can change the position...

Страница 110: ...OM V for the shooting conditions 2 If you selected PRESET1 PRESET2 CUSTOM or V press e while holding down WB to display the next selection screen PRESET1 g Preset1 white balance P 110 PRESET2 g Preset2 white balance P 110 CUSTOM g Custom white balance P 111 V g One touch white balance P 111 Auto white balance Automatically adjusts the white balance for any light source Press e while holding down W...

Страница 111: ...ndoors 1 Press ac to select PRESET2 then press d 2 Press ac to select w x y z 1 depending on the type of light then press e Press e again to exit the menu w For shooting under a daylight fluorescent lamp 6 700K This type of lamp is used mainly in homes x For shooting under a neutral white fluorescent lamp 5 000K This type of lamp is generally used in desk lamps etc y For shooting under a cool whit...

Страница 112: ...ouch white balance This function is useful when you need more precise white balance than PRESET WB can provide To set the optimum white balance for the shooting conditions point the camera at a white object under the light source you want to use and adjust the white balance 1 Press ac to select GO then press d 2 Display the V screen and point the camera at a sheet of white paper Position the paper...

Страница 113: ...rom the colors you see on the monitor White balance compensation This function lets you make fine changes to the AUTO PRESET 1 PRESET 2 and one touch white balance settings 1 Follow the procedure on P 109 P 111 to select the white balance you want to adjust 2 Press e while holding down WB 3 Press ac to select then press d 4 The color becomes bluer each time you press a and redder each time you pre...

Страница 114: ...nt to save 2 Press e while holding down WB 3 Press ac to select SET then press d 4 Press ac to select CUSTOM 1 CUSTOM 2 CUSTOM 3 or CUSTOM 4 then press e The current white balance setting and white balance adjustment value are saved as a custom white balance If a custom white balance is already saved in the selected number a confirmation screen appears To register the new settings select RESET and...

Страница 115: ...tours are emphasized making the image appear sharper and more vivid Use this setting when you want to print pictures To reduce the sharpness Press c The image contours are softened Use this setting when you want to edit images on a PC When you have finished setting the sharpness press e Press e again to exit the menu If you adjust the sharpness too far toward noise may become noticeable in the pic...

Страница 116: ...asics P 38 2 Press ac to adjust the contrast between 5 and 5 To increase the contrast Press a The light and dark areas are defined more clearly making the image look crisper To reduce the contrast Press c The light and dark areas become less defined giving the image a softer impression Use this setting when you want to edit images on a PC When you have finished setting the contrast press e Press e...

Страница 117: ... press d g Menu basics P 38 2 Press ac to adjust the hue between 5 and 5 To increase the hue Press a Based on the blue of the sky the picture takes on a greener hue To reduce the hue Press c Based on the blue of the sky the pictures takes on a purpler hue When you have finished setting the hue press e Press e again to exit the menu Mode dial Arrow pad OK button SAtURAtION HUE CARD CAM PICtURE ...

Страница 118: ...ve finished setting the saturation press e Press e again to exit the menu In P A S M r and n modes the image is processed according to your purpose and the effect you want to achieve The color reproduction sharpness contrast and saturation are adjusted automatically 1 In the top menu select MODE MENU PICTURE SCENE MODES then choose from NORMAL I L or m and press e g Menu basics P 38 For I L and m ...

Страница 119: ... and press e g Menu basics P 38 Press e again to exit the menu When m mode is set noise reduction is fixed to ON When noise reduction is set to ON the camera implements noise reducing processes after each shot For this reason shooting time is approximately twice as long as usual During this time you cannot continue shooting When noise reduction is set to ON sequential shooting i j k 7 is not possi...

Страница 120: ...8 ON The histogram is always displayed DIRECT The black and white areas are displayed directly on the image Ex When ON is selected in P mode When the image is bright When the image is dark Ex When DIRECT is selected in P mode F5 6 F5 6 1 200 1 200 SET The part indicated in green in the histogram shows the luminance distribution within the histogram target mark Histogram target mark If the peak fil...

Страница 121: ...You can turn the histogram display on and off during exposure compensation g Exposure compensation P 108 The histogram displayed during shooting may differ from that displayed during playback The histogram is not displayed in movie mode Changing the position of the histogram target mark While the histogram is displayed in shooting mode hold down F and use the arrow pad to move the histogram target...

Страница 122: ...isplayed see Viewfinder and monitor indications P 11 2 Use the arrow pad or control dial to play back other pictures Arrow pad Control dial If no operation is performed for about 3 minutes the camera automatically enters the sleep mode and the monitor or viewfinder turns off Press f or any button to turn the monitor or viewfinder on Mode dial Arrow pad Mode dial Control dial 04 04 17 15 30 04 04 1...

Страница 123: ...ting quickly Functions available in normal playback mode are also available in Quick View 1 Press the QUICK VIEW button in the shooting mode The camera immediately enters the playback mode and displays the last picture taken Single frame playback 2 Press the QUICK VIEW button again to return to the shooting mode A light press of the shutter button will also return the camera to shooting mode Mode ...

Страница 124: ...de press y Each pressing of y rotates the image in the following sequence 90 degrees counterclockwise 90 degrees clockwise and back to the original The following pictures cannot be rotated Movies protected pictures pictures that have been edited on a PC and pictures taken with another camera New picture orientations are saved even when the power is turned off Mode dial y Rotation button 04 04 17 1...

Страница 125: ...ned By using the arrow pad while the enlarged picture is displayed you can shift the picture in the desired direction enabling you to view a different portion Turning the control dial allows you to view the next or previous frame in the same magnification To return the picture to the original size 1x turn the zoom lever toward W Pictures cannot be stored in an enlarged state Mode dial Zoom lever 0...

Страница 126: ...1 In the single frame playback mode turn the zoom lever toward W G Use the arrow pad to select the picture b Moves to the previous frame d Moves to the next frame a Moves to the upper frame c Moves to the lower frame Turning the control dial during an index display allows you to change the pages displayed To return to the single frame playback turn the zoom lever toward T Mode dial Zoom lever ...

Страница 127: ... select the number of pictures in an index display from 4 9 and 16 1 In the top menu select MODE MENU E G 4 9 or 16 and press e g Menu basics P 38 Press e again to exit the menu TIPS Pictures can also be displayed in index format using the E tab in C mode Mode dial Arrow pad OK button ...

Страница 128: ...enu 2 Press a to start the slideshow 3 Press e to stop the slideshow The slideshow will not stop until you cancel it by pressing e You are recommended to use the optional AC adapter when running a slideshow for a long period of time If a battery is used the camera will stop the slideshow after about 30 minutes and enter sleep mode Mode dial a button e button MODE MENU 8 04 04 17 15 30 04 04 17 15 ...

Страница 129: ...ingof the movie The following operations can be performed during movie playback H appears on movies that have sound recorded Pressing ac lets you adjust the sound volume during playback a Increases the volume c Reduces the volume d Plays the movie at double the normal speed Holding the button down increases the speed to 20 times the normal speed b Plays the movie in reverse at double the normal sp...

Страница 130: ...the previous frame The movie can be played continuously in reverse by holding the button down e Displays the MOVIE PLAYBACK menu If you selected CAPTURE Play back the movie one frame at a time until the frame you want to save as a still picture is displayed Press e Press ac to select CAPTURE then press e Press ac to select the card then press e If only one card is inserted skip this step When ther...

Страница 131: ...s function lets you create indexes from as well as edit movies However you cannot edit movies longer than approximately 56 seconds in SHQ mode 150 seconds in HQ mode and 600 seconds in SQ mode INDEX 9 frames extracted from a movie are displayed as an index to show the movie at a glance Indexes can be stored on the card as still pictures EDIT This function lets you cut the parts of the movie that y...

Страница 132: ...there is insufficient card memory the display returns to the setting screen 7 Press ac to select OK then press e The camera returns to the playback mode then the 9 frames extracted from the movie appear as an index display The index is stored as a new picture If you want to select different frames select RESET and press e and repeat the procedure from Step 4 To quit the index function select CANCE...

Страница 133: ...ious frame The movie can be played continuously in reverse by holding the button down 5 As in Step 4 select the last frame of the part you want to keep and press e 6 Press ac to select the card then press e If only one card is inserted skip this step When there is insufficient card memory the display returns to the setting screen 7 Press ac to select NEW FILE or OVERWRITE then press e NEW FILE Sto...

Страница 134: ...the procedure from Step 4 To quit the editing function select CANCEL and press e The edited movie is stored and the screen returns to the playback mode You cannot edit movies with sound which were taken with another digital camera You cannot select NEW FILE if there is insufficient memory space on the card GO SELECt OK EDIt RESEt CANCEL Note ...

Страница 135: ...r playback functions can also be used on a TV screen TIPS You are recommended to use the optional AC adapter when using the camera with a TV Make sure that the camera s video output signal type is the same as the TV s video signal type g VIDEO OUT Setting the video signal type P 174 The camera s monitor and viewfinder turn off automatically when the AV cable is connected to the camera Be sure to u...

Страница 136: ... press INFO the information displayed changes as follows If the picture has been taken with a different camera not all the information may be displayed when INFO is set to ON The file number used to specify an image when making non DPOF print at a print shop is displayed when INFO is set to ON g How to print pictures P 176 The histogram displayed during shooting may differ from that displayed duri...

Страница 137: ...en the guidelines are displayed use bd or the control dial to display the picture you want to see 3 Press e to remove the guidelines The guidelines on the screen disappear and the camera returns to normal single frame playback The guidelines are not displayed during close up playback or during an index display Mode dial Arrow pad OK button Control dial CANCEL SELECt CANCEL SELECt Horizontal positi...

Страница 138: ...to record and press e to start recording The BUSY bar is displayed during recording If the microphone is placed farther than 1m 3 3ft away from the subject the recorded sound quality may not be satisfying If you re record the sound the original sound is erased You may not be able to record sound when there is insufficient card memory the CARD FULL message is displayed Sound recording may pick up c...

Страница 139: ...ose each item g Menu basics P 38 Select Q g P 138 Select P g P 139 Select RAW DATA EDIT g P 140 When selecting RAW DATA EDIT display the image recorded in RAW mode first Resizing 2 Select Q then press d 3 Turn the control dial to select the still picture you want to edit then press e 4 Press ac to select a resolution then press e To quit the resizing function select CANCEL then press e 5 Press ac ...

Страница 140: ...the control dial to select the height and width of the trimming frame 3 2 trimming size can be selected when the size of the selected picture is 3264 2448 or 3264 2176 6 Press e The trimmed picture is displayed for one second 7 Press ac to select the card then press e If only one card is inserted skip this step When there is insufficient card memory the display returns to the setting screen 8 Pres...

Страница 141: ...n set press e 7 Press ac to select the card then press e If only one card is inserted skip this step When there is insufficient card memory the display returns to the setting screen 8 Press ac to select OK then press e The BUSY bar is displayed during RAW editing After the image is saved the camera returns to Step 3 Items that can be set by RAW editing Can only be selected if WB was set to CUSTOM ...

Страница 142: ...vie in the top menu press b to select COPY g Menu basics P 38 The screen is displayed for you to select ALL or SELECT 2 Press ac to select ALL or SELECT then press d If you choose ALL A confirmation screen appears asking if you want to copy the pictures Select YES and press e The pictures are copied and the menu is exited If you choose SELECT The playback screen is displayed Turn the control dial ...

Страница 143: ...t pictures to avoid accidentally erasing them Protected pictures cannot be erased by the single frame all frame erase function 1 Use the arrow pad or control dial to display the picture you want to protect g Viewing still pictures P 121 2 Press 0 To cancel protection press 0 again Protected pictures cannot be erased by the single frame all frame erase function but they are all erased by formatting...

Страница 144: ... Once erased pictures cannot be restored Check each picture before erasing to avoid accidentally erasing pictures you want to keep g Protecting pictures P 142 Single frame erase 1 Use the arrow pad or control dial to display the picture you want to erase g Viewing still pictures P 121 2 Press S The S ERASE screen is displayed 3 Press ac to select YES then press e The picture is erased and the menu...

Страница 145: ... top menu select MODE MENU CARD CARD SETUP and press d g Menu basics P 38 2 Press ac to select R ALL ERASE then press e 3 Press ac to select YES then press e All the pictures are erased Mode dial Arrow pad OK button CARD SEtUP ALL ERASE CANCEL GO SELECt FORMAt YES CAUtION ERASING ALL SELECt GO ALL ERASE NO ...

Страница 146: ...cord mode is changed to SQ1 and All Reset is set to ON the record mode will return to HQ factory default setting next time the camera is turned on OFF The settings made before the power is turned off are saved and are activated again next time the camera is turned on 1 In the top menu select MODE MENU E ALL RESET ON or OFF and press e Or in C mode select E ALL RESET ON or OFF and press e g Menu ba...

Страница 147: ...FF P 99 AF MF AF P 79 87 88 u OFF P 119 4 ESP P 81 K HQ P 102 B OFF P 89 90 WB AUTO P 109 LCD EVF LCD ON P 50 No compensation P 112 CARD xD P 23 SCENE MODES NORMAL P 117 Optical zoom wide P 57 SHARPNESS 0 P 114 j o P 92 CONTRAST 0 P 115 BKT 1 0 3 pictures P 93 HUE 0 P 116 ISO AUTO P 107 SATURATION 0 P 117 MY MODE MY MODE 1 P 73 JPEG DUPLICATE SETTING OFF P 106 QFLASH IN Q P 66 TIFF SHQ HQ 3264 244...

Страница 148: ...ious picture is being recorded AUTO The picture you have just taken is displayed while it is recorded to the card 3 SEC 5 SEC 10 SEC You can select the length of time the picture is displayed If recording is not completed in the set time the picture is displayed until recording is finished 1 In the top menu select MODE MENU E REC VIEW OFF AUTO 3 SEC 5 SEC or 10 SEC and press e Or in C mode select ...

Страница 149: ...or the volume You can turn the sound off completely by setting OFF 1 In the top menu select MODE MENU E BEEP and press d Or in C mode select E BEEP and press d g Menu basics P 38 2 Select 1 or 2 and press d Then select LOW or HIGH and press e To turn the sound off completely select OFF and press e Press e again to exit the menu In C mode set the mode dial to a different mode to exit the menu Mode ...

Страница 150: ...u can turn the sound off completely by setting OFF 1 In the top menu select MODE MENU E SHUTTER SOUND and press d Or in C mode select E SHUTTER SOUND and press d g Menu basics P 38 2 Select 1 or 2 and press d Then select LOW or HIGH and press e To turn the sound off completely select OFF and press e Press e again to exit the menu In C mode set the mode dial to a different mode to exit the menu Mod...

Страница 151: ...using both direct buttons and the control dial with only the direct buttons The function of the control dial and arrow pad varies depending on the shooting mode You can also assign functions chosen from CUSTOM 1 CUSTOM 2 and CUSTOM 3 For more details see the table on the next page 1 In the top menu select MODE MENU E DIAL NORMAL CUSTOM 1 CUSTOM 2 or CUSTOM 3 and press e Or in C mode select E DIAL ...

Страница 152: ...nsation Exposure compensation Aperture value Aperture value Exposure compensation Aperture value Exposure compensation S Shutter speed Exposure compensation Exposure compensation Shutter speed Shutter speed Shutter speed Exposure compensation Exposure compensation M Shutter speed Shutter speed Shutter speed Shutter speed Aperture value Aperture value Aperture value n Exposure compensation Exposure...

Страница 153: ...sing the direct buttons P 33 Ex Changing the flash mode Press repeatedly The flash mode changes each time is pressed SEt FLASH MODE FLASH MODE AUtO SEt FLASH MODE SEt Press Press Press The exposure compensation cannot be adjusted by pressing F Flash intensity control cannot be adjusted by pressing F and at the same time When sharpness contrast hue or saturation are assigned to the z button the set...

Страница 154: ...tion flash intensity shutter speed aperture and ISO sensitivity will differ depending on the adjustment range you choose 1 In the top menu select MODE MENU E EV STEP 1 3EV or 1 2EV and press e Or in C mode select E EV STEP 1 3EV or 1 2EV and press e g Menu basics P 38 Press e again to exit the menu In C mode set the mode dial to a different mode to exit the menu Mode dial Arrow pad OK button ...

Страница 155: ...y the control dial Ref page ISO default setting AUTO 50 to 400 P 107 j o i j k 7 P 92 DIGITAL ZOOM OFF ON P 58 NOISE REDUCTION OFF ON P 118 FUNCTION OFF PANORAMA 8 BLACK WHITE SEPIA P 95 97 98 FRAME ASSIST OFF ON P 99 R still pictures OFF ON P 100 R movies OFF ON P 101 MY MODE s to u P 73 u OFF FON ON DIRECT P 119 SCENE MODES NORMAL I L m P 117 SHARPNESS 5 to 0 to 5 P 114 CONTRAST 5 to 0 to 5 P 11...

Страница 156: ...on you want to set then press e Press e again to exit the menu In C mode set the mode dial to a different mode to exit the menu If the mode dial is set to a mode other than r and z is pressed when MY MODE is set on the custom button the customized settings are not activated Set the mode dial to r and press z to display the MY MODE screen Mode dial Arrow pad OK button GO SELECt CUStOM BUttON ISO NO...

Страница 157: ...control dial while holding down z to set z is used in the same way as the direct button g Direct button basics P 31 When an operation guide is displayed at the bottom of the screen more specific settings can be made Ex 1 When j is set to z Ex 2 When SHARPNESS is set to z Mode dial z Custom button Control dial AF BKt HI SEt Operation guide SHARPNESS ...

Страница 158: ...Functions that can be set in the shortcut menu Ref page Functions that can be set in the shortcut menu Ref page FLASH MODE P 59 R still pictures P 100 AF MF P 79 87 88 MY MODE P 73 ESP n P 81 u P 119 j P 92 WB P 109 B P 89 90 D P 102 ISO P 107 SCENE MODES P 117 DIGITAL ZOOM P 58 SHARPNESS P 114 NOISE REDUCTION P 118 CONTRAST P 115 FUNCTION P 95 97 98 HUE P 116 FRAME ASSIST P 99 SATURATION P 117 To...

Страница 159: ... in C mode select E SHORT CUT and press d g Menu basics P 38 2 Press ac to select A B or C then press d 3 Press ac to select the function you want to set then press e The shortcut menu is set Press e again to exit the menu In C mode set the mode dial to a different mode to exit the menu MODE MENU Mode dial Arrow pad OK button GO SELECt SHORt CUt ISO ISO DIGI IGItAL ZO ZOOM GO SELECt SHORt CUt FLAS...

Страница 160: ... appears on the top menu 2 Press a b or c to select the shortcut menu The monitor jumps directly to the setting screen for that function Ex When SHARPNESS is set in shortcut menu A Mode dial Arrow pad OK button CONtRASt SHARPNESS MODE MENU SAtURAtION CONtRASt WB SHARPNESS SCENE MODES CARD CAM PICtURE Press e CONtRASt SHARPNESS MODE MENU SAtURAtION Top menu Pressing atakes you directly to the SHARP...

Страница 161: ... and 140 mm These numbers are based on the focal length of a 35 mm camera Functions that can be set in MY MODE Default setting Ref page Functions that can be set in MY MODE Default setting Ref page P A S M S Prg P P 46 WB AUTO P 109 FNo F2 4 P 70 D HQ P 102 SHUTTER 1 1000 P 71 j o P 92 F 0 0 P 108 ISO AUTO P 107 LCD EVF 1 LCD P 50 DIGITAL ZOOM OFF P 58 ZOOM 2 28 mm NOISE REDUCTION OFF P 118 FLASH ...

Страница 162: ...s settings one by one Cannot be selected in C mode The MY MODE SETUP screen appears 3 Select a MY MODE number Press ac to select a MY MODE number from 1 to 8 then press e When selecting CURRENT in Step 2 4 Press ac to select SET then press e The current camera settings are saved in the selected MY MODE Mode dial Mode dial Arrow pad OK button EV StEP DUAL CONtROL PANEL CUStOM BUttON MY MODE SEtUP S...

Страница 163: ...60 Press ac to change the setting then press e The setting is saved You can also change the other custom settings 5 When you have made all the settings you want press e The screen displayed in Step 2 appears Press e again to exit the menu In C mode set the mode dial to a different mode to exit the menu The zoom position is set to one of the five zoom positions available in MY MODE SETUP The value ...

Страница 164: ... the mode dial to a different mode to exit the menu The control panel is displayed on the monitor Even when the control panel is displayed on the monitor you can display the subject by pressing f Pressing the direct button displays the setting in green on the control panel Each setting can be made on the control panel by turning the control dial For more details g Control panel screen P 164 The su...

Страница 165: ... metering Center weighted metering 9 Focus mode P AF 10 Flash mode 11 Flash intensity control 12 Sequential shooting 13 Self timer Remote control 14 Sound record 15 Record mode Resolution 16 Number of storable still pictures Recording time 17 Memory gauge 18 Exposure compensation 19 ISO 20 White balance compensation 21 White balance 22 Saturation Sharpness Hue Contrast 23 Scene modes 24 Folder num...

Страница 166: ...rom 1 In the top menu select MODE MENU E VOLUME and press d Or in C mode select E VOLUME and press d g Menu basics P 38 2 Press ac to select the volume level then press e Press e again to exit the menu In C mode set the mode dial to a different mode to exit the menu Mode dial Arrow pad OK button ALL RESEt VOLUME BEEP CARD EDIt Selecting this level will mute the sound completely ...

Страница 167: ... basics P 38 PASM rnmlji The I FORMAT screen is displayed q The CARD SETUP screen is displayed 2 If the mode dial is set to P A S M r n m l j i press a to select YES If the mode dial is set to q press c to select FORMAT then press e The I FORMAT screen is displayed Press a to select YES 3 Press e The BUSY bar is displayed and the card is formatted Do not perform any of the following actions during...

Страница 168: ... reference manual shows the English on screen display in illustrations and explanations Available languages vary depending on the area where you purchased this camera 1 Select SETUP W then press d g Menu basics P 38 2 Press ac to select a language then press e Mode dial Arrow pad OK button ENGLISH DEUtSCH SELECt GO FRANCAIS ESPAÑOL ...

Страница 169: ... setting To move back to the previous setting press b The first two digits of the year are fixed 4 Repeat this procedure until the date and time are completely set The time is displayed in the 24 hour format For example 2pm will be displayed as 14 00 5 Press e For a more accurate setting press e when the time signal hits 00 seconds The date and time settings will be returned to the factory default...

Страница 170: ... 3 MIN 5 MIN or 10 MIN and press e g Menu basics P 38 The camera will not enter sleep mode when powered by the AC adapter In q mode the camera will enter sleep mode and the monitor will turn off after 3 minutes of non operation regardless of the time set in the sleep timer In slideshow mode the camera will enter sleep mode and the monitor will turn off after 30 minutes In shooting mode when the po...

Страница 171: ...if a new card is inserted the folder number and file number are retained from the previous card so the same file number is not used on different cards This helps you to manage multiple cards This method is useful when you want to manage all your files with sequential numbers 1 In the top menu select SETUP FILE NAME RESET or AUTO and press e g Menu basics P 38 When the File No reaches 9999 the file...

Страница 172: ...nitor does not turn on when f is pressed The camera automatically enters sleep mode and the viewfinder turns off after 10 seconds of non operation In P m l j i mode the fastest shutter speed automatically selected by the camera is 1 2000 sec 1 Select SETUP BATTERY SAVE ON or OFF and press e g Menu basics P 38 To enable the powersaving mode select ON Mode dial Arrow pad OK button ...

Страница 173: ...mmended Wait over a minute after the monitor is used or continuous shots are taken to allow for proper performance of the Pixel Mapping function 1 Select SETUP PIXEL MAPPING and press d g Menu basics P 38 START appears 2 Press e The BUSY bar is displayed during Pixel Mapping When Pixel Mapping is finished the screen returns to the C mode menu If you accidentally turn the camera off during Pixel Ma...

Страница 174: ... viewfinder and when you have set the desired level press e Pressing a brightens the monitor or viewfinder and pressing c darkens it The measurement unit can be selected from either meters or feet in the manual focus mode m At long ranges the camera measures in meters and at short ranges in centimeters ft At long ranges the camera measures in feet and at short ranges in inches 1 Select SETUP m ft ...

Страница 175: ...e If you use the wrong video signal type you will not be able to play back the recorded pictures properly on your TV 1 Select SETUP VIDEO OUT NTSC or PAL and press e g Menu basics P 38 TIPS TV video signal types main regions Check the video signal type before connecting the camera to your TV NTSC North America Japan Taiwan Korea PAL European countries China Mode dial Arrow pad OK button ...

Страница 176: ...SB cable and transferring pictures to the PC For instructions on how to connect the camera to your PC refer to the OPERATION MANUAL DIGITAL CAMERA PC CONNECTION PRINT Select when connecting the camera to a PictBridge compatible printer with the USB cable Pictures can be printed directly without using a PC g Connecting the camera to a printer P 187 1 Select SETUP USB PC or PRINT and press e g Menu ...

Страница 177: ...information from digital cameras You can print out pictures automatically at home or in a print shop by storing such data as which pictures you wish to print and the number of prints on the card Pictures with print reservation data can be printed using the following procedures Printing using a DPOF compatible photo lab or print shop You can print the pictures using the print reservation data Print...

Страница 178: ...using the original device If a card contains DPOF reservations set by another device entering reservations using this camera may overwrite the previous reservations If there is not enough space in the card memory you may not be able to enter the reservation data CARD FULL will be displayed You can make DPOF print reservations for up to 999 images per card Even if an image appears with the message ...

Страница 179: ...ith n 2 Press The PRINT ORDER screen appears If print reservation data is already stored on the card the PRINT ORDER SETTING screen appears giving you the choice of resetting the data or keeping it 3 Press ac to select U then press e 4 Press ac to select number of prints or X date time then press d 5 Perform each setting as illustrated Mode dial Arrow pad OK button Print button EXIt GO SELECt PRIN...

Страница 180: ...number Set the date time printing data Press ac to select NO DATE or TIME then press e NO The pictures are printed without the date and time DATE All the pictures are printed with the shooting date TIME All the pictures are printed with the shooting time After completing the number of prints or the date time printing data setting press e to return to the playback screen ...

Страница 181: ...rame you want to print using the arrow pad or the control dial and press e 5 Select the appropriate item using the arrow pad MORE Sets the number of prints date time and trim size The print reservation data is set and the screen proceeds to Step 6 SINGLE PRINT Sets single frame print The date time and trimming settings are not available Step 9 CANCEL Cancels the print reservation for the displayed...

Страница 182: ...TIME All the selected pictures are printed with the shooting time Trim the picture g Trimming P 182 8 After completing all the print reservations press e to complete the print reservations and return to the screen in Step 4 The icon appears on the displayed picture Repeat steps 4 to 8 to make print reservations for other images 9 Press e to display the single frame reservation menu 10 Press b to s...

Страница 183: ... toward W or T to decide the trimming size Use the control dial to select the height and width of the trimming frame 3 2 trimming size can be selected when the size of the selected picture is 3264 2448 or 3264 2176 3 Press e 4 Press ac to select OK then press e OK Saves the current trimming size and returns to the single frame reservation screen RESET Sets a new trimming size Step 2 CANCEL Cancels...

Страница 184: ...ttings If the trimmed picture size is small printing magnification increases accordingly resulting in a printed picture with lower resolution For best results with close up prints you are recommended to use the TIFF SHQ or HQ mode The original picture is not trimmed If your printer does not have a trimming feature the picture will be printed untrimmed Do not rotate pictures that have been trimmed ...

Страница 185: ... card You can reset all the print reservation data or just for selected pictures Resetting all print reservation data 1 Press The PRINT ORDER SETTING screen appears 2 Press ac to select RESET then press e 3 Press b to exit the menu Mode dial Arrow pad OK button Print button Control dial RESEt KEEP PRINt ORDER SEttING PRINt ORDERED SELECt EXIt GO ...

Страница 186: ...reset the print reservation data using the arrow pad or the control dial and press e The single frame reservation menu is displayed 5 Press c to select CANCEL The print reservation data is canceled and the screen returns to Step 4 6 If you have finished canceling print reservation data press e The single frame reservation menu is displayed 7 Press b to select END Press b repeatedly to return to th...

Страница 187: ...e standard for connecting digital cameras and printers of different makers and printing out pictures directly STANDARD All printers that support PictBridge have standard print settings Selecting STANDARD on the setting screens gP 189 to 195 images are printed according to these settings See the instruction manual for your printer for its standard settings or inquire of the printer manufacturers Yo...

Страница 188: ...details of how to turn the printer on and the position of the USB port refer to the printer s instruction manual 3 Set the camera s mode dial to q and plug the USB cable into the camera s USB connector 4 Press the power switch to turn the camera on ONE MOMENT is displayed and the camera and printer are connected The PRINT MODE SELECT screen is displayed on the monitor Make the print settings on th...

Страница 189: ...one picture in multiple layout format g PRINT MULTI PRINT P 190 ALL INDEX Prints an index of all the pictures stored on the card g ALL INDEX mode PRINT ORDER mode P 195 PRINT ORDER Prints the pictures according to the print reservation data on the card If no print reservations P 176 have been made this option is not available g ALL INDEX mode PRINT ORDER mode P 195 GO SELECt EXIt PRINt MODE SELECt...

Страница 190: ...then press e OFF The image is printed inside a blank frame ON The image is printed filling the entire page 4 Press bd or turn the control dial to select the picture you want to print and press e The PRINT screen is displayed 5 Press ac to select OK then press e Printing starts To cancel printing select CANCEL and press e The PRINT MODE SELECT screen is displayed When printing is finished the scree...

Страница 191: ...is printed inside a blank frame ON The image is printed filling the entire page 4 Press ac to select PICS SHEET then press e PICS SHEET depends on the paper size set in Step 2 and the capabilities of your printer 5 Press bd or turn the control dial to select the picture you want to print Turn the zoom lever toward W to display the picture in index format You can then select the pictures you want t...

Страница 192: ...E print reservations Press c The Print information settings screen is displayed Press ac to select the item you want to set then press d Press ac to select the item then press e Sets the number of prints You can select up to 10 prints DATE If you select WITH pictures are printed with the date and time FILE NAME If you select WITH pictures are printed with the file name P Crops part of a recorded p...

Страница 193: ...ures Press ac to select OK or CANCEL then press e OK Printing starts CANCEL The settings are canceled and the monitor returns to the PRINT MODE SELECT screen When printing is finished the monitor returns to the PRINT MODE SELECT screen g Exiting direct printing P 198 To cancel printing Pressing e during print data transfer displays the screen for selecting whether to continue or cancel printing To...

Страница 194: ...image is printed filling the entire page The PRINT INFO screen is displayed 4 Press ac to select the item you want to set then press d Press ac to select the item then press e If PRINT INFO cannot be set with your printer go to Step 6 Only one print can be made at a time DATE If you select WITH pictures are printed with the date and time FILE NAME If you select WITH pictures are printed with the f...

Страница 195: ...eturns to the PRINT MODE SELECT screen When printing is finished the monitor returns to the PRINT MODE SELECT screen g Exiting direct printing P 198 To cancel printing Pressing e during print data transfer displays the screen for selecting whether to continue or cancel printing To cancel printing press ac to select CANCEL then press e CANCEL GO SELECt PRINt OK CANCEL CANCEL Data transfer screen GO...

Страница 196: ...frame ON The image is printed filling the entire page The PRINT screen is displayed BORDERLESS is not available in ALL INDEX mode Press e and go to Step 4 4 Print the pictures Press ac to select OK or CANCEL then press e OK Printing starts CANCEL The settings are canceled and the monitor returns to the PRINT MODE SELECT screen When printing is finished the monitor returns to the PRINT MODE SELECT ...

Страница 197: ...nting PictBridge To cancel printing Pressing e during print data transfer displays the screen for selecting whether to continue or cancel printing To cancel printing press ac to select CANCEL then press e GO PRINt CONtINUE CANCEL SELECt ...

Страница 198: ...already been set the P screen appears Press ac to select RESET then press e 2 Press e 3 Press ac to select OK then press e OK Saves the current trimming size RESET Sets a new trimming size Repeat the procedure from Step 1 CANCEL Cancels the current trimming setting Press e to complete trimming setting and return to the PRINT INFO screen The size of the printed picture varies depending on the print...

Страница 199: ...sconnect the camera from the printer 1 In the PRINT MODE SELECT screen press b A message is displayed 2 Press the power switch to turn the camera off 3 Remove the USB cable from the camera 4 Remove the USB cable from the printer GO SELECt EXIt PRINt MODE SELECt TURN OFF THE POWER Power switch ...

Страница 200: ... correctly Disconnect the camera and connect it again correctly NO PAPER There is no paper in the printer Load some paper in the printer NO INK The printer has run out of ink Replace the ink cartridge in the printer JAMMED The paper is jammed Remove the jammed paper SETTINGS CHANGED The printer s paper cassette has been removed or the printer has been manipulated while making settings on the camer...

Страница 201: ...int reservations can be recorded Replace the card or erase unwanted pictures Before erasing download important images to a PC NO PICTURE There are no pictures on the card The card contains no pictures Record pictures PICTURE ERROR There is a problem with the selected picture and it cannot be played back on this camera Use image processing software to view the picture on a PC If that cannot be done...

Страница 202: ...er button is pressed The battery is exhausted Charge the battery P 17 The camera is in the playback mode Set the mode dial to any position except q P 50 The flash has not finished charging Remove your finger from the shutter button and wait until stops blinking Press the shutter button again P 50 60 The card is full Erase unwanted pictures or insert a new card Before erasing download important ima...

Страница 203: ... or on the monitor screen during shooting Aiming the camera at a bright subject in sunlight may cause vertical lines to appear on the screen This is not a malfunction The date recorded with the image data is wrong The date time is not set Set the date time The clock adjustment is not factory preset P 168 The camera has been left with the battery removed If the camera is left for a few days with th...

Страница 204: ... subject set the flash to P 59 Sequential shooting i j k 7 is set The flash does not fire in the sequential shooting mode Set o in the j menu P 92 The camera is in the movie mode The flash does not fire in the n mode Set a different shooting mode P 55 Super macro mode is set The flash does not fire in the super macro mode Cancel the super macro mode P 88 Panorama mode is set The flash does not fir...

Страница 205: ... a tripod or set the flash to AUTO P 59 The lens was dirty Clean the lens Use a commercially available blower blush and then wipe with a lens cleaner to remove dust Mold may form on the lens surface if the lens is left dirty P 219 The picture is too bright The flash was set to the mode Select a flash mode other than P 59 The center of the subject is too dark If the center of the subject is too dar...

Страница 206: ... bright If the center of the subject is too bright the image as a whole emerges darker Adjust the exposure compensation toward plus P 108 The aperture value setting is too high in A M mode Decrease the aperture value or set the camera to P mode P 70 The shutter speed setting is too fast in S M mode Reduce the shutter speed or set the camera to P mode P 71 The colors of pictures look unnatural Indo...

Страница 207: ... or set the mode dial to q P 121 122 There are no pictures on the card NO PICTURE appears on the monitor Record pictures There is a problem with the card Refer to Error codes P 200 The camera is connected to a TV The monitor does not function when the AV cable is connected to the camera P 134 Single frame erase and all frame erase cannot be performed The pictures are protected Display pictures wit...

Страница 208: ...ROM The camera has not been turned on Press the power switch to turn the camera on P 25 The printer is selected as the connection destination Set the USB option in the SETUP tab to PC P 175 The camera cannot be connected to the printer PC is selected as the connection destination Set the USB option in the SETUP tab to P 175 The camera or printer has not been turned on Turn the camera or printer on...

Страница 209: ...FLASH IN Q Q SLAVE P 66 69 SLOW SLOW1 H SLOW SLOW2 P 63 AF MF FOCUS MODE AF MF MF P 79 87 88 AF MODE iESP n P 74 FULLTIME AF OFF ON P 75 P AF OFF ON P 76 ESP n ESP n n MULTI 4 P 81 j 1 o i j k 7 P 92 B OFF Y P 89 90 ISO AUTO 50 to 400 P 107 DIGITAL ZOOM OFF ON P 58 NOISE REDUCTION 2 OFF ON P 118 FUNCTION OFF PANORAMA 8 BLACK WHITE SEPIA P 95 97 98 FRAME ASSIST OFF ON P 99 R OFF ON P 100 MY MODE 3 ...

Страница 210: ...TIFF 3264 2448 3264 2176 3 2 2592 1944 2288 1712 2048 1536 1600 1200 1280 960 1024 768 640 480 P 102 105 SHQ 3264 2448 3264 2176 3 2 P 102 105 HQ 3264 2448 3264 2176 3 2 P 102 105 SQ1 2592 1944 2288 1712 2048 1536 P 102 105 SQ2 1600 1200 1280 960 1024 768 640 480 P 102 105 SCENE MODES 2 NORMAL I L m P 117 SHARPNESS 5 to 5 P 114 CONTRAST 5 to 5 P 115 HUE 5 to 5 P 116 SATURATION 5 to 5 P 117 CARD CA...

Страница 211: ...L RESET 4 OFF ON P 145 REC VIEW OFF AUTO 3 SEC 5 SEC 10 SEC P 147 BEEP OFF 1 2 P 148 SHUTTER SOUND OFF 1 2 P 149 DIAL NORMAL CUSTOM 1 to CUSTOM 3 P 150 EV STEP 1 3EV 1 2EV P 153 CUSTOM BUTTON P 154 SHORT CUT P 157 MY MODE SETUP CURRENT MY MODE 1 to MY MODE 8 P 160 161 RESET MY MODE 1 to MY MODE 8 P 160 162 CUSTOM MY MODE 1 to MY MODE 8 P 160 162 CONTROL PANEL OFF ON P 163 j 5 P 92 ISO 5 P 107 DIGI...

Страница 212: ... PRESET 2 SET P 110 112 113 CUSTOM CUSTOM 1 to CUSTOM 4 P 111 V GO ADJUST SET P 111 112 113 K SHQ HQ SQ P 105 SCENE MODES NORMAL I L m P 117 SHARPNESS 5 to 5 P 114 CONTRAST 5 to 5 P 115 HUE 5 to 5 P 116 SATURATION 5 to 5 P 117 CARD CARD SETUP FORMAT CANCEL P 166 E ALL RESET OFF ON P 145 REC VIEW OFF AUTO 3 SEC 5 SEC 10 SEC P 147 BEEP OFF 1 2 P 148 DIAL NORMAL CUSTOM 1 to CUSTOM 3 P 150 EV STEP 1 3...

Страница 213: ... to BLUE 7 P 140 SCENE MODES NORMAL I L m P 140 SHARPNESS 5 to 5 P 140 CONTRAST 5 to 5 P 140 HUE 5 to 5 P 140 SATURATION 5 to 5 P 140 FUNCTION OFF BLACK WHITE SEPIA P 140 P P 140 Q 640 480 320 240 CANCEL P 138 P NEW FILE CANCEL P 139 COPY ALL SELECT P 141 CARD CARD SETUP ALL ERASE FORMAT P 144 166 E ALL RESET OFF ON P 145 BEEP OFF 1 2 P 148 VOLUME 0 to 5 P 165 G 4 9 16 P 126 m P 127 8 OFF ON P 136...

Страница 214: ...p menu Tab Function Sub menu Setting Ref page MODE MENU CARD CARD SETUP ALL ERASE FORMAT P 144 166 E ALL RESET OFF ON P 145 BEEP OFF 1 2 P 148 VOLUME 0 to 5 P 165 G 4 9 16 P 126 MOVIE PLAY MOVIE PLAYBACK INDEX EDIT P 128 COPY ALL SELECT P 141 ...

Страница 215: ...T P 157 MY MODE SETUP RESET MY MODE 1 to MY MODE 8 P 160 162 CUSTOM MY MODE 1 to MY MODE 8 P 160 162 CONTROL PANEL OFF ON P 163 VOLUME 0 to 5 P 165 G 4 9 16 P 126 SETUP W ENGLISH FRANCAIS DEUTSCH ESPAÑOL ITALIANO РУССКИЙ PORTUGUES P 167 X P 168 8 OFF LOW HIGH P 169 SLEEP 30 SEC 1 MIN 3 MIN 5 MIN 10 MIN P 169 FILE NAME RESET AUTO P 170 BATTERY SAVE OFF ON P 171 PIXEL MAPPING START P 172 s P 173 m f...

Страница 216: ...Histogram target mark Center FLASH AUTO S M SLOW n MY MODE MY MODE 1 w 0 0 WB AUTO FLASH IN Q None SLAVE 1 CUSTOM WB Not Registered SLOW SLOW1 K HQ 3264 2448 n 320 240 AF MF AF AF target mark Center JPEG OFF AF MODE iESP TIFF 3264 2448 FULLTIME AF OFF SHQ 3264 2448 P AF ON HQ 3264 2448 ESP 5 ESP SQ1 2048 1536 NORMAL Metering target Center SQ2 640 480 NORMAL j o SCENE MODES NORMAL 7 1 0 3 pictures ...

Страница 217: ...L RESET ON W ENGLISH REC VIEW ON X Y M D 2004 01 01 00 00 BEEP 1 LOW 8 LOW SHUTTER SOUND 1 LOW SLEEP 3 MIN DIAL NORMAL FILE NAME AUTO EV STEP 1 3EV BATTERY SAVE OFF CUSTOM BUTTON ISO s NORMAL SHORT CUT A j B ISO C DIGITAL ZOOM m ft m VIDEO OUT NTSC or PAL CONTROL PANEL OFF AF ILLUMINATOR ON VOLUME 3 USB PC G 9 ...

Страница 218: ...MODE SETUP menu Mode P A S M m l j i n Function Zoom DIGITAL ZOOM AF MODE FULLTIME AF P AF AF target mark Manual focus Flash AUTO SLOW1 HSLOW SLOW2 w SLOW Q n n MULTI 4 Metering target AE LOCK MF Y i j k 1 7 1 FUNCTION PANORAMA 8 BLACK WHITE SEPIA FRAME ASSIST u Histgram target mark R still picture R movie K ...

Страница 219: ...ot be selected in m mode 2 Cannot be selected in r mode ISO F WB CUSTOM WB SHARPNESS CONTRAST HUE SATURATION SCENE MODES NOISE REDUCTION ALL RESET 2 REC VIEW BEEP SHUTTER SOUND DIAL EV STEP CUSTOM BUTTON SHORT CUT MY MODE CONTROL PANEL Mode P A S M m l j i n Function ...

Страница 220: ...e beach use a cloth soaked in clean water and well wrung Monitor and viewfinder Wipe gently with a soft cloth Lens Blow dust off the lens with a commercially available blower then wipe gently with a lens cleaner Card Wipe gently with a soft dry cloth Storage When storing the camera for extended periods remove the battery and the card and keep in a cool dry place that is ventilated well Periodicall...

Страница 221: ...move the old battery and insert a new battery CR2025 with the battery facing up as shown 3 Replace the cover turn the remote control device over and turn the screw on the bottom clockwise to tighten Do not apply excessive force to the remote control device Never heat the remote control device or dispose of it in fire The working temperature range for the remote control device is 10 C to 40 C 14 F ...

Страница 222: ...SQ2 1024 768 pixels TIFF SQ2 640 480 pixels TIFF SQ2 No of storable pictures When a 32 MB card is used without sound Approx 2 frames RAW 3264 2448 Approx 1 frames TIFF 3264 2448 Approx 8 frames SHQ 3264 2448 Approx 16 frames HQ 3264 2448 Approx 40 frames SQ1 2048 1536 NORMAL Approx 331 frames SQ2 640 480 NORMAL No of effective pixels 8 000 000 pixels Image pickup device 1 1 8 CCD solid state image...

Страница 223: ...tem 2000 up to 2099 Operating environment Temperature 0 C to 40 C 32 F to 104 F operation 20 C to 60 C 4 F to 140 F storage Humidity 30 to 90 operation 10 to 90 storage Power supply Only an Olympus BLM 1 lithium ion battery AC adapter specified by Olympus optional Dimensions 124 mm W 84 5 mm H 99 mm D 4 9 3 3 3 9 excluding protrusions Weight Approx 510 g 1 1 lb without battery and card SPECIFICATI...

Страница 224: ...ge Contrast Detection System This is used to measure the distance to the subject The camera determines if the image is focused by the level of contrast in the subject Conventional Photograph This refers to recording images using silver halide the method for recording images in conventional non digital photography This system is in contrast to still video and digital photography DCF Design rule for...

Страница 225: ...lash is used in combination with the flash cable ISO A method for indicating film speed by the International Organization for Standardization ISO e g ISO100 Higher ISO values indicate greater sensitivity to light so images can be exposed even in low light conditions JPEG Joint Photographic Experts Group A compression format for still images Photographs images shot using this camera are recorded on...

Страница 226: ...ttery life The camera automatically enters the sleep mode if you do not operate it for a certain time To get out of the sleep mode use any button on the camera shutter button arrow pad etc Synchro Terminals Terminals on an external flash unit for connecting it to the camera TIFF Tagged Image File Format A format used for saving highly detailed black and white or color image data TIFF image files c...

Страница 227: ...ry 18 Battery check 14 Battery compartment cover 10 18 Battery compartment lock 10 18 BATTERY SAVE 171 Beep sound 8 169 BLACK WHITE 98 Bulb shots 72 C Camera movement warning 50 CAPTURE 129 Card 21 Card access lamp 9 50 Card button CF xD 9 23 Card cover 9 22 CARD SETUP 166 CCD 223 Center weighted metering 4 81 CF 21 23 Charger 17 Close up playback U 124 Cloudy day 3 110 Color temperature 110 Compa...

Страница 228: ...1 Flash pop up button 10 59 Flash stand by 50 Fluoescent lamp 110 Focus 50 53 74 Focus Lock 53 FOCUS MODE 79 87 88 FORMAT I 166 FRAME ASSIST display 99 FRAME ASSIST shooting 8 97 136 FULLTIME AF 75 Fully 50 FUNCTION 95 97 98 G Green lamp 50 H Halfway 50 HIGH 102 High speed sequential shooting i 92 Histogram display u 119 Histogram target mark 120 Hot shoe 10 65 HQ 104 105 HUE I 116 I iESP 74 Index...

Страница 229: ... V 111 Operation sound BEEP 148 Optical zoom 57 P P AF 76 PAL 174 224 PANORAMA 95 PC 175 Phase difference detection system 76 224 PictBridge 186 Picture rotation y 123 PIXEL MAPPING 172 Pixels 224 Playback mode 13 41 44 121 Playback on a TV 134 Portrait shooting i 49 Power battery holder 19 Power on off 25 Power switch 10 25 Preset white balance 110 PRINT 175 Print button 10 178 Print setting 176 ...

Страница 230: ...e S 143 Single frame reservation 180 Single frame shooting o 92 SLAVE 69 Slave flash 69 225 SLEEP 169 Sleep mode 169 225 Slideshow m 127 Slow synchronization SLOW 61 63 Speaker 10 Sports shooting j 49 Spot AF mode 74 Spot metering 5 81 SQ 104 105 Standard STANDARD 186 Strap 16 Strap eyelet 10 16 Sunny day 5 110 Super macro MF 88 Super macro shooting 88 T Taking still pictures 50 TIFF 104 105 225 T...

Страница 231: ... 20097 Hamburg Germany Tel 49 40 23 77 3 0 Fax 49 40 23 07 61 Letters Postfach 10 49 08 20034 Hamburg Germany European Technical Customer Support Please visit our homepage http www olympus europa com or call our TOLL FREE NUMBER 00800 67 10 83 00 for Austria Belgium Denmark Finland France Germany Italy Luxemburg Netherlands Norway Portugal Spain Sweden Switzerland United Kingdom Please note some m...

Страница 232: ...era Thank you for purchasing an Olympus digital camera This manual provides instructions on how to install the USB driver To ensure correct installation refer only to these installation procedures DIGITAL CAMERA PERSONAL COMPUTER DIGITAL CAMERA PC CONNECTION OPERATION MANUAL ...

Страница 233: ...re its accuracy However if you find any errors or incomplete information please contact your local Olympus representative It is prohibited by copyright laws to duplicate in part or in whole the information contained in this manual except for personal use Reproduction without permission of the copyright owner is prohibited The PC screens shown in this manual may differ slightly from the actual disp...

Страница 234: ...3 Macintosh Windows INDEX Flowchart 4 Identifying the OS 6 Windows 98 Me 2000 XP 8 Macintosh OS 9 X 23 Downloading image files using other OS For other OS users 31 ...

Страница 235: ... on USB connector extension card etc Windows 95 NT 4 0 Windows 98 98 SE upgrade from Windows 95 Mac OS 8 6 or lower except Mac OS 8 6 equipped with USB MASS Storage Support 1 3 5 installed at the factory Data transfer is not guaranteed on a home built PC system or PCs with no factory installed OS Identifying the OS p 6 Windows 98 98 SE Second Edition Windows Me 2000 XP MacOS 9 0 9 2 OS X For OS 8 ...

Страница 236: ...the AC adapter disconnect the camera from the computer and make sure that the camera is turned off To avoid computer malfunctions do not turn off the camera when the camera is connected to a computer If the camera is connected to the computer via a USB hub operation may not be stable if there are any compatibility problems between the computer and the hub In such cases do not use the hub and conne...

Страница 237: ... your desktop When the My computer icon is not on your desktop click Control Panel from the Start menu 2 Double click the Control Panel icon 3 Double click the System icon The way the file icons inside the folder appear may vary depending on your version of Windows If you don t see the icon you are looking for click on view all Control Panel options on the left of the window ...

Страница 238: ...lose the window If your OS is Windows 98 98 SE proceed to Installing the USB driver for Windows 98 p 9 Users running Windows Me 2000 XP p 11 Users running other OS p 31 Mac OS Macintosh Select About This Computer from the Apple menu on the menu bar A window appears with the name of the computer s OS Confirm that the OS is OS 9 0 9 2 or OS X Users running Mac OS 9 X p 23 Users running other OS p 31...

Страница 239: ...e camera the camera will turn off in the middle of the operation and this could destroy image files data If you are using batteries make sure that there is sufficient remaining battery power Installing the USB driver for Windows 98 When using Windows 98 98 SE 9 Connecting the camera to the computer 11 Confirming the computer recognizes the camera 14 Confirming the USB driver is installed 15 Downlo...

Страница 240: ...nnecting the camera to the computer p 11 1 Insert the provided software CD into your CD ROM drive 2 The Olympus Windows Installer should automatically launch Click USB Driver If the USB driver is already installed in your computer this option will not appear This option will not appear if you are using Windows Me 2000 XP If the installer is not automatically launched select Run on the Start menu a...

Страница 241: ...k Continue The installation of the USB driver will start 4 Click OK to restart your computer and the installation is complete 5 When the computer has restarted installation is complete If the Olympus Windows Installer screen appears click Close and remove the CD ROM from the CD ROM drive ...

Страница 242: ...he marked end of the provided USB cable into the USB port on your computer as shown below 3 After making sure that the camera is turned off connect the end of the USB cable to the USB connector on the camera The location of the USB connector or multi connector varies depending on the camera model Refer to the camera manual for details The location of the USB port varies depending on the computer F...

Страница 243: ...as a mode dial turn the power switch to ON 5 Some camera models display this screen shown right on the monitor When this screen appears use the arrow pad to select PC and press the OK button 6 The computer recognizes the camera as a new device When you connect the camera to the computer for the first time the computer automatically recognizes the camera Click OK when the message saying that the in...

Страница 244: ...hen follow the on screen instructions You may also select take no action to bypass the Microsoft Scanner and Camera Wizard You may then use a more advanced image viewing editing program such as Olympus CAMEDIA Master software For detailed instructions on downloading refer to the CAMEDIA Master software user s guide When the camera is connected to the computer none of the camera buttons are functio...

Страница 245: ... be other Removable Disk icons for other devices such as a removable media drive or USB SmartMedia Reader Writer In this case the digital camera is recognized as another Removable Disk If you cannot find the icon the camera and computer are not connected properly Turn the camera off disconnect the camera from the computer and connect again or proceed to Confirming the USB driver is installed p 15 ...

Страница 246: ...le Disk follow the procedure below to check whether the USB driver has been fully installed 1 Open My Computer and double click the Control Panel icon For users running Windows XP open Control Panel from the Start menu 2 Double click the System icon 3 The System window will appear Click the Device Manager tab ...

Страница 247: ...and start again Users running Windows 98 98 SE start again from Confirming the USB driver is installed and Users running Window Me 2000 XP start from Connecting the camera to the computer If the USB driver was successfully installed you can find the following in the Device Manager the name of the camera you have connected listed under Disk drives OLYMPUS Digital Camera listed as one of the items i...

Страница 248: ...d as a Removable Disk 3 Double click the Dcim folder If an error message appears when you double click the icon there may be a problem with one of the following the camera s power source the AC adapter is not properly connected or the battery power is low Make sure that the AC adapter is correctly connected or that the batteries are not running low the card there is no card in the camera or there ...

Страница 249: ...the My Documents icon The camera automatically assigns folder names and file names according to the following rules Serial numbers of image files run from 0001 to 9999 Serial numbers of folders run from 100 to 999 When file number 9999 is reached a new folder is created and assigned the next number Months January through September are expressed by the numbers 1 through 9 October by the letter A No...

Страница 250: ...age files downloaded to your computer The files will be opened in the default image viewer of the operating system If you want to view the image a different size or process it you will need to open the image with software that supports JPEG or TIFF images files such as Paint Shop Pro Photoshop or CAMEDIA Master software The lamp on the right of the viewfinder or the card access lamp blinks while t...

Страница 251: ...f the viewfinder or the card access lamp is not blinking Some camera models have either a lamp on the right of the viewfinder or a card access lamp and the location varies depending on the model Refer to your camera s reference manual 2 Double click the My Computer icon and right click the Removable Disk to display the menu 3 Click Eject on the menu Lamp Card access lamp ...

Страница 252: ...g then the cable can be removed 5 Remove the USB cable from the camera 6 Remove the USB cable from your computer Windows Me 2000 XP 1 Make sure that the lamp on the right of the viewfinder or the card access lamp is not blinking Some camera models have either a lamp on the right of the viewfinder or a card access lamp and the location varies depending on the model Refer to your camera s reference ...

Страница 253: ...ars 3 Click on the message The Unplug or Eject Hardware window appears 4 When a message appears click OK 5 Remove the USB cable from the camera 6 Remove the USB cable from your computer If the window returns the following message when you click Unplug or Eject Hardware first make sure that no image data is being downloaded from the camera and then remove the USB cable ...

Страница 254: ...mage files data If you are using batteries make sure that there is sufficient remaining battery power If you are running Mac OS X the connection to the computer and downloading the image data are verified Restrictions such as the following may occur due to the OS The image file properties are not displayed correctly Images in the camera cannot be opened without first downloading them etc For more ...

Страница 255: ...mputer as shown below 3 After making sure that the camera is turned off connect the end of the USB cable to the USB connector on the camera The location of the USB connector or multi connector varies depending on the camera model Refer to the camera manual for details The location of the USB port varies depending on the computer For details refer to your computer s manual PLAY EDIt CARD SEtUP SETU...

Страница 256: ...a models display this screen shown right on the monitor When this screen appears use the arrow pad to select PC and press the OK button 6 The computer recognizes the camera as a new device The computer recognizes the camera automatically and an Untitled icon appears on the desktop If you cannot find this icon turn off the camera and connect again Mac OS X When the computer has recognized the camer...

Страница 257: ...rror message appears when you double click the icon there may be a problem with one of the following the camera s power source the AC adapter is not properly connected or the battery power is low the card there is no card in the camera or there is a problem with the card Check that you can play back pictures on the monitor of your camera the USB cable the camera is not properly connected to the co...

Страница 258: ...e names according to the following rules Serial numbers of image files run from 0001 to 9999 Serial numbers of folders run from 100 to 999 When file number 9999 is reached a new folder is created and assigned the next number Months January through September are expressed by the numbers 1 through 9 October by the letter A November by B and December by C Folder name Example File name Example Serial ...

Страница 259: ...iles in the Hard Disk folder The files will be opened in the default image viewer of the operating system If you want to view the image a different size or process it you will need to open the image with software that supports JPEG or TIFF images files such as Paint Shop Pro Photoshop or CAMEDIA Master software The lamp on the right of the viewfinder or the card access lamp blinks while the image ...

Страница 260: ... Capture software dialog appears 1 From the Download To menu select a destination folder 2 To download all images click Download All To selectively download images click Download Some and highlight the desired images The images are transferred from the camera to your computer If you are operating Mac OS X and you want to download images using the same procedure as for Mac OS 9 select File Close an...

Страница 261: ...ing 2 Drag the untitled icon on the desktop to Trash 3 Make sure that the lamp on the right of the viewfinder or the card access lamp is not blinking The green lamp lights on some models If the lamp is no flashing then the cable can be removed 4 Remove the USB cable from the camera 5 Remove the USB cable from your computer Lamp Card access lamp Lamp ...

Страница 262: ...omputer have a USB interface Is there a port marked on your computer Does your computer have a built in PC card slot Consult your nearest Olympus representative Is your OS one of the following Windows 98 Windows 2000 Windows Me Windows XP Mac OS 9 X Yes No No Yes Connect the camera directly to your computer using the provided USB cable Use the optional USB reader writer Certain card readers may no...

Страница 263: ... 20097 Hamburg Germany Tel 49 40 23 77 3 0 Fax 49 40 23 07 61 Letters Postfach 10 49 08 20034 Hamburg Germany European Technical Customer Support Please visit our homepage http www olympus europa com or call our TOLL FREE NUMBER 00800 67 10 83 00 for Austria Belgium Denmark Finland France Germany Italy Luxemburg Netherlands Norway Portugal Spain Sweden Switzerland United Kingdom Please note some m...

Отзывы: