background image

6

Troubleshooting

6-48

MF45

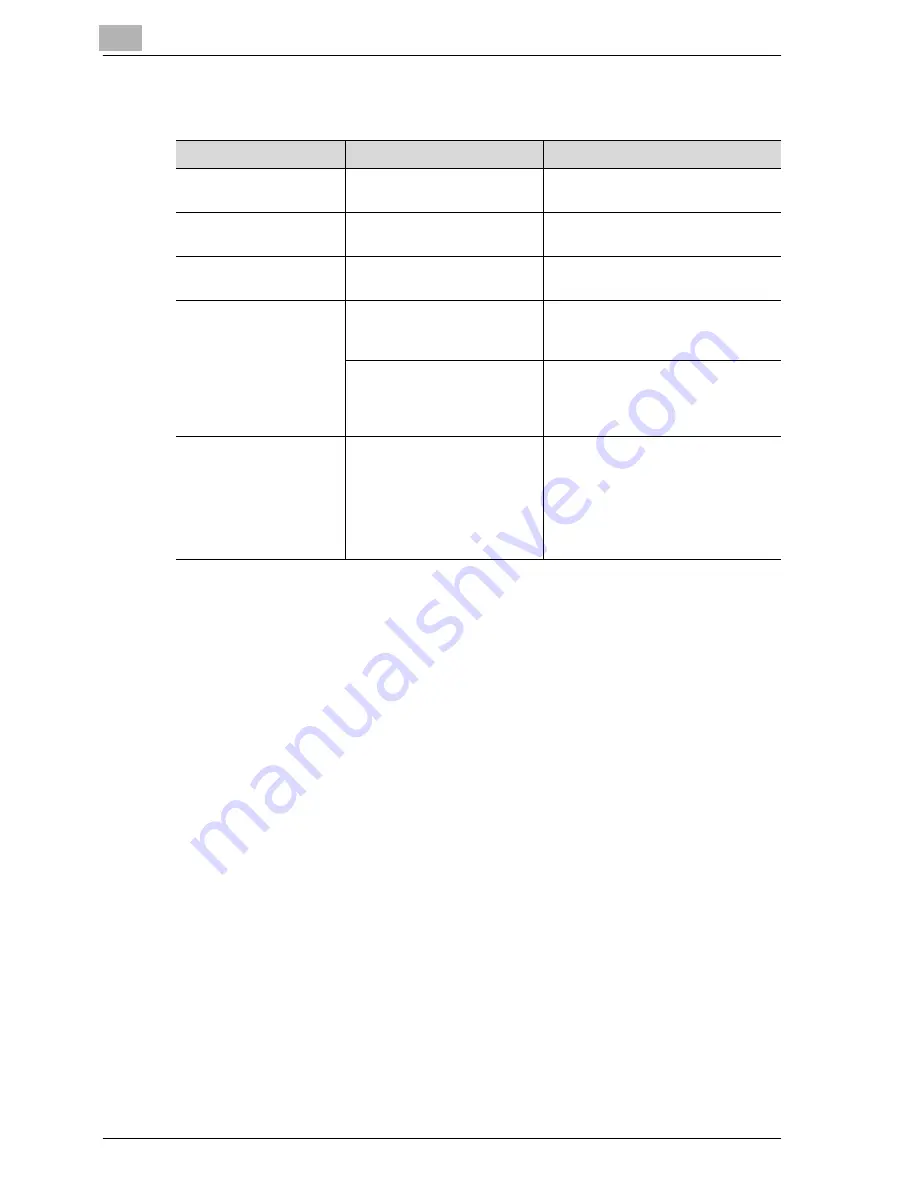
Finisher

If any message other than those listed above appears, perform the operation 
described in the message.

If the problem is not corrected after the described operation is performed, 
contact your technical representative.

Symptom

Possible Cause

Remedy

The finisher cannot be 
used.

Is no power supplied to the 
connector?

Check that the cord is correctly in-
serted into the connector.

The pages cannot be 
stapled.

Have the staples run out?

Replace the staple cartridge. (See 
p. 10-10.)

The staple is incorrectly 
positioned by 90°.

Are the staples positioned as 
specified?

Select the desired position for the 
staples. (See p. 4-84.)

The pages that were fed 
out were not uniformly 
loaded and the punched 
holes or staples are in-
correctly positioned.

Is the paper curled?

Remove the paper from the paper 
drawer, turn it over, and then load it 
again.

Is there a gap between the 
lateral guides in the paper 
drawer and the side of the pa-
per?

Slide the lateral guides in the paper 
drawer against the side of the paper 
so that there is no gap.

Even though a Punch 
setting was selected, 
holes are not punched. 
(when Punch Kit PK-501 
is installed on Finisher 
FS-603 or Finisher FS-
507) 

Did the message “Remove 
Punch Scraps.” appear?

Empty the hole-punch waste con-
tainer.

Содержание d-Color MF45

Страница 1: ......

Страница 2: ...uct certifies that the product satisfies the basic quality requirements Your attention is drawn to the following actions which could compromise the conformity attested to above as well as the characte...

Страница 3: ...y of the original 1 10 Inserting paper between copies of overhead projector transparencies 1 10 Adding a cover page 1 10 Inserting different paper into copies 1 11 Inserting pages from a different doc...

Страница 4: ...parameter CMYK color adjustment 1 25 1 10 Brightness parameter 1 27 1 11 Contrast parameter 1 28 1 12 Saturation parameter 1 29 1 13 Sharpness parameter 1 30 1 14 Hue parameter 1 31 1 15 Copy Density...

Страница 5: ...2 8 Ventilation 2 9 Actions in response to troubles 2 9 Consumables 2 10 When moving the machine 2 11 Before successive holidays 2 11 2 2 Regulation notices 2 12 CE Marking Declaration of Conformity...

Страница 6: ...ically canceling the settings automatic panel reset 3 31 Automatically canceling the mode screen automatic system reset 3 32 Automatically conserving energy low power mode 3 33 Automatically conservin...

Страница 7: ...settings 4 23 To specify an original direction setting 4 25 Selecting the position of the binding margin Margin settings 4 27 To specify a margin setting 4 29 To change scan settings for each documen...

Страница 8: ...ality of text 4 71 4 11 Selecting a combine originals setting 4 73 Copying multiple document pages onto a single page Combine originals 4 75 4 12 Selecting finishing settings 4 77 Separating copies by...

Страница 9: ...lity setting screen 5 25 To set the Key Repeat Start Interval Time function 5 25 To set the Enlarge Display Timer Setting function 5 28 To set the Message Display Time function 5 30 To set the Sound S...

Страница 10: ...When the message Please replace XXXX appears 6 43 6 7 Simple troubleshooting 6 45 Main unit 6 45 ADF 6 47 Finisher 6 48 6 8 Main messages and their remedies 6 49 7 Specifications 7 1 Specifications 7...

Страница 11: ...tween overhead projector transparencies OHP Interleave function 9 3 To copy using the OHP Interleave function 9 4 9 2 Adding cover pages Cover Mode function 9 7 To copy using the Cover Mode function 9...

Страница 12: ...58 To adjust the Adjust color parameters 9 59 Checking the print result of the adjust color settings Sample Copy 9 62 To make sample copies 9 63 9 15 Adding filing margins to copies Page Margin funct...

Страница 13: ...ed staples in finisher FS 603 10 23 10 4 Emptying the waste containers 10 29 To empty the hole punch waste container in finisher FS 507 10 32 To empty the hole punch waste container for finisher FS 60...

Страница 14: ...ity 13 1 Overview of utility mode parameters 13 3 List of registration information and parameters 13 3 13 2 Selecting a destination register 13 22 Scan 13 22 Fax 13 22 User box 13 23 Displaying the De...

Страница 15: ...olor registration for yellow magenta and cyan 13 73 13 9 Adjusting the gradation levels 13 77 Requisite 13 77 13 10 Authentication method 13 80 User authentication and account track 13 80 When user au...

Страница 16: ...tings 13 112 13 15 Viewing the status of the consumables 13 116 Displaying the Unit Life Indicator screen 13 117 14 Appendix 14 1 Entering text 14 3 To type text 14 5 List of Available Characters 14 5...

Страница 17: ...1 Introduction...

Страница 18: ......

Страница 19: ...so that it can easily be referred to when questions or problems arise during operation The illustrations used in this manual may appear slightly different from views of the actual equipment Energy Sta...

Страница 20: ...use in source and binary forms with or without modifica tion are permitted provided that the following conditions are met 1 Redistributions of source code must retain the above copyright notice this l...

Страница 21: ...All rights reserved This package is an SSL implementation written by Eric Young eay crypt soft com The implementation was written so as to conform with Netscapes SSL This library is free for commerci...

Страница 22: ...MERCHANTABILITY AND FITNESS FOR A PARTICULAR PURPOSE ARE DISCLAIMED IN NO EVENT SHALL THE AU THOR OR CONTRIBUTORS BE LIABLE FOR ANY DIRECT INDIRECT INCI DENTAL SPECIAL EXEMPLARY OR CONSEQUENTIAL DAMA...

Страница 23: ...ed paper size For details refer to Automatically selecting the zoom ratio Auto zoom set ting on page 4 41 Specifying separate horizontal and vertical zoom ratios By specifying separate horizontal and...

Страница 24: ...ld Staple on page 4 92 Sorting copies The finishing method for copies can be selected For details refer to Separating copies by sets Sort setting on page 4 80 Separating copies by pages Group setting...

Страница 25: ...nto a single page Multiple pages of the document can be printed together on a single page For details refer to Copying multiple document pages onto a single page Combine originals on page 4 75 Copying...

Страница 26: ...r between copies of overhead projector transparencies In order to prevent overhead projector transparencies from becoming stuck to each other a page interleaf can be inserted between the transparency...

Страница 27: ...Inserting different paper into copies Insert Sheet func tion on page 9 11 Inserting pages from a different document at specified locations in a copy A document scanned later can be inserted for speci...

Страница 28: ...cument can be copied with the light and dark colored areas of the doc ument image inversed With Color setting Full Color copies are printed with the hues and brightness inversed With Color setting Bla...

Страница 29: ...for the desired image For details refer to Adjusting the copy color quality Adjust color parame ters on page 9 58 Separately copying a page spread A page spread such as in an open book or catalog can...

Страница 30: ...age on multiple pages A single document page can be automatically split into parts with each part printed enlarged For details refer to Copying an enlarged image on multiple pages Poster Mode function...

Страница 31: ...ons of copies Areas such as the shadows of punched holes and transmission information in received faxes can be erased in copies For details refer to Erasing specified areas of copies Erase function on...

Страница 32: ...tering copy programs Mode Memory on page 5 11 Checking the copy settings Screens showing the current copy settings can be displayed From these screens the copy settings can also be changed For details...

Страница 33: ...ifferent copy job to be printed For details refer to Interrupting a copy job Interrupt mode on page 5 9 Printing a sample copy Before printing a large number of copies a single sample copy can be prin...

Страница 34: ...tion on the adjust ment of the vividness p 1 29 Green Parameter Provides informa tion on the adjust ment of the green hues p 1 23 Sharpness Parameter Provides informa tion on the adjust ment of the sh...

Страница 35: ...cted color p 1 34 Neg Pos Reverse Function Provides informa tion on copying a document with the light and dark colored areas of the image inversed p 1 36 Background Color Function Provides informa tio...

Страница 36: ...is obvious that the yellow of the lemon is brighter But what about when comparing the yellow of a lemon and the red of a bean Obviously the yellow of the lemon is brighter Brightness is the this degre...

Страница 37: ...er edge is the hue the vertical axis is the brightness and the horizontal axis from the center is the saturation Assigning colors to the solid object representing the three attributes of color shown i...

Страница 38: ...5 1 6 Red parameter This parameter can be used to adjust the degree of red in the image to one of 19 levels For details on the setting procedure refer to Adjusting the copy color quality Adjust color...

Страница 39: ...1 7 Green parameter This parameter can be used to adjust the degree of green in the image to one of 19 levels For details on the setting procedure refer to Adjusting the copy color quality Adjust colo...

Страница 40: ...1 8 Blue parameter This parameter can be used to adjust the degree of blue in the image to one of 19 levels For details on the setting procedure refer to Adjusting the copy color quality Adjust color...

Страница 41: ...f the document can be reproduced Changing the amount of each color of toner enables the tints in the copy to be finely adjusted Each color can be adjusted to any of 19 levels For details on the settin...

Страница 42: ...1 Introduction 1 26 MF45 Y G B R M C...

Страница 43: ...Brightness parameter This parameter can be used to finely adjust the brightness of the image to one of 19 levels For details on the setting procedure refer to Adjusting the copy color quality Adjust...

Страница 44: ...ast parameter This parameter can be used to finely adjust the image to one of 19 levels be tween soft smooth and crisp For details on the setting procedure refer to Adjusting the copy color quality Ad...

Страница 45: ...Saturation parameter This parameter can be used to finely adjust the vividness of the image to one of 19 levels For details on the setting procedure refer to Adjusting the copy color quality Adjust c...

Страница 46: ...arpness parameter This parameter can be used to adjust the amount of contours in text and im ages to one of 7 levels For details on the setting procedure refer to Adjusting the copy color quality Adju...

Страница 47: ...31 1 14 Hue parameter This parameter can be used to finely adjust the hue of the image to one of 19 levels For details on the setting procedure refer to Adjusting the copy color quality Adjust color p...

Страница 48: ...Density parameter This parameter can be used to finely adjust the light and shading of the im age to one of 19 levels For details on the setting procedure refer to Adjusting the copy color quality Ad...

Страница 49: ...cument using only one of the 21 colors available For details on the setting procedure refer to Selecting a color setting on page 4 35 Yellow Magenta Cyan Red Green Orange Pumpkin Yellow Green Teal Blu...

Страница 50: ...color areas of the document printed in one of the six colors available For details on the setting procedure refer to Selecting a color setting on page 4 35 Yellow Magenta Cyan Red Green Blue H A P P Y...

Страница 51: ...e 18 colors avail able as the color of the background blank areas For details on the setting procedure refer to Adding a background color to copies Background Color function on page 9 55 Yellow Magent...

Страница 52: ...he dark colored areas of the image inversed For details on the setting procedure refer to Copying with image colors in versed Neg Pos Reverse function on page 9 49 Monotone copy Yellow Magenta Cyan Re...

Страница 53: ...Introduction 1 MF45 1 37 Full color copy and Background Color function...

Страница 54: ...38 MF45 1 20 Mirror Image function This function allows you to copy a mirror image of the original document For details on the setting procedure refer to Copying in a mirror image Mirror Image functi...

Страница 55: ...prevent injuries and to ensure safe use of the machine 7 CAUTION Failure to observe instructions highlighted in this manner may result in slight injuries or property damage Observe all cautions in ord...

Страница 56: ...ine 2 Reminder Text highlighted in this manner contains information that should be re minded Detail Text highlighted in this manner contains references for more detailed in formation Special text mark...

Страница 57: ...the first value always refers to the width of the paper shown as Y in the illustration and the second to the length shown as X Paper orientation Lengthwise w If the width Y of the paper is shorter th...

Страница 58: ...for using Scan to E Mail Scan to FTP and Scan to SMB User manual Box Operations This manual contains details on operating procedures for using the boxes Refer to this user manual for details on opera...

Страница 59: ...encies Internal revenue stamps canceled or uncanceled Passports Immigration papers Motor vehicle licenses and titles House and property titles and deeds General Identification cards badges or insignia...

Страница 60: ...1 Introduction 1 44 MF45...

Страница 61: ...2 Installation and operation precautions...

Страница 62: ......

Страница 63: ...safety and preventing equipment problems Please keep this manual in a handy place near the machine Make sure you observe all of the precautions appear in each section of this manual KM_Ver 01E_C 2 No...

Страница 64: ...ne indicates a pro hibited course of action This symbol warns against dis mantling the device A black circle indicates an im perative course of action This symbol indicates you must unplug the device...

Страница 65: ...a fire or electrical shock Use the power cord supplied in the package only for this ma chine and NEVER use it for any other product Failure to ob serve this precaution could result in a fire or electr...

Страница 66: ...connecting to inadequate power supply voltage current capacity grounding and may result in fire or shock If proper wall outlet is not available the customer shall ask qualified electrician for the ins...

Страница 67: ...and plug in the power cord with a wet hand as an electrical shock could result Plug the power cord all the way into the power outlet Failure to do this could result in a fire or electrical shock Caut...

Страница 68: ...ly turn OFF the pow er switch unplug the power cord from the power outlet and then call your authorized service representative Caution Symbol After installing this product mount it on a secure base If...

Страница 69: ...ted room for an extended period of time could injure your health Ventilate the room at regular intervals Warning Symbol Do not keep using this product if this product becomes inor dinately hot or emit...

Страница 70: ...of the unit for malfunctions such as a paper misfeed do not touch the locations around the fus ing unit etc which are indicated by a Caution HOT caution label Warning Symbol Do not throw the toner ca...

Страница 71: ...y Do not ignore this safety advices Caution Symbol Whenever moving this product be sure to disconnect the power cord and other cables Failure to do this could damage the cord or cable resulting in a f...

Страница 72: ...ipment generates uses and can radiate radio frequency energy and if not installed and used in accordance with the instruction manual may cause harmful interference to radio communications Operation of...

Страница 73: ...CISPR rules and local rules LED radiation safety This product is a copier which operates by means of a LED light emitting di odes exposure system There is no possibility of danger from the LED opti c...

Страница 74: ...la pi ce ou se trouve l appareil Placer l appareil dans une pi ce largement ventil e Acoustic noise For European users only Maschinenl rminformations Verordnung 3 GPSGV Der h chste Schalldruckpegel be...

Страница 75: ...otations and labels appear on this machine at the follow ing positions Be very careful that an accident does not occur when operations such as re moving paper misfeeds are performed The area around th...

Страница 76: ...ce ment and regular maintenance can easily be performed adhere to the rec ommended space requirements detailed below 2 Reminder Be sure to allow a clearance of 100 mm 4 in or more at the back of this...

Страница 77: ...s for correct operation of the machine are as follows Temperature 10 C 50 F to 30 C 86 F with fluctuations of no more than 10 C 18 F within an hour Humidity 15 to 85 with fluctuations of no more than...

Страница 78: ...2 Installation and operation precautions 2 18 MF45...

Страница 79: ...3 Before making copies...

Страница 80: ......

Страница 81: ...it The document is scanned by the scanner section and the scanned image is printed by the printer sec tion Referred to as the machine the main unit or the MF45 throughout the manual 2 Working Table WT...

Страница 82: ...e sin gle paper feed cabinet or on the double paper feed cabinet 10 Punch Kit PK 501 Allows hole punching to be used if installed onto fin isher FS 603 Referred to as the punch kit throughout the man...

Страница 83: ...tain the functionality and quality of the machine be sure to use the desk or paper feed cabinet when installing the machine on the floor 20 Mechanical Counter MC 501 Shows the total number of black pr...

Страница 84: ...3 Before making copies 3 6 MF45 Outside of machine The illustration above shows the main unit with the optional LCT installed 1 2 3 4 5 6 7 8 9 10 11 12...

Страница 85: ...sheets of thick paper or 10 envelopes Referred to as the bypass tray throughout the manual See p 3 57 5 Main power switch cover Opened when using the main power switch to turn the machine on and off 6...

Страница 86: ...efore making copies 3 8 MF45 The illustration above shows the main unit with the optional double paper feed cabinet and mechanical counter installed 15 13 14 15 16 17 18 19 20 21 22 23 24 25 26 27 28...

Страница 87: ...the amount of paper remaining When the indicator is completely red the drawer is empty 21 Right side door of the paper feed cabinet Opened when clearing paper misfeeds 22 Right side door release lever...

Страница 88: ...s 3 10 MF45 The illustration above shows the main unit with the optional double paper feed cabinet mechanical counter fax multi line and dehumidifier heater in stalled 29 32 31 30 33 35 36 37 38 39 41...

Страница 89: ...NE jack 2 Used for connecting a general subscriber line This jack is used when the optional fax multi line is in stalled 37 USB port type B USB 2 0 1 1 compliant Used for connecting a USB cable from t...

Страница 90: ...ht side door unit or the fusing unit 4 LED cleaning tool Used to clean the surface of the LED unit for exam ple when replacing the image transfer belt unit 5 Charger cleaning tool Used to clean the el...

Страница 91: ...orizontal transport unit cover Opened when clearing paper misfeeds from the horizontal transport unit See p 6 34 4 Hole punch waste container Removed when emptying hole punch waste that has accumulate...

Страница 92: ...10 15 p 10 23 10 Misfeed clearing dial 1 Turned when clearing paper misfeeds within the fin isher See p 6 34 11 Misfeed clearing dial 2 Turned when clearing jammed staples or replacing the staple car...

Страница 93: ...dials FN5 Turned when clearing paper misfeeds within the fin isher See p 6 30 3 Exit tray 2 Collects printed pages 4 Exit tray 1 Collects printed pages 5 Exit tray 3 Feeds out printed pages when job s...

Страница 94: ...eds from the horizontal transport unit See p 6 30 11 Right side door FN7 Opened when clearing paper misfeeds emptying hole punch waste or replacing the staple cartridge 12 Hole punch waste container R...

Страница 95: ...Before making copies 3 MF45 3 17...

Страница 96: ...ave been applied press this key after entering the user name and password for user authentication or the account name and password for account track in order to use this machine 4 Box key Press to ent...

Страница 97: ...o restart a stopped job For details on jobs refer to Managing jobs Job list on page 12 3 13 Main Power indicator Lights up in green when the machine is turned on with the main power switch 14 Data ind...

Страница 98: ...ched or damaged Never push down on the touch panel with force and never use a hard or pointed object to make a selection in the touch panel 24 Help key Press to display the Main Help Menu screen where...

Страница 99: ...operations that must be performed are displayed here 4 Functions settings display Tabs and keys for displaying screens containing various functions are displayed Touch a tab or button to display the...

Страница 100: ...de Indicates that this machine is receiving data regardless of the current mode Indicates that an error occurred during an image stabilization operation a print operation or a scan operation Touch thi...

Страница 101: ...ust the control panel to the angle that allows for easy operation To adjust the angle of the control panel 1 Pull the control panel release lever toward you and then push down on the control panel The...

Страница 102: ...r angle pull the control panel release lever toward you and then push down on the control panel The control panel stops at the lower position 3 To return the control panel to the up per position pull...

Страница 103: ...ower switch turns on off all functions of the machine Normally the main power switch is turned on The auxiliary power button turns on off machine operations for example for copying printing or scannin...

Страница 104: ...panel or touch panel and those that are se lected when the Reset key is pressed to cancel all settings specified from the control panel or touch panel The default settings can be changed For details...

Страница 105: ...displayed the Basic screen appears The indicator on the Start key lights up in green 3 Position the document to be copied How is the document positioned For details on positioning the document to be c...

Страница 106: ...rinting of a job stopped Press the Stop key For details refer to Stopping scanning print ing on page 4 96 Detail While the machine is warming up to begin printing after it is turned on us ing the auxi...

Страница 107: ...again the machine may not function properly Do not turn off the machine with the main power switch or the auxiliary power button while it is making copies or printing otherwise a paper mis feed may oc...

Страница 108: ...3 Before making copies 3 30 MF45 Detail The following are cleared when the main power switch and auxiliary pow er button are turned off Settings that have not been programmed Jobs queued to be printed...

Страница 109: ...s is the automatic panel reset operation As the factory default the automatic panel reset operation is performed after 1 minute Detail The length of time until the automatic panel reset operation is p...

Страница 110: ...n is au tomatically changed to that for the mode given priority This is the automatic system reset operation As the factory default the Copy mode screen is displayed after 1 minute Detail The mode scr...

Страница 111: ...jobs while it is warming up The touch panel comes on again and after the machine has fin ished warming up it is ready to begin printing within 30 seconds at normal room temperature 23 C 2 Note As the...

Страница 112: ...To recover from Sleep mode 1 Press the Power Save key 2 The machine can receive jobs while it is warming up The touch panel comes on again and after the machine has fin ished warming up it is ready to...

Страница 113: ...ion mode Press the Power Save key or press the auxiliary power button As the factory default the ma chine enters Low Power mode Detail Whether the machine enters Low Power mode or Sleep mode when the...

Страница 114: ...achine while the weekly timer is being used 1 Press the Power Save key How is the weekly timer set For details on setting the weekly timer refer to System setting on page 13 36 2 Type in the password...

Страница 115: ...factory default the weekly timer is not set If the message Access restricted due to weekly timer Input amount of time prior to entering Sleep Mode or Access restricted due to weekly timer Input passw...

Страница 116: ...users that have been registered can use this machine 0 When user authentication has been set only users that enter passwords for specified accounts can use this machine 0 Contact your administrator f...

Страница 117: ...ars with the name of the default server Touch Domain Name to display the names of servers registered with Ac tive Directory and then select the desired server For details on specifying settings for an...

Страница 118: ...3 Before making copies 3 40 MF45 3 Touch Password 4 Type in the password and then touch OK 5 Press the Access key The Basic screen appears 6 Make copies using the desired copy settings...

Страница 119: ...mplete user authentication and then log on by using the account track input screen User authentication settings can be specified using the User Authentica tion Setting parameters in Administrator mode...

Страница 120: ...account track settings have been applied the account track screen ap pears However if Synchronize User Authentication Account Track has been set to Synchronize the account track screen does not appear...

Страница 121: ...of prints produced with each account can be controlled This is account track 0 When account track has been set only users that enter passwords for specified accounts can use this machine 0 Contact you...

Страница 122: ...3 Before making copies 3 44 MF45 2 Type in the account name and then touch OK 3 Touch Password 4 Type in the password and then touch OK...

Страница 123: ...Method on the Authentication Method screen of Administrator mode was set to Password Only log on is possible by only entering the password For details refer to User authentication Ac count track on p...

Страница 124: ...the 1st drawer 2 Press down on the paper lifting plate until it locks into place 3 Slide the lateral guides to fit the size of paper to be loaded How is non standard sized paper loaded First load the...

Страница 125: ...be printed on faces down How is curled paper loaded Flatten the paper before loading it How many sheets of paper and other media can be loaded No more than 250 sheets of plain paper can be loaded In...

Страница 126: ...will not be correctly detected Be sure to adjust the lateral guides to the size of the loaded paper 2 Reminder Before loading envelopes press them down to make sure that all air is removed and make s...

Страница 127: ...king copies 3 MF45 3 49 2 Reminder When loading overhead projector transparencies load them in the v ori entation as shown in the illustration Do not load overhead projector transparencies in the w or...

Страница 128: ...tion 2 Reminder Be sure to load letterhead paper so that the side to be printed on faces down Detail For details on specifying the paper size for the 1st drawer refer to To specify a paper size Set Si...

Страница 129: ...ull out the paper drawer 2 Slide the lateral guides to fit the size of paper to be loaded 3 Load the paper into the drawer so that the side of the paper to be print ed on the side facing up when the p...

Страница 130: ...plain paper that the top of the stack is higher than the mark 4 Close the paper drawer 2 Reminder If the lateral guides are not positioned correctly for the loaded paper the paper size will not be co...

Страница 131: ...Before making copies 3 MF45 3 53 2 Note To print on overhead projector transparencies and envelopes use the by pass tray or the 1st drawer...

Страница 132: ...the drawer release button is pressed Be sure that the machine is turned on with the auxiliary power button 1 Press the drawer release button 2 Pull out the paper drawer for the LCT 3 Load the paper in...

Страница 133: ...ackage was unwrapped faces up Load letterhead paper so that the side to be printed on faces down 5 Close the paper drawer for the LCT 2 Reminder Be careful not to touch the film Do not load so many sh...

Страница 134: ...3 56 MF45 2 Note If the machine has entered Low Power mode or Sleep mode the paper drawer for the LCT cannot be pulled out even after the drawer release button is pressed Be sure to first cancel Low P...

Страница 135: ...ish to copy onto thick paper postcards envelopes overhead projector transparencies or label sheets To load paper bypass tray 1 Open the bypass tray When loading large sized paper pull out the tray ext...

Страница 136: ...per and then select the paper type What paper type is selected when postcards are loaded Select Thick 3 What paper type is selected when label sheets are loaded Select Thick 1 2 Reminder Do not load s...

Страница 137: ...the v orientation A maximum of 20 postcards can be loaded into the bypass tray 2 Reminder When loading overhead projector transparencies load them in the v ori entation as shown in the illustration D...

Страница 138: ...firmly pressed otherwise the envelopes may become wrinkled or a paper misfeed may occur When loading envelopes load them with the flap side up as shown in the illustration If the envelopes are loaded...

Страница 139: ...them in the w orientation as shown in the illustration Do not load label sheets in the v orientation A maximum of 20 label sheets can be loaded into the bypass tray 2 Reminder Be sure to load letterh...

Страница 140: ...surface of the paper facing down when the paper is loaded into the bypass tray Detail For details on specifying the paper size for the bypass tray refer to To specify a paper size Set Size settings on...

Страница 141: ...Before making copies 3 MF45 3 63...

Страница 142: ...3 Before making copies 3 64 MF45...

Страница 143: ...4 Basic copy operations...

Страница 144: ......

Страница 145: ...py a single sided document using basic copy operations 2 Note Some settings cannot be used together For details on the settings that cannot be combined refer to Operations that cannot be combined on p...

Страница 146: ...ting on page 4 41 For details on specifying a Simplex Duplex setting refer to Select ing the document and copy type settings 1 side 2 sides settings on page 4 55 For details on selecting the quality o...

Страница 147: ...fy the correct number of copies 5 Press the Start key To stop the copy operation being performed press the Stop key For details refer to Stopping scanning printing on page 4 96 The next copy operation...

Страница 148: ...he follow ing The setting specified last is given priority The setting specified first is canceled The setting specified first is given priority A warning message appears Operations where the setting...

Страница 149: ...4 7 2 Set the Booklet function The 2 Position Staple setting is automatically cancelled and the Booklet function is set To select the 2 Position Staple setting cancel the Booklet function and then se...

Страница 150: ...Position Staple setting after setting the Booklet function is described below 1 Set the Booklet function 2 Select the 2 Position Staple setting The message This mode is not available with Booklet appe...

Страница 151: ...eds 100 pages can be scanned in separate batches For details re fer to Scanning the document in separate batches Separate scan set ting on page 4 13 0 If the document is not loaded correctly the docum...

Страница 152: ...zes refer to Copying documents of mixed sizes Mixed original setting on page 4 19 For details on loading thick docu ments refer to Copying thick documents Thick original set ting on page 4 21 For deta...

Страница 153: ...tion do not press down extremely hard on a book spread placed on the original glass otherwise the original glass may be damaged 0 For thick books or large objects make the copy without closing the ADF...

Страница 154: ...nding margin refer Selecting the position of the binding margin Margin settings on page 4 27 For transparent or translucent documents place a blank sheet of paper of the same size as the document over...

Страница 155: ...h the Separate Scan setting a document that ex ceeds 100 pages can be scanned and treated as a single copy job In addi tion the scanning location can be switched between the original glass and the ADF...

Страница 156: ...n the types of documents that can be loaded into the ADF refer to Original documents on page 8 24 The amount of memory available can be checked beside Memory in the upper right corner of the Basic scr...

Страница 157: ...in the Change Setting screen differ de pending on the specified settings Settings for the following can be changed Simplex Duplex Bind Zoom Frame Erase Center Erase Original Size 4 After all document...

Страница 158: ...t The following procedure describes how to place single sided document pages on the original glass to make double sided copies 1 Lift open the ADF 2 Position the first page or the first side of the do...

Страница 159: ...Basic copy operations 4 MF45 4 17 4 In the Basic screen touch Simplex Duplex The Simplex Duplex screen appears 5 Touch 1 2 and then touch OK 6 Press the Start key Scanning begins...

Страница 160: ...n delete the job For details refer to Stopping scanning printing on page 4 96 To change the scanning settings touch Change Setting For de tails on changing the scanning settings refer to To change sca...

Страница 161: ...ise a document misfeed or dam age to the document or machine may occur However a document that exceeds 100 pages can be scanned in separate batches For details re fer to Scanning the document in separ...

Страница 162: ...ment Load the document pages into the ADF so that the top of the pages is toward the back or the left side of the machine 4 In the Basic screen touch Combine Originals The Combine Originals and Origin...

Страница 163: ...ick Original setting is selected a maximum of 38 docu ment pages can be loaded into the ADF For details on thick documents refer to Original documents on page 8 24 0 For details on positioning the doc...

Страница 164: ...4 Basic copy operations 4 22 MF45 3 Touch Thick Original...

Страница 165: ...ng with the top of the document at the top toward the back of the machine Document Loading Orientation Using the ADF Using the Original Glass Icon Description Select this setting for a document loaded...

Страница 166: ...aded into the ADF with the top of the document toward the right side of this machine Select this setting for a document placed on the original glass with the top of the document toward the left side o...

Страница 167: ...tails on positioning the document refer to Feeding the document on page 4 9 1 Position the document to be copied 2 In the Basic screen touch Combine Originals The Combine Originals and Original settin...

Страница 168: ...4 Basic copy operations 4 26 MF45 4 Touch the button for the orientation of the loaded document and then touch OK To cancel changes to the settings touch Cancel...

Страница 169: ...nt by specifying the binding margin position for the document 2 Note The default setting is Auto Document Binding Margin Position Margin Setting Icon Description Select this setting if the document is...

Страница 170: ...document length is 297 mm or less a binding position along the long side of the paper is selected If the document length is more than 297 mm a binding position along the short side of the paper is se...

Страница 171: ...g the document on page 4 9 1 Position the document to be copied When loading a document with a binding margin position the top of the document toward the back of the machine 2 In the Basic screen touc...

Страница 172: ...4 Basic copy operations 4 30 MF45 4 Touch the button for the desired margin position and then touch OK To cancel changes to the settings touch Cancel...

Страница 173: ...the original glass the scan settings can be changed for each document The following procedure describes how to change the set tings when the Separate Scan setting is used 1 Position the document to b...

Страница 174: ...desired setting and then touch OK The buttons that appear in the Change Setting screen differ de pending on the specified settings Settings for the following can be changed Simplex Duplex Bind Zoom Fr...

Страница 175: ...Basic copy operations 4 MF45 4 33 Simplex Duplex screen Original Bind Position screen Center Erase screen Original Size Setting screen...

Страница 176: ...ns 4 34 MF45 Detail For details on specifying the Zoom setting refer to Specifying a zoom setting on page 4 41 For details on specifying a zoom ratio refer to Erasing specified areas of copies Erase f...

Страница 177: ...black and white Single Color Select this setting to print copies in the specified color re gardless of whether the scanned document is in color or in black and white The color used for printing the c...

Страница 178: ...In the Basic screen touch Color The Color screen appears 2 Touch the button for the desired Color setting If the 2 Color setting was selected touch the button for the de sired color and then touch OK...

Страница 179: ...and then touch OK Touch Back or Fwd and then select the desired color If desired touch Solid If the Solid setting is not selected the relative luminosity method is selected To use the average brightne...

Страница 180: ...Auto Paper Select setting How ever a paper drawer set to Single Side Only is given priority to be se lected This setting is useful for paper drawers loaded with special paper For details refer to To s...

Страница 181: ...g paper of the same size If the 1 0 Zoom setting was specified paper of the same size as the doc ument is selected If the zoom ratio was increased or decreased a paper size that corresponds to the spe...

Страница 182: ...ected based on the size of the loaded document and the speci fied paper size For details on the Auto Zoom setting refer to Automatically selecting the paper size Auto paper select setting on page 4 39...

Страница 183: ...matically selecting the zoom ratio Auto zoom setting The most appropriate zoom ratio is automatically selected based on the size of the loaded document and the specified paper size 0 The default setti...

Страница 184: ...4 Basic copy operations 4 42 MF45 3 Touch OK The Basic screen appears again...

Страница 185: ...A copy that is the same size as the document 1 000 is produced 0 The default setting is 1 0 0 Touch to enlarge the zoom ratio and touch to reduce the zoom ra tio in 0 001 intervals 1 In the Basic scr...

Страница 186: ...0 0 Touch to enlarge the zoom ratio and touch to reduce the zoom ra tio in 0 001 increments 0 Select the Minimal setting to produce a copy with the original image slightly reduced 0 930 0 The zoom ra...

Страница 187: ...Basic copy operations 4 MF45 4 45 3 Touch OK The Basic screen appears again...

Страница 188: ...mon standard document size to a standard paper size 0 The default setting is 1 0 0 Touch to enlarge the zoom ratio and touch to reduce the zoom ra tio in 0 001 increments 1 In the Basic screen touch Z...

Страница 189: ...outside of the allowable range is specified the message Input Error appears Type in a value within the allowable range If the value was incorrectly entered press the C clear key to erase the value an...

Страница 190: ...e button under Zoom with Constant X and Y Ratio and then use the keypad to type in the desired zoom ratio To cancel changes to the settings touch Cancel 4 Touch OK and then touch OK in the next screen...

Страница 191: ...tween 0 250 and 4 000 By combining different horizontal and vertical zoom ratios the copy image can be adjusted as shown in the following illustration 0 If a value outside of the allowable range is sp...

Страница 192: ...4 Basic copy operations 4 50 MF45 2 Touch XY Zoom 3 Touch X under Set Individual Zoom and then use the keypad to type in the desired zoom ratio between 0 250 and 4 000 for the X direction...

Страница 193: ...ndividual Zoom and then use the keypad to type in the desired zoom ratio between 0 250 and 4 000 for the Y direction To cancel changes to the settings touch Cancel 5 Touch OK and then touch OK in the...

Страница 194: ...default setting is 1 0 Touch to enlarge the zoom ratio and touch to reduce the zoom ratio in 0 001 increments 0 Stored zoom ratios can be changed to desired zoom ratios For details on storing zoom rat...

Страница 195: ...alue within the allowable range If the value was incorrectly entered press the C clear key to erase the value and then specify the correct value 0 The default zoom ratios 4 000 2 000 and 0 500 are sto...

Страница 196: ...ratio between 0 250 and 4 000 To cancel changes to the settings touch Cancel 4 Touch Set Zoom 5 Touch the button or Minimal where the new zoom ratio is to be stored To cancel changes to the settings...

Страница 197: ...res describe how to select a 1 Side 2 Sides setting 1 side 2 sides setting Description 1 1 Select this setting to produce single sided copies from single sided documents 1 2 Select this setting to pro...

Страница 198: ...n of the binding margin refer to Se lecting the position of the binding margin Margin settings on page 4 27 For details on specifying the document orientation refer to Selecting the document orientati...

Страница 199: ...Basic copy operations 4 MF45 4 57 3 Touch OK The Basic screen appears again...

Страница 200: ...o Se lecting the position of the binding margin Margin settings on page 4 27 For details on specifying the document orientation refer to Selecting the document orientation Original direction settings...

Страница 201: ...Basic copy operations 4 MF45 4 59 2 Touch 1 2 or 2 2 3 Touch OK The Basic screen appears again...

Страница 202: ...etting when copying photos from documents containing both text and images onto photographic paper A smooth copy image is produced Printed Photo Select this setting when copying printed documents con t...

Страница 203: ...ntaining pencil markings or fine colored lines A sharp copy image is produced Dot Matrix Original Select this setting when copying documents consisting only of text that appears faint such as that wri...

Страница 204: ...copied 2 In the Basic screen touch Quality Density The Quality Density screen appears 3 Touch the button for the quality setting most appropriate for the loaded document For a document that contains...

Страница 205: ...perations 4 MF45 4 63 To cancel changes to the settings touch Cancel For a document that contains photos touch Photo to display the Photo Type screen Touch the button for the appropriate setting and t...

Страница 206: ...4 64 MF45 For a document that contains maps or faint text touch Special Quality to display the Special Quality screen Touch the button for the appropriate setting and then touch OK The Quality Densit...

Страница 207: ...one of nine levels Each time Light or Dark is touched the background density is lightened or darkened by one level Touch Std to select the seventh setting from the Light end Touch Auto to automaticall...

Страница 208: ...copy operations 4 66 MF45 Adjusting the print density Density settings 1 In the Basic screen touch Quality Density The Quality Density screen appears 2 Touch Change under Density The Density screen a...

Страница 209: ...3 Select the desired Density setting Each time Light or Dark is touched the density is lightened or darkened by one level To select the center setting default setting touch Std To cancel changes to th...

Страница 210: ...68 MF45 Adjusting the background density Background removal settings 1 In the Basic screen touch Quality Density The Quality Density screen appears 2 Touch Change under Background Removal The Backgrou...

Страница 211: ...ark is touched the density is lightened or darkened by one level To select the third setting from the right default setting touch Std Touch Auto to automatically adjust the level of the background den...

Страница 212: ...tions 4 70 MF45 Printing with a glossy finish Glossy setting 1 In the Basic screen touch Quality Density The Quality Density screen appears 2 Touch Glossy To cancel the Glossy setting touch Glossy aga...

Страница 213: ...4 MF45 4 71 Adjusting the reproduction quality of text 0 The default setting is 0 1 In the Basic screen touch Quality Density The Quality Density screen appears 2 Touch Text Enhancement The Text Enhan...

Страница 214: ...desired text density setting Each time Lighter Text or Darker Text is touched the density is lightened or darkened by one level Touch Std to select the middle setting 0 of the nine levels To cancel c...

Страница 215: ...the recommended zoom ratio is selected and the document image is copied at a reduced size The recommended zoom ratios for each setting are listed below 2 in 1 0 707 4 in 1 0 500 8 in 1 0 353 2 Note Th...

Страница 216: ...ting to print two document pages on one page 4 in 1 Select this setting to print four document pages on one page The page arrangement Numbering Direction settings can be specified Horizontal Vertical...

Страница 217: ...Originals The Combine Originals and Original settings screen appears 2 Select the desired combination of pages Select the page arrangement according to the orientation and number of pages If 4 in 1 o...

Страница 218: ...4 Basic copy operations 4 76 MF45 If 4 in 1 or 8 in 1 was selected touch Horizontal or Vertical to specify the page arrangement To cancel the setting touch the button again to deselect it...

Страница 219: ...stalled or punch kit PK 501 is installed on finisher FS 603 2 Note The factory default setting is Group Detail If no finisher is installed and the following conditions are met printed copies can be fe...

Страница 220: ...ocu ment collated Group Select this setting to separate the copies of each page in a multi page document uncollated Offset If no finisher is installed If the sorting conditions are met printed copies...

Страница 221: ...s describe how to select Finishing settings Staple Select one of these settings to bind the copies with a staple in the corner or with two staples Punch Select this setting to punch holes 4 holes in t...

Страница 222: ...aper is used 0 Paper of the same size and type is loaded with the w orientation in one paper drawer and with the v orientation in another drawer 0 The Auto Paper Select setting is selected 0 The Auto...

Страница 223: ...Basic copy operations 4 MF45 4 81 2 Touch Sort To separate each set of copies touch Offset 3 Touch OK The Basic screen appears again...

Страница 224: ...r is used 0 Paper of the same size and type is loaded with the w orientation in one paper drawer and with the v orientation in another drawer 0 The Auto Paper Select setting is selected 0 The Auto Pap...

Страница 225: ...Basic copy operations 4 MF45 4 83 2 Touch Group To separate each set of pages touch Offset 3 Touch OK The Basic screen appears again...

Страница 226: ...the page to be stapled otherwise the copies may not be stapled as desired For details on specifying the document orientation refer to Selecting the document orientation Original direction settings on...

Страница 227: ...er of Bound Pages Maximum Number of Sets One place to wards the back One place to wards the front Two places Paper Weight Paper Size Loading Capacity detected with ei ther measurement 60 g m2 to 90 g...

Страница 228: ...th staples 1 In the Basic screen touch Finishing The Finishing screen appears 2 Under Staple touch either Corner or 2 Position To cancel the Staple settings touch Corner or 2 Position again to deselec...

Страница 229: ...the orientation of the loaded document If the document length is 297 mm or less the long side of the paper is stapled If the document length is more than 297 mm the short side of the paper is stapled...

Страница 230: ...selected select the orientation in which the document is positioned If an Original Direction setting is not selected holes may not be punched in the copies as desired For details on specifying the do...

Страница 231: ...F45 4 89 To punch holes in copies 1 In the Basic screen touch Finishing The Finishing screen appears 2 Touch 4holes To cancel the Punch setting touch 4holes again to deselect it To cancel changes to t...

Страница 232: ...If the document length is 297 mm or less the holes are punched along the long side of the paper If the document length is more than 297 mm the holes are punched along the short side of the paper If A...

Страница 233: ...be bound together differs depending on the paper weight 64 g m2 paper 15 sheets 80 g m2 paper 10 sheets Document The Booklet function is automatically set Bound copy folded in half and stapled at two...

Страница 234: ...under Center Erase an area of 10 mm along the binding is erased 0 If paper misfeeds often occur when No is selected under Center Erase select Yes to reduce the number of paper misfeeds 1 In the Basic...

Страница 235: ...Basic copy operations 4 MF45 4 93 3 Touch OK The Basic screen appears again...

Страница 236: ...cannot be reserved while a document is being scanned 0 If Utility Setting parameter Copy Operating Screen is set to ON Pro gram Next Job appears Touch Program Next Job and then specify the copy settin...

Страница 237: ...ears copy set tings can be specified for the next copy job 3 Press the Start key 4 After the current copy job is finished the next copy job begins When the current copy job is finished the copy settin...

Страница 238: ...scanning printing 0 If a document is being scanned for a job pressing the Stop key stops scanning 0 For details on deleting a stopped job refer to Deleting a stopped job on page 4 97 1 Press the Stop...

Страница 239: ...being printed refer to Stopping scanning printing on page 4 96 0 Select only one job at a time to be deleted 0 To continue the stopped job press the Start key 1 Press the Stop key while a docu ment i...

Страница 240: ...4 Basic copy operations 4 98 MF45...

Страница 241: ...5 Additional copy operations...

Страница 242: ......

Страница 243: ...s 5 MF45 5 3 5 Additional copy operations 5 1 Checking the copy settings Mode Check From the Mode Check screens the current copy settings can be checked and changed if desired To check the settings 1...

Страница 244: ...5 Additional copy operations 5 4 MF45 The Mode Check screen appears...

Страница 245: ...e To display the previous screen touch Back To display the next screen touch Fwd The buttons for functions where the setting has been changed from the default appear selected To change the settings 1...

Страница 246: ...s from occurring To make test prints 1 Position the document to be copied Refer to page 4 9 for details 2 Select the desired copy settings 3 Press the Proof Copy key A single proof copy is printed 4 C...

Страница 247: ...be changed stop printing the proof copy Then press the Reset key to cancel the copy settings and then specify the desired settings 7 Press the Proof Copy key to print another sample copy If copying st...

Страница 248: ...n page 4 96 If multiple copies have been specified another sample copy can be printed The number under of Sets in the Change Setting screen is the number of copies that will be printed when Print is t...

Страница 249: ...e Job is stopping appears The indicator on the Interrupt key lights up in green and printing of the current job stops What settings are selected when the Interrupt key is pressed When the Interrupt ke...

Страница 250: ...5 Additional copy operations 5 10 MF45 2 Note If the interrupting job is cancelled printing for the interrupted job auto matically restarts...

Страница 251: ...py settings to be registered in the copy program Can the current settings be checked To check the currently specified copy settings press the Mode Check key 2 Press the Mode Memory key The Recall Copy...

Страница 252: ...yping in the name touch OK The copy program can be given the same name as a copy program that has already been registered The Recall Copy Program screen appears again The copy program is registered an...

Страница 253: ...ing confirmation to delete the copy program touch Yes to delete the selected copy program 6 Touch OK or Cancel To return to the Basic screen press the Mode Memory key Detail Copy programs cannot be ch...

Страница 254: ...all Copy Program screen touch the button for the copy pro gram to be deleted 2 Touch Del A message appears requesting confirmation to delete the copy pro gram 3 Touch Yes The Recall Copy Program scree...

Страница 255: ...be recalled to be used again for copying 1 Position the document to be copied For details refer to page 4 9 2 Press the Mode Memory key The Recall Copy Program screen ap pears 3 Touch the button for t...

Страница 256: ...py settings registered with the selected copy program 6 Touch Job End The Recall Copy Program screen appears again Can different settings be displayed To display the previous screen touch Back To disp...

Страница 257: ...e recalled and the Basic screen ap pears again 9 Press the Start key Copying begins with the recalled copy settings 2 Note To stop recalling the copy program press the Reset key or the Mode Memory key...

Страница 258: ...Menu screens can be selected by touching the button or by pressing the key in the keypad for the number of the desired item To display the next screen higher in the menu structure touch Touch Exit to...

Страница 259: ...or the name and function of each part differ depending on the options that are installed Item Description Basic Combine Originals Quality Density Application Displays the first Help screen for each de...

Страница 260: ...en title 1 4 in the previous screen indicate the number of the currently displayed screen total number of Help screens for the displayed item To display the previous screen touch Back To display the n...

Страница 261: ...ew Detail There are six Function Map screens for Copy mode The top number in dicates the number of the six screens that is currently displayed To display the previous screen touch To display the next...

Страница 262: ...opy during Enlarge Display mode during Accessibility mode 0 While the Help screens are displayed the following keys are not availa ble Start Stop C clear Interrupt Proof Copy Access Mode Mem ory Enlar...

Страница 263: ...for the desired information or press the key in the keypad for the number to the left of the desired information to display the corresponding Help screen 4 After checking the Help information touch E...

Страница 264: ...y is there no Help information for some functions in the Help Menu screen Depending on the displayed screen there may be no Help information for some functions Is there more information about the butt...

Страница 265: ...ion The length of time until the value begins to change after a touch panel button is held down and the length of time for the value to change to the next number can be specified The factory default s...

Страница 266: ...the settings touch Cancel 4 Touch OK The Accessibility Setting screen appears again 5 Touch Close or press the Accessibility key The Basic screen appears again 2 Note The Enlarge Display mode is compa...

Страница 267: ...Additional copy operations 5 MF45 5 27 Detail To return to the Basic screen from the Accessibility Setting screen press the Accessibility key or the Reset key...

Страница 268: ...Enlarge Display mode can be displayed In addition it is possible to specify the length of time that the message re questing confirmation to cancel Enlarge Display mode is displayed 1 Display the Acce...

Страница 269: ...essage is to be displayed To cancel changes to the settings touch Cancel 4 Touch OK The Accessibility Setting screen appears again 5 Touch Close or press the Accessibility key The Basic screen appears...

Страница 270: ...e for displaying warning messages which appear for example when an incorrect operation is performed The factory default setting is 3 sec 1 Display the Accessibility Setting screen To display the scree...

Страница 271: ...ime that messages are dis played Select whether messages are displayed for 3 seconds or for 5 sec onds To cancel changes to the settings touch Cancel 4 Touch OK The Accessibility Setting screen appear...

Страница 272: ...can set whether or not a sound is produced when a control panel key is pressed or a touch panel button is touched The factory default setting for Accept Sound Setting is ON 1 Display the Accessibilit...

Страница 273: ...nd Key Refuse Sound or press the 1 key in the keypad The Key Accept Sound Key Refuse Sound screen appears 4 Specify the setting for Accept Sound Setting To produce a sound touch ON To not produce a so...

Страница 274: ...copy operations 5 34 MF45 5 Touch OK The Sound Setting screen appears again 6 Touch Close The Accessibility Setting screen appears again 7 Touch Close or press the Accessibility key The Basic screen a...

Страница 275: ...h the position of the actual touch sensor and may need to be adjusted 1 Display the Accessibility Setting screen To display the screen refer to page 5 25 2 Touch Touch Panel Adj or press the 5 key in...

Страница 276: ...ts If the check points have been touched correctly the indicator on the Start key lights up in green 4 Press the Start key The touch panel is adjusted and the Accessibility Setting screen ap pears aga...

Страница 277: ...firmation to reset the settings in Enlarge Display mode In addition it is possible to specify when the message is displayed request ing confirmation to reset the settings in Enlarge Display mode The f...

Страница 278: ...rge Display mode touch OFF To display the message requesting confirmation to reset the set tings in Enlarge Display mode touch the button 30 sec 60 sec 90 sec or 120 sec for the length of time that th...

Страница 279: ...be seen more easily For details on the Enlarge Display mode refer to the user manual Enlarge Display Operations If the time setting is the same for the automatic panel reset operation and the automati...

Страница 280: ...of the screen a message can be displayed requesting confirmation to reset the settings to their defaults The factory default setting is No 1 Display the Accessibility Setting screen To display the sc...

Страница 281: ...Basic screen appears again 2 Note The Enlarge Display mode is compatible with basic copy scanning and fax functions With the Enlarge Display mode text and illustrations are displayed at a larger size...

Страница 282: ...5 Additional copy operations 5 42 MF45...

Страница 283: ...6 Troubleshooting...

Страница 284: ......

Страница 285: ...by the user occurred the message Malfunction detected Please call your Technical Representative appears call technical representative screen The phone number and fax number for the usual technical re...

Страница 286: ...6 Troubleshooting 6 4 MF45 Touch to display the message shown in the following illustration...

Страница 287: ...on code for example C 0001 in the call tech nical representative screen 2 Press the auxiliary power button to turn off the control panel 3 Use the main power switch to turn off the machine 4 Unplug th...

Страница 288: ...bleshooting 6 6 MF45 2 Reminder Since the machine may be damaged contact the technical representa tive according to the procedure described above as soon as the call tech nical representative screen a...

Страница 289: ...ately cleared Location of paper misfeed A flashing o indicates the location of the paper misfeed In addition a lit o indicates areas where paper may have been misfed and that should be checked Example...

Страница 290: ...6 Troubleshooting 6 8 MF45 Display in enlarge display mode If a paper misfeed occurs the screen shown below appears Touch to display the message shown in the following illustration...

Страница 291: ...it right side door p 6 16 4 A paper misfeed in the bypass tray p 6 10 5 A paper misfeed in the LCT p 6 15 6 A paper misfeed in finisher FS 507 job separator JS 601 p 6 30 7 A paper misfeed in the auto...

Страница 292: ...bypass tray 2 If misfed paper cannot be pulled out pull the lever for the sliding plate of the bypass tray and then pull the sliding plate toward you 3 Pull the sliding plate toward you and then caref...

Страница 293: ...Troubleshooting 6 MF45 6 11 5 Carefully pull out any misfed paper 6 Close the right side door Detail For details on the positions of paper misfeeds refer to Paper misfeed in dications on page 6 9...

Страница 294: ...eed in the automatic duplex unit 1 Open the automatic duplex unit door 2 Carefully pull out any misfed paper 3 Close the automatic duplex unit door Detail For details on the positions of paper misfeed...

Страница 295: ...y misfed paper 3 Close the right side door 4 Pull out the paper drawer and then remove any misfed paper 5 Close the paper drawer 2 Reminder Be careful not to touch the surface of the paper take up rol...

Страница 296: ...oor of the paper drawer 3rd or 4th drawer 2 Carefully pull out any misfed paper 3 Close the right side door 4 Pull out the paper drawer and then remove any misfed paper 5 Close the paper drawer 2 Remi...

Страница 297: ...out any misfed paper 3 Close the right side door of the LCT 4 Press the drawer release button pull out the paper drawer of the LCT and then remove any misfed paper 5 Closer the paper drawer of the LCT...

Страница 298: ...nd then remove any paper re maining in the drawer 2 Load the paper into the paper drawer again and then close the drawer 3 Pull up the right side door release le ver and then open the right side door...

Страница 299: ...ection 7 CAUTION The area around the fusing unit is extremely hot Touching anything other than the indicated levers and di als may result in burns If you get burnt immediately cool the skin under cold...

Страница 300: ...per take up roller in the 1st drawer or the film in the 2nd 3rd and 4th drawers and in the LCT with your hands 2 Reminder Decreased copy quality may result if the surface of the image transfer belt or...

Страница 301: ...right side door release le ver and then open the main unit right side door 2 Lift up inside cover M4 and then pull out any misfed paper 3 Pull lever M2 down toward you Then turn dial M3 to feed out t...

Страница 302: ...rea around the fusing unit is extremely hot Touching anything other than the indicated levers and di als may result in burns If you get burnt immediately cool the skin under cold water and then seek p...

Страница 303: ...unit The paper that was removed tore and partly remains in the fusing unit 2 Reminder Decreased copy quality may result if the surface of the image transfer belt or the image transfer roller is touche...

Страница 304: ...up the right side door release le ver and then open the right side door If the end of the paper cannot be seen or cannot be grabbed pull out the paper in the direction of the arrow 2 Turn knob M1 on...

Страница 305: ...y paper caught in the tim ing roller section 4 Lift up inside cover M4 and then pull out any misfed paper 5 Pull lever M2 down toward you Then turn dial M3 to feed out the pa per 6 Pull out any paper...

Страница 306: ...CAUTION The area around the fusing unit is extremely hot Touching anything other than the indicated levers and di als may result in burns If you get burnt immediately cool the skin under cold water a...

Страница 307: ...is folded or shredded by the roller in the fusing unit The paper that was removed tore and partly remains in the fusing unit 2 Reminder Decreased copy quality may result if the surface of the image t...

Страница 308: ...tray support otherwise your hand may be pinched by the trays 1 Open the misfeed clearing cover on the left side of the ADF and then carefully pull out any documents from the document feed tray 2 Open...

Страница 309: ...en with the document exit tray support and the document feed tray support locked into place 5 Turn the dial to feed out any misfed documents and then carefully pull out the documents 6 Lower the docum...

Страница 310: ...arefully pull out any misfed documents 8 Remove any documents on the orig inal glass and then close the ADF 9 Close the left side and right side misfeed clearing covers 10 Reload the documents accordi...

Страница 311: ...Troubleshooting 6 MF45 6 29 Detail For details on the positions of paper misfeeds refer to Paper misfeed in dications on page 6 9...

Страница 312: ...o clear a paper misfeed in finisher FS 507 1 Slide the finisher away from the ma chine 2 Open the horizontal transport unit cover and then remove any misfed paper 3 Close the horizontal transport unit...

Страница 313: ...be done if the paper can be seen from the exit tray Turn misfeed clearing dials FN5 counterclockwise at the same time to feed out any misfed pa per 6 Close front door FN4 7 Open right side door FN7 8...

Страница 314: ...ng guide FN2 and then pull out any misfed paper 12 While holding misfeed clearing guide FN3 open pull out any misfed paper 13 Close upper cover FN1 14 If job separator JS 601 is installed Open the job...

Страница 315: ...guide FN6 open pull out any misfed paper 18 Slide the finisher back against the machine 7 CAUTION Metallic parts on the inside of the upper cover are very hot Touching any part other than the paper m...

Страница 316: ...a paper misfeed in finisher FS 603 1 Slide the finisher away from the ma chine 2 Open the horizontal transport unit cover and then remove any misfed paper 3 Close the horizontal transport unit cover 4...

Страница 317: ...ld be done if the mis feed clearing dial 1 is turned too far Turn the misfeed clearing dial 1 counterclockwise to finely adjust it 6 Open the upper door of the finisher and then pull out any paper in...

Страница 318: ...ht side door and then pull out any misfed paper in the transport section 11 If the paper could not be removed in step 10 turn the misfeed clearing dial in the folding section clockwise Feed the paper...

Страница 319: ...om pletely blue and then remove the paper If the paper is pulled out with too much force the finisher may be damaged Do not pull paper remaining in the transfer unit out with too much force otherwise...

Страница 320: ...o replenish paper Check which paper drawer appears highlighted in the touch panel and then load it with paper Detail For details on loading paper into the paper drawers refer to Loading pa per into th...

Страница 321: ...be continued Not enough re maining memory or The job has been deleted Not enough remaining memory appears Continue the operation according to the corresponding instructions Memory becomes full while...

Страница 322: ...s message appears when the memory becomes full and the scanned job was deleted while scanning a document for a job to be queued Check the number of pages counted for the document and then adjust the n...

Страница 323: ...this machine the message shown in the following illustration appears warning about the re placement period As an example the message warning that the yellow imaging unit will soon need to be replaced...

Страница 324: ...e message Please replace following unit s the message Please replace XXXX appears and the machine stops operating The number of pages that can be printed from the time that the message Please replace...

Страница 325: ...ars indicating that the part or supplies should be replaced and the ma chine stops operating As an example the message indicating that the yellow imaging unit should be replaced when replaceable by th...

Страница 326: ...following illustration 2 Note When the message appears replace the specified supplies or part ac cording to your maintenance agreement 2 Reminder Do not throw away used supplies or parts Instead keep...

Страница 327: ...rawer The printed output is too light Is the copy density set too light Touch Dark in the Density screen to copy at the desired copy density See p 4 66 Is the paper damp Replace the paper with new pap...

Страница 328: ...ean the electrostatic charger See p 11 6 The image is not aligned properly on the paper Is the document incorrectly positioned Correctly position the document against the document scales See p 4 11 Lo...

Страница 329: ...to Zoom setting to reduce the copy to the se lected paper size See p 4 41 Even though the paper misfeed was cleared copies cannot be pro duced Are there paper misfeeds at other locations Check the tou...

Страница 330: ...positioned by 90 Are the staples positioned as specified Select the desired position for the staples See p 4 84 The pages that were fed out were not uniformly loaded and the punched holes or staples...

Страница 331: ...all pages from section tray Since the maximum amount of copies for the indicated fin isher exit tray has been ex ceeded the machine is unable to make copies Remove all copies from the indicat ed tray...

Страница 332: ...the Toner Car tridge Since the toner for the indi cated color has run out the machine is unable to make copies Replace the toner cartridge accord ing to your maintenance agreement Stapler empty Repla...

Страница 333: ...7 Specifications...

Страница 334: ......

Страница 335: ...Weight 2 kg three dimensional objects Paper Plain paper 60 to 90 g m2 Plain paper 127 to 160 g m2 thick paper 1 91 to 150 g m2 thick paper 2 151 to 209 g m2 thick paper 3 210 to 256 g m2 overhead proj...

Страница 336: ...C Image loss Leading edge 4 2 mm Trailing edge 3 mm Rear edge 3 mm Front edge 3 mm First copy Full color 8 5 seconds or less Black 5 5 seconds or less Print speed Using the 1st drawer Full color 19 p...

Страница 337: ...440 mm D 345 mm H Weight Approx 3 kg Specifications Document feed methods Plain paper Single sided and double sided documents Thick paper Single sided documents 129 to 210 g m2 Mixed Original functio...

Страница 338: ...o o o A4 w o o o o o o A5 v o o o o B5 w o o o o o A5 w o o Specifications Paper types Plain paper 60 to 90 g m2 thick paper 1 91 to 150 g m2 thick paper 2 151 to 209 g m2 thick paper 3 210 to 256 g m...

Страница 339: ...drawer 4th drawer 500 sheets 80 g m2 Power requirements Supplied from main unit Power consumption Less than 15 W Dimensions 570 mm W 548 mm D 263 mm H Weight Approx 26 kg Unit structure 2 paper drawe...

Страница 340: ...sizes Exit tray 1 Group setting A3 w to B5 w v A3 Wide 12 18 w Sort setting A3 w to A5 v Staple setting A3 w to B5 w v Exit tray 2 A3 w B4 w A4 w Paper capacity Exit tray 1 Plain paper 60 to 90 g m2 1...

Страница 341: ...cations Number of punched holes 4 Paper types Plain paper 60 to 90 g m2 thick paper 1 91 to 150 g m2 thick paper 2 151 to 209 g m2 Paper sizes A3 w A4 v Power requirements Supplied from finisher Dimen...

Страница 342: ...Paper sizes Exit tray 1 A3 w to B5 w v A3 Wide 12 18 w Exit tray 2 A3 w to B5 w v A3 Wide 12 18 w Paper capacity Exit tray 1 Plain paper 60 to 90 g m2 250 sheets Thick paper 1 91 to 150 g m2 thick pa...

Страница 343: ...MF45 7 11 Job Separator JS 601 Specifications Exit trays Exit tray 3 Paper types Plain paper 60 to 90 g m2 Paper sizes A3 w to B5 w v Paper capacity 100 sheets Dimensions 341 mm W 527 mm D 149 mm H We...

Страница 344: ...7 Specifications 7 12 MF45...

Страница 345: ...8 Copy paper Original documents...

Страница 346: ......

Страница 347: ...m 176 0 mm to 457 2 mm Paper Source Paper Size Bypass tray A3 w to B6 w A6 w A3 Wide 12 18 w 11 17 w to 5 1 2 8 1 2 w v 8 13 w 1 1st drawer A3 w to B6 w A6 w A3 Wide 12 18 w 11 17 w to 5 1 2 8 1 2 w v...

Страница 348: ...unch setting A3 w A4 v Job separator JS 601 A3 w to B5 w v Copy exit tray standard A3 w to B6 w A6 w A3 Wide 12 18 w 11 17 w to 5 1 2 8 1 2 w v Paper Source Paper Size Paper Type Plain Paper Thick Pa...

Страница 349: ...r Type Overhead Projector Transparen cies Postcards Envelopes Label Sheets Banner Paper Paper Source Etc Bypass tray 20 sheets A4 v only 20 sheets 10 20 sheets 1 sheet 1st drawer 20 sheets A4 v only 2...

Страница 350: ...en paper already printed with a company name or preset text is loaded as plain pa per with a weight of 60 g m2 to 90 g m2 A paper drawer with this setting is not automatically selected when the Auto P...

Страница 351: ...hat is bound with glue staples or paper clips Paper with labels attached Paper with ribbons hooks buttons etc attached Paper storage Observe the following precautions when storing the paper Store pape...

Страница 352: ...eter in the Utility mode is set to Permit Operating Conditions The paper is the same size The paper is positioned in the same orientation The paper is the same type Paper drawers that are selected wh...

Страница 353: ...drawer on page 3 46 For details on loading the paper into the bypass tray refer to Loading paper into the bypass tray on page 3 57 To automatically detect the paper size Auto Paper Select setting The...

Страница 354: ...1st drawer To set the paper size for the bypass tray touch the button for the bypass tray 3 Touch Change Tray Settings 4 Touch Auto Detect As a default Auto Detect is selected 5 Touch OK and then tou...

Страница 355: ...l for example when the size of the paper that is loaded cannot be automatically detected such as with postcards or paper in inch sizes The following procedure describes how to specify the postcard set...

Страница 356: ...ected If pa per other than postcards is loaded change the paper type setting For details on the paper type settings refer to To specify a setting for special paper on page 8 22 6 Touch OK and then tou...

Страница 357: ...tandard sized paper is loaded it will be necessary to enter the paper size The following procedure describes how to specify the size of non standard paper loaded into the 1st drawer 1 In the Basic scr...

Страница 358: ...outside of the allowable range is specified the message Input Error appears Type in a value within the allowable range If the value was incorrectly entered press the C clear key in the keypad to eras...

Страница 359: ...ents 8 MF45 8 15 For details on storing paper sizes refer to To store a non standard paper size Custom Size settings on page 8 16 6 Touch OK and then touch OK in the next two screens that appear The B...

Страница 360: ...aper size to be quickly selected without having to re enter the setting The following procedure describes how to store a non standard paper size for the 1st drawer 1 In the Basic screen touch Paper Th...

Страница 361: ...ouch Y to select it and then use the keypad to type in the length of side Y 90 0 mm to 311 1 mm Check the illustration in the screen for the sides that are considered X and Y If a value outside of the...

Страница 362: ...ame then type the new name into the Custom Name screen that appeared and then touch OK Use the keyboard that appeared in the screen to type in the new name and then touch OK For details on typing in t...

Страница 363: ...or example if A3 Wide paper is used an area up to 311 1 mm 457 2 mm can be printed allowing the entire area of an A3 size document to be printed If oversized paper is loaded it will be necessary to en...

Страница 364: ...ge Size The Change Size screen for oversized paper appears 7 Specify the X and Y sides of the paper and then touch OK Touch either X or Y press the C clear key to clear the current setting and then us...

Страница 365: ...ue and then specify the correct value 8 Touch OK and then touch OK in the next two screens that appear The Basic screen appears again 2 Note The selected size button is programmed with the entered pap...

Страница 366: ...per drawer switching feature However a paper drawer set to Single Side Only is given priority when the Auto Paper Select setting is specified or when the paper drawers are switched automatically The f...

Страница 367: ...er that can loaded refer to Specifications on page 7 3 Paper Feed Cabinet PC 102 on page 7 6 To specify Letterhead Colored Paper or Envelope touch Specialty Paper in the Change Settings of Selected Tr...

Страница 368: ...ocuments on thick paper There are limits on the types of documents that can be loaded with each method Normal method For documents of mixed sizes Single Sided Documents Double Sided Documents Document...

Страница 369: ...djustable document guides of the ADF 2Indicates document sizes that can be specified together with the max imum document width For documents on thick paper Maximum Document Width 1 A3 w A4 v B4 w B5 v...

Страница 370: ...s that are bound for example with staples or paper clips Documents that are bound in a book or booklet Documents that are bound together with glue Document pages that have been cut or contain cutouts...

Страница 371: ...Auto Paper Se lect and Auto Zoom settings cannot be used since the document size cannot be detected automatically If a document of non standard paper size is loaded select the size of the paper to be...

Страница 372: ...8 Copy paper Original documents 8 28 MF45...

Страница 373: ...9 Application functions...

Страница 374: ......

Страница 375: ...nt copies printed onto overhead projector transparencies from sticking together as a result of the heat that is produced during copying paper interleaf can be inserted between the transparencies Detai...

Страница 376: ...e doc ument on page 4 9 2 Load overhead projector transparencies into the bypass tray or the 1st drawer Load the interleaf paper into the desired paper drawer Use interleaf paper with the same size as...

Страница 377: ...5 4 Touch Application and then touch Sheet Cover Chapter Insert To cancel all settings for the Application functions touch Reset The Sheet Cover Chapter Insert screen appears 5 Touch OHP Interleave Th...

Страница 378: ...6 Select the paper drawer loaded with the interleaf paper To cancel changes to the settings touch Cancel To cancel the OHP Interleave function touch OFF 7 Touch OK 8 If necessary specify any other cop...

Страница 379: ...With double sided copying the second page of the document is copied onto the back of the front cover sheet Front Blank Paper for the front cover sheet is added as the first page of the copy The same...

Страница 380: ...es and the paper for the main body of the document into separate paper drawers Use paper with the same size for the cover pages and for the main body of the document and load them in the same orientat...

Страница 381: ...e paper drawer loaded with cover pages can be specified from the Utility mode For details refer to Copier setting on page 13 31 To cancel changes to the copy settings touch Cancel To cancel the Cover...

Страница 382: ...e paper drawer loaded with the paper for the cover pages 8 Touch OK and then touch OK in the next screen that appears 9 If necessary specify any other copy settings 10 Using the keypad type in the des...

Страница 383: ...specified If Blank was set the specified paper is inserted after the specified page When page 5 is specified Finishing Description Single sided copies The specified paper is inserted for the 6th page...

Страница 384: ...F45 Detail The specified paper can be inserted at a maximum of 15 locations within a document of up to 999 pages In double sided documents one double sided page is considered to be two pages one for t...

Страница 385: ...be inserted and the paper for the main body of the copy into separate paper drawers Make sure that the paper loaded for the insertion and for the copy have the same size and orientation 3 Touch Appli...

Страница 386: ...nctions 9 14 MF45 4 Touch Insert Sheet The Insert Sheet screen appears 5 Touch Insert Paper To cancel changes to the settings touch Cancel To cancel the Insert Sheet function touch OFF The Insert Pape...

Страница 387: ...fy the pages where the paper is to be inserted When Select is touched the entered page is specified After the page number is specified the page numbers are arranged in order starting with the lowest n...

Страница 388: ...9 Application functions 9 16 MF45 9 Touch OK 10 If necessary specify any other copy settings 11 Using the keypad type in the desired number of copies 12 Press the Start key...

Страница 389: ...l glass can be inserted at the specified location in a document first scanned with the ADF The in serted document is added after the specified pages Detail A separate document can be inserted at a max...

Страница 390: ...c ument on page 4 9 For a document that exceeds 100 pages refer to Scanning the document in separate batches Separate scan setting on page 4 13 2 Touch Application and then touch Sheet Cover Chapter I...

Страница 391: ...mber that has been specified touch Edit touch the button for the page to be removed and then press the C clear key If the total number of pages in the document to be inserted is great er than the numb...

Страница 392: ...added at the end of the document copy 5 Touch OK 6 If necessary specify any other copy settings 7 Using the keypad type in the desired number of copies 8 Press the Start key Scanning begins 9 Place t...

Страница 393: ...functions 9 MF45 9 21 11 Touch Finish To insert a multi page document repeat steps 9 and 10 until all pages of the insertion document are scanned in the order that they are to be inserted 12 Press th...

Страница 394: ...at the specified page would be printed on the back side of a page the page is left blank and the specified page is printed on the front side of the next page In addition the specified page can be prin...

Страница 395: ...details on positioning the document refer to Feeding the doc ument on page 4 9 For a document that exceeds 100 pages refer to Scanning the document in separate batches Separate scan setting on page 4...

Страница 396: ...the first page of the chap ter and then touch OK 5 Using the keypad specify the first page of the chapters When Select is touched the entered page is specified After the page number is specified the...

Страница 397: ...e specified page number is greater than the number of pages in the document that page number is ignored 6 Touch OK 7 If necessary specify any other copy settings 8 Using the keypad type in the desired...

Страница 398: ...s Setting Description Book Spread Copies of the left and right pages of the page spread are printed on the same page without being separated Separation Separate copies of each page in the page spreads...

Страница 399: ...efer to Feeding the doc ument on page 4 9 To add copies of the covers load them first How are the front and back covers copied Scan the front cover then the back cover and then scan the re mainder of...

Страница 400: ...ect the binding position of the document If necessary touch Erase or Center Erase under Book Erase Select the desired area to be erased touch and to specify the width to be erased and then touch OK Wh...

Страница 401: ...on Refer to Erasing specified areas of copies Erase function on page 9 67 In addition if the Erase function in the Application screen is specified Erase under Book Erase will be selected What happens...

Страница 402: ...copy settings 9 Using the keypad type in the desired number of copies 10 Press the Start key For details on scanning the document refer to Scanning a Multi Page Document from the Original Glass on pag...

Страница 403: ...en scanned touch Finish If Front and Back Cover was selected the back cover is scanned after the front cover and then all page spreads are scanned in or der If Front Cover was selected all page spread...

Страница 404: ...ls on stapling refer to To bind copies at the center Fold Sta ple on page 4 92 The number of sheets that can be stapled together is no more than 15 and differs depending on the paper type For details...

Страница 405: ...booklet with the staples removed For details on positioning the document refer to Feeding the doc ument on page 4 9 When using the original glass position the pages in order starting with the side tha...

Страница 406: ...9 34 MF45 2 Touch Application and then touch Book Copy Repeat To cancel all settings for the Application functions touch Reset The Book Copy Repeat screen appears 3 Touch Booklet Original The Booklet...

Страница 407: ...OK 6 If necessary specify any other copy settings 7 Using the keypad type in the desired number of copies 8 Press the Start key If the document is placed on the original glass scanning begins Touch Fi...

Страница 408: ...he document and paper sizes and the zoom ratio The following repeating formats and settings are available Setting Description With Margin Multiple copies are printed of the entire image within the spe...

Страница 409: ...he doc ument on page 4 9 2 Load the paper to be used into the desired paper drawer 3 Touch Application and then touch Book Copy Repeat To cancel all settings for the Application functions touch Reset...

Страница 410: ...e document size does not appear under Scan Range or to specify the scanning area touch Set Range and then specify the area to be scanned from any of the screens When the document is loaded into the AD...

Страница 411: ...ction touch OFF Can sizes in inches be displayed Touch or to display a different list of sizes If Custom Size is touched the Custom Size screen appears If Photo Size is touched the Photo Size screen a...

Страница 412: ...when a value outside of the allowable range is spec ified The message Input Error appears If Input Error appears or if the value was incorrectly entered press the C clear key in the key pad and then s...

Страница 413: ...The finished size can be specified by the image size zoom ratio or paper size To copy using the Poster Mode function 1 Position the document to be copied For details on positioning the document refer...

Страница 414: ...Zoom or Paper Size under Finished Size The factory default setting for the finished size is A2 Touch Image Size select the finished image size and then touch OK If Inches is touched a screen containi...

Страница 415: ...Application functions 9 MF45 9 43 Touch Zoom use the keypad to type in the desired value and then touch OK Touch Paper Size select the finished paper size and then touch OK...

Страница 416: ...of the screens When the document is loaded into the ADF the document size does not appear If a standard sized document is loaded the doc ument size is automatically detected after the Start key is pre...

Страница 417: ...tom Size screen Touch X or Y to select the dimension press the C clear key and then use the keypad to specify the correct value What happens when a value outside of the allowable range is spec ified T...

Страница 418: ...installed Detail Generally a multiple of 4 document pages is required with a single sided document and a multiple of 2 document pages is required with a double sided document If there are not enough p...

Страница 419: ...and then touch Booklet To cancel all settings for the Application functions touch Reset 3 Touch either Left Bind or Right Bind If the document contains only pages in the landscape orientation they wil...

Страница 420: ...9 Application functions 9 48 MF45 6 Using the keypad type in the desired number of copies 7 Press the Start key...

Страница 421: ...e colors are inversed with the se lected color If the Background Color function is set the colors includ ing the selected background color are inversed To copy using the Neg Pos Reverse function 1 Pos...

Страница 422: ...MF45 3 Touch Neg Pos Reverse How is the Neg Pos Reverse function canceled Touch Neg Pos Reverse again 4 If necessary specify any other copy settings 5 Using the keypad type in the desired number of c...

Страница 423: ...e of the original document To copy using the Mirror Image function 1 Position the document to be copied For details on positioning the document refer to Feeding the doc ument on page 4 9 2 Touch Appli...

Страница 424: ...cify the document size from any of the screens When the document is loaded into the ADF the document size does not appear If a standard sized document is loaded the doc ument size is automatically det...

Страница 425: ...ction touch OFF Can sizes in inches be displayed Touch or to display a different list of sizes If Custom Size is touched the Custom Size screen appears If Photo Size is touched the Photo Size screen a...

Страница 426: ...ad to specify the correct value What happens when a value outside of the allowable range is spec ified The message Input Error appears If Input Error appears or if the value was incorrectly entered pr...

Страница 427: ...areas Detail For sample images of the Background Color function refer to Back ground Color function on page 1 35 To copy using the Background Color function 1 Position the document to be copied For d...

Страница 428: ...Background Color screen appears 4 Select the desired background color To cancel changes to the settings touch Cancel To cancel the Background Color function touch OFF Can other background colors be di...

Страница 429: ...Application functions 9 MF45 9 57 5 Touch OK 6 If necessary specify any other copy settings 7 Using the keypad type in the desired number of copies 8 Press the Start key...

Страница 430: ...e used to adjust the level of green in the image Blue This parameter can be used to adjust the level of blue in the image Hue The hue is divided into red blue and yellow By adjusting the hue the image...

Страница 431: ...djusting the Brightness parameter is de scribed below 1 Touch Application and then touch Edit Color To cancel all settings for the Application functions touch Reset The Edit Color screen appears 2 Tou...

Страница 432: ...he Brightness parameter touch OFF The Sharpness parameter can only be specified in single incre ments In the Color Balance screen touch the button for a color and then specify the adjustment setting H...

Страница 433: ...Application functions 9 MF45 9 61 2 Note Even though the setting can be specified in increments of 1 3 the setting will appear at the nearest full increment in the Adjust Color screen...

Страница 434: ...etail For details on displaying the screen for each Adjust Color parameter re fer to Adjusting the copy color quality Adjust color parameters on page 9 58 2 Note Sample Copy does not appear in the Col...

Страница 435: ...opy screen appears 2 Load paper of a size listed under Paper that can be used into the pa per drawer 3 Place the document within the sample area of the original glass 4 Press the Start key 2 Note Afte...

Страница 436: ...the image orientation can adjusted by specifying the position of the filing margin In addition the image orienta tion can adjusted without creating a filing margin Detail If the positions of the stap...

Страница 437: ...oc ument on page 4 9 2 Touch Application and then touch Page Margin To cancel all settings for the Application functions touch Reset The Page Margin screen appears 3 Specify the position of the filing...

Страница 438: ...he margin width If None is selected the margin width is set to 0 mm When making double sided copies the image orientation can adjusted without creating a filing margin What happens when a value outsid...

Страница 439: ...me erasing the same width can be erased along all four sides of the document or a different width can be erased along each side of the docu ment To copy using the Erase function 1 Position the documen...

Страница 440: ...idth to be erased To specify a different width to be erased depending on the position specify different settings for Top Left Right and Bottom When using the keypad to specify the settings press the C...

Страница 441: ...ted in any of the following ways Setting Description Full Size The area that contains the entire image is centered and enlarged to the size of the paper Centering is also selected automatically Center...

Страница 442: ...2 Touch Application and then touch Image Adjustment To cancel all settings for the Application functions touch Reset The Image Adjustment screen appears 3 Touch the button for the desired setting If...

Страница 443: ...of the screens When the document is loaded into the ADF the document size does not appear If a standard sized document is loaded the doc ument size is automatically detected after the Start key is pre...

Страница 444: ...om Size screen Touch X or Y to select the dimension press the C clear key and then use the keypad to specify the correct value What happens when a value outside of the allowable range is spec ified Th...

Страница 445: ...be added when multiple copies are made The following stamp formats are available and can be combined Setting Description Reference Date Time Select a format and print the date or time on the specified...

Страница 446: ...unction 1 Position the document to be copied For details on positioning the document refer to Feeding the doc ument on page 4 9 2 Touch Application and then touch Stamp To cancel all settings for the...

Страница 447: ...Cancel To cancel the Date Time function touch OFF To print the stamp only on the front cover page touch Cover Only The stamp will not be printed on blank pages inserted using the Cover Mode Insert She...

Страница 448: ...djusted in 0 1 mm increments Can no adjustments be made To make no left right or up down adjustments touch No Adj What happens when a value outside of the allowable range is spec ified The message Inp...

Страница 449: ...function To copy using the Page function 1 Position the document to be copied For details on positioning the document refer to Feeding the doc ument on page 4 9 2 Touch Application and then touch Stam...

Страница 450: ...etween 100 and 100 When specifying a starting number switch the number between positive and negative by pressing the key If a negative value is specified the numbers are not printed until the numberin...

Страница 451: ...and then select the settings for the pages to be printed Blank pages inserted using the Cover Mode Insert Sheet and Chapters functions are only counted but page numbers are not printed on them If Exce...

Страница 452: ...value outside of the allowable range is spec ified The message Input Error appears If Input Error appears or if the adjustment value was incorrectly entered touch No Adj or press the C clear key and t...

Страница 453: ...stribution number is normally printed as a four digit number If Start Number is set to 1 0001 is printed To copy using the Set Numbering function 1 Position the document to be copied 2 Touch Applicati...

Страница 454: ...uch Cancel To cancel the Set Numbering function touch OFF 5 Touch a button under Text Color and under Pages to specify the desired settings Pages printed with the Black Color setting and Red or Blue s...

Страница 455: ...10 Replacing toner cartridges and staples and emptying waste containers...

Страница 456: ......

Страница 457: ...run out the advanced warning message shown below appears Example Message when the yellow toner is about to run out Detail About 1000 A4 pages can be printed after the message Toner Car tridge X needs...

Страница 458: ...Example Message indicating that the yellow toner is empty if replaceable by the user 2 Note When the message appears replace the toner cartridge according to your maintenance agreement Detail For det...

Страница 459: ...spills Be careful not to spill toner inside the machine or get toner on your clothes or hands If your hands become soiled with toner immediately wash them with soap and water If toner gets in your eye...

Страница 460: ...included in the package with the black toner cartridge 0 Desiccant is attached to the black ton er cartridge Be sure to remove the desiccant before installing the toner cartridge into the machine 1 O...

Страница 461: ...the one that was re moved cannot be installed If the wrong toner cartridge is installed with extreme force the machine may be damaged 4 Shake the new toner cartridge well The toner within the toner c...

Страница 462: ...ung up as shown otherwise the front door cannot be closed 8 Slowly pull out the charger cleaning tool as far as possible Next slowly push in the charger cleaning tool as much as possible Repeat the ab...

Страница 463: ...emptying waste containers 10 MF45 10 9 2 Reminder Be careful about the installation location of the toner cartridges since it is different for other colors 2 Reminder When installing the new filter 2...

Страница 464: ...ples When finisher FS 507 or FS 603 is installed and is about to run out of staples the message shown below appears Example When finisher FS 603 is installed Display in enlarge display mode Detail Be...

Страница 465: ...ntainers 10 MF45 10 11 To replace the staple cartridge for finisher FS 507 1 Slide the finisher away from the ma chine 2 Open the right side door FN7 3 Turn the jammed staple clearing dial to the left...

Страница 466: ...ridge holder to ward you from stapler 1 or stapler 2 as described in the touch panel mes sages 5 Press the button marked PUSH on the side of the staple cartridge hold er The staple case is released 6...

Страница 467: ...MF45 10 13 7 Remove the staple cartridge from the staple case 8 Load the new staple cartridge into the staple cartridge holder Fully insert the staple cartridge as far as possible 9 Press the staple c...

Страница 468: ...0 14 MF45 11 Insert the staple cartridge holder until it locks into place 12 Close the right side door FN7 13 Slide the finisher back against the machine 2 Reminder Be sure to replace the staple cartr...

Страница 469: ...r of the finisher 2 Turn misfeed clearing dial 1 clock wise until the removal indicator is completely blue What should be done if the mis feed clearing dial 1 is turned too far Turn the misfeed cleari...

Страница 470: ...MF45 4 Grasp both sides of the staple car tridge holder lift it up and then pull it out 5 Press the button marked PUSH on the side of the staple cartridge hold er The staple case is released 6 Pull u...

Страница 471: ...MF45 10 17 7 Remove the staple cartridge from the staple case 8 Load the new staple cartridge into the staple cartridge holder Fully insert the staple cartridge as far as possible 9 Press the staple c...

Страница 472: ...g the rails in the compart ment 12 Insert the staple cartridge holder until it locks into place Check that the staple cartridge holder is securely installed 13 Carefully move the stapler unit back int...

Страница 473: ...d staples and emptying waste containers 10 MF45 10 19 10 3 Clearing a staple jam If a staple jam occurs in the finisher the message shown below appears 2 Reminder Be careful when clearing jammed stapl...

Страница 474: ...waste containers 10 20 MF45 To clear jammed staples in finisher FS 507 1 Slide the finisher away from the ma chine 2 Open the right side door FN7 3 Turn the jammed staple clearing dial to the left in...

Страница 475: ...of the staple cartridge holder and then pull out one sheet of staples 6 Return the shutter of the staple cartridge holder to its original position 7 Insert the staple cartridge holder until it locks i...

Страница 476: ...placing toner cartridges and staples and emptying waste containers 10 22 MF45 2 Reminder If stapling still cannot be resumed even after performing the above pro cedure contact your technical represent...

Страница 477: ...m the following procedure If the following procedure is not followed and the paper is pulled out with too much force the stapler unit may be damaged 1 Slide the finisher away from the ma chine 2 Open...

Страница 478: ...er 6 Turn misfeed clearing dial 1 clock wise until the removal indicator is completely blue What should be done if the mis feed clearing dial 1 is turned too far Turn the misfeed clearing dial 1 count...

Страница 479: ...ull out any misfed paper in the transport section 9 Clockwise turn the misfeed clearing dial in the folding section Feed out into the exit tray 2 the paper that could not be fed out in step 8 and then...

Страница 480: ...s to a posi tion from where it can be removed What should be done if the mis feed clearing dial 2 is turned too far Turn the misfeed clearing dial 2 counterclockwise to adjust it so the cartridge remo...

Страница 481: ...apling cannot continue correct ly 15 Return the shutter of the staple cartridge to its original position 16 Insert the staple cartridge holder making sure the tabs on the holder slide along the rails...

Страница 482: ...idges and staples and emptying waste containers 10 28 MF45 19 Close the front door 20 Slide the finisher back against the machine 2 Reminder Do not pull out paper with too much force otherwise the fol...

Страница 483: ...FS 603 becomes full the message shown below appears if it can be emp tied by the user 2 Note The setting for emptying the hole punch waste container should be spec ified by the technical representati...

Страница 484: ...used To continue the job with out canceling the Punch setting empty the hole punch waste container To cancel the Punch setting and continue the job touch Cancel Punch When performed by technical repre...

Страница 485: ...and staples and emptying waste containers 10 MF45 10 31 2 Note No message appears if the hole punch waste container in finisher FS 507 becomes full Periodically check the volume of the contents of the...

Страница 486: ...ty the hole punch waste container in finisher FS 507 Follow the procedure described below to empty the hole punch waste con tainer 1 Slide the finisher away from the ma chine 2 Open the right side doo...

Страница 487: ...r cartridges and staples and emptying waste containers 10 MF45 10 33 5 Install the hole punch waste container into its original position 6 Close the right side door FN7 7 Slide the finisher back again...

Страница 488: ...sher FS 603 Follow the procedure described below to empty the hole punch waste con tainer 1 Slide the finisher away from the ma chine 2 Pull out the hole punch waste con tainer 3 Empty the hole punch...

Страница 489: ...11 Care of the machine...

Страница 490: ......

Страница 491: ...ith a soft cloth dampened with a mild household detergent 2 Reminder Be sure to turn off the machine set the power switch to o before cleaning it Never use solvents such as benzene or thinner to clean...

Страница 492: ...control panel by wiping it with a soft dry cloth 2 Reminder Pressing too hard on the control panel or the touch panel may damage them In addition never use a mild household detergent glass cleaner ben...

Страница 493: ...the belt to the left to expose a hidden area of the belt 3 Clean the newly exposed surface of the belt by wiping it with a soft cloth dampened with a mild household detergent as in step 1 Repeat the...

Страница 494: ...of the machine 11 6 MF45 Paper take up roller Clean the paper take up rollers by wiping them with a soft dry cloth 2 Reminder Never use solvents such as benzene or thinner to clean the paper take up...

Страница 495: ...to clean the electrostatic charger wire 1 Open the machine s front door 2 Slowly pull out the charger cleaning tool as far as possible Next slowly push in the charger cleaning tool as much as possibl...

Страница 496: ...rints since counting started can be viewed In addition the list of counters can be printed To view the counters 1 Press the Utility Counter key 2 Touch Details in the sub display area The list of coun...

Страница 497: ...machine 11 MF45 11 9 3 Touch Close and then touch Close in the next screen that appears The Basic screen appears again 2 Note The list of counters can be displayed even while the machine is copying o...

Страница 498: ...d can be viewed in the Toner Coverage screen To view the coverage rate 1 Press the Utility Counter key 2 Touch Details in the sub display area The list of counters appears 3 Touch Toner Coverage 4 Tou...

Страница 499: ...chine 11 MF45 11 11 11 3 When the message Preventive maintenance time appears If the message Preventive maintenance time appears contact your tech nical representative and request a periodic maintenan...

Страница 500: ...11 Care of the machine 11 12 MF45...

Страница 501: ...12 Managing jobs Job list...

Страница 502: ......

Страница 503: ...te The job number identifies the job it does not indicate the printing order In addition the job number does not change until the job is deleted By using the Increase Priority function the selected jo...

Страница 504: ...ove can be displayed from any other Job List screen However if the screen is changed while a setting is being changed that setting is canceled A Current Jobs list and a Job History list can be display...

Страница 505: ...to Job History This lists the completed jobs Held Jobs Active Jobs displayed on the Cur rent Jobs list of the Print tab Specifies the type of jobs displayed in the Job List screen Change the display...

Страница 506: ...gned when the job is queued User Name Displays the type source of the job COPY is displayed for copy jobs Status Displays the status of the job Document Name Displays the name of the file for print jo...

Страница 507: ...appears 2 In the Print tab display the job to be deleted Jobs in the Job History list cannot be deleted 3 Select the job to be deleted and then touch Delete If the job to be deleted is not displayed t...

Страница 508: ...e screen displayed before Delete was touched appears again and the job is deleted from the Current Jobs list 5 Touch Exit or press the Reset key The screen that was displayed before Job List was touch...

Страница 509: ...ct a different job or touch the button for the selected job again to deselect it The Mode Check screen appears The contents and number of Mode Check screens differ depending on the job that was select...

Страница 510: ...of specified recipients 3 Fax TX tab Status Transferring Waiting Dialing Redial Waiting 1 Result Job Com plete Error cleared User Delete Deleted Due To Error 2 Error Detail 2 Address Type User Name TX...

Страница 511: ...eck Detail screen appears 4 After the desired information has been checked touch Close or Exit or press the Reset key To return to the screen displayed before Detail was touched touch Close To return...

Страница 512: ...ive Jobs Displays only jobs that are being performed Detail For details on the function of each button refer to Job List screens on page 12 4 Detail Proof copies of stored jobs can be printed For deta...

Страница 513: ...List The Job List screen appears 2 Touch Job History The Job History screen appears 3 Touch the button for the desired list Deleted Jobs Displays only jobs that were deleted before they were finished...

Страница 514: ...for data in the boxes 1 Display the Held Jobs list in the Current Jobs list of the Print tab 2 Touch Release Held Job The Release Held Job screen appears 3 From the job list select the job whose sampl...

Страница 515: ...12 MF45 12 15 4 Touch Clear After the single sample copy is printed check the print result Detail To change the settings touch Change setting in the Release Held Job screen For details refer to To pr...

Страница 516: ...t the job to be removed from the Held Jobs list If the job to be removed from the Held Jobs list is not displayed touch and until the desired job is displayed If an incorrect job was selected select a...

Страница 517: ...e more information about the settings Refer to the appropriate section 6 In the Release Held Job screen touch OK The stored job appears in the Active Jobs list and is printed Can a sample copy be prin...

Страница 518: ...interrupted and printing of the job given priority begins Printing of the interrupted job is automatically restarted once printing for the job given priority is finished If the job currently being pri...

Страница 519: ...until the desired job is displayed If an incorrect job was selected select a different job or touch the button for the selected job again to deselect it The selected job moves to the top of the list...

Страница 520: ...12 Managing jobs Job list 12 20 MF45...

Страница 521: ...13 Utility...

Страница 522: ......

Страница 523: ...appear in the screens differ depending on the specified settings Utility Counter One Touch Registration p 13 22 1 Scan p 13 22 1 Address Book 1 E Mail 2 FTP 3 SMB 4 User Box 2 Group 3 Program 4 Subjec...

Страница 524: ...ray Setting 1 Auto Tray Select Set ting 2 Auto Tray Switch ON OFF 3 No Match ing Paper in Tray Setting 4 Print Lists 4 Auto Color Level Adjust ment 5 Power Save Setting Low Power Mode Setting Sleep Mo...

Страница 525: ...Default Tab Program De fault Address Book Default Index Address Type Symbol Display 3 Fax Basic ScreenDefault Setting Default Tab Default Pro gram Address Book Default Index Address Type Symbol Displa...

Страница 526: ...Origi nals Auto Booklet ON when Fold Staple Auto Zoom for Combine Booklet Sort Group Auto change Auto Zoom Platen Auto Zoom ADF Select Tray when APS Off Select Tray for Insert Sheet Print Jobs During...

Страница 527: ...3 LTR LGR Auto Switch Banner Set ting 2 Paper Set ting Paper Tray DefaultPaper Size 2 Sided Print Bind Direc tion Staple Hole Punch Banner Pa per Tray 3 PCL Set ting 1 Font Set ting Internal Disk Soft...

Страница 528: ...ower Save Key Entering Power Save Mode Fax 2 Output Set ting 1 Print Fax Output Set tings Printer Fax 2 Output Tray Setting 3 Date Time Setting 4 Daylight Savings Time Setting 5 Weekly Timer Setting 1...

Страница 529: ...Deleting Oth er User s Jobs Registering and Chang ing Address es Changing Zoom Ratio Changing the From Ad dress 4 Restrict Operation Setting Restrict Fax Broadcasting 7 Expert Ad justment 1 AE Level...

Страница 530: ...Densi ty Black Black Image Density 5 Image Stabilization 6 Thin Paper Duplex Mode 7 Color Registration Adjust 1 Color Registration Adjust Yel low 2 Color Registration Adjust Ma genta 3 Color Registra...

Страница 531: ...8 List Cout ner 1 Manage ment List Job Setting List 2 Paper Size Type Counter 9 Reset Set ting 1 System Auto Reset 2 Auto Re set 3 Job Reset When Ac count is changed When Origi nal is set on ADF When...

Страница 532: ...tra tor Registra tion 2 Input Ma chine Address 3 One Touch Regis tration p 13 45 1 Scan 1 Address Book 1 E Mail 2 FTP 3 SMB 4 User Box 2 Group 3 Program 4 Subject Text for E Mail 1 Subject 2 Text 2 Fa...

Страница 533: ...t Text List 4 User Au thentication Account Track p 13 46 1 Authentica tion Method 2 User Au thentication Setting 1 Adminis trative Set ting User Name List Default Func tion Permis sion Public User Key...

Страница 534: ...P Setting 2 NetWare Setting 3 http Server Setting Support Op eration Printer Infor mation 4 FTP Setting 5 SMB Set ting 6 Apple Talk Setting 7 LDAP Set ting 1 Enabling LDAP 2 Setting Up LDAP 3 Default...

Страница 535: ...Set ting 3 Status No tification Set ting 1 Notifica tion Address Setting 2 Notifica tion Item Set ting 3 Notifica tion Time Setting 4 Total Counter Re port Setting 5 PING con firmation 6 SLP Set ting...

Страница 536: ...NMP Set ting 1 Bonjour Setting 2 TCP Sock et Setting 6 Copier Setting p 13 49 Auto Zoom Platen Auto Zoom ADF Select Tray when APS OFF Select Tray for Insert Sheet Print Jobs During Copy Operation 7 Pr...

Страница 537: ...Meth od Receive Mode Number of RX Call Rings Number of Redials Redial Inter val Line Monitor Sound Line Monitor Sound Vol ume 4 TX RX Set ting Duplex Print RX Inch Paper Priority Over A4 Print Paper...

Страница 538: ...is play Function 3 Memory RX 4 Closed Netword RX 5 Forward TX Setting 8 PC Fax RX Setting 9 TSI User Box Setting 6 PBX CN Set 7 Report Set tings Activity Re port TX Report Sequential TX Report Timer R...

Страница 539: ...lephone Line Settings Dialing Meth od Number of RX Call Rings Line Monitor Sound 2 Function Setting PC FAX TX Setting 3 Multi Lines Setting 9 System Connection p 13 50 1 IS OpenAPI Setting Access Set...

Страница 540: ...ecurity Details Password Rules Prohibit Functions when Auth Error Release Manual Des tination Input Print Data Capture Secure Doc ument Ac cess Method Restrict Fax TX 5 Enhanced Security Mode 6 HDD Se...

Страница 541: ...1 7 Manage ment Func tion Setting 1 Function Settings 2 Max No of Sets to Copy Setting 3 Network Function Set ting 4 Authenti cation Time Setting Check Con sumable Life p 13 116 Banner Print ing Meter...

Страница 542: ...when no user has logged on However after a user has logged on 1 One Touch Registration appears Fax 2 Note 2 Fax appears only when fax kit FK 502 is installed Parameter Description Address Book Registe...

Страница 543: ...2 Bulletin Board User Box appears only when fax kit FK 502 is installed Parameter Description Public Personal User Box Register recipients for boxes For details refer to the Box Operations of the MF4...

Страница 544: ...splay the One Touch Registra tion Screen 1 Press the Utility Counter key 2 Touch 1 One Touch Registration An item can also be selected by pressing the key in the keypad for the number beside the desir...

Страница 545: ...uit specifying the Utility mode setting touch Exit in the sub display area or press the Utility Counter key Otherwise cancel the Utility mode by touching Close in each screen until the screen for the...

Страница 546: ...formed In addition specify the priority of the paper drawers when the automatic paper drawer switching feature is performed Tray 2 Tray 3 Tray 4 Tray 1 Auto Tray Switch ON OFF Select whether or not a...

Страница 547: ...cted The reference level can be set to one of 5 settings 3 standard Parameter Description Default Setting Low Power Mode Set ting Specify the desired length of time be tween 10 and 240 minutes until t...

Страница 548: ...andard Description Default Setting Display Type Sub Area Setting value An image of the selected setting is displayed Job List A list of the jobs that are being performed is displayed Setting value Par...

Страница 549: ...N A copy job can be reserved by touching Next Job Reservation in the screen with the message Now print ing which appears during printing OFF A copy job can be reserved while the Basic screen in Copy m...

Страница 550: ...ling the settings automatic panel reset on page 3 31 Description Default Setting Specify the default settings for Copy mode The copy settings selected when the machine is turned on the pow er switch i...

Страница 551: ...is selected automatically when the Fold Staple setting is selected This parameter is available only if option al finisher FS 603 is installed Auto Select Booklet Auto Zoom For Com bine Booklet Select...

Страница 552: ...is automatically selected when a paper drawer is selected except when Auto Paper Select is set while a document is loaded into the ADF ON Select Tray when APS OFF Select which paper drawer is selected...

Страница 553: ...ations of the MF45 user manual Black Compression Level TWAIN Lock Time Parameter Description Basic Setting Specify settings for printing For details refer to the Print Operations of the MF45 user manu...

Страница 554: ...scribes how to display the User Setting Screen 1 Press the Utility Counter key 2 Touch 2 User Setting An item can also be selected by pressing the key in the keypad for the number beside the desired b...

Страница 555: ...ouch Exit in the sub display area or press the Utility Counter key Otherwise cancel the User mode by touching Close in each screen until the screen for the Copy Fax Scan or Box mode appears Detail For...

Страница 556: ...y Select which low power mode is entered when the Power Save key is pressed Low Power The touch panel goes off and the ma chine enters a mode where it con serves energy Sleep Although the machine cons...

Страница 557: ...Select whether or not the machine s internal clock observes daylight saving time If ON is selected a setting appears so that the length of time for adjusting the current time can be set The daylight...

Страница 558: ...low Deleting Other User s Jobs Select whether or not jobs from other us ers can deleted when the user authenti cation settings have been specified Restrict Register ing and Changing Addresses Select w...

Страница 559: ...2nd Side Adjust the starting print position be tween 3 0 mm and 3 0 mm at the left edge of the paper for the second side during automatic double sided copying Adjustments can be specified for each pap...

Страница 560: ...ack Im age Densi ty 0 Image Stabilization Perform an image stabilization if the im age is incorrect even after the gradation levels have been adjusted Image Stabilization Only Perform normal image sta...

Страница 561: ...ratio in the transverse document feed direction for the scanner can be adjusted For details on making this adjustment contact your technical representative Vertical Adjust ment If the copy image is di...

Страница 562: ...3 70 For the procedure on adjusting the gradation levels refer to Adjusting the gradation levels on page 13 77 For details on displaying Vertical Adjustment and Erase Leading Edge contact your technic...

Страница 563: ...is machine detects that the user has changed when the optional key counter has been removed or when the Access key is pressed after entering user au thentication and account track informa tion Reset W...

Страница 564: ...er Box Specify settings for using boxes For details refer to the User man ual Box Operations Delete Secure Print Documents Auto Delete Secure Document Specify settings for using boxes For details re f...

Страница 565: ...of the machine and its e mail address can be registered The registered machine name is added to the names of files that are sent and to documents saved in boxes As a default the machine name is speci...

Страница 566: ...y a password select Password Only No setting can be selected when Account Track is set to OFF If both user au thentication and account track settings have been specified only Account Name Password can...

Страница 567: ...ted when authenti cating with an external server Copy Allow Scan Allow Fax Allow Print Allow User Box Allow Print TX Function Allow Public User Key Select whether or not the public user is authenticat...

Страница 568: ...etting This parameter appears only if user authentication or account track settings have been specified The use for each user or account can be checked Tray 1 1 Sided Parameter Description TCP IP Sett...

Страница 569: ...Before APS ON The paper drawer that was being used before the Auto Paper Select setting was selected is selected Default Tray The paper drawer set as the default is selected Tray Before APS ON Select...

Страница 570: ...simile Opera tions of the MF45 user manual Header Footer Position Telephone Line Settings TX RX Setting Function Setting PBX CN Set Report Settings Job Settings List Multi Lines Setting Parameter Desc...

Страница 571: ...or using boxes For details refer to the Box Operations of the MF45 user man ual Description Default Setting Specify the range of Administrator mode parameters available to users Level 1 Power Save Aut...

Страница 572: ...cuments User Box Operations for password pro tected boxes SNMP Operations for SNMP v3 Write user authentication Mode 1 Manual Destination Input Select whether or not a recipient can be typed in manual...

Страница 573: ...ted even after touching Release from the Prohibit Functions when Auth Error parameter to specify the items whose operation restrictions are canceled or if operation is prohib ited from a failed attemp...

Страница 574: ...Overwrite Setting screen the area of the hard disk where image data is saved can be overwritten after the data is printed or sent and the data can be erased This process prevents disclosure of image...

Страница 575: ...ure describes how to display the Administrator Setting Screen 1 Press the Utility Counter key 2 Touch 3 Administrator Setting An item can also be selected by pressing the key in the keypad for the num...

Страница 576: ...sub display area or press the Utility Counter key Otherwise touch Close in each screen until the desired screen appears 2 Reminder The default administrator password is 12345678 The administrator of t...

Страница 577: ...into the elec trical outlet even if the machine has been turned off 0 Press the Utility Counter key touch 3 Administrator Setting then 1 System Setting then 3 Date Time Setting and correctly specify...

Страница 578: ...ly this position will not need to be adjusted 1 Display the Administrator Setting screen For details on displaying the Administrator Setting screen refer to Displaying the administrator setting screen...

Страница 579: ...mm and 3 0 mm To scroll through the values quickly touch or continuously 9 Press the Start key The adjusted test pattern is printed 10 Check the distance from the starting print position of the test p...

Страница 580: ...d to be adjusted 0 Only A4 v paper can be used to adjust the bypass tray 1 Display the Administrator Setting screen For details on displaying the Administrator Setting screen refer to Displaying the a...

Страница 581: ...nd 3 5 mm skip to step 10 Each time or is touched the value is increased or decreased by one increment 9 Press the Start key The adjusted test pattern is printed 10 Adjust the distance from the starti...

Страница 582: ...per can be used to adjust the bypass tray 1 Display the Administrator Setting screen For details on displaying the Administrator Setting screen refer to Displaying the administrator setting screen on...

Страница 583: ...and 3 5 mm skip to step 14 Each time or is touched the value is increased or decreased by one increment 9 Press the Start key The adjusted test pattern is printed 10 Adjust the distance from the star...

Страница 584: ...ion to print a single sample copy Perform the adjustment while checking the sample that was created 1 Display the Administrator Setting screen For details on displaying the Administrator Setting scree...

Страница 585: ...een 1 mm and 7 mm If the staple position is too far to the right of the center of the paper touch to reduce the adjustment between 1 mm and 7 mm To scroll through the values quickly touch or continuou...

Страница 586: ...13 Utility 13 66 MF45 9 Check the print result Check that the stapling position is adjusted to the center of the pa per If more adjustment is necessary repeat steps 6 and 8...

Страница 587: ...hecking the sample that was created 1 Display the Administrator Setting screen For details on displaying the Administrator Setting screen refer to Displaying the administrator setting screen on page 1...

Страница 588: ...etween 1 mm and 7 mm If the folding position is too far to the right of the center of the paper touch to reduce the adjustment between 1 mm and 7 mm To scroll through the values quickly touch or conti...

Страница 589: ...Utility 13 MF45 13 69 9 Check the print result Check that the folding position is adjusted to the center of the pa per If more adjustment is necessary repeat steps 6 and 8...

Страница 590: ...The test pattern can be printed on A3 w 11 17 w A4 v or 8 1 2 11 v paper that can only be loaded into the 1st drawer 1 Display the Administrator Setting screen For details on displaying the Administra...

Страница 591: ...pat tern 8 Check the angle of the horizontal lines in the test pattern If horizontal lines A and B are angled as shown below touch to reduce the value of q between 1 dot and 10 dots If horizontal line...

Страница 592: ...ligned skip to step 11 9 Press the Start key The adjusted test pattern is printed When is the adjustment applied The adjustment is applied when the Start key is pressed To can cel the adjustment touch...

Страница 593: ...e other colors yel low magenta and cyan For details on adjusting the color registration for black refer to Adjusting the color registration for black on page 13 70 0 The test pattern can be printed on...

Страница 594: ...rn is printed 7 Check the distance from the reference black lines to the cyan lines in the test pattern along the X and Y directions If the lines are shifted in the X direction as shown below touch un...

Страница 595: ...are shifted in the X direction as shown below touch under X to increase the adjustment between 1 dot and 6 dots If the lines are shifted in the Y direction as shown below touch under Y to reduce the a...

Страница 596: ...eference lines skip to step 10 8 Press the Start key The adjusted test pattern is printed When is the adjustment applied The adjustment is applied when the Start key is pressed To can cel the adjustme...

Страница 597: ...usting the gradation levels of the copy is described be low Requisite 0 After replacing an imaging unit be sure to adjust the gradation levels 0 The test pattern is printed on plain paper from a paper...

Страница 598: ...13 Utility 13 78 MF45 5 Touch the button for the mode to be adjusted 6 Press the Start key A test pattern is printed...

Страница 599: ...ace into the 1st drawer 10 or more sheets of blank paper of the same size as the printed test pattern page 9 Close the ADF 10 Press the Start key The printed test pattern is scanned When the test patt...

Страница 600: ...r to use this machine when user authentication or account track settings are specified the user name and password must be entered For details refer to Controlling each user s use of this machine User...

Страница 601: ...t track and user authentication settings can be specified sep arately Check the differences between these features and then specify the appropriate settings For details on external server authenticati...

Страница 602: ...t In addition totals can be maintained on each employee each user and each duty each account even if the same duty is performed by two different employees To manage the use of this machine in this way...

Страница 603: ...g To cancel user authentication touch OFF To use the user authentication function from an external server touch ON External Server and then select the server type To use the user authentication functi...

Страница 604: ...touch Skip Job To stop the machine when the limit specified with account track is reached touch Stop Job 10 Beside Synchronize User Authentication Account Track touch the button for the desired setti...

Страница 605: ...all data appears 13 Touch Yes The authentication method is set Continue by specifying settings for user authentication and account track 2 Reminder Do not differentiate between uppercase and lowercas...

Страница 606: ...machine If public user access is permitted we recommend placing limitation on the machine functions that can be used For details refer to User registra tion on page 13 93 If account track settings ha...

Страница 607: ...nters is set to 50 up to 950 accounts can be registered 2 Note If No was touched the management data is not cleared however the settings cannot be changed If the setting for any of the following is ch...

Страница 608: ...displaying the Administrator Setting screen refer to Displaying the administrator setting screen on page 13 55 2 Touch 4 User Authentication Account Track The User Authentication Account Track screen...

Страница 609: ...Utility 13 MF45 13 89 2 Note To limit machine use by authorized users specify settings in the User Registration screen...

Страница 610: ...1 Display the Administrator Setting screen For details on displaying the Administrator Setting screen refer to Displaying the administrator setting screen on page 13 55 2 Touch 4 User Authentication A...

Страница 611: ...uch OK The default function permissions are set 2 Note To limit machine use by authorized users specify settings in the User Registration screen If Print Scan Fax From Box setting is used to scan or f...

Страница 612: ...ng the Administrator Setting screen refer to Displaying the administrator setting screen on page 13 55 2 Touch 4 User Authentication Account Track The User Authentication Account Track screen appears...

Страница 613: ...od screen is set to ON the number of users set for of User Counters can be registered 0 If external server authentication is selected users are registered auto matically If users are registered in adv...

Страница 614: ...tered it cannot be changed A user name that has already been registered cannot be used again The user name is set 8 Touch User Password If Account Track Input Method was set to Password Only the same...

Страница 615: ...e e mail address 13 Touch Account Name The Account Name screen appears 14 Touch the button for the desired account and then touch OK The account is set Before an account name can be selected accounts...

Страница 616: ...and Black of the Print are set to Restrict the message Copy is prohibited appears if authentication was com pleted correctly If Color is set to Restrict under Send color scanning is not possible 17 To...

Страница 617: ...ar to display a message and apply the settings to all users At this time do not turn off the machine with the main power switch 22 Touch OK The maximum number of prints allowed are set 23 Touch Functi...

Страница 618: ...ion settings that are specified a different Basic screen may appear when logging on The Basic screen that appears changes in the following order Copy Scan Fax Box If no operation is permitted user aut...

Страница 619: ...the Full Color setting the 2 Color setting and the Single Color setting Large Size Shows the total number of copies made on paper specified as large size paper using all Color settings the Black setti...

Страница 620: ...0 MF45 2 Note Counting automatically continues with user counters for external server authentication If Public User Access on the Authentication Method screen was set to Allow public is added to the l...

Страница 621: ...r the selected user appears 6 Touch the button for the counter to be viewed and then check the counter To clear the counters for the current user touch Clear Counter in the User Counter screen for the...

Страница 622: ...es how to specify accounts when Account Track Input Method on the Authentication Method screen is set to Account Name Password 1 Display the Administrator Setting screen For details on displaying the...

Страница 623: ...unt Name The Account Name screen appears 7 Type in the account name up to 8 characters and then touch OK For details on typing in text refer to Entering text on page 14 3 If Name was displayed type in...

Страница 624: ...ype the password specified in step 9 and then touch OK The account password is set 11 Touch Output Permission The Output Permission screen appears 12 Beside Print and Send touch the button for the des...

Страница 625: ...and Black of the Print are set to Restrict the message Copy is prohibited appears if authentication was com pleted correctly If Color is set to Restrict under Send color scanning is not possible 13 To...

Страница 626: ...rint mode set to Limit and then use the keypad to type in the maxi mum number allowed Touch All Accounts to apply the current settings to all other regis tered accounts Touch All Accounts and then tou...

Страница 627: ...setting the Full Color setting the 2 Color setting and the Single Color setting Large Size Shows the total number of copies made on paper specified as large size paper using all Color settings the Bl...

Страница 628: ...13 Utility 13 108 MF45 2 Note If User Box Admin was set to Allow and only account track settings have been specified Box Admin appears at the end of the list of counters...

Страница 629: ...account appears 6 Touch the button for the counter to be viewed and then check the counter To clear the counters for the current account touch Clear Counter in the Account Track Counter screen for th...

Страница 630: ...e character cannot be registered The same password as one before being changed can not be registered Limitations on the number of characters Limitations on registering changing 8 or more alphanumeric...

Страница 631: ...screen Use the user password account password when user authentication ac count track settings have been applied For details on the User Box Password and Password for the confiden tial document refer...

Страница 632: ...Enhanced Security Mode cannot be set to ON Detail Certain conditions must be met in order for the enhanced security set tings to be applied For details contact your technical representative The settin...

Страница 633: ...ion Method screen set Account Track Input Method to Account Name Password If Pass word Only is selected the setting for Prohibit Functions When Auth Er ror is not changed even when Enhanced Security M...

Страница 634: ...ions Administrator Setting commands Changed settings System Setting Restrict User Access Restrict Access to Job Settings Registering and Changing Address Set to Restrict User Authentication Account Tr...

Страница 635: ...nd then select the items whose operation restrictions are canceled The recipient cannot be changed by the user This machine s counter data cannot be retrieved by Net Care or VISUALCOUNT MASTER An appl...

Страница 636: ...e From the Unit Life Indicator screen the status usage level of the following consumables can be viewed Imaging Unit C Imaging Unit M Imaging Unit Y Imaging Unit K Fusing Unit Transfer Roller Unit Ima...

Страница 637: ...1 Press the Utility Counter key 2 Touch 4 Check Consumable Life An item can also be selected by pressing the key in the keypad for the number beside the desired button For Check Consumable Life press...

Страница 638: ...oned above are replaceable For replacements contact your technical representative 2 Note To quit specifying the Utility mode setting touch Exit in the sub display area or press the Utility Counter key...

Страница 639: ...14 Appendix...

Страница 640: ......

Страница 641: ...o use the keyboard that appears in the touch panel for typing in the names of registered accounts and custom paper sizes The keypad can also be used to type in numbers Any of the following keyboards m...

Страница 642: ...14 Appendix 14 4 MF45 Touching Shift switches the keyboard display between lowercase letters numbers and uppercase letters symbols...

Страница 643: ...with the keypad The entered characters appear in the text box 2 Note To cancel changes to the settings touch Cancel To clear all entered text press the C clear key Detail To change a character in the...

Страница 644: ...er Select setting ATS Automatic paper drawer switching feature ATS Auto tray select Auto Zoom Select this setting to automatically select the appropriate zoom ratio after a document is placed on the o...

Страница 645: ...of cyan C magenta M yellow Y and black K Each color can be finely adjusted to any of 19 levels between 3 and 3 Combine Originals Select a setting to arrange reduced copies of multiple document pages...

Страница 646: ...e Set this function to later scan multiple images from the original glass and in sert them at the desired locations in a document scanned with the ADF then feed out all copies together Insert Sheet Se...

Страница 647: ...ies that are fed out OHP Interleave Set this function to insert paper between overhead projector transparencies that are being copied This prevents overhead projector transparencies from sticking toge...

Страница 648: ...ed Sort Select this setting to separate each set of the copies The second copy set is printed after all of the first copy set is finished Staple Select a setting to staple copies together T Text Enhan...

Страница 649: ...ok copy 9 26 Booklet 9 46 Booklet original 9 32 Brightness 1 20 1 27 9 58 Bypass tray 3 6 3 57 6 10 C Capacities 8 4 Caution notations and labels 2 15 Center binding 4 91 Center erase 4 92 9 27 Chapte...

Страница 650: ...ttings 4 65 4 66 Destination register 13 22 13 45 Display setting 13 28 Distribution numbers 9 73 9 81 Document selection 4 55 Double sided copies 4 58 E Emptying the waste container 10 29 Emptying th...

Страница 651: ...ading paper media 3 46 3 51 3 54 3 57 Low power mode 3 33 3 35 M Machine setting 13 45 Main unit 3 3 7 3 Malfunction detected 6 3 Managing jobs 12 3 Margin setting 4 27 9 64 Memory full 6 39 Message d...

Страница 652: ...n notices 2 12 Replacing a staple cartridge for finisher FS 507 10 11 Replacing a toner cartridge 10 3 Replacing parts supplies 6 41 6 43 Replacing the staple cartridge 10 10 Replacing the staple cart...

Страница 653: ...dge 10 3 Touch panel adjustment 5 35 Troubleshooting 6 3 Troubleshooting reference tables 6 45 Turning off 3 29 Turning on 3 25 U Unit life indicator 13 116 User authentication 3 38 13 46 13 80 User m...

Страница 654: ...14 Appendix 14 16 MF45...

Страница 655: ......

Страница 656: ...you need and the instructions for handling the waste correctly for example location and times of the waste collection centres etc b When you purchase a new device of ours give a used device similar t...

Отзывы: