21
7.3 Cleaning the surfaces
To clean the surfaces, use a rag dampened with water or with water and a neutral de-
tergent.
7.4 Cleaning the metal parts
To clean the metal parts of the stove, use a soft cloth dampened with water.
Never clean the metal parts with alcohol, thinners, petrol, acetone or other degreasing
substances. If such substances are used, our company declines any responsibility.
Eventual variations in the colour of the metal parts can be caused by an incorrect use
of the stove.
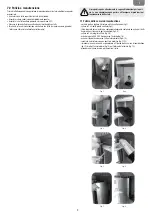
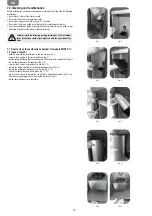
Fig. 11
Fig. 12
Fig. 13
Fig. 14
Fig. 15
GB
7.5 Cleaning the brazier and brazier support
When the flame assumes a red colour or seems weak, and is accompanied by black
smoke, this means that there are ash deposits or incrustations that do not permit the
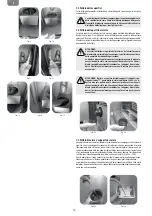
correct functioning of the stove and that must be removed (fig. 25a-25b).
Remove the brazier every day by simply raising it from its slot; then clean out the ashes
and eventual incrustations that may have formed, paying particular attention to liberating
the holes by using a pointed tool (not included with the stove)
This operation is made particularly necessary before every lighting the first several times
and above all if using pellets that differ from those supplied by our company. The fre-
quency of this operation is determined by how frequently the stove is used and the
choice of pellets. It is also a good idea to check the brazier support, vacuuming the even-
tual ash present.
7.7 Ash box
Open the door and extract the ash box (Fig. 26). Use a vacuum to remove all the ash de-
posited within. This operation must be performed more or less frequently depending on
the quality of the pellets used.
7.8 Cleaning the glass
The glass is a self cleaning type, therefore, while the stove is working, a veil of air is
blown across its surface to remove ash and dirt; nevertheless over a period of several
hours, a greyish patina tends to form which should be cleaned when the stove is next
shut down. How dirty the glass becomes also depends on the quality and quantity of
pellets used. Cleaning the glass should be done when the stove is cold with products
recommended and tested by our company.
When performing this operation, always check that the grey seal around the glass is in
a good state; failure to check the efficiency of this gasket can compromise the function
of the stove. Poor quality pellets can, in any case, cause the glass to become dirty.
7.9 Cleaning the clearing system
Until a reasonable experience is acquired regarding the operating conditions, it is advi-
sable to perform this maintenance on at least a monthly basis.
• Remove the electrical feed cable;
• Remove the cap from the T-joint and proceed with the cleaning of the ducts. If neces-
sary, at least for the first few times, call in qualified personnel;
• Carefully clean the smoke discharge system: for this, contact a professional chimney
sweep;
• Once a year clean the dust, cobwebs, etc. from the zone behind the internal covering
panels, paying particular attention to the fans.
Fig.25a
Fig.25b
Fig.23
Fig.24
The use of aggressive detergents or thinners can damage the sur-
faces of the stove. Before using any detergent it is advisable to try
it on a small section out of sight or contact the Authorized Assi-
stance Centre for information regarding the product.
WARNING! Periodically remove and empty the cap of the inspection
"T" pipe located behind the stove (see picture 23 and 24). The lack
of cleanliness can prevent the starting of the stove, causing dama-
ges to the stove itself and to the environment (possible emission of
unbrunt material and soot). Do not re-use the pellet possibly remai-
ned in the brazier due to no starting-up.
Fig. 26
WARNING!
If the glass is broken, do not attempt to light the stove.
ATTENZIONE:
the furnace and ash drawer must be cleaned every day and prior to
each powering-on. Cleaning must consist in the complete removal
of all residue.
The lack of cleanliness can prevent the starting of the stove, causing
damages to the stove itself and to the environment (possible emis-
sion of unbrunt material and soot).
Do not re-use the pellet possibly remained in the brazier due to no
starting-up.
Содержание MIA 2-11
Страница 1: ...MIA 2 9 MIA 2 11...
Страница 2: ......
Страница 5: ...5 I MIA 2 9 MIA 2 11 475 1050 520 227 133 390 340 50 80 110 455...
Страница 13: ...13 I...
Страница 16: ...16 GB MIA 2 9 MIA 2 11 475 1050 520 227 133 390 340 50 80 110 455...
Страница 24: ...24 GB...
Страница 27: ...27 F MIA 2 9 MIA 2 11 475 1050 520 227 133 390 340 50 80 110 455...
Страница 35: ...35 F...
Страница 38: ...38 D MIA 2 9 MIA 2 11 475 1050 520 227 133 390 340 50 80 110 455...
Страница 46: ...46 D...
Страница 49: ...49 E MIA 2 9 MIA 2 11 475 1050 520 227 133 390 340 50 80 110 455...
Страница 57: ...57 E...
Страница 58: ......
Страница 59: ......
Страница 60: ...278960A...


