background image

CHECKING PACKAGE CONTENT > 9

English

CHECKING PACKAGE CONTENT

S900 SCANCOPIER

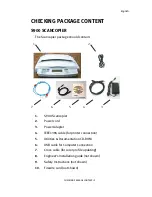
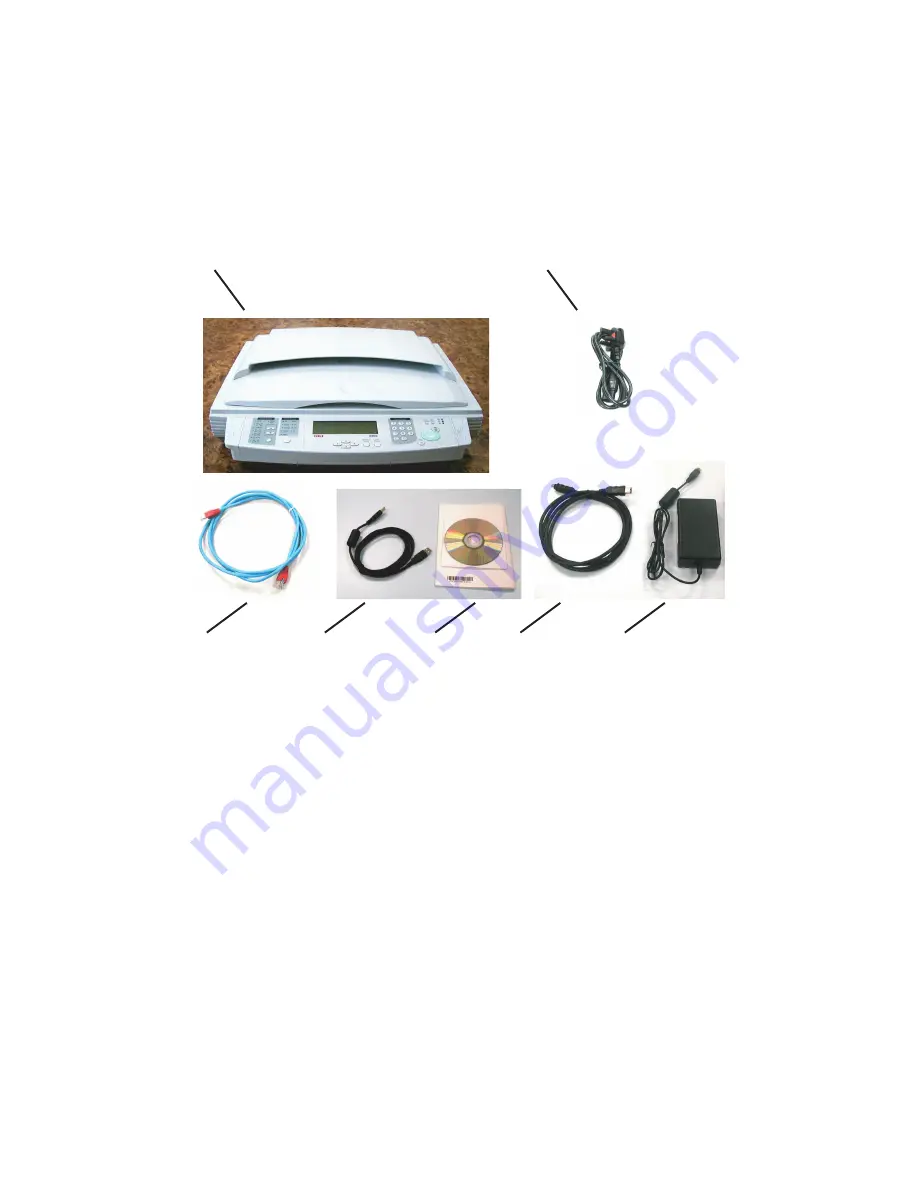
The Scancopier package should contain:

1.

S900 Scancopier

2.

Power cord 

3.

Power Adapter

4.

IEEE1394 cable (for printer connection)

5.

Utilities & Documentation CD-ROM

6.

USB cable for Computer Connection

7.

Cross cable (for color profile updating)

8.

Engineer’s Installation guide (not shown)

9.

Safety Instructions (not shown)

10.

Firewire card (not shown)

1

2

3

4

5

6

7

Содержание S900

Страница 1: ......

Страница 2: ...ls are available from the Oki Data Americas web site http my okidata com Copyright 2003 Oki Data Americas Inc Oki and Microline are registered trademarks of Oki Electric Industry Company Ltd Energy St...

Страница 3: ...19 Installing the Scancopier and ADF 20 Precautions 20 Unlocking the scanning head 21 Installing the ADF 22 Connecting the Cables 24 Connecting the power and switching on 25 Setting up Additional Sett...

Страница 4: ...ter profile 49 Oki Data Americas Service Centers 51 FCC Statement 52 Limited warranty United States and Canada 53 Limited Warranty Scancopier 53 On Site Repair 53 Limited Warranty Automatic Document F...

Страница 5: ...All trademarks acknowledged NOTE A note appears in this manual like this A note provides additional information to supplement the main text which may help you to use and understand the product CAUTION...

Страница 6: ...6 NOTES CAUTIONS AND WARNINGS...

Страница 7: ...cument is intended for use by installation technicians and explains how to l install an S900 Scancopier with its Stand and Automatic Document Feeder ADF to operate with an Executive Series printer l c...

Страница 8: ...erational 1 Check the contents of the Scancopier and any optional packages 2 Check that sufficient space is available for the installation 3 Install the IEEE1394 Firewire card in the printer and if re...

Страница 9: ...1 S900 Scancopier 2 Power cord 3 Power Adapter 4 IEEE1394 cable for printer connection 5 Utilities Documentation CD ROM 6 USB cable for Computer Connection 7 Cross cable for color profile updating 8...

Страница 10: ...nimessage Pro Utility to enable you to carry out a range of functions such as creating and sending messages e mailing or faxing scanned documents l IEEE1394 Utility to enable the Firewire firmware to...

Страница 11: ...PACKAGE CONTENT 11 English AUTOMATIC DOCUMENT FEEDER ADF The ADF package should contain 1 ADF Document Cover shown set up STAND AND CABINET Refer to the documentation supplied in the stand and cabine...

Страница 12: ...nter or can be mounted on an optional stand and cabinet arrangement If the user already has a Finisher 1 it will be mounted on a cabinet 2 attached to the printer 3 and the stand 4 for the Scancopier...

Страница 13: ...ING INSTALLATION SPACE 13 English The Scancopier and ADF dimensions and weight are as follows l Without ADF 23 2 x19 8 x6 589x502x153mm 19 8 lb 9kg l With ADF 23 2 x19 8 X12 5 589x502x318mm 25 1 lb 11...

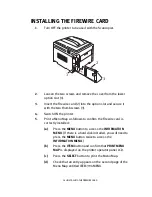
Страница 14: ...inter 5 Print a Menu Map as follows to confirm the Firewire card is correctly installed a Press the MENU button to access the INFORMATION MENU If there is a hard disk installed you will need to press...

Страница 15: ...to the menu map you have just printed Examine the print out in the lower right corner of the block just below the Menu Map title If the value is less than that shown above proceed with the firmware u...

Страница 16: ...nch the tool 4 Ensure that no non USB cables are connected to the printer and then connect the PC to the printer via the USB cable 5 When the new hardware search window is displayed click the Cancel b...

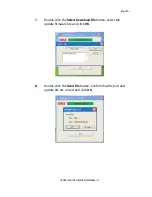
Страница 17: ...RE FIRMWARE 17 English 7 Double click the Select Download File button select the update firmware file and click OK 8 Double click the Send File button Confirm that the port and update file are correct...

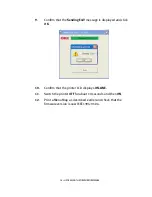
Страница 18: ...Sending End message is displayed and click OK 10 Confirm that the printer LCD displays ON LINE 11 Switch the printer OFF for about 10 seconds and then ON 12 Print a Menu Map as described earlier and...

Страница 19: ...INSTALLING THE STAND AND CABINET 19 English INSTALLING THE STAND AND CABINET Refer to the assembly instructions for the cabinet and stand which are enclosed with these items...

Страница 20: ...dusty place l Be sure to use the proper AC power source l Be sure to use the supplied AC adapter Using other AC adapters may damage the Scancopier and void the warranty l Place the unit securely on an...

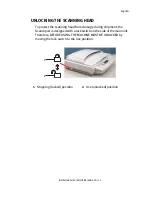
Страница 21: ...tect the scanning head from damage during shipment the Scancopier is designed with a lock switch on the side of the main unit Therefore BEFORE USING THE MACHINE MUST BE UNLOCKED by moving the lock swi...

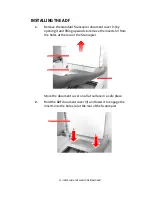
Страница 22: ...cover 1 by opening it and lifting upwards to remove the inserts 2 from the holes at the rear of the Scancopier Store the document cover on a flat surface in a safe place 2 Hold the ADF document cover...

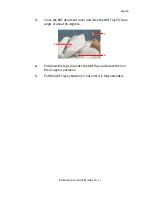
Страница 23: ...h 3 Close the ADF document cover and raise the ADF Tray 5 to an angle of about 45 degrees 4 Pull down the legs 6 under the ADF Tray and locate them in their support positions 5 Pull the ADF Tray exten...

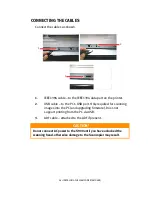
Страница 24: ...printer 2 USB cable to the PC s USB port Only required for scanning images into the PC and upgrading firmware Does not support printing from the PC via USB 3 ADF cable attached to the ADF if present C...

Страница 25: ...the Scancopier power port 2 3 Connect the Adapter to an appropriate power outlet with the power cable supplied and switch on the power 4 Press the Scancopier power switch to the I position to turn on...

Страница 26: ...and the Color Table version number At the end of the warm up message the LCD display shows the system default values in readiness for copying NOTE The default installed Color Table is for the ES 3037...

Страница 27: ...Output Tray Top Output Face down 7 Multi Purpose Tray ON 8 Collate ON 9 Paper Tray Tray1 10 Power Saving Mode 30Min 11 Paper Supply Std Paper At this point change the Printer Profile setting if requi...

Страница 28: ...g device e g a mouse A CD ROM drive For minimum system requirements for Unimessage Pro operation refer to the Unimessage Pro User s Guide on the CD supplied with the Scancopier Follow the steps below...

Страница 29: ...screen instructions 6 Double click on Install Unimessage Pro TWAIN and follow the on screen instructions referring to the Unimessage Pro User s Guide for detailed instructions 7 When you have complet...

Страница 30: ...30 INSTALLING THE SCANCOPIER AND ADF...

Страница 31: ...ues to be set as user defaults and show the user how to set these up using the Additional Settings button adjacent arrow keys and Save Settings button See Appendix A The functional checks involve copy...

Страница 32: ...color document to be copied Place the document face down on the glass aligned to the top left corner 1 of the glass 2 Enter your copy count via the Copy Count panel NOTE You can use the following func...

Страница 33: ...n 4 is illuminated 4 Visually check that the expected copy results are obtained by comparing with the original 5 Repeat the above steps from Step 1 but this time a At Step 1 place an example two page...

Страница 34: ...ich you should direct the user 1 Start Unimessage Pro for example using Start Programs Unimessage Pro Unimessage Pro 2 Place an example single page color document on the flatbed 3 Click on the Scan Im...

Страница 35: ...p select View it 9 Visually check on screen that the expected results are obtained by comparing with the original 10 Use File Close to return to the Unimessage Pro Welcome window 11 Repeat the above s...

Страница 36: ...36 BASIC FUNCTIONAL CHECKS...

Страница 37: ...he user aware of l the content of the S900 Scancopier and Unimessage Pro User s Guides contained in the CD supplied with the Scancopier l how to clear a paper jam in the ADF described in the S900 Scan...

Страница 38: ...38 USER INFORMATION...

Страница 39: ...to the original factory default settings if required hold down the All Clear button for 5 seconds The options available under each menu item displayed in the LCD selectable by using the adjacent Arrow...

Страница 40: ...With Left Edge set printing is such that pages are bound on the left edge and the back of each page is printed in the same direction as the front Staple only displayed when a Finisher is installed l...

Страница 41: ...nction is enabled l OFF Collate function is disabled Paper Tray l Tray1 l Tray2 l Tray3 l Tray4 l Tray5 l MPT l Auto Selection Function Notes Stapler Hole Punch Job Offset Top Output Face down Disable...

Страница 42: ...Power Saving Mode l 30Min l 2 Hour l 4 Hour l OFF Paper Supply l Std Paper l Alt Paper Detectable Paper Size Flatbed Ledger Letter LEF Letter SEF ADF Letter SEF Letter LEF Detectable Paper Size Flatbe...

Страница 43: ...print count can be acquired as log data The following conditions can be set l Printing limitation can be applied to certain users l Color printing limitation can be applied to certain users l Printin...

Страница 44: ...a 10 digit number and register it Example 1000001234 is the resulting number when the S900 PIN is 1234 4 Choose registered User ID and set up a use limitation and limitation value SETTING THE PIN ID O...

Страница 45: ...nt ID Properties and check the Inhibit color print in setting Use Restrictions When an unregistered ID is entered the S900 will scan data but the printer will ignore data if it is color data and not p...

Страница 46: ...ob is displayed in more than one column e g Duplex Color 1 sheet Mono 1 sheet make Printed Sheets take the value 2 1 Color The number of pages printed in color 1 Monochrome The number of pages printed...

Страница 47: ...this item 3 Left blank if time is not notified to printer Multi Purpose Tray Number of sheets fed from Multi Purpose Tray Manual Tray 2 Multi Purpose Feeder Number of sheets fed from Optional Multi p...

Страница 48: ...ame B and check the Print not permitted box 2002 is entered as PIN ID For Copying the S900 will scan but the printer will ignore the data and not print C 1000002003 All permitted No settings needed 20...

Страница 49: ...ld match the printer model ES 3037 or ES3037e for optimum results It is possible to update the profile using the Update Tool via the cross cable supplied through the service port at the rear of the Sc...

Страница 50: ...50 APPENDIX C UPDATING THE PRINTER PROFILE...

Страница 51: ...1 800 654 3282 Fax 1 856 222 5247 CANADA Oki Data Americas Inc 2735 Matheson Blvd East Unit 1 Mississauga Ontario Canada L4W 4M8 Tel 1 800 654 3282 Fax 1 905 238 4427 MEXICO Oki Data de Mexico S A de...

Страница 52: ...or television reception which can be determined by turning the equipment off and on the user is encouraged to try to correct the interference by one or more of the following measures Reorient or reloc...

Страница 53: ...he date of original purchase repair or replace at Oki Data s option on site at the original purchaser s facility and without charge any defective component s of the scancopier provided that the warran...

Страница 54: ...authorized Oki Data service center THERE ARE NO EXPRESS WARRANTIES OTHER THAN THOSE ON THE FACE HEREOF AND DESCRIBED ABOVE NO WARRANTIES WHETHER EXPRESS OR IMPLIED INCLUDING BUT NOT LIMITED TO ANY IM...

Страница 55: ...written receipt for the ADF showing the date of purchase dealer s name and item purchased must accompany any request or claim for work to be performed under this Limited Warranty This Limited Warranty...

Страница 56: ...ve will be asking for this information You will receive the exchange ADF the next business day or no later than the second business day Return the original ADF to Oki Data by using the same packaging...

Страница 57: ...ning 34 F Firewire card 14 firmware upgrade 15 I installing ADF 22 Firewire card 14 printer firmware 15 utilities 28 L Lock Scan head lock 21 M main steps 8 P package content ADF 11 S900 9 stand and c...

Страница 58: ......

Отзывы: