background image

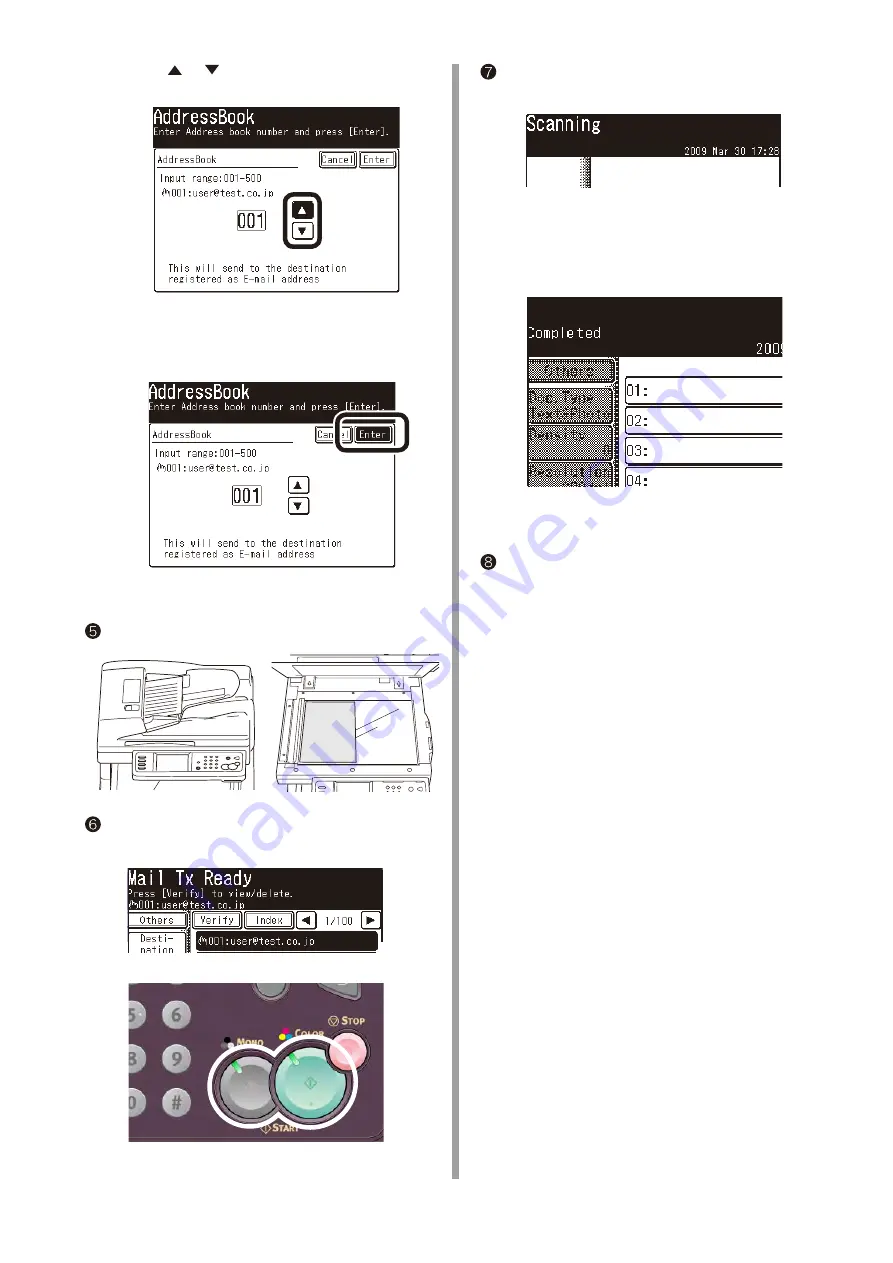
2) Press 

 or 

 to select the registered number 

of the destination.

Note

You  can  enter  the  number  with  the        

numeric keypad.

3)  Press [Enter].

 Set a document to be sent on ADF or Flatbed.

 Check  that  [Mail Tx  Ready]  is  displayed,  and 

press the <Color Start> Key or <Mono Start> key.

 [Scanning  document]  is  displayed  on  LCD,  and 

Scan To Email is started.


 Check  that  the  email  is  transmitted  from  MC860 

to a destination computer.

If the email has been received, 
the setup is completed.

If not, check the settings again.

W h e n   t r a n s m i s s i o n   i s   c o m p l e t e d , 

[Completed] is displayed.

abc

Содержание MC860 MFP

Страница 1: ......

Страница 2: ...re Memo In this guide MC860 CX2633 are collectively described MC860 Contents Setup Information Form 3 1 Checking Common Setup Information 4 1 1 Check the administrator s password of MC 860 4 1 2 Check...

Страница 3: ...Password of the outgoing mail server okimc860 E 9 POP user ID Account name of the incoming mail server user E 10 POP password Password of the incoming mail server okimc860 E 11 Name of Email destinat...

Страница 4: ...dress of MC860 If MC860 is connected to the network before following the procedure of this guide an IP address has been already set up in MC860 Press the Setup key Press View Information Press Network...

Страница 5: ...Express on Windows XP is used If you are using other email software refer to the manual of that email software Click the Start button to select Email Outlook Express Select Tools Accounts Select an it...

Страница 6: ...60 test co jp If the E 6 authentication method is POP enter the same name as E 12 in E 1 Notes If the From mail address is not set in MC860 an error will occur in the mail server at the email transmis...

Страница 7: ...POP Password and Destination Name and Email Address 2 2 1 Set From in MC860 Press the Setup key Press Admin Setup Enter the administrator password Value in G 1 of the Setup information form to press E...

Страница 8: ...ess Close on the Scanner Setup screen Check that the screen is Admin Setup Mail Server is now set up 2 2 2 Set up items related to Mail Server in MC860 Press Network Menu Press Mail Server Setup Press...

Страница 9: ...hen press Enter Press SMTP Port Use the numeric keypad to enter the value of E 4 on the Setup Information Form then press Enter Press POP3 Port Use the numeric keypad to enter the value of E 5 on the...

Страница 10: ...ceed to Step 23 page 11 Press SMTP User ID Enter the value of E 7 on the Setup Information Form then press Enter Press SMTP Password Enter the value of E 8 on the Setup Information Form then press Ent...

Страница 11: ...Information Form then press Enter Press Close on the Mail Server Setup screen Press Close on the Network Menu screen Press Yes Network Rebooting is displayed and the screen will be the stand by screen...

Страница 12: ...anel Press the E mail icon Press Destination Enter the destination When entering a destination from the operation panel 1 Press Enter Address 2 Enter the value of E 12 on the Setup Information Form 3...

Страница 13: ...bed Check that Mail Tx Ready is displayed and press the Color Start Key or Mono Start key Scanning document is displayed on LCD and Scan To Email is started Check that the email is transmitted from MC...

Страница 14: ...ed in MC860 Note Profile means a combination of settings including a user name folder name of a saved place file name of data to be saved scanned resolution contrast and hue adjustment A combination o...

Страница 15: ...ab and click Change Check Computer Name to enter it in C 1 on the Setup Information Form Click Cancel to close the window For Windows 2000 Select Start Settings Control Panel Open System Select the Ne...

Страница 16: ...on the Setup Information Form 3 2 Set up a computer to which data is sent by Scan To CIFS Register MC 860 in the computer as a user and set up a shared folder For Windows XP users proceed to page 18 F...

Страница 17: ...scanned by MC860 in the computer To save data scanned by MC 860 in the computer create a folder with the name of C 5 of the Setup Information Form Right click the folder created in the step and open P...

Страница 18: ...to 3 3 Set up items for Scan To CIFS in MC860 Page 22 Click Permissions For Windows XP Select Start Control Panel Click User Accounts Click Create a new account Enter the value of C 2 on the Setup Inf...

Страница 19: ...data scanned by MC860 in the computer Enter the value of C 3 Select the icon of the added user Select a folder created in the step to open Sharing and Security Select the radio button for Share this f...

Страница 20: ...n click Create Enter the value of C 2 Enter the value of C 3 For Windows 2000 Right click My Computer to select Manage Select System Tools Local Users and Groups and then select Users New User on the...

Страница 21: ...of the Setup Information Form Select a folder created in the step and right click to select Sharing Click Add Select the user added in the step and click OK Check the box of Allow for Full Control an...

Страница 22: ...t Press the profile number you want to register Enter the profile name entered in C 4 in the Setup Information Form Press Enter Press Target URL Enter the values of C 1 and C 5 in the Setup Informatio...

Страница 23: ...If domain management is performed enter User name domain name Enter the value of C 6 in the Setup Information Form and press Enter Note The number of characters for a file name is up to 64 characters...

Страница 24: ...other values if needed After setting all values press Enter Press Close on the Register Edit screen Press Close on the Profile screen Press Close on the Setup screen The setup for Scan To CIFS is com...

Страница 25: ...ect a registered profile Check that Scan Ready is displayed and press Color Start or Mono Start Scanning is displayed on LCD and Scan To CIFS is started When transmission is completed Completed is dis...

Страница 26: ...rograms In Windows 2000 Programs Oki Data Configuration Tool Configuration Tool If MC 860 has been already registered in Configuration Tool proceed to the step Select Register Device on the Tools menu...

Страница 27: ...ut to the left the RecordID column and add the number of items you want to register like 001 002 B In the EntryNumber column add the number of items you want to register like 2 3 C In the Name column...

Страница 28: ...email the setup of Scan To Email is necessary See Page 5 In this example the following environment is used Device name M860 IP address of the device 192 168 0 2 MAC address 00 80 87 84 9C 9B Web brow...

Страница 29: ...email 1 Click Setup for Email destination address 2 Enter a destination email address and click Add to the list 3 Check that entered email address is displayed in the address list and click OK When sa...

Страница 30: ...managed by the domain Add the domain name to the user name See 6 3 Server Login Failed Press the Stop key The password of the computer or profile is wrong Check that the password specified in the com...

Страница 31: ...roperties 4 Enter the value of the IP address in C 1 Set up the profile in MC860 Set up with the procedure of 3 3 Setup for Scan To CIFS in MC860 page 22 In this case the value to be entered in the St...

Страница 32: ...lowing procedure In this example Windows XP is used for the description Check the domain name 1 Open Start Control Panel Set up MC860 Set up with the procedure of 3 3 Setup for Scan To CIFS in MC860 p...

Страница 33: ...nited States and or other countries Apple Macintosh and Mac OS are registered trademarks or trademarks of Apple Inc in the United States and or other countries About Copyright on This Manual All right...

Страница 34: ......

Отзывы: