- 39 -
Installing Additional Tray Units
1
2
4
5
6
3
Note
•
When the User Management setting is enabled, it is
used to manage a print job instead of the Department
Code Management setting. In this case, a user name
that has been entered to log in to your computer is
used for the authentication of the print job. Therefore,
you do not need to set your department code to the
printer driver but you must register your user name in
advance. If your user name is not registered, the print
job is processed as an invalid one according to the User
Authentication Enforcement setting. Also if a print job is
sent in RAW format, it is processed according to the RAW
Print Job setting. For more information about the User
Authentication Enforcement setting or the RAW Print Job
setting, refer to the
TopAccess Guide
.
•
If the No Limit Black function is enabled, you do not
have to specify the department code when you print a
document with [Black and White] selected for the [Color]
option in the [Basic] tab of printer driver.
Memo
•
How the equipment performs printing for an invalid
department code print job, for which an invalid
department code is specified, varies depending on the
Invalid Department Code Print Job setting that can be set
in the TopAccess Administrator mode and whether SNMP
communication is enabled or not.
-
When SNMP communication is enabled and Invalid
Department Code Print Job is set to [Store to invalid
job list], an error message will be displayed when an
invalid department code is entered.
-
When SNMP communication is disabled and Invalid
Department Code Print Job is set to [Store to invalid
job list], the invalid department code print job will be
stored in the invalid department code print job list
without printing.
-
When the Invalid Department Code Print Job is set to
[Print], the invalid department code print job will be
printed.
-
When the Invalid Department Code Print Job is set to
[Delete], the invalid department code print job will be
deleted.
•
A department code needs to be entered every time you
begin printing. If you have to use a different department
code for each print job, enter it when you begin printing.
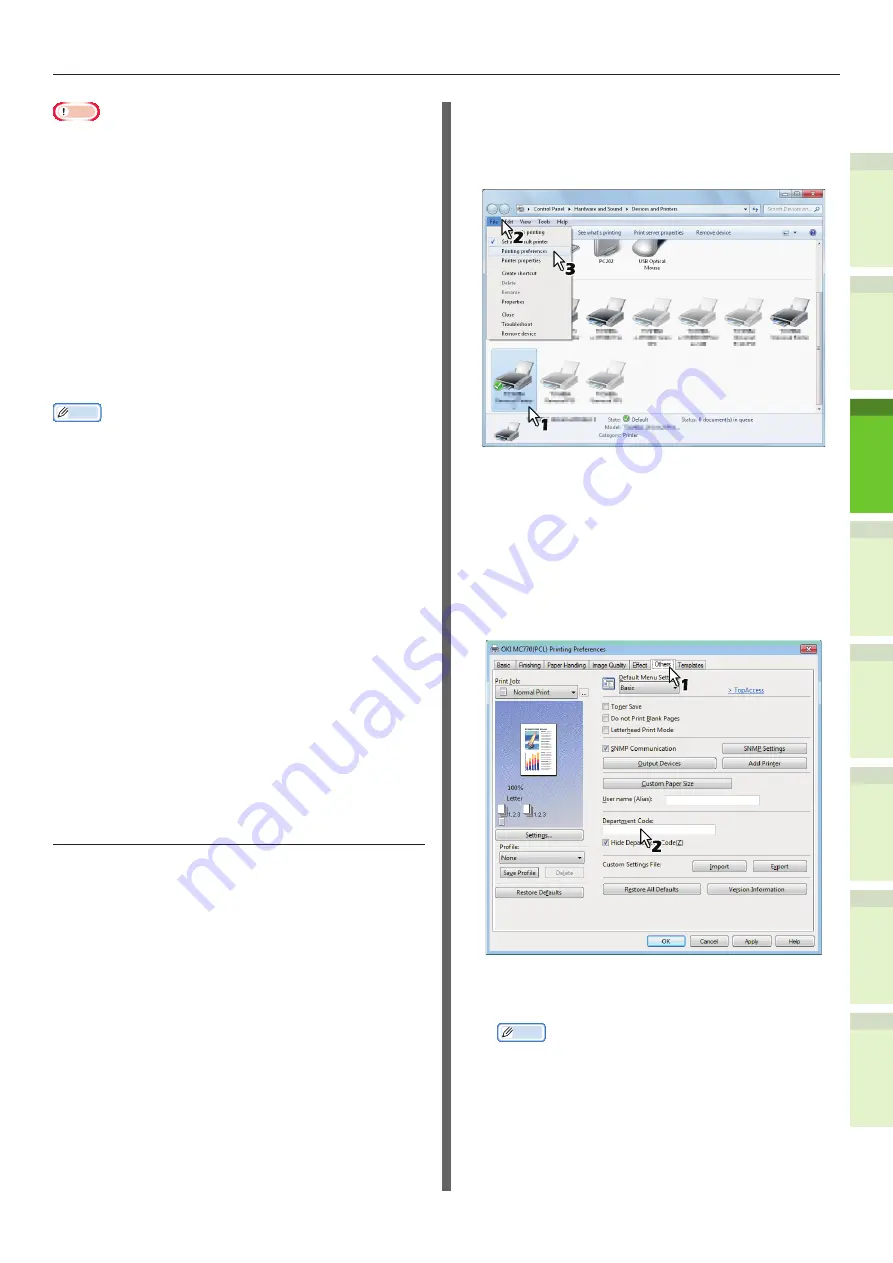
Entering department code
1
Click [Start] menu and select
[Devices and Printers].
The Printers folder appears.
2
Select the printer driver of
this equipment, and then click
[File] menu and select [Printing
Preferences].
•
If the [File] menu is not displayed, press
[Alt].
•
The printing preferences dialog box
appears.
3
Display the [Others] tab menu and
enter your department code in the
[Department Code] box.
In the [Department Code] box, you can enter a
department code within 63 characters.
Memo
•
A department code must consist of one-byte characters
such as numbers from 0 to 9, letters of the alphabet
from A to Z (both capital and small ones), a hyphen
(-), an underscore (_), and a period (.).
4
Click [Apply] or [OK] to save the
settings.
Содержание ES7460 MFP
Страница 54: ...1 2 4 5 6 3 4 About Paper About Paper P 55 How to Load the Paper P 62 Paper Output P 70 ...
Страница 71: ...1 2 4 5 6 3 5 About Document Copies About Document Copies P 72 Loading Documents P 76 ...
Страница 78: ...1 2 4 5 6 3 6 Using Each Function Configuration of the Printer Fax and Scanner Functions P 79 ...
Страница 81: ...1 2 4 5 6 3 Index ...
Страница 85: ...January 2013 45510602EE Rev1 ...


