background image


Das dosierte Medium kann giftig und/oder gefährlich sein.  Weitere 
Einzelheiten bezüglich ordnungsgemäßer Handhabung und 
Sicherheitsvorkehrungen finden Sie im Sicherheitsdatenblatt. 


Wird kein Stopfen mit der Kartusche eingesetzt, ist am Schlauch des 
Kartuschenadapters ein Inline-Filter (881-000-000)  zu montieren, so dass 
die Medien nicht in das Dosiergerät zurück gesaugt werden.  Die Kartusche 
darf nicht überfüllt oder auf die Seite gelegt werden. 


Rauchen oder offenes Feuer sind bei der Dosierung brennbarer Medien 
untersagt.


Dieses Gerät ist nur für den Gebrauch in geschlossenen Räumen geeignet.


2


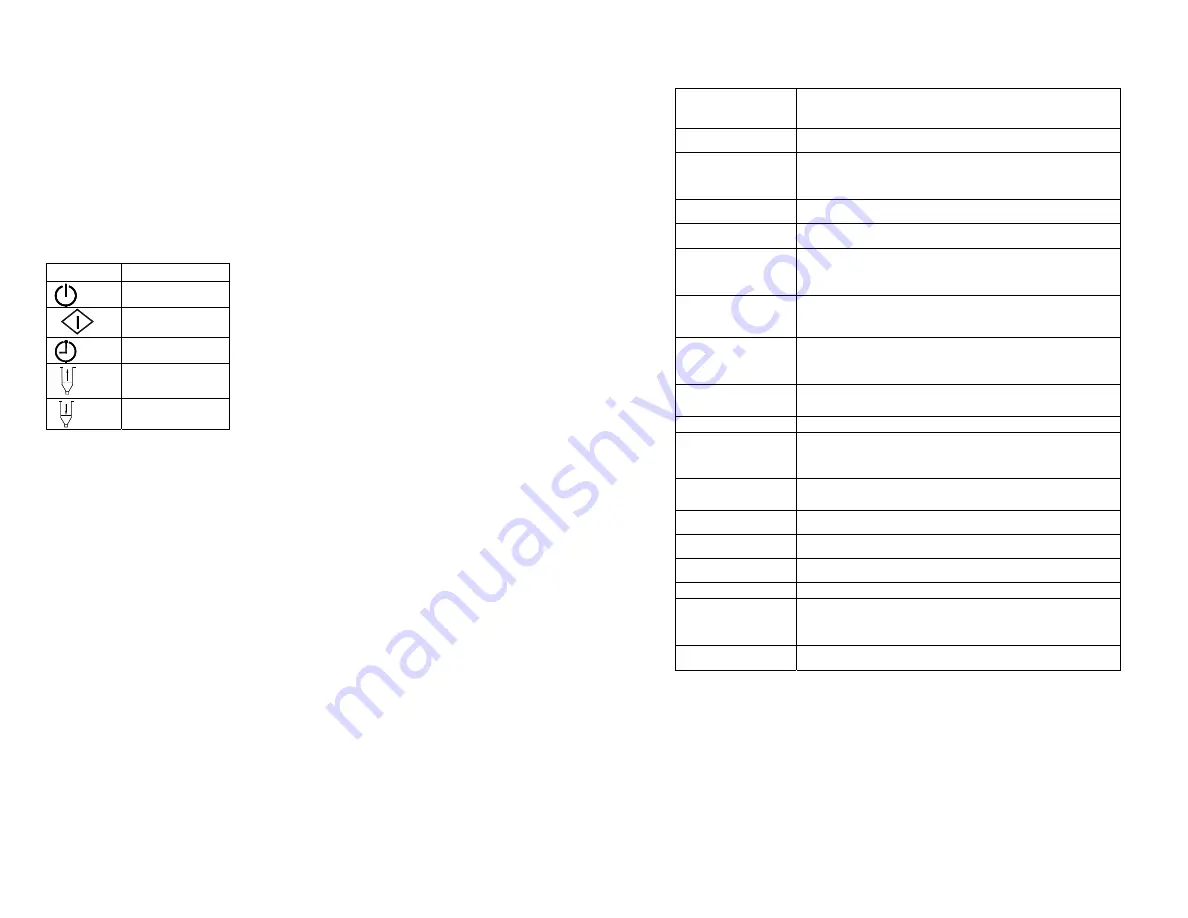
ERLÄUTERUNG DER SYMBOLE 


Symbol  


Ein / Aus 


Zyklusbetrieb 


Timer 


Vakuum 


Druckluft 


4

3


SPEZIFIKATIONEN 


Abmessungen 

152mm X 165mm X 178mm 
(6” X 6,5” X 7,0”) 

Gewicht 

1.5 kg (3.3lbs) 

Eingangsspan-

nung 

24VDC 

Nennleistung 10W 

Druckluft-eingang 

100 psi ( 7 bars) max. 

Verunreini-

gungsgrad 

II 

Installations-
kategorie 

Einsatz in 

Innenräumen 

Aufstellungshöhe bis zu 2,0 m (6,562 ft) 

Betriebstempe-
ratur 

0°C bis 40°C (32°F bis 104°C) 

Lagertemperatur 

-10°C bis 60°C (14°F bis 140°F) 

max. relative 
Feuchtigkeit 

80% für Temperaturen bis 31°C (87,8°F), linear 
abnehmend bis auf 50% bei 40°C (104°F) 

Druckluft-ausgang 

DX-300 = 0-100 psi (0- 7bar)  
DX-315 = 0-15 psi (0-1bar)  

Vakuum 

406mm (16”) Hg 

Timer 0,008-99,999 

Sekunden 

Zyklusbetrieb 

kontinuierlich, Schrittbetrieb, spülen 

Wiederholto-/- 

0,001% 

Zyklenge-

schwindigkeit 

 1.200 Zyklen/Minute;  


LCD 

16 X 2 Displaysegmente 


Содержание DX-300

Страница 1: ...in this User Guide OK International cannot be responsible for injuries or damages resulting from unintended applications of its equipment Unintended uses may result form taking the following actions M...

Страница 2: ...ating Temperature 0 C to 50 C 32 F to 122 F Storage Temperature 10 C to 60 C 14 F to 140 F Max Relative Humidity 80 for temperature up to 31 C 87 8 F Decreasing linearly to 50 relative humility at 40...

Страница 3: ...ss Foot switch to activate timed dispensed cycle 6 3 Teach Mode Setting In the teach mode the unit will accumulate time as long as the foot switch is depressed This is helpful in determining dispense...

Страница 4: ...LEM POSSIBLE CAUSE CORRECTION LCD does not light No power input Check power cord connections Turn on power System will not actuate Foot switch not plugged in or improperly plugged in Defective foot sw...

Страница 5: ...to make engineering product changes without notice 12 I O Configuration and End of Cycle Switch For DX3xx 2xx I O Configuration and End of Cycle Switch information please visit the DX 3xx 2xx User Gu...

Страница 6: ...NG DER SYMBOLE Symbol Ein Aus Zyklusbetrieb Timer Vakuum Druckluft 4 3 SPEZIFIKATIONEN Abmessungen 152mm X 165mm X 178mm 6 X 6 5 X 7 0 Gewicht 1 5 kg 3 3lbs Eingangsspan nung 24VDC Nennleistung 10W Dr...

Страница 7: ...die Modustaste 2 bis Purge im Display erscheint 3 Erh hen Sie die Druckluftversorgung durch Drehen des Druckluftreglers 6 bis der gew nschte Druck am Druckluftmesser 5 angezeigt wird 4 F llen Sie die...

Страница 8: ...d jetzt f r diesen Zeitraum summiert 5 Lassen Sie den Fu schalter los sobald die entsprechende Dosiermenge dosiert wurde 6 Halten Sie die Taste Set 3 zwei Sekunden gedr ckt wenn die Daten gespeichert...

Страница 9: ...s SETUP MODE Setup Modus TIME SETTING Zeiteinstellung Save and Exit Speichern und beenden COUNTER RESET Zur cksetzen des Z hlers Power ON OFF Ein Ausschalten Change Mode Modus wechseln Select Program...

Страница 10: ...ische Produkt nderungen ohne Vorank ndigung vorzunehmen 12 I O Konfiguration und Schalter zum Beenden des Zyklus Informationen zur I O Konfiguration und Zyklusbeendigung des DX 3xx 2xx finden Sie auf...

Страница 11: ...max Classe de pollution II Cat gorie d installation I Utilisation l int rieur Altitude jusqu 2 000m 6 562ft Temp rature d utilisation 0 C 50 C 32 F 122 F Temp rature de stockage 10 C 60 C 14 F 140 F...

Страница 12: ...INTERRUPT 2 Appuyez sur le bouton R glage 3 pour allumer la s lection du num ro de programme 3 Appuyez sur les boutons et pour s lectionner le programme souhait 4 Appuyez sur le bouton R glage 3 pour...

Страница 13: ...E P 2 250 00004 CONTINUE P 2 250 00004 CONTINUE P 2 250 00004 OFF CONTINUE P1 2 250 00004 Normal Operation Power ON OFF Change Mode Select Program MODE Prog Time Counter Setup CONTINUE P1 2 250 00004...

Страница 14: ...ne humidit ou une saturation de solvant excessive 4 Ne raccordez pas d alimentation en air comprim une pression sup rieure 100 psi 6 9 bars pour le DX 300 200 et 15 psi 1 03 bars pour le DX 315 215 5...

Страница 15: ...di fluido corrosivo o infiammabile all interno dell apparecchio In caso d impiego di fluidi corrosivi o infiammabili occorre installare un filtro in linea 881 000 000 sul dosatore per prevenire il ri...

Страница 16: ...A 1 6 15 5 6 4 10 17 13 14 12 11 5 Pos Descrizione 1 Pulsante accensione 2 Pulsante modalit 3 Pulsante di setup salvataggio 4 Display 5 Manometro pressione aria 6 Regolatore pressione aria 7 Uscita ar...

Страница 17: ...mma 3 Premere il pulsanti e per selezionare il programma desiderato 4 Premere il pulsante 3 per uscire 6 2 2 Impostazione del tempo 1 Premere e mantenere premuto il pulsante di setup 3 per due secondi...

Страница 18: ...E P1 2 250 00004 INTERRUPT P1 2 250 00004 PURGE CONTINUE P 2 250 00004 CONTINUE P 2 250 00004 CONTINUE P 2 250 00004 OFF CONTINUE P1 2 250 00004 Normal Operation Power ON OFF Change Mode Select Progra...

Страница 19: ...mentazione sia pulita e secca 2 Non ribaltare i cilindri n adagiarli su di un fianco onde evitare il riflusso di materiale attraverso il tubo dell aria fino ai componenti interni 3 Non esporre l appar...

Страница 20: ...ebe instalarse un filtro en l nea 881 000 000 en el dosificador para impedir que los l quidos sean succionados nuevamente a la unidad El l quido que se dosifica puede ser t xico y o peligroso Consulte...

Страница 21: ...purga 1 Encienda la unidad presionando el bot n de encendido 1 2 Presione el bot n de modo 2 hasta que aparezca el texto PURGE en la pantalla 3 Active la presi n de aire girando la perilla del regula...

Страница 22: ...izaje El tiempo mostrar 0 000 en la pantalla LCD 4 Mantenga presionado el interruptor de pedal El tiempo de dosificaci n se acumular durante este tiempo 5 Suelte el interruptor de pedal cuando se haya...

Страница 23: ...r COUNTER RESET RESTABLECER CONTADOR Power ON OFF ENCENDIDO APAGADO Change Mode Cambiar modo Select Program Selecci n de programa 9 8 SOLUCI N DE PROBLEMAS PROBLEMA CAUSA POSIBLE CORRECCI N La pantall...

Страница 24: ...NT A LIMITADA OK International garantiza este producto al comprador original por un per odo de 1 a o a partir de la fecha de compra como libre de defectos de material y mano de obra excepto por el des...

Отзывы: