22
1.BEFORE USING EQUIPMENT
1.DESCRIPTION OF EACH COMPONENT (Cont.)
1
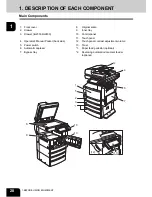
7
: Additional drawer module
Enables one drawer to be added to the paper feed pedestal.
The 2nd drawer is standard on the im2330/im2830.
8
: Slot cover
This cover is used when the 2nd drawer is not installed. (Not available for the im2830/im2330)
9
: Saddle-stitch finisher
Enables the saddle stitching in addition to the sort/group mode and stapling. (Hole punch unit can be
installed.) Requires the Bridge unit (IM23300010 sold separately) for the installation.
10
: Single-staple finisher
Enables the sort/group mode and stapling. Requires the Bridge unit (IM23300010 sold separately) for the
installation.
11
: Hole punch unit
Makes punching holes on output pages.
12
:Automatic duplexer
Enables duplex copying.
Standard on the im2330/im2830.
13
: Network interface card
Enables network functions.
Standard on the im2330/im2830.
We have other options: Work tray, Fax board, Printer kit
*
, Printer/Scanner kit
*
, Scanner upgrade kit
*
, Fax
board 2nd line, Wireless LAN adapter, Scrambler board, Parallel interface kit, Data overwrite kit.
Contact your service technician or representative for the details.
* im2330/im2830
Printer kit: IM23300050
Printer / Scanner kit: IM23300050
Scanner upgrade kit: CM4530320
Содержание im2330
Страница 1: ...For Oc and Imagistics Models Oc Operator s Manual for Basic Functions im2330 im2830...
Страница 4: ......
Страница 8: ...4...
Страница 10: ...6 NOTICE TO USERS Cont 1 Identification Label 2 Certification Label 3 Explanatory Label 4 Warning Label 1 3 2 4...
Страница 76: ...2 72 2 HOW TO MAKE COPIES...
Страница 107: ...103 4 4 IMAGE EDITING AND IMAGE ADJUSTMENT 1 BACKGROUND ADJUSTMENT 104 2 SHARPNESS ADJUSTMENT 105...
Страница 110: ...4 106 4 IMAGE EDITING AND IMAGE ADJUSTMENT...
Страница 144: ...5 140 5 USING THE EDITING FUNCTIONS...
Страница 145: ...141 6 6 STORING ORIGINALS 1 STORE TO e FILING 142 2 COPY FILE 145...
Страница 152: ...6 148 6 STORING ORIGINALS...
Страница 185: ...181 8 2 Select the destination that you want to delete and then press the DELETE button...
Страница 211: ...207 9 4 Press the paper size button you set by pressing the paper size button on the screen 5 Press the START button...
Страница 228: ...224 10 e FILING 2 SETTING UP BOX Cont 10 4 Press the ENTER button A box is newly set...
Страница 230: ...226 10 e FILING 3 CHANGING INPUT DATA Cont 10 5 Press the ENTER button The box settings are updated...
Страница 240: ...10 236 10 e FILING...
Страница 256: ...252 11 TEMPLATE 4 CHANGING INPUT DATA Cont 11 7 Press the ENTER button The data of user group are changed...
Страница 260: ...256 11 TEMPLATE 5 DELETING TEMPLATE Cont 11 5 Press the DELETE button The selected user group is deleted...
Страница 273: ...269 12 3 Drawer Misfeed 1 Open the cover 2 Remove any misfed paper 3 Close the cover...
Страница 295: ...291 13 13 MAINTENANCE 1 DAILY INSPECTION 292 2 SIMPLE TROUBLESHOOTING 294...
Страница 302: ...13 298 13 MAINTENANCE...
Страница 322: ...318 X X Y ZOOM 123...
Страница 323: ...Printed in China im2330 2830...
Страница 324: ......


