background image

Chapter 7

Scanning Thick Media..............................................................................................

57

Scanning Thick Media.....................................................................................

58

Automatic Thick Media Adjustment...............................................................

59

When Scanning in Thick Media Positions......................................................

61

Chapter 8

Maintenance..............................................................................................................

63

About scanner maintenance...........................................................................

64

Cleaning the Scan Area...................................................................................

65

Camera Alignment and Calibration................................................................

69

Replacing Scanner Parts..................................................................................

72

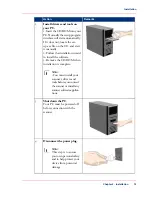
Replacing scanner parts............................................................................

72

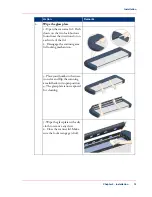
Replacing the glass-plate...........................................................................

73

Replacing the White-background platen..................................................

77

Replacing the Scanner Lamp-Unit............................................................

81

Replacing the Dust-Filters..........................................................................

84

Downloading new firmware............................................................................

86

Chapter 9

Océ Scanner Agent...................................................................................................

89

Introduction......................................................................................................

90

Installation of Océ Scanner Agent..................................................................

91

Interface of Océ Scanner Agent......................................................................

92

Chapter 10

Océ Scanner Maintenance.....................................................................................

101

Installation of the software............................................................................

102

Océ Scanner Maintenance program.............................................................

103

Chapter 11

Trouble Shooting ...................................................................................................

107

Trouble Shooting General.............................................................................

108

Problems Related to Scanner Installation....................................................

109

Problems Related to Operation of the scanner...........................................

112

Problems Related to Scanning Results........................................................

117

Problems Related to Océ Copy Easy............................................................

119

Technical Assistance......................................................................................

120

Chapter 12

Appendix A: Important safety Instructions..........................................................

121

Important safety instructions........................................................................

122

Chapter 13

Appendix B: Regulations........................................................................................

125

Regulations.....................................................................................................

126

Chapter 14

6

Contents

Содержание CS4300

Страница 1: ...o Oc CS4300 scanner series User Manual Oc CS4300 scanner series Oc User manual...

Страница 2: ...c Technologies B V makes no representation or warranties with respect to the contents hereof and specifically disclaims any implied warranties of merchantability or fitness for any particular purpose...

Страница 3: ...Adobe Systems Incorporated Microsoft Windows Windows XP Windows Server 2003 Windows Vista 32 are either registered trademarks or trademarks of Microsoft Corporation in the United States and or other c...

Страница 4: ...or are about the prevention of damage to your properties Note Attention and Caution The words Note Attention and Caution indicate important parts The attention getters with the corresponding icons In...

Страница 5: ...F 34 The scanner s Self Test Procedure 35 Scanner ready to scan 37 Wake and Sleep modes 38 Automatic Power ON OFF 39 Automatic Power ON OFF 39 Timer Function Scheduling ON OFF Times 40 Automatic Shut...

Страница 6: ...firmware 86 Chapter 9 Oc Scanner Agent 89 Introduction 90 Installation of Oc Scanner Agent 91 Interface of Oc Scanner Agent 92 Chapter 10 Oc Scanner Maintenance 101 Installation of the software 102 Oc...

Страница 7: ...Appendix 129 Reader s comment sheet 130 Addresses of local Oc organisations 132 7 Contents...

Страница 8: ...8 Contents...

Страница 9: ...Chapter 1 About this Manual o...

Страница 10: ...CD ROM that came with your scanner or a newer version Out of date versions of Oc Scanner Agent software may not detect your scanner model Note Windows Compatibility Your scanner and drivers are teste...

Страница 11: ...Chapter 2 Installation o...

Страница 12: ...er or install any scanner software applications Caution The scanner is equipped with a three wire pin grounding type plug If you cannot insert the Remarks Action Note DO NOT YET CONNECT THE SCANNER TO...

Страница 13: ...stall the software 3 Remove the CD ROM when installation is complete Note You must install your scanner s drivers and tools before you connect the scanner or install any scanner software applica tions...

Страница 14: ...Clean the scanner feeding bed This is the flat surface in front of the insertion slot Wipe thor oughly so dirt and dust are not dragged into the scan area with the original 5 Chapter 2 Installation 1...

Страница 15: ...Disengage the scanning area lid locking mechanism 3 Place your thumbs in the inser tion slot and flip the scanning area lid back to its open position 4 The glass plate is now exposed for cleaning 5 Wi...

Страница 16: ...ctor square shaped end through the opening in the back of the scanner until it emerges in front of the cable connector panel Thenconnect the B con nector to the USB connection socket on your scanner C...

Страница 17: ...nnect the A connector end flat end to a USB port on your computer 8 Connect the power cable to the scanner Connect the scanner power cable to the scanner s main power connection socket The main power...

Страница 18: ...ire pin grounding type plug If you cannot insert the plug into your outlet contact your electrician to replace the plug or outlet to ensure a grounded power connec tion Do not try to de feat or ignore...

Страница 19: ...ct scanner installa tion 1 Locate the scanner icon on the Windows System Tray 2 Left double click on the pro gram icon 3 Your scanner is installed and detected if your scanner s name appears at the to...

Страница 20: ...gned 1 Right click on the scanner icon 2 Select Launch Oc Scanner Maintenance 3 Follow the instructions on your screen See Camera Alignment and Cali bration on page 69 Note The best quality of a calib...

Страница 21: ...Chapter 3 The Operator s Panel o...

Страница 22: ...he LED indicators function is to display scanner status in relation to its basic operations such as self testing and media readiness Operation of the buttons and interpretation of the LED indicator li...

Страница 23: ...relation to its basic operations such as self testing and media readiness Operation of the buttons and interpretation of the LED indicator light patterns are de scribed in this section Illustration D...

Страница 24: ...ain Power ON At back of the scanner plug in the power cable and flip the main power switch to ON The scanner starts the selftest procedure which starts with the Init Sequence Init Sequence startup pha...

Страница 25: ...g and black white points Note To maintain optimal conditions the scanner runs new Self adjustment proce dures periodically during the day without lighting the wait LED If the Wait indica tor blinks th...

Страница 26: ...wake and sleep by pressing and holding down the power button or inserting a document for scanning See Power Wake sleep and Adjustment The scanner can automatically be powered up and down wake up slee...

Страница 27: ...completed The scanner should be left alone while Self adjustment is running During Calibration Wait LED lights This is normal The Wait LED is on during Cali bration to indicate that the original shou...

Страница 28: ...d the Wait LED may mean that the scan ning area needs cleaning and the cameras calibrat ed See the section on Maintenance for instruc tions If the Diagnostic and the Wait LEDs con tinue to blink after...

Страница 29: ...y pressing the Paper Reverse key Overview Description How it looks on the scanner Paper Forward and Paper Reverse Keys The Paper Forward Key moves the drawing into the start scan position for manual l...

Страница 30: ...hts yellow when the scanner is ready to scan thick media The pressure platen has been lowered and the media is posi tioned correctly in the scanner The scanner goes automatically out of ATAC mode The...

Страница 31: ...ed No Thick media detected The paper ready indicator will light red if the pressure platen is in a thick media setting a raised pressure platen but no media is detected in the scanner Chapter 3 The Op...

Страница 32: ...Chapter 3 The Operator s Panel 32 Media Control Buttons and LED Patterns...

Страница 33: ...Chapter 4 Turning Power ON OFF Wake Sleep Mode o...

Страница 34: ...at the back of the scanner Press the upper half of the switch marked I to turn the main power to ON Press the lower half of the switch marked 0 to turn the main power to OFF Chapter 4 Turning Power O...

Страница 35: ...up with a self test procedure The scanner s self test procedure consists of two main steps 1 Init Initialization Sequence The scanner loads and tests internal parameters Only initiated when you turn t...

Страница 36: ...oints Starts after the Init Sequence when the scanner s main power switch is turned ON or right away when the scanner goes from sleep to wake mode The panel s LEDs will be lit as shown below Chapter 4...

Страница 37: ...ll know that the self test procedures have completed and the scanner is Ready when the Power LED is lighted green and the other LEDs are off as shown below Chapter 4 Turning Power ON OFF Wake Sleep Mo...

Страница 38: ...ou feed a document into the scanner When you press any button on the panel Advantages with using Wake up and Sleep modes Ready faster You turn the scanner OFF and ON sleep wake up by pressing the powe...

Страница 39: ...ed through your Oc Scanner Agent software There are two automatic power functions Timer function Enter Sleep mode automatically after idle time option Note In order to use automatic power management f...

Страница 40: ...e s wakeup and sleep times in Oc Scanner Agent Timer tab as shown in the example below To set the Timer 1 Open Oc Scanner Agent Double left click the scanner icon in the system tray 2 Select the Timer...

Страница 41: ...e whole work day week Note The Idle time before sleep time setting will still apply and may conflict with your Timer settings Change or disable the Idle time before sleep time setting if it does 9 Whe...

Страница 42: ...ct the Timer Tab 3 Select or deselect the Enter Sleep mode automatically option 4 If you do not select the Enter Sleep mode automatically option you will need to use the manual method for entering sle...

Страница 43: ...elected Wake by pressing any button on the panel or inserting a document for scanning Sleep by pressing and holding down the power button for 3 seconds You can choose to disable automatic entry into S...

Страница 44: ...Chapter 4 Turning Power ON OFF Wake Sleep Mode 44 Automatic Shut Down after Idle Time...

Страница 45: ...Chapter 5 Loading Originals into the Scanner o...

Страница 46: ...oading These 2 loading options are selected in the scan copy application dialogs on your PC Read the instructions about Automatic and Manual loading in the next sections Note The availability of the a...

Страница 47: ...document with the center arrow marking on the scanner bed 3 Push the original into the insertion slot until you feel it contact the rollers and the Paper Ready LED lights green yellow for thick media...

Страница 48: ...ed 3 Push the original into the insertion slot until you feel it contact the rollers and the Paper Ready LED lights green yellow for thick media 4 While holding the original in place with one hand use...

Страница 49: ...n 1 Press the Paper Reverse button to eject the original back to the scanner feeding bed 2 Press the Paper Forward button if you wish to eject the original out the back of the scanner Chapter 5 Loadin...

Страница 50: ...e Fast load option is convenient for batch scanning of originals with robust edges that feed easily Normally with batch scanning you would use the Fast load option in conjunction with automatic loadin...

Страница 51: ...availability of the soft handling load option depends on your scan copy software and its level of compatibility with the scanner model Use Soft handling with 1 Old curled or creased originals that tr...

Страница 52: ...culate the input size for you 2 Set a standard size Common standard sizes are marked on the scanner bed Use these markings to determine which standard size matches the original and then select that si...

Страница 53: ...Chapter 6 Scanning o...

Страница 54: ...cally developed for compatibility with your scanner model See the scanner manufacturer s website for information on scanner software and compat ible third party applications Simple scanning functional...

Страница 55: ...When a button is pressed a scan is initiated and the result is loaded into the application triggered You configure your one touch buttons through Oc Scanner Agent and your compatible scanning software...

Страница 56: ...ftware into Batch Mode This will tell the scanner to start scanning as soon as the document is fed so you don t need to trigger the scan 3 Choose Automatic loading optional for fast and effective load...

Страница 57: ...Chapter 7 Scanning Thick Media o...

Страница 58: ...pasted on thick media such as cardboard foamboards gatorboards etc To do so you will need to fit the insertion slot to the thickness of your original This is done by raising the pressure platen to the...

Страница 59: ...on your operator s panel to set the scanner in ATAC mode 2 The Paper Ready Indicator blinks yellow indicating the scanner is in ATAC mode but not yet ready i e the pressure platen is not yet positione...

Страница 60: ...leave the ATAC mode which means that the Paper Forward and Paper Reverse keys will return to their normal functionality for moving the original forwards and backwards Chapter 7 Scanning Thick Media 60...

Страница 61: ...anner can run Auto Self Adjustment Modifying Stitching Parameters Thick stiff originals will rest on top of the scanner rollers and thus raise a small distance over the glass plate This can lead to ir...

Страница 62: ...Chapter 7 Scanning Thick Media 62 When Scanning in Thick Media Positions...

Страница 63: ...Chapter 8 Maintenance o...

Страница 64: ...lignment Scanner Calibration is easy to perform and most of it is completely automatic Scanner calibration includes camera alignment and calibration of B W and color parameters To run you insert a Cal...

Страница 65: ...he instructions below Caution Do not spray liquids directly onto the scanner glass plate Caution Make sure the scanner power is OFF when using the dust cover Remarks Action Turn scanner power off Pres...

Страница 66: ...scanning area lid back to its open position 2 Clean the glass plate The glass plate is now exposed for cleaning 1 Clean the glass with a lint free cloth and a mild streak free glass cleaner Apply the...

Страница 67: ...l the upper rollers in both rows 4 Dry the platen and rollers completely using separate clean dry lint free cloths Caution Do not spray liquids directly onto the scan area 4 Clean the lower rollers Th...

Страница 68: ...s reengage click 6 Clean the scanner feed area surface Clean also the scanner surface so dirt and dust are not dragged in to the scan area with the original 7 Cover when not in use Cover the scanner w...

Страница 69: ...rect calibration will always require a clean scan area Note The best quality of a calibration is generated after 1 hour warming up of the scanner lamp Remarks Action Turn the scanner power ON Make sur...

Страница 70: ...ted face down Align the sheet s midpoint arrow with the scanner s midpoint ar row and feed the sheet into the scanner Click the wizard s Next button to continue 4 The program aligns and cali brates th...

Страница 71: ...1 Remove the Scanner Calibra tion Sheet from the scanner 2 Return the Scanner Calibra tion Sheet to its protective cover and then place it in the storage folder Store the folder in a dry place and ou...

Страница 72: ...e background platen replacement After receiving a warning by Oc Scanner Agent and replacing the part be sure to reset the part replacement warning flag through the Oc Scanner Agent Status tab Note Reg...

Страница 73: ...off and disconnect the power plug 1 Open the scan area lid Push down on the two lever buttons found near the insertion slot on each side of the lid 2 The scanning area lid locking mechanism should now...

Страница 74: ...ide of the glass plate there is a small lever with a round lever handle on its end Place a finger under both round lever handles on each side of the scanner 6 With both arms pull simultane ously on th...

Страница 75: ...rom the scanner 8 Reverse the above operations to reinsert a new glass plate Carefully set the new glass plate down into the scan area Fit the new glassplate s lever hooks on to the round pins on each...

Страница 76: ...a lid Note It is recommended to clean the new glass plate after inserting it in the scanner and before scan ning Note It is recommended to calibrate after changing the glassplate 11 Chapter 8 Maintena...

Страница 77: ...ent with a fresh whitebackground platen is recommended Oc Scanner Agent monitors the scanner usage and will warn you when it is time for a replacement Caution Turn the scanner power off and disconnect...

Страница 78: ...ear the insertion slot on each side of the lid 2 The scanning area lid locking mechanism should now be disen gaged 3 Place your thumbs in the inser tion slot and flip the scanning area lid back to its...

Страница 79: ...d strip to expose the edge of the white back groundplaten 6 Grip the edge of the white background platen with your fingers and pull to slide it out of the scanner 7 Reverse the steps to insert your ne...

Страница 80: ...the red strip 9 Close the scanning area lid so the locking mechanism reengages Note It is recommended to calibrate after changing the white background platen 10 Chapter 8 Maintenance 80 Replacing the...

Страница 81: ...mp reflector power connectors can be obtained through your dealer Oc Scanner Agent monitors lamp usage and will warn you when it is time for a replace ment Caution Switch the scanner power off and dis...

Страница 82: ...k to detach 3 Lift the cover upwards to free it from the scanner 4 You must remove the whole lamp unit A lamp unit consists of a lamp mounted in a reflector brace and fixed power connec tors 5 Grasp t...

Страница 83: ...ver on the scanner fit the bottom notches in the holes and snap the cover shut The cover must always be closed before turning scanner power ON 9 Test the replacement by turning power and scanner on to...

Страница 84: ...for a replacement Note The dust filters are delivered with the scanner lamp unit Caution Turn the scanner power off and disconnect the power plug Illustration Procedure Action Step Turn the scanner p...

Страница 85: ...nside the bin B Remove the old filter and place a fresh one in the bin 4 Re attach click on the bin to its frame on the underside of the scanner 5 Repeat the process with the second filter 6 Chapter 8...

Страница 86: ...re made to the scanner though its firmware 2 An error is discovered in the firmware version you have in the scanner and Oc recom mends installation of new firmware in which the error is corrected NOTE...

Страница 87: ...firmware is installed by opening the firmware exe file The firmware exe file must first reside on your machine Select the Save target or Save Link option if downloading from the web Chapter 8 Mainten...

Страница 88: ...Chapter 8 Maintenance 88 Downloading new firmware...

Страница 89: ...Chapter 9 Oc Scanner Agent o...

Страница 90: ...n features available from this application Gain visual indication that the scanner is connected to the PC View the scanner s status called the Scanner Mode by moving the mouse over the scanner icon on...

Страница 91: ...all Oc Scanner Agent 1 Insert the CD ROM in your CD driver The setup program is launched automatically 2 Follow the instructions of the setup wizard 3 At the end of the installation the wizard asks if...

Страница 92: ...e of Oc Scanner Agent Start of Oc Scanner Agent There are two ways to start the program From the Windows Start menu select Programs Oc Scanner Agent Chapter 9 Oc Scanner Agent 92 Interface of Oc Scann...

Страница 93: ...tab displays useful messages about what the scanner is currently doing and displays error messages when relevant Scanner mode What the scanner is doing at any given moment Here is a list of the diffe...

Страница 94: ...the error message Not Ready Error detected The scanner test mode is used during technical service Test Mode The scanner is performing test operations to ensure optimal performance light profile corre...

Страница 95: ...e full maintenance process adjustment stitching and calibration Contact your Oc service technician if the problem persists Stitching of Cam era X Y A B or B C or C D failed Note If you encounter anoth...

Страница 96: ...nufacturer Firmware build number Firmware revision User The amount of time your scan ner has been turned on Scanner uptime User The time lapsed since the scan ner last performed auto adjust ment Time...

Страница 97: ...tal length scanned Total roller movement Used to monitor and plan the scanner maintenance Lamp light on Last calibration timestamp Lamp light on It is advised to replace the lamp every 4000 hours of u...

Страница 98: ...erature is essential when making high quality scanning through sensitive CCD s Your scanner needs to warm up before it can start scanning optimally The Timer Settings tab lets you program the scanner...

Страница 99: ...tral power switch has been turned OFF manually and its clock needs to be reset 7 Quick Menu The Oc Scanner Agent quick menu offers an easy way to initiate common scanning ac tions and a direct link to...

Страница 100: ...izard which will guide you through the camera alignment and calibration procedure Note These two options above are available if the Oc Scan and Scanner maintenance have been previously installed on yo...

Страница 101: ...Chapter 10 Oc Scanner Maintenance o...

Страница 102: ...s are installed with Oc Scanner Agent and help you set up correctly your system Install Oc Scanner Maintenance 1 Oc Scanner Maintenance is part of the installtion wizard Start Oc Scanner Maintenance 1...

Страница 103: ...is follow the instructions on the screen For more details about the procedure please refer to the Scanner Maintenance leaflets provided with the software Oc Scanner Maintenance is performed in three...

Страница 104: ...those in another production batch Colour matching and calibration are optimal when using your IT8 Calibration sheet with an IT8 calibration sheet reference data file corresponding to the sheet s produ...

Страница 105: ...tion requires that you are connected to the internet Use Standard IT8 file The standard IT8 file IT8data IT8 comes with the maintenance program and is installed on your system The file can substitute...

Страница 106: ...Chapter 10 Oc Scanner Maintenance 106 Oc Scanner Maintenance program...

Страница 107: ...Chapter 11 Trouble Shooting o...

Страница 108: ...se of the error may be reported immediately through a message on your screen If not open Oc Scanner Agent double left click the scanner icon on your system tray and select the Status tab to view addit...

Страница 109: ...e connec tions and restart the installation from step 1 as described above If you continued installation before installing Oc Scanner Agent see the troubleshooting instructions below Loose interface c...

Страница 110: ...ce type in this guide Need to reinstall I got the Unknown device is found messageandcontin ued installation of the scanner Now the scanner appears as incorrectly in stalled on my sys tem The Oc Scanne...

Страница 111: ...e top of the interface cover Push down to snap the lid open Remove the interface cover with both hands Smart Card is inserted in its slot above the interface connec tions Note The cover must always be...

Страница 112: ...al position i e not a thick media setting When Self Adjustment becomes possible the Wait LED stops flashing but continues to be on until Self Adjustment is completed If the error doesn t disappear tur...

Страница 113: ...ner maintenance then there may be camera position errors that require help for your technical service provider Both wait and diag nostics LEDs flash The pressure platen is in a thick media setting a r...

Страница 114: ...again to scan Error message Pa per Jam Your scanner is continuously monitoring its cameras This error message often appears when the internal glass plate or white background platen is dirty or smudged...

Страница 115: ...n its slot Shut down scanner power and restart to initialize with the smart card data Error message In valid Smart Card for this scanner type Error message No Smart Card found Control that the scanner...

Страница 116: ...ons defined in the Oc Scanner Agent One Touch setup entries are installed on your PC Make sure that the applications defined in the Oc Scanner Agent One Touch setup entries are actually designed to wo...

Страница 117: ...edia thick stiff originals will rest on top of the scanner rollers and thus raise a small distance over the glass plate This can lead to stitching irregularities In such cases the stitching parameters...

Страница 118: ...remedy run a full scanner maintenance session cleaning alignment and cali bration The last two maintenance steps are also vital as the scanner will have memorized dirt specs in previous calibra tions...

Страница 119: ...ove the cursor over the copy button Check the information Examples Media to small The Quality still not OK Step 1 Original type selection is not correct Select a different original type Example Mixed...

Страница 120: ...rough the action suggested on your PC screen the error and its remedy is not de scribed in this users guide the system fails to report the error on your screen 1 Before calling technical assistance pr...

Страница 121: ...Chapter 12 Appendix A Important safety Instructions o...

Страница 122: ...r make sure that the total ampere ratings of the products plugged into the extension cord does not exceed the extension card ampere rating Make sure that the total rating of all products plugged into...

Страница 123: ...ctions in this manual Improper adjustment of controls other than those mentioned in this manual may result in per manent damage and will at best require extensive work by a qualified technician to res...

Страница 124: ...Chapter 12 Appendix A Important safety Instructions 124 Important safety instructions...

Страница 125: ...Chapter 13 Appendix B Regulations o...

Страница 126: ...ergy and if not installed and used in accordance with the instruction manual may cause harmful interference to radio communications Operation of this equipment in a residential area is likely to cause...

Страница 127: ...limit requirement in SJ T11363 2006 X Indicates that this toxic or hazardous substance contained in at least one of the ho mogeneous materials used for this part is above the limit requirement in SJ...

Страница 128: ...Chapter 13 Appendix B Regulations 128 Regulations...

Страница 129: ...Chapter 14 Appendix o...

Страница 130: ...and arrangement page layout chapter order etc O Yes O No Could you find the information you were looking for O Always O Most of the times O Sometimes O Not at all What did you use to find the required...

Страница 131: ...Company Phone Address City Country Please return this sheet to Oc Technologies B V For the attention of ITC User Documentation P O Box 101 5900 MA Venlo The Netherlands Send your comments by E mail to...

Страница 132: ...http www oce com cn Oc Canada Inc 4711 Yonge Street Suite 1100 Toronto Ontario M2N 6K8 Canada http www oce ca Oc Danmark a s Vallensb kvej 45 2605 Br ndby Denmark http www oce dk Oc Czech Republic ltd...

Страница 133: ...my Oc Belgium S A Rue Astrid 2 A 1143 Luxembourg Belair http www oce lu Oc Norge A S Postboks 4434 Nydalen Gjerdrums vei 8 0403 Oslo Norway http www oce no Oc Mexico S A de C V Prolongaci n Reforma 12...

Страница 134: ...m http www oce co uk Oc Nederland B V P O Box 800 5201 AV s Hertogenbosch The Netherlands http www oce nl Oc North America Inc 5450 North Cumberland Avenue Chicago IL 60656 USA http www oceusa com Not...

Страница 135: ...ibration 64 69 103 Camera Alignment 69 Camera allignment 103 Caution 4 clean 64 Cleaning 64 glass plate 65 rollers 65 D Documentation 10 Download 86 E Error 92 108 109 error 117 Error indicator 112 F...

Страница 136: ...laten 77 S Safety information 4 scan 117 Scanner Agent 42 90 92 Scanner installation 109 scanner maintenance 102 Scanning Thick Media 58 Setting the input size 52 Sleep mode 38 sleep mode 42 Soft hand...

Отзывы: