background image

CS240/CS231

12-3

Managing jobs

12

12

Managing jobs

12.1

Overview of job list screen

Jobs

Specifying the desired copy settings, then pressing the [Start] key queues the copy operation in this machine. 
This queued operation is called a job. In the same way, operations for making scans and computer printouts 
are also queued as jobs.

-

Jobs that are being performed and the job log can be checked from the Job List screens.

-

Jobs are printed starting with the one at the top of the Current Jobs list.

-

Jobs are numbered in the order that they were programmed and are queued to be performed (printed).

2

Note 

The job number identifies the job; it does not indicate the printing order. In addition, the job number 
does not change until the job is deleted.

By using the "Increase Priority" function, the selected job can be moved to the front of the queue so 
that it is printed first.

Multi-job feature

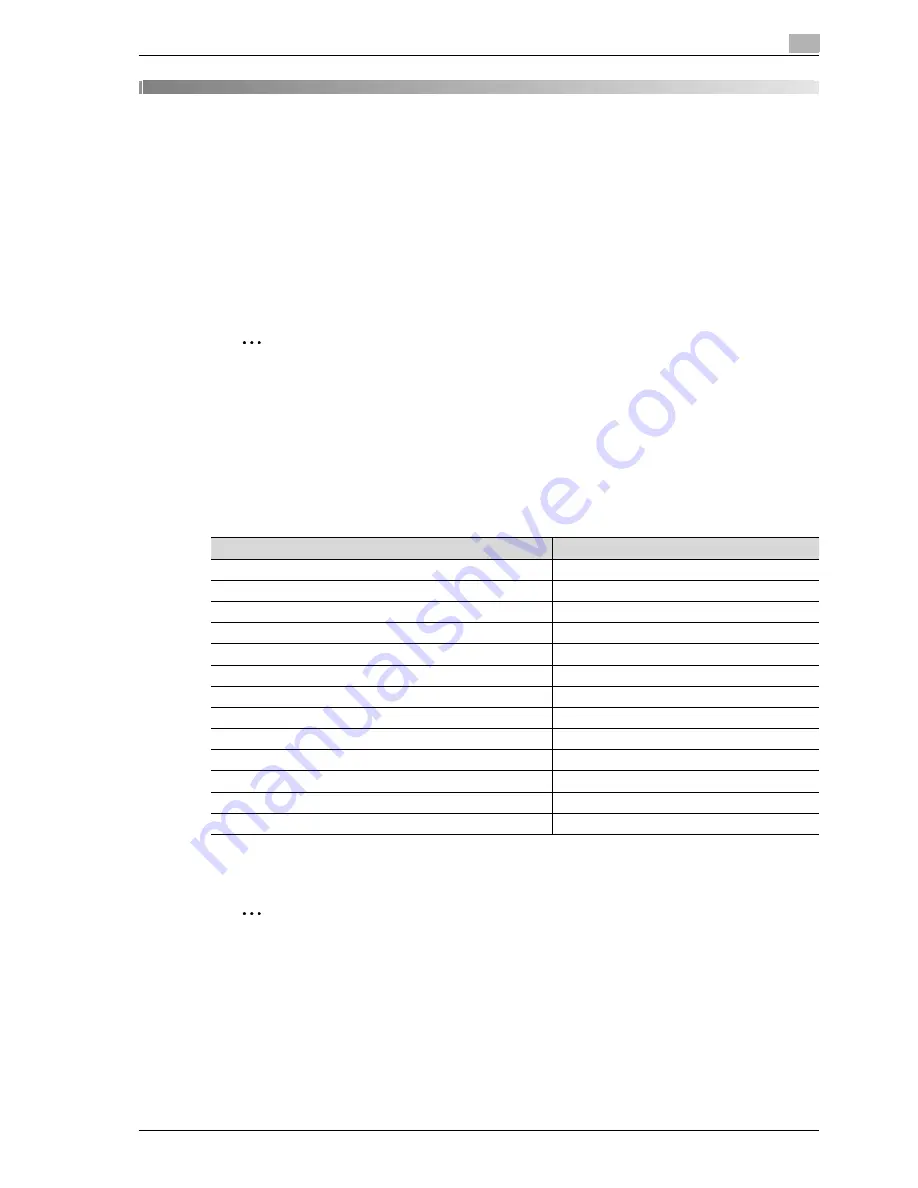
While one job is being printed, another job can be queued. A total of 251 jobs can be queued.

The number of jobs possible for each operation is listed below.

*The values listed above are for reference and may differ from the actual values depending on other settings.

When one job is finished being printed, the next queued job automatically begins.

2

Note 

Up to 251 jobs, including print jobs, scanner transmission jobs, fax transmission jobs and received 
fax/save jobs, can be queued.

Operation

Number of jobs

Copy

5

Interrupted copy

1

Scan

5

TWAIN (Push, Pull)

1

Print

10

Fax (Quick Memory TX)

1

Fax (Memory TX)

50

Fax (Timer TX)

20

Fax RX

100

Fax (Polling RX)

1

Fax (Polling TX)

1

Sharing

56

Total

251

Содержание CS240

Страница 1: ...Oc CS240 CS231 Copy Operations...

Страница 2: ......

Страница 3: ...or 1 9 Improving the copy color quality 1 9 Separately copying a page spread 1 9 Repeating copy images 1 9 Printing the enlarged image on multiple pages 1 9 Creating booklets from copies of pamphlets...

Страница 4: ...y label 2 13 Ozone release 2 14 Acoustic noise for European users only 2 14 For EU member states only 2 14 2 3 Caution notations and labels 2 15 2 4 Space requirements 2 16 2 5 Operation precautions 2...

Страница 5: ...pecifying the document size Original Size settings 4 18 Copying documents of mixed sizes Mixed Original setting 4 20 Loading folded Z folded documents 4 22 Selecting the document orientation Original...

Страница 6: ...11 5 5 Copying with programmed copy settings Mode Memory 5 12 5 6 Displaying function descriptions Help 5 14 Overview of help screens 5 14 Displaying main help screens 5 16 5 7 Specifying control pane...

Страница 7: ...XXX needs to be replaced appears 6 71 6 8 When the message Now remote operating Please do not turn off the power appears 6 72 6 9 Simple troubleshooting 6 73 6 10 Main messages and their remedies 6 76...

Страница 8: ...rror image Mirror Image function 9 42 9 10 Adding a background color to copies Background Color function 9 45 9 11 Adjusting the copy color quality Color Adjust parameters 9 47 To adjust the color adj...

Страница 9: ...ft partition glass 11 3 Control panel 11 4 Document pad 11 4 Paper take up rollers 11 4 Electrostatic charger wire 11 5 Print head 11 5 11 2 Viewing counters Meter count 11 7 Viewing counters 11 7 Vie...

Страница 10: ...ide 2 13 42 Centering Duplex 2nd side 13 43 13 8 Finisher adjustment 13 45 2 position staple pitch adjustment 13 45 Center staple position adjustment 13 46 Half fold position 13 48 Tri fold position a...

Страница 11: ...d rules 13 84 Conditions of the password rules 13 84 13 16 Enhanced security settings 13 85 14 Appendix 14 1 Entering text 14 3 Enlarging the keyboard 14 4 To type text 14 5 List of available characte...

Страница 12: ...Contents 10 CS240 CS231...

Страница 13: ...1 Introduction...

Страница 14: ......

Страница 15: ...4 The names OpenSSL Toolkit and OpenSSL Project must not be used to endorse or promote products derived from this software without prior written permission For written permission please contact openss...

Страница 16: ...on and or other materials provided with the distribution 3 All advertising materials mentioning features or use of this software must display the following acknowledgement This product includes crypto...

Страница 17: ...oom ratios By specifying separate horizontal and vertical zoom ratios copies of the original can be resized as desired For details refer to Typing in separate X and Y zoom ratios Individual Zoom setti...

Страница 18: ...pied and stapled together For details refer to Stapling copies Staple settings on page 4 65 Punching holes in copies Holes for filing can be punched in the copies For details refer to Punching holes i...

Страница 19: ...tings on page 4 55 Inserting paper between copies of OHP In order to prevent OHP from becoming stuck to each other a page interleaf can be inserted between the transparency copies For details refer to...

Страница 20: ...he front side For details refer to Specifying pages to be printed on the front side Chapters function on page 9 33 Copying with reversed colors An original can be copied with the light and dark colore...

Страница 21: ...n page 9 47 Separately copying a page spread A page spread such as in an open book or catalog can be copied onto separate pages For details refer to Producing separate copies of each page in a page sp...

Страница 22: ...fer to Adding a binding margin to copies Page Margin function on page 9 65 Adjusting the image to fit the paper size When the copy paper is larger than the original copies can be printed so that the o...

Страница 23: ...r to Managing jobs on page 12 3 Programming copy settings Frequently used copy settings can be programmed and recalled to be used with other copy jobs For details refer to Registering copy programs Mo...

Страница 24: ...ies and to ensure safe use of the machine Sequence of action 1 The number 1 as formatted here indicates the first step of a sequence of actions 2 Subsequent numbers as formatted here indicate subseque...

Страница 25: ...ual the first value always refers to the width of the paper shown as Y in the illustration and the second to the length shown as X Paper orientation Lengthwise w If the width Y of the paper is shorter...

Страница 26: ...manual for details on saving data in user boxes retrieving data from user boxes and transferring data Network Scanner Operations This manual contains descriptions on specifying network settings for s...

Страница 27: ...agencies Internal revenue stamps canceled or uncanceled Passports Immigration papers Motor vehicle licenses and titles House and property titles and deeds General Identification cards badges or insig...

Страница 28: ...1 Introduction 1 16 CS240 CS231...

Страница 29: ...2 Installation and operation precautions...

Страница 30: ......

Страница 31: ...r 01E_C 2 Note Some parts of the contents of this section may not correspond with the purchased product Warning and precaution symbols The following indicators are used on the warning labels or in thi...

Страница 32: ...er the laser beam source could cause blindness Warning Symbol Use only the power cord supplied in the package If a power cord is not supplied only use the power cord and plug that is specified in POWE...

Страница 33: ...urrent capacity grounding and may result in fire or shock If proper wall outlet is not available the customer shall ask qualified electrician for the installation Do not use a multiple outlet adapter...

Страница 34: ...e power plug from the outlet more than one time a year and clean the area between the plug terminals Dust that accumulates between the plug terminals may cause a fire Warning Symbol Connect the power...

Страница 35: ...mechanical breakdown Do not let any object plug the ventilation holes of this product Heat could accumulate inside the product resulting in a fire or malfunction Do not use flammable sprays liquids or...

Страница 36: ...around the fusing unit etc which are indicated by a Caution HOT caution label Warning Symbol Do not throw the toner cartridge or toner into an open flame The hot toner may scatter and cause burns or...

Страница 37: ...cessive holidays When the optional Fax Kit FK 502 is not installed 7 CAUTION Ignoring this cautions could cause injury or damage to property Do not ignore this safety advices Caution Symbol Unplug the...

Страница 38: ...harmful interference in which case the user will be required to correct the interference at his own expense 7 WARNING The design and production of this unit conform to FCC regulations and any changes...

Страница 39: ...on This machine is certified as a Class 1 laser product This means the machine does not produce hazardous laser radiation Internal laser radiation 7 WARNING This product employs a Class 3B laser diode...

Страница 40: ...performance of procedures other than those specified in this manual may result in hazardous radiation exposure This is a semiconductor laser The maximum power of the laser diode is 30 mW and the wavel...

Страница 41: ...Betrakta ej str len For Norway users 7 ADVARSEL Dette en halvleder laser Dersom apparatet brukes p annen m te enn spesifisert i denne bruksanvisning kan brukeren utsettes for unsynlig laserstr ling so...

Страница 42: ...availler dans un environnement r unissant des conditions de confort sant et de s curit il est pr f rable de bien a rer la pi ce ou se trouve l appareil Acoustic noise for European users only Maschinen...

Страница 43: ...recautions 2 2 3 Caution notations and labels Safety precaution notations and labels appear on this machine at the following positions Be very careful that an accident does not occur when operations s...

Страница 44: ...ar maintenance can easily be performed adhere to the recommended space requirements detailed below 2 Reminder Be sure to allow a clearance of 100 mm 4 in or more at the back of this machine for the ve...

Страница 45: ...ents for correct operation of the machine are as follows Temperature 10 C 50 F to 30 C 86 F with fluctuations of no more than 10 C 18 F within an hour Humidity 15 to 85 with fluctuations of no more th...

Страница 46: ...2 Installation and operation precautions 2 18 CS240 CS231...

Страница 47: ...3 Before making copies...

Страница 48: ......

Страница 49: ...501 Installed to increase the telephone lines available for faxing 5 Large capacity unit LU 301 Can be loaded with up to 3 000 sheets of plain A4 size paper Can be loaded with the following A4 size p...

Страница 50: ...mp to documents that have been scanned For details refer to the User manual Fax Operations Option 13 Scan accelerator kit SA 501 Creates images at high speed when sending scans 14 Security kit SC 503...

Страница 51: ...Position Half Fold Center Staple Fold and Tri Fold are available 8 Punch kit PK 512 Installed onto the Finisher FS 517 FS 608 to allow hole punching to be used 9 Punch kit PK 513 Installed onto the Fi...

Страница 52: ...s or 10 en velopes 4 Paper empty indicator Flashes in orange when very few pages remain in the paper tray and lights up when the tray is empty 5 Tray 4 Can be loaded with up to 1 000 sheets of plain p...

Страница 53: ...ing the waste toner box and when replacing the imaging unit when cleaning the print head 10 Upper front door Opened when replacing the toner cartridge 11 Output tray Collects printed pages 12 Control...

Страница 54: ...ase lever Used to open the automatic duplex unit door when clearing pa per misfeeds 19 Upper right side door release lever Used to open the upper right side door 20 Bypass tray door Opened when cleari...

Страница 55: ...ORT2 Used for connecting a general subscriber line This jack is used when the optional fax multi line is installed 33 Jack for connecting a telephone TEL PORT1 Used for connecting the cord from a tele...

Страница 56: ...1 Network connector 10Base T 100Base TX 1000Base T Used for connecting the network cable when this machine is used for network printing and network scanning 42 Ozone filter Collects the ozone generate...

Страница 57: ...cleaning tool Used to clean the surface of the print head glass for example when replacing the imaging unit 6 Waste toner box Collects used waste toner 7 Imaging unit Creates the print image 8 Charge...

Страница 58: ...S231 12 Document scales Position the document so that it is aligned with the scales Also use the scales to measure the loaded document 13 Misfeed clearing dial Turned when clearing paper misfeeds with...

Страница 59: ...al transport unit cover Opened when clearing paper misfeeds within the horizontal transport unit 7 Misfeed clearing dial FN3 Turned when clearing paper misfeeds within the finisher 8 Guide lever FN2 O...

Страница 60: ...K 512 Punch kit PK 513 No Part name Description 14 Punch kit Punches holes for filing printed pages when the punch kit is in stalled onto Finisher FS 517 15 Punch scrap box Removed when emptying punch...

Страница 61: ...r FN4 Opened when clearing paper misfeeds 6 Guide lever FN1 Opened when clearing paper misfeeds 7 Misfeed clearing dial FN3 Turned when clearing paper misfeeds within the finisher 8 Guide lever FN2 Op...

Страница 62: ...lever FN10 Opened when clearing paper misfeeds 17 Staple cartridge holder Removed from the stacker unit when clearing jammed staples or when replacing the staple cartridge No Part name Description No...

Страница 63: ...Guide lever FN1 Raised when clearing paper misfeeds within the finisher 8 Punch scrap box FN3 1 Removed when emptying punch scraps that have accumulated from using the Punch settings 9 Guide lever FN...

Страница 64: ...S240 CS231 Saddle stitcher SD 505 Mailbin kit MT 502 Saddle stitcher SD 505 1 2 No Part name Description 1 Output tray Collects printed pages 2 Misfeed clearing door Opened when clearing paper misfeed...

Страница 65: ...ailbin kit MT 502 4 3 5 No Part name Description 3 Mailbins Collects printed pages 4 Misfeed clearing door Opened when clearing paper misfeeds within the mailbin kit 5 Guide lever FN7 Moved when clear...

Страница 66: ...clearing cover Opened when clearing paper misfeeds 2 Upper door Opened when loading paper 3 Paper empty indicator Flashes in orange when very few pages remain in the paper tray and lights up when the...

Страница 67: ...using the finisher Do not place objects on top of the finisher and below the paper output trays otherwise the machine may be damaged CS240 Do not place your hand below or rest your foot on top of the...

Страница 68: ...s to enter Interrupt mode While the machine is in Interrupt mode the indicator on the Interrupt key lights up in green and the message Now in Interrupt mode appears on the touch panel To cancel Interr...

Страница 69: ...the indicator on the Power Save key lights up in green and the touch panel goes off To cancel Power Save mode press the Power Save key again 18 Access key If user authentication or account track sett...

Страница 70: ...ns When the machine is ready to begin making copies after being turned on the Basic screen appears To activate a function or to select a setting lightly touch the desired button in the touch panel Bas...

Страница 71: ...creen for specifying the settings 3 Icon display area Icons indicating the status of jobs and the machine are dis played 4 Separate Scan button Touch to scan the document in separate batches A documen...

Страница 72: ...ine regardless of the current mode Indicates that an error occurred during an image stabilization operation a print op eration or a scan operation Touch this icon to view a screen containing a warning...

Страница 73: ...ted to the left Adjust the control panel to the angle that allows for easy operation To adjust the angle of the control panel 1 Pull the control panel release lever toward you and then push down on th...

Страница 74: ...l panel The control panel stops at the lower position 3 To tilt the control panel to the left hold the bottom of the control panel and then tilt the panel to the left 4 To return the control panel to...

Страница 75: ...message Warming up Ready to scan appears on the touch panel and the indicator on the Start key lights up in blue indicating that a job can now be queued The default settings are the settings that are...

Страница 76: ...ueued jobs 7 Check that the document has finished being scanned and then position the next document 8 Specify new copy settings and the desired number of copies and then press the Start key If the Cop...

Страница 77: ...rned off Do not turn off the machine with the main power switch or the Power auxiliary power key while it is making copies or printing otherwise a paper misfeed may occur Do not turn off the machine w...

Страница 78: ...Auto Reset operation As the factory default the Copy mode screen is displayed after 1 minute Detail The mode screen that is displayed when the System Auto Reset operation is performed can be changed...

Страница 79: ...eparation time than Low Power mode As the factory default the machine enters Sleep mode after 30 minute To recover from Sleep mode 1 Press the Power Save key 2 The machine can receive jobs while it is...

Страница 80: ...ettings mode For details refer to System settings on page 13 22 Automatically turning the machine on off weekly timer The machine can be set to automatically enter Sleep mode according to a usage sche...

Страница 81: ...of 60 or more cannot be specified 5 Touch OK The message Ready to copy appears on the touch panel 2 Note If the message It is now non business hour Set the Sleep Mode time or It is now non business h...

Страница 82: ...for the server name 0 If machine authentication or external server authentication has been set a total of 1 000 users and accounts can be registered 1 Touch User Name If a list of user names can be di...

Страница 83: ...appears with the name of the default server Touch Server Name to display the names of the registered servers and then select the desired server For details on specifying settings for an external serve...

Страница 84: ...ccount Track has been set to Synchronize the account track screen does not appear if the users and accounts are synchronized 6 Make copies using the desired copy settings 7 When you are finished print...

Страница 85: ...d by the administrator Controlling each account s use of this machine account track If the account track settings have been specified by the administrator only users of registered accounts can use thi...

Страница 86: ...efore making copies 3 40 CS240 CS231 2 Type in the account name and then touch OK 3 Touch Password 4 Type in the password and then touch OK 5 Touch Login or press the Access key The Basic screen appea...

Страница 87: ...nts can be managed in Administrator Settings mode available from the Utility mode Settings should be specified by the administrator If Account Track Input Method on the General Settings screen of Admi...

Страница 88: ...ometric type authenticates the user by scanning the vein patterns in the finger Detail For details on specifying authentication settings for the authentication unit biometric type and on registering f...

Страница 89: ...has been specified 1 Type in the user name 2 Place your finger on the authentication unit biometric type The basic screen appears 2 Note If the authentication unit biometric type cannot be used it is...

Страница 90: ...are not positioned correctly for the loaded paper the paper size will not be correctly detected Be sure to adjust the lateral guides to the size of the loaded paper 3 Load the paper into the tray so...

Страница 91: ...pecial paper is loaded the paper type setting must be specified For details refer to Specifying a setting for special paper on page 8 19 2 Reminder Be careful not to touch the film For details on sele...

Страница 92: ...How many sheets of paper and other media can be loaded Do not load so many sheets of plain paper that the top of the stack is higher than the mark 3 Lower the paper take up roller and then close tray...

Страница 93: ...How many sheets of paper and other media can be loaded Do not load so many sheets of plain paper that the top of the stack is higher than the mark 3 Lower the paper take up roller and then close tray...

Страница 94: ...d paper loaded Flatten the paper before loading it How many sheets of paper and other media can be loaded Do not load so many sheets of plain paper that the top of the stack is higher than the mark 3...

Страница 95: ...bypass tray When loading large sized paper pull out the tray extension 2 With the side to be printed on facing down insert the paper as much as possible into the feed slot 3 Slide the lateral guides...

Страница 96: ...s on selecting a setting for non standard size paper refer to Specifying a non standard paper size Custom Size settings on page 8 12 For details on selecting a setting for wide paper refer to Selectin...

Страница 97: ...air is removed and make sure that the folds of the flaps are firmly pressed otherwise the envelopes may become wrinkled or a paper misfeed may occur When loading envelopes load them with the flap side...

Страница 98: ...ypass tray Be sure to load letterhead paper so that the side to be printed on faces up 2 Note The image will be printed on the surface of the paper facing down when the paper is loaded into the bypass...

Страница 99: ...4 Basic copy operations...

Страница 100: ......

Страница 101: ...ay has reached its capacity Remove paper from the tray indicated by may appear even if the paper was removed from the output trays For details on multiple jobs refer to Multi job feature on page 12 3...

Страница 102: ...a Zoom setting refer to page 4 35 For details on selecting the document and copy settings refer to page 4 45 For details on selecting the document image quality refer to page 4 52 For details on sele...

Страница 103: ...C clear key in the keypad and then specify the correct number of copies 5 Press the Start key To stop the copy operation being performed press the Stop key For details refer to page 4 81 The next copy...

Страница 104: ...setting specified first is given priority A warning message appears Operations where the setting specified last is given priority The procedure for setting the Booklet function after selecting the 2...

Страница 105: ...the 2 Position Staple setting after setting the Booklet function is described below 1 Set the Booklet function 2 Select the 2 Position Staple setting The message Cannot be set with Booklet appears and...

Страница 106: ...is not loaded correctly it may not be fed in straight or a document misfeed or damage to the document may occur 0 If the document is loaded in any orientation other than with the top of the document...

Страница 107: ...y not be detected 0 Do not place objects weighing more than 2 kg on the original glass In addition do not press down extremely hard on a book spread on the original glass otherwise the original glass...

Страница 108: ...rent or translucent documents place a blank sheet of paper of the same size as the document over the document For bound documents spread over two facing pages such as a book or magazine position the t...

Страница 109: ...acity of the ADF is 100 sheets of plain paper 80 g m2 or 38 sheets of thick paper 210 g m2 0 The output method used with the Separate Scan setting can be set to Page Print or Batch Print As a default...

Страница 110: ...To change the scanning settings touch Change Setting For details on changing the scanning settings refer to Changing scan settings for each document on page 4 28 The buttons that appear in the screen...

Страница 111: ...utput Method parameter is set to Batch Print touch Print or press the Start key If the Separate Scan Output Method parameter is set to Batch Print the copy settings can be changed To change the copy s...

Страница 112: ...te Scan setting can be set to Page Print or Batch Print As a default Page Print is selected 0 For details on the output method used with the Separate Scan setting refer to Copier settings on page 13 1...

Страница 113: ...ch OK For details on specifying the binding position refer to Selecting double sided copies on page 4 47 7 Touch Original Direction select the orientation of the loaded document and then touch OK For...

Страница 114: ...settings touch Change Setting For details on changing the scanning settings refer to Changing scan settings for each document on page 4 28 The buttons that appear in the screen for changing the setti...

Страница 115: ...utput Method parameter is set to Batch Print touch Print or press the Start key If the Separate Scan Output Method parameter is set to Batch Print the copy settings can be changed To change the copy s...

Страница 116: ...an be produced after specifying the document scanning size if the document size cannot be detected automatically or if you wish to specify a certain document size 1 Position the document to be copied...

Страница 117: ...ct the dimension use the keypad to specify the desired value and then touch OK If a value outside the allowable range is specified in the Custom Size screen the message Input Error appears If Input Er...

Страница 118: ...it may not be fed in straight or a document misfeed or damage to the document may occur 1 Slide the adjustable lateral guides of the ADF to fit the size of the largest page The possible combinations...

Страница 119: ...4 21 Basic copy operations 4 4 In the Basic screen touch Original Setting The Original Setting screen appears 5 Touch Mixed Original To cancel the Mixed Original setting touch Mixed Original again to...

Страница 120: ...document are scanned at that size 1 Position the document to be copied Unfold folded documents before loading them into the ADF If the document is copied without being unfolded a paper misfeed may occ...

Страница 121: ...original glass Icon Description Select this setting for a document load ed with the top toward the back of this machine Select this setting for a document load ed with the top toward the front of thi...

Страница 122: ...the document refer to Feeding the document on page 4 8 2 In the Basic screen touch Original Setting The Original Setting screen appears 3 Touch Original Direction The Original Direction screen appears...

Страница 123: ...s loaded with the binding margin at the left Right Select this setting if the document is loaded with the binding margin at the right Top Select this setting if the document that is loaded has a bindi...

Страница 124: ...8 When loading a document with a binding margin position the top of the document toward the back of the machine 2 In the Basic screen touch Original Setting The Original Setting screen appears 3 Touch...

Страница 125: ...a document loaded into the ADF 2 Note For details on cleaning the left partition glass refer to Left partition glass on page 11 3 1 Load the document into the ADF For details on loading the document r...

Страница 126: ...e scanned from the original glass the scan settings can be changed for each document The following procedure describes how to change the settings when the Separate Scan setting is used 1 Position the...

Страница 127: ...OK The buttons that appear in the screen for changing the settings differ depending on the specified settings Settings for the following can be changed 1 Sided 2 Sided Binding Position Zoom Frame Eras...

Страница 128: ...etails on specifying the Frame Erase setting refer to Erasing specified areas of copies Frame Erase function on page 9 73 The Center Erase screen appears only when the Book Scanning function is select...

Страница 129: ...o print the copy in black and white regardless of whether the scanned document is in color or in black and white Single Color Select this setting to print copies in the specified color regardless of w...

Страница 130: ...able Color combinations other than those displayed are not available If the Single Color setting was selected touch the button for the desired color and then touch OK Touch and to display other availa...

Страница 131: ...er on page 8 19 As the factory default Auto is selected The Auto Zoom setting and the Auto Paper setting cannot both be selected at the same time If the Auto Zoom setting was selected the Zoom screen...

Страница 132: ...appropriate zoom ratio is selected based on the size of the loaded document and the specified paper size For details on the Auto Zoom setting refer to Automatically selecting the zoom ratio Auto zoom...

Страница 133: ...ased on the size of the loaded document and the specified paper size 0 If the Auto Zoom setting is selected and an enlargement is to be copied on paper larger than the document load the document with...

Страница 134: ...y that is the same size as the document 100 is produced 0 As the factory default Full Size is selected 0 Touch to enlarge the zoom ratio and touch to reduce the zoom ratio in 0 1 increments 1 In the B...

Страница 135: ...r appears Type a value within the allowable range If the value was incorrectly entered press the C clear key to erase the value and then specify the correct value 0 The entered zoom ratio can be store...

Страница 136: ...original document size and centered in the copy 0 As the factory default Full Size is selected 0 The zoom ratio of the Minimal setting can be changed between 90 0 and 99 9 For details on changing the...

Страница 137: ...ng from common standard document sizes to standard paper sizes are preset 0 As the factory default Full Size is selected 1 In the Basic screen touch Zoom The Zoom screen appears 2 Touch the button for...

Страница 138: ...ection between 25 0 and 400 0 By combining different horizontal and vertical zoom ratios the copy image can be adjusted as shown below 0 If a value outside the allowable range is specified the message...

Страница 139: ...m ratio between 25 0 and 400 0 for the X direction 4 Touch Y under Set Individual Zoom and then use the keypad to type in the desired zoom ratio between 25 0 and 400 0 for the Y direction To cancel ch...

Страница 140: ...t Full Size is selected 0 Touch to enlarge the zoom ratio and touch to reduce the zoom ratio in 0 1 increments 0 Stored zoom ratios can be changed to desired zoom ratios For details on storing zoom ra...

Страница 141: ...lue and then specify the correct value 0 To store a Minimal zoom ratio type in the desired zoom ratio between 90 0 and 99 9 0 The default zoom ratios 400 0 200 0 and 50 0 are stored When a new zoom ra...

Страница 142: ...uch the button or Minimal where the new zoom ratio is to be stored To cancel the setting and select the default press the Reset key The specified zoom ratio is stored 6 Touch OK and then touch OK in t...

Страница 143: ...ginal Copy settings Description 1 Sided 1 Sided Select this setting to produce single sided copies from single sided doc uments 1 Sided 2 Sided Select this setting to produce one double sided copy fro...

Страница 144: ...binding margin and the orientation of the loaded document otherwise the copies will not be printed as desired If the binding position for the document is set to Auto the position of the binding margin...

Страница 145: ...erwise the copies will not be printed as desired If the binding position for the document is set to Auto the position of the binding margin is automatically selected A binding margin along the long si...

Страница 146: ...le sided document select the binding positions for the document and the copy and then touch OK 4 Touch Original Direction select the orientation of the loaded document and then touch OK For details on...

Страница 147: ...size The zoom ratio that is selected can be changed manually 2 Note As the factory default Auto Display Zoom Ratio is selected The Auto Zoom for Combine Booklet parameter in Utility mode can be set s...

Страница 148: ...ecifying the position of the binding margin refer to Selecting the position of the binding margin Binding Position settings on page 4 25 For details on specifying the document orientation refer to Sel...

Страница 149: ...aper arrangement is selected can be viewed in the touch panel However this appears only if the Left Pane Display Default parameter in Utility mode is set to Check Job Settings If 2in1 was selected the...

Страница 150: ...ining both text and images such as pamphlets or catalogs Photo Photo Paper Select this setting when printing photos from documents onto photo graphic paper Select this setting to produce better reprod...

Страница 151: ...page 4 8 2 In the Basic screen touch Quality Density The Quality Density screen appears 3 Touch the button for the quality setting most appropriate for the loaded document For a document that contain...

Страница 152: ...y the Photo Type screen Touch the button for the appropriate setting and then touch OK For a document that contains maps touch Map For a document that contains faint text touch Dot Matrix Original For...

Страница 153: ...e background color of the document can be adjusted to one of nine levels Each time Light or Dark is touched the background density is lightened or dark ened by one level Touch Standard to select the s...

Страница 154: ...reen appears 3 Select the desired Density setting Each time Light or Dark is touched the density is lightened or darkened by one level To select the center setting default setting touch Standard To ca...

Страница 155: ...und Removal screen appears 3 Select the desired Background Removal setting Each time Light or Dark is touched the density is lightened or darkened by one level To select the third setting from the rig...

Страница 156: ...uality Density screen appears 2 Touch Text Enhancement The Text Enhancement screen appears 3 Select the desired text density setting Each time Lighter Text or Darker Text is touched the density is lig...

Страница 157: ...a glossy finish Glossy setting 1 In the Basic screen touch Quality Density The Quality Density screen appears 2 Touch Glossy To cancel the Glossy setting touch Glossy again to deselect it To cancel t...

Страница 158: ...Mixed Original setting is selected 2 Note From Administrator Settings mode the machine can be set so that copies are fed out without being shifted when the finisher is installed As a factory default...

Страница 159: ...ies The copies can also be bound with staples at the same time Center Staple Fold CS231 Select this setting to fold copies The copies can also be bound with staples at the same time The Center Staple...

Страница 160: ...an alternating w and v pattern if the following conditions are met A4 or B5 size paper is used Paper of the same size and type is loaded with the w orientation in one paper tray and with the v orienta...

Страница 161: ...231 4 63 Basic copy operations 4 1 In the Basic screen touch Finishing The Finishing screen appears 2 Touch Sort To separate each set of copies touch Yes under Offset 3 Touch OK The Basic screen appea...

Страница 162: ...ditions are met A4 or B5 size paper is used Paper of the same size and type is loaded with the w orientation in one paper tray and with the v orientation in another tray The Auto Paper setting is sele...

Страница 163: ...nstalled 1 In the Basic screen touch Finishing The Finishing screen appears 2 Touch Output Tray 3 Select the output tray where copies are to be fed and then touch OK The Basic screen appears again Sta...

Страница 164: ...nisher FS 608 3 There are five Foolscap sizes 220 e 330 mm w 8 1 2 e 13 w 8 1 4 e 13 w 8 1 8 e 13 1 4 w and 8 e 13 w Any one of these sizes can be selected For details contact your technical represent...

Страница 165: ...None Tray Paper weight Paper size Loading capacity Finishing tray 1 Plain paper 64 g m2 to 90 g m2 A3 w to A5 v When the stack is 32 mm high or contains 200 sheets or 20 sets Thick paper 1 91 g m2 to...

Страница 166: ...length is 297 mm or less the long side of the paper is stapled If the document length is more than 297 mm the short side of the paper is stapled If Auto is selected for the stapling position load the...

Страница 167: ...entation Original Direction settings on page 4 23 2 Note The Punch settings are available only if the punch kit is installed on the optional finisher When Punch kit PK 512 and or Finisher FS 517 FS 60...

Страница 168: ...s the holes are punched along the long side of the paper If the document length is more than 297 mm the holes are punched along the short side of the paper If Auto is selected for the stapling positio...

Страница 169: ...er FS 608 is installed or finisher FS 519 is installed with the saddle stitcher attached Copies can be folded in three only if Finisher FS 608 is installed Setting Description Compatible models CS240...

Страница 170: ...he Finishing screen appears 2 Touch Fold Bind The Fold Bind screen appears Paper weight Paper size Plain paper 64 g m2 to 90 g m2 A3 w B4 w A4 w 12 1 4 e 18 w 11 e 17 w 8 1 2 e 14 w 8 1 2 e 11 w 8K w...

Страница 171: ...heets of 90 g m2 paper maximum of 60 pages 1 sheet of 64 to 209 g m2 paper 14 sheets of 64 to 90 g m2 paper maximum of 60 pages Maximum of 13 sheets of 91 to 120 g m2 paper Maximum of 10 sheets of 121...

Страница 172: ...ing screen appears 2 Touch Center Staple Fold The Center Staple Fold screen appears 3 Touch Yes below Half Fold As the factory default the Booklet function is automatically specified when Half Fold is...

Страница 173: ...led 1 In the Basic screen touch Finishing The Finishing screen appears 2 Touch Fold Bind The Fold Bind screen appears 3 Touch Center Staple Fold Paper weight Paper size Maximum number of bound sheets...

Страница 174: ...finisher FS 519 CS231 Number of bound pages Examples of the possible number of bound pages are listed below 2 to 15 sheets of 90 g m2 paper maximum of 60 pages 1 sheet of 64 to 209 g m2 paper 14 sheet...

Страница 175: ...eet is added with the Cover Sheet function the cover sheet 200 g m2 cannot be sta pled When the Center Staple Fold setting is selected the following factory default settings are auto matically selecte...

Страница 176: ...on the inside or the outside For details on selecting the setting refer to Copier settings on page 13 18 1 In the Basic screen touch Finishing The Finishing screen appears 2 Touch Fold Bind The Fold...

Страница 177: ...Touch Tri Fold When the Tri Fold setting is selected the following Finishing settings are not available Group Offset Staple Punch To cancel the Tri Fold setting touch No or the button for a different...

Страница 178: ...ed 0 To delete a reserved copy job touch Job List in the left panel and then touch Job Details For details refer to Deleting a job on page 12 8 1 When the message Ready to accept another job appears w...

Страница 179: ...nting operation 0 If a document is being scanned for a job pressing the Stop key stops scanning 0 For details on deleting a temporarily stopped job refer to Deleting a paused job on page 4 82 1 Press...

Страница 180: ...d or printed refer to Temporarily stopping scanning printing on page 4 81 0 Select only one job at a time to be deleted 0 To continue a temporarily stopped job press the Start key 1 Press the Stop key...

Страница 181: ...5 Additional copy operations...

Страница 182: ......

Страница 183: ...ions 5 1 Checking the copy settings Check Job From the Check Job Details screens the current copy settings can be checked and changed if desired To check the settings 1 Touch Check Job in the left pan...

Страница 184: ...5 Additional copy operations 5 4 CS240 CS231...

Страница 185: ...y the next screen touch Forward If the setting for a function has been changed from the default the button for that function appears with a colored box around it To change the settings 1 Touch Check J...

Страница 186: ...e with step 8 To change the copy settings continue with step 6 6 Touch Change Setting in the screen that appeared when the proof copy was printed To stop copying while the proof copy screen is display...

Страница 187: ...n specify the desired settings To stop copying while the screen for changing the settings is displayed select the proof copy job to be stopped from the list of jobs in the left panel and then touch De...

Страница 188: ...job is stopping appears The indicator on the Interrupt key lights up in green and printing of the current job stops What settings are selected when the Interrupt key is pressed When the Interrupt key...

Страница 189: ...ently specified copy settings touch Check Job in the left panel and then touch Job Details For details refer to Checking the copy settings Check Job on page 5 3 2 Press the Mode Memory key The Recall...

Страница 190: ...program can be given the same name as a copy program that has already been registered To stop specifying the name of the copy program touch Cancel The Recall Copy Program screen appears again The cop...

Страница 191: ...ation is cancelled Otherwise continue to touch Cancel until the Basic screen is displayed The settings of a copy program cannot be changed If the copy program that was selected has been locked Edit Na...

Страница 192: ...the selected copy program are not to be checked continue with step 8 If the copy program to be recalled is not displayed touch and until the desired copy program is displayed 4 Press the Check Program...

Страница 193: ...egistered with the copy settings to be recalled If OK is touched with no copy program selected the Basic screen appears again without a copy program being recalled 8 Touch OK The programmed copy setti...

Страница 194: ...ess Mode Memory Enlarge Display Items in the Help Menu screen and other Help screens can be selected by touching the button or by pressing the key in the keypad for the number of the desired item To d...

Страница 195: ...installed Help screen bottom level Example Function Copy Color Function Map screen Example Copy A chart of the available functions and settings are displayed in the function maps Select an item from...

Страница 196: ...ns the selected item touch Close in the Help screen displayed by selecting an item in a Function Map screen To quit the Help mode press the Help key or touch Exit Displaying main help screens As an ex...

Страница 197: ...he Copy Help screen appears 4 Touch Open or the desired information or press the key in the keypad for the number to the left of the desired information to display the corresponding Help screen 5 Afte...

Страница 198: ...h Close Setting the Touch Panel Adjustment function If the touch panel buttons do not respond correctly the position of buttons in the touch panel may not be correctly aligned with the position of the...

Страница 199: ...points If the check points have been touched correctly the indicator on the Start key lights up in blue 4 Press the Start key The touch panel is adjusted and the Accessibility Setting screen appears...

Страница 200: ...he Accessibility Setting screen For details on displaying the Accessibility Setting screen refer to Displaying the accessibility setting screen on page 5 18 2 Touch Key Repeat Start Interval Time or p...

Страница 201: ...e can be displayed allowing you to choose either to continue operating without exiting Enlarge Display mode or to exit Enlarge Display mode and return to the Basic screen In addition it is possible to...

Страница 202: ...nd or 120 second for the length of time that the message is to be displayed To cancel changes to the settings press the Reset key All changes to the settings are canceled 4 Touch OK The Accessibility...

Страница 203: ...yed requesting confirmation to reset the settings in Enlarge Display mode As the factory default No is selected Yes The current settings are not reset No The current settings are reset to the default...

Страница 204: ...settings are canceled 4 Touch OK The Accessibility Setting screen appears again 5 Touch Close or press the Accessibility key The Basic screen appears again 2 Note The Enlarge Display mode is compatib...

Страница 205: ...Display mode As the factory default OFF is selected Yes The settings that cannot be displayed are cancelled and the Enlarge Display mode is entered No The Enlarge Display mode is not entered 1 Display...

Страница 206: ...lity Setting screen appears again 5 Touch Close or press the Accessibility key The Basic screen appears again 2 Note The Enlarge Display mode is compatible with basic copy scanning and fax functions W...

Страница 207: ...ying the Accessibility Setting screen refer to Displaying the accessibility setting screen on page 5 18 2 Touch Message Display Time or press the 1 key in the keypad The Message Display Time screen ap...

Страница 208: ...button on the touch panel Invalid Input Sound When incorrectly pressing a key in the control panel or a but ton on the touch panel Basic Sound When switching settings and the default setting is select...

Страница 209: ...nd setting To produce a sound touch Yes and then touch Low Medium or High To not produce a sound touch No To cancel changes to the settings press the Reset key All changes to the settings are canceled...

Страница 210: ...5 Additional copy operations 5 30 CS240 CS231...

Страница 211: ...6 Troubleshooting...

Страница 212: ......

Страница 213: ...the error code appears call technical representative screen The phone number and fax number for the usual technical representative appear in the center of the call technical representative screen Disp...

Страница 214: ...ion code for example C 0001 in the call technical representative screen 2 Turn the machine off by using the Power auxiliary power key and the main power switch 3 Unplug the machine 4 Contact the techn...

Страница 215: ...ashing o indicates the location of the paper misfeed In addition a lit o indicates areas where paper may have been misfed and that should be checked Example Screen when a paper misfeed occurs in tray...

Страница 216: ...misfeed in the ADF turnover section p 6 20 6 Paper misfeed in the fusing area p 6 22 7 Paper misfeed in the main unit p 6 25 8 Paper misfeed in the automatic duplex unit p 6 27 9 Paper misfeed in the...

Страница 217: ...ion above shows the main unit with optional Finisher FS 608 and the LCT installed The illustration above shows optional finisher FS 519 and the mailbin kit installed The illustration above shows optio...

Страница 218: ...r misfeed in the automatic duplex unit p 6 27 9 Paper misfeed in the bypass tray p 6 29 10 Paper misfeed in the paper transport section p 6 30 11 Paper misfeed in the LCT p 6 38 12 Paper misfeed in tr...

Страница 219: ...the ADF feed section Detail For details on the positions of paper misfeeds refer to Paper misfeed indications on page 6 6 1 Remove all document pages remaining in the document feed tray 2 Open the lef...

Страница 220: ...e the document feed tray before pulling out any misfed pages When pulling out misfed paper be sure to pull it in the feed direction 5 Return the document feed tray to its original position 6 Close the...

Страница 221: ...e ADF transport section Detail For details on the positions of paper misfeeds refer to Paper misfeed indications on page 6 6 1 Remove all document pages remaining in the document feed tray 2 Open the...

Страница 222: ...40 CS231 4 Slowly remove any misfed document pages Since the document pages may be damaged raise the document feed tray before pulling out any misfed pages When pulling out misfed paper be sure to pul...

Страница 223: ...the second side of a double sided document open the transparent guide in the left side cover and then turn misfeed clearing dial 2 in the direction of the arrow to feed out the page 5 Return the docu...

Страница 224: ...6 Troubleshooting 6 14 CS240 CS231 6 Close the left side cover 7 Load the document into the document feed tray according to the instructions that appear on the screen...

Страница 225: ...e ADF scanning section Detail For details on the positions of paper misfeeds refer to Paper misfeed indications on page 6 6 1 Remove all document pages remaining in the document feed tray 2 Open the l...

Страница 226: ...direction of the arrow to feed out the document page If the edge of the paper is not visible in the document output tray open the guide and pull out the edge of the paper and then turn misfeed clearin...

Страница 227: ...ubleshooting 6 6 Close the ADF 7 Return the document feed tray to its original position 8 Close the left side cover 9 Load the document into the document feed tray according to the instructions that a...

Страница 228: ...on the positions of paper misfeeds refer to Paper misfeed indications on page 6 6 1 Remove all document pages remaining in the document feed tray 2 Raise the document feed tray as far as possible and...

Страница 229: ...tion of the arrow to feed out the document page into the document output tray 5 Close the ADF 6 Return the document feed tray to its original position 7 Load the document into the document feed tray a...

Страница 230: ...6 6 1 Remove all document pages remaining in the document feed tray 2 Raise the document feed tray as far as possible and then remove all document pages from the document output tray 3 Raise the docum...

Страница 231: ...d open the ADF and then turn misfeed clearing dial 2 in the direction of the arrow to feed out the page 4 Return the document output tray to its original position 5 Return the document feed tray to it...

Страница 232: ...en open the upper right side door 2 Slowly remove any misfed paper from the fusing unit Pull down any misfed paper from the fusing unit Toner that did not pass through the fusing unit may get on your...

Страница 233: ...han the indicated levers and dials may result in burns If you get burnt immediately cool the skin under cold water and then seek professional medical attention 7 CAUTION Precautions for toner spills B...

Страница 234: ...oller in the fusing unit The paper that was removed tore and remains in the fusing unit Decreased image quality may result if the surface of the image transfer belt or image transfer roller is touched...

Страница 235: ...the upper right side door release lever and then open the upper right side door 2 Slowly remove any misfed paper from the main unit Toner that did not pass through the fusing unit may get on your hand...

Страница 236: ...levers and dials may result in burns If you get burnt immediately cool the skin under cold water and then seek professional medical attention 7 CAUTION Precautions for toner spills Be careful not to...

Страница 237: ...unit Decreased image quality may result if the surface of the image transfer belt or image transfer roller is touched Be careful not to touch the surface of the image transfer belt or the image trans...

Страница 238: ...dial to feed out the paper 3 Close the door of the automatic duplex unit 4 Pull out the tray being used and then remove all paper from the tray 5 Load the paper into the tray again and then close the...

Страница 239: ...s tray Detail For details on the positions of paper misfeeds refer to Paper misfeed indications on page 6 6 1 Remove the paper from the bypass tray 2 Open the door of the bypass tray 3 Slowly remove a...

Страница 240: ...ort section Detail For details on the positions of paper misfeeds refer to Paper misfeed indications on page 6 6 1 Open the door of the bypass tray 2 Open the lower right side door 3 Slowly remove any...

Страница 241: ...6 5 Pull out the tray being used and then remove all paper from the tray 6 Load the paper into the tray again and then close the tray 2 Reminder Be careful not to touch the film and surface of the pap...

Страница 242: ...details on the positions of paper misfeeds refer to Paper misfeed indications on page 6 6 1 Pull out tray 1 2 Remove any misfed paper 3 Remove any paper remaining in the tray 4 Load the paper into th...

Страница 243: ...details on the positions of paper misfeeds refer to Paper misfeed indications on page 6 6 1 Pull out tray 2 2 Remove any misfed paper 3 Remove any paper remaining in the tray 4 Load the paper into th...

Страница 244: ...out tray 3 2 Remove any misfed paper 3 Lift up paper take up roller and then remove any paper remaining in the tray 4 Load the paper into the tray again lower the paper take up roller and then close...

Страница 245: ...out tray 4 2 Remove any misfed paper 3 Lift up paper take up roller and then remove any paper remaining in the tray 4 Load the paper into the tray again lower the paper take up roller and then close...

Страница 246: ...it Detail For details on the positions of paper misfeeds refer to Paper misfeed indications on page 6 6 1 Pull out tray 4 2 Pull out the tray 3 4 horizontal transport unit 3 Open the cover for the tra...

Страница 247: ...ove any paper remaining in the tray 7 Load the paper into the tray again lower the paper take up roller and then close the tray 2 Reminder When removing misfed paper remove it without lifting the pape...

Страница 248: ...ng a paper misfeed in the LCT 1 Slide the LCT away from the machine 2 Slowly remove any misfed paper from the feed slot of the LCT 3 Open the misfeed clearing cover and then slowly pull out any misfed...

Страница 249: ...emove any paper remaining in the tray 7 Load the paper into the tray again lower the paper take up roller and then close the tray 2 Reminder When removing misfed paper remove it without lifting the pa...

Страница 250: ...er misfeed CS231 1 Pull up the upper right side door release lever and then open the upper right side door 2 Slowly remove any misfed paper from the main unit If the edge of the paper cannot be grabbe...

Страница 251: ...CS240 CS231 6 41 Troubleshooting 6 If the edge of the paper is not visible open the door of the bypass tray and then remove the paper 3 Slowly remove all paper from the fusing unit...

Страница 252: ...leshooting 6 42 CS240 CS231 If the paper is zigzag folded and jammed in the fusing unit open the fusing unit cover and then remove the paper 4 Slowly remove any misfed paper 5 Close the upper right si...

Страница 253: ...ek professional medical attention 2 Reminder If the paper is misfed as described below contact your technical representative The paper is wrapped around the timing roller The paper is folded or shredd...

Страница 254: ...in different locations in the finisher where paper misfeeds may occur 1 Open the cover for the horizontal transport unit and then remove any misfed paper in the horizontal transport unit Do not force...

Страница 255: ...not be removed turn misfeed clearing dial FN3 to feed out the paper 6 Return guide lever FN4 to its original position 7 Lower guide lever FN5 and then remove any paper If the paper cannot be removed t...

Страница 256: ...Grab handle FN7 and then pull out the stacker unit Slowly pull out the stacker unit as far as possible 10 Remove any misfed paper from the stacker unit If the paper cannot be removed turn misfeed cle...

Страница 257: ...7 Troubleshooting 6 11 Return the stacker unit to its original position When returning the stacker unit to its original position grab handle FN7 otherwise your hand or fingers may be pinched 12 Close...

Страница 258: ...er path changes resulting in different locations in the finisher where paper misfeeds may occur 1 Open the cover for the horizontal transport unit and then remove any misfed paper in the horizontal tr...

Страница 259: ...ny paper If the paper cannot be removed turn misfeed clearing dial FN3 to feed out the paper 6 Return guide lever FN4 to its original position 7 Lower guide lever FN5 and then remove any paper If the...

Страница 260: ...pull out the stacker unit Slowly pull out the stacker unit as far as possible 10 Lower guide lever FN9 and then remove any paper 11 Open guide lever FN8 and then remove any paper If the paper cannot b...

Страница 261: ...ve any paper If the paper cannot be removed turn misfeed clearing dial FN7 to feed out the paper 13 Return the stacker unit to its original position When returning the stacker unit to its original pos...

Страница 262: ...the finisher release lever 1 to unlock the finisher 2 Grab the finisher at 2 and then slide the finisher away from the main unit To move the finisher away from the main unit be sure to grab it at 2 D...

Страница 263: ...t any paper If the punch kit is installed pull out the hole punch waste container FN3 1 6 Return guide FN3 to its original position If the punch kit is installed insert the hole punch waste container...

Страница 264: ...Return the finisher to its original position When returning the finisher to its original position do not grab the handle on the front door the control panel the mailbins or the saddle stitcher Detail...

Страница 265: ...ting 6 To clear a paper misfeed in the mailbin CS231 1 Open the front door 2 Turn dial FN5 or dial FN6 to feed out the paper 3 While pressing down lever FN7 pull out any paper 4 Pull handle FN8 to ope...

Страница 266: ...e the misfeed clearing door 7 Close the front door Detail For details on the positions of paper misfeeds refer to Paper misfeed indications on page 6 6 To clear a paper misfeed in the saddle stitcher...

Страница 267: ...paper from the finishing tray 4 Open the misfeed clearing door and then pull out any paper 5 Close the misfeed clearing door 6 Close the front door Detail For details on the positions of paper misfeed...

Страница 268: ...sage shown below appears 2 Reminder Be careful when clearing jammed staples since injuries may result Clearing jammed staples in Finisher FS 517 Detail For details on clearing misfed paper in Finisher...

Страница 269: ...e front door 3 Grab handle FN7 and then pull out the stacker unit Slowly pull out the stacker unit as far as possible 4 Remove the staple cartridge holder Hold the lever on the staple cartridge holder...

Страница 270: ...and then pull out one sheet of staples 6 Return the shutter of the staple cartridge holder to its original position 7 Install the staple cartridge holder Check that the staple cartridge holder is sec...

Страница 271: ...rab handle FN7 otherwise your hand or fingers may be pinched 9 Close the front door Clearing jammed staples in Finisher FS 608 Detail For details on clearing misfed paper in Finisher FS 608 refer to C...

Страница 272: ...e front door 3 Grab handle FN6 and then pull out the stacker unit Slowly pull out the stacker unit as far as possible 4 Remove the staple cartridge holder Hold the lever on the staple cartridge holder...

Страница 273: ...and then pull out one sheet of staples 6 Return the shutter of the staple cartridge holder to its original position 7 Install the staple cartridge holder Check that the staple cartridge holder is sec...

Страница 274: ...N6 otherwise your hand or fingers may be pinched 9 Close the front door Clearing jammed staples in Finisher FS 519 CS231 Detail For details on clearing misfed paper in the finisher refer to To clear a...

Страница 275: ...e holder and then pull out one sheet of staples 6 Return the shutter of the staple cartridge holder to its original position 7 Insert the staple cartridge holder sliding it along the rails in the comp...

Страница 276: ...CS231 on page 6 52 1 Remove all paper from the finisher 2 Open the misfeed clearing door and then remove all paper 3 Close the misfeed clearing door 4 Raise the output tray and then push down the sta...

Страница 277: ...CS240 CS231 6 67 Troubleshooting 6 7 Insert the staple cartridge holder and then push it up until it locks into place 8 Return the output tray to its original position...

Страница 278: ...message Replenish paper appears Check which paper tray is indicated in color and then load it with paper Detail For details on loading paper refer to Loading paper into tray 1 and tray 2 on page 3 44...

Страница 279: ...hile copy operations are being performed the message The job has been deleted due to insufficient memory appears Display in Enlarge Display mode 2 Note If the amount of memory available becomes limite...

Страница 280: ...tail When the message appears replace the specified consumables or part according to your maintenance agreement After the message Please replace following unit s appears the message XXXX needs to be r...

Страница 281: ...hin this machine a message similar to the one shown below appears Display in Enlarge Display mode 2 Note When the message appears replace the specified consumables or part according to your maintenanc...

Страница 282: ...not turn off the power appears This message appears when the machine is being accessed in Administrator mode of Web Connection 2 Reminder Do not turn off the machine while this message is displayed Af...

Страница 283: ...that it is pressed closely against the original glass See p 4 9 The printed output is blur ry Is the paper damp Replace the paper with new paper See p 3 44 p 3 46 p 3 47 and p 3 48 Was the document no...

Страница 284: ...ent Otherwise select the Auto Zoom setting to enlarge the copy to the selected paper size See p 4 33 Is the orientation of the document different from the orientation of the paper with a Zoom setting...

Страница 285: ...grees Is the staple position correctly specified Specify the desired position for stapling See p 4 65 The pages that were fed out were not uniformly loaded and the punched holes or staples are incor r...

Страница 286: ...cor rect password are entered Type in your user name and pass word See p 3 39 Your account has reached its maxi mum allowance The limit on the number of pages that can be printed has been reached Cont...

Страница 287: ...main power switch and then contact the technical representative Cannot be accessed due to unau thorized access Please contact your administrator The authentication information has become invalid sinc...

Страница 288: ...6 Troubleshooting 6 78 CS240 CS231...

Страница 289: ...7 Specifications...

Страница 290: ......

Страница 291: ...ray Copy sizes Tray 1 and tray 2 A3 w to A5 w 12 1 4 e 18 w 12 e 18 w to 8 1 2 e 11 v 8 e 13 w 1 16K v 8K w CS240 Width 139 7 mm to 311 1 mm length 182 mm to 457 2 mm Tray 3 and tray 4 A4 v B5 v A5 v...

Страница 292: ...Copy speed Full color 45 ppm single sided 45 sides min double sided CS240 Black 55 ppm single sided 55 sides min double sided With special paper or with the Glossy setting 23 ppm single sided 23 sides...

Страница 293: ...mm Power requirements Supplied from main unit Specifications Document feed methods Standard functions Single sided and double sided documents Mixed Original setting Combination of single sided and do...

Страница 294: ...g m2 to 209 g m2 Can only be used as cover sheets Paper sizes Finishing tray 1 A3 w to A5 v w B6 w A6 w 12 1 4 e 18 w 12 e 18 w to 5 1 2 e 8 1 2 v w 8 e 13 w 1 16K v w 8K w width 100 mm to 311 1 mm l...

Страница 295: ...8 1 2 v w 8 e 13 w 1 Width 100 mm to 311 1 mm length 139 mm to 457 2 mm Finishing tray 3 Half Fold A3 w B4 w A4 w 12 1 4 e 18 w 11 e 17 w 8 1 2 e 11 w 8 1 2 e 14 w 8K w width 210 mm to 311 1 mm length...

Страница 296: ...rt Offset Group Offset and Sort and Staple Paper types Finishing tray 1 finishing tray 2 Plain paper 64 to 90 g m2 Thick paper 1 1 2 3 91 to 256 g m2 OHP postcards envelopes label sheets letter heads...

Страница 297: ...m 200 sheets or 20 sets Staple settings Number of bound pages 2 to 15 sheets Dimensions 445 mm W 203 mm D 478 mm H When the tray is pulled out 576 mm W 281 mm D Weight 7 4 kg Consumables MS 2C cartrid...

Страница 298: ...resentative is dispatched to perform inspections and maintenance and to replace parts With this plan a copy charge is applied Fee based plan With this plan a fee is charged each time the customer requ...

Страница 299: ...8 Copy paper original documents...

Страница 300: ......

Страница 301: ...esentative 2 The setting must be changed by the technical representative Paper source Paper width Paper length Bypass tray 1 90 0 mm to 311 1 mm 139 7 mm to 457 2 mm Tray 1 Tray 2 Tray 3 Tray 4 LCT Do...

Страница 302: ...A4 w 12 1 4 e 18 w 11 e 17 w 8 1 2 e 14 w 8 1 2 e 11 w 8K w Center Staple and Fold A3 w B4 w A4 w 8 1 2 e 14 w 8 1 2 e 11 w 8K w Tri fold A4 w 8 1 2 e 11 w 16K w Finisher FS 519 CS231 Finishing tray 1...

Страница 303: ...hanged by the technical representative Paper type Transparencies Postcards Envelopes Label sheets banner paper CS231 Paper source 210 g m2 to 256 g m2 Bypass tray 20 sheets 50 sheets 10 sheets 50 shee...

Страница 304: ...r with a weight of 64 g m2 to 90 g m2 A paper tray with this setting is not automatically selected when the Auto Paper setting is specified Transparency Select this setting when OHP transparencies are...

Страница 305: ...aper that has been decorated with foil or embossing Paper of a non standard shape not rectangular Paper that is bound with glue staples or paper clips Paper with labels attached Paper with ribbons hoo...

Страница 306: ...set to Allow Operating conditions The paper is the same size The paper is positioned in the same orientation The paper is the same type The paper trays are selected when the paper tray is automaticall...

Страница 307: ...r to Loading paper into the bypass tray on page 3 49 Automatically detecting the paper size Auto Detect setting The size of the paper loaded into tray 1 and the bypass tray can be detected automatical...

Страница 308: ...g The paper size can be set for the bypass tray so that it can be used with the specified paper size This is useful for example when the size of the paper that is loaded cannot be automatically detect...

Страница 309: ...r other than postcards are loaded change the paper type setting For details on the paper type settings refer to Specifying a setting for special paper on page 8 19 6 Touch OK and then touch OK in the...

Страница 310: ...Non standard sized paper can be loaded into the bypass tray If wide paper is loaded it will be necessary to enter the paper size 1 In the Basic screen touch Paper The Paper screen appears 2 Select the...

Страница 311: ...incorrectly entered press the C clear key in the keypad to erase the value and then specify the correct value To cancel changes to the settings touch Cancel Can paper sizes be stored Five non standard...

Страница 312: ...er sizes can be stored Storing paper sizes that are used often allows the paper size to be quickly selected without having to re enter the setting 1 In the Basic screen touch Paper The Paper screen ap...

Страница 313: ...the illustration in the screen for the sides that are considered X and Y If a value outside the allowable range is specified the message Input error appears Type a value within the allowable range If...

Страница 314: ...e loaded into tray 1 or tray 2 or the bypass tray Wide paper is a size larger than the standard size and allows copies of standard sized documents to be printed so that there is no loss at the edges F...

Страница 315: ...nding paper tray 3 Touch Change Tray Settings 4 Touch Wide Paper The Wide Paper screen appears 5 Select the size of the paper to be loaded Touch and until the button for the desired paper size is disp...

Страница 316: ...sizes If the orientation of the loaded paper does not match the sizes specified for X and Y Input error appears even if the values are within the allowable range In addition do not enter the same siz...

Страница 317: ...reen appears 2 Touch the button for tray 1 To specify a setting for special paper for tray 1 tray 2 or tray 3 or the bypass tray touch the button for the corresponding paper tray If a setting for spec...

Страница 318: ...paper that can loaded refer to Specifications on page 7 3 If postcards were loaded select Thick 3 5 Touch OK and then touch OK in the next screen that appears The Basic screen appears again 2 Reminder...

Страница 319: ...t be fed through the automatic duplex unit The paper to be used for printing the second side can be loaded into the bypass tray 1 In the Basic screen touch Paper The Paper screen appears 2 Touch the b...

Страница 320: ...8 Copy paper original documents 8 22 CS240 CS231 5 Select the type of paper to be loaded 6 Touch OK and then touch OK in the next screen that appears The Basic screen appears again...

Страница 321: ...setting o Possible Not possible Detail 1Indicates the width of the widest document size of the mixed originals width of the adjustable lateral guides of the automatic document feeder 2Indicates docume...

Страница 322: ...that can be placed on the original glass To copy documents that cannot be loaded into the ADF position them on the original glass Precautions for positioning documents on the original glass Observe th...

Страница 323: ...9 Application functions...

Страница 324: ......

Страница 325: ...Parameter Provides information on the adjustment of the sharpness of text p 9 14 Blue Parameter Provides information on the adjustment of the blue hues p 9 8 Hue Parameter Provides information on the...

Страница 326: ...the yellow of a grapefruit it is obvious that the yellow of the lemon is brighter But what about when comparing the yellow of a lemon and the red of a bean Obviously the yellow of the lemon is brighte...

Страница 327: ...e outer edge is the hue the vertical axis is the brightness and the horizontal axis from the center is the saturation Assigning colors to the solid object representing the three attributes of color sh...

Страница 328: ...9 Application functions 9 6 CS240 CS231 Red parameter This parameter can be used to adjust the degree of red in the image to one of 19 levels For details on the setting procedure refer to page 9 47...

Страница 329: ...S240 CS231 9 7 Application functions 9 Green parameter This parameter can be used to adjust the degree of green in the image to one of 19 levels For details on the setting procedure refer to page 9 47...

Страница 330: ...9 Application functions 9 8 CS240 CS231 Blue parameter This parameter can be used to adjust the degree of blue in the image to one of 19 levels For details on the setting procedure refer to page 9 47...

Страница 331: ...ck in a full color copy the colors of the original can be reproduced Changing the amount of each color of toner enables the tints in the copy to be finely adjusted Each color can be adjusted to any of...

Страница 332: ...9 Application functions 9 10 CS240 CS231 Y G B R M C...

Страница 333: ...CS231 9 11 Application functions 9 Brightness parameter This parameter can be used to finely adjust the brightness of the image to one of 19 levels For details on the setting procedure refer to page...

Страница 334: ...ion functions 9 12 CS240 CS231 Contrast parameter This parameter can be used to finely adjust the image to one of 19 levels between soft smooth and crisp For details on the setting procedure refer to...

Страница 335: ...CS231 9 13 Application functions 9 Saturation parameter This parameter can be used to finely adjust the vividness of the image to one of 19 levels For details on the setting procedure refer to page 9...

Страница 336: ...cation functions 9 14 CS240 CS231 Sharpness parameter This parameter can be used to adjust the amount of contours in text and images to one of 7 levels For details on the setting procedure refer to pa...

Страница 337: ...CS240 CS231 9 15 Application functions 9 Hue parameter This parameter can be used to finely adjust the hue of the image to one of 19 levels For details on the setting procedure refer to page 9 47...

Страница 338: ...tion functions 9 16 CS240 CS231 Copy Density parameter This parameter can be used to finely adjust the light and shading of the image to one of 19 levels For details on the setting procedure refer to...

Страница 339: ...ows you to copy an original using only one of the 21 colors available For details on the setting procedure refer to page 4 31 Yellow Magenta Cyan Red Green Orange Pumpkin Yellow Green Teal Blue Aquama...

Страница 340: ...ed in black and the color areas of the original printed in one of the six colors available For details on the setting procedure refer to page 4 31 Yellow Magenta Cyan Red Green Blue H A P P Y BIRT H D...

Страница 341: ...you to copy an original using one of the 18 colors available as the color of the background blank areas For details on the setting procedure refer to page 9 45 Yellow Magenta Cyan Red Green Orange Pum...

Страница 342: ...red areas and the dark colored areas of the image inversed For details on the setting procedure refer to page 9 40 Monotone copy Full color copy and Background Color function Yellow Magenta Cyan Red G...

Страница 343: ...CS240 CS231 9 21 Application functions 9 Mirror Image function This function allows you to copy a mirror image of the original For details on the setting procedure refer to page 9 42...

Страница 344: ...ls on loading OHP transparencies refer to Paper types and paper capacities on page 8 4 and Loading paper into the bypass tray on page 3 49 2 In the Basic screen touch Color and then touch Black Printi...

Страница 345: ...apter Insert screen appears 6 Touch OHP Interleave The OHP Interleave screen appears 7 Select the paper tray loaded with the interleaf paper To cancel the setting and select the default press the Rese...

Страница 346: ...paper with the same size for the cover pages and for the main body of the document and load them in the same orientation Setting Description Front Cover Front Copy The first page of the document is c...

Страница 347: ...to the settings for all Application functions press the Reset key All changes to the settings are canceled The Sheet Cover Chapter Insert screen appears 4 Touch Cover Sheet The Cover Sheet screen appe...

Страница 348: ...The corresponding Cover Paper screen appears 7 Select the paper tray loaded with the paper for the cover pages 8 Touch OK and then touch OK in the next two screen that appears 9 Specify any other desi...

Страница 349: ...f Blank is selected the specified paper is inserted before the specified page When page 3 is specified Blank Finishing Description Single sided copies The specified paper is inserted for the 2nd sheet...

Страница 350: ...main body of the document into the desired paper trays Use paper with the same size for the insertion sheets and for the main body of the document and load them in the same orientation To cancel chan...

Страница 351: ...s not possible Delete repeated page numbers If the entered page number is greater than the number of pages in the document paper is not inserted 6 Touch Insert Paper The Insert Paper Settings screen a...

Страница 352: ...ument of up to 999 pages In double sided documents one double sided page is considered to be two pages one for the front and one for the back 1 Load the document into the ADF For details on positionin...

Страница 353: ...he document scanned from the original glass has more pages than the number of pages specified in the Insert Image screen the extra pages of the insertion document are printed at the end of the documen...

Страница 354: ...riginal glass For details on positioning the document refer to Feeding the document on page 4 8 10 Press the Start key Scanning begins 11 Touch Finish To insert a multi page document repeat steps 9 an...

Страница 355: ...ide of the paper within a document of up to 999 pages In double sided documents one double sided page is considered to be two pages one for the front and one for the back 2 Note Make sure that the pap...

Страница 356: ...ouch the button for the page to be removed and then press the C clear key Under Original Copy select 1 Sided 2 Sided If the same page number is entered multiple times copying is not possible Delete re...

Страница 357: ...ears Touch Chapter Paper select the paper to be used for the first page of the chapter and then touch OK 6 Touch OK and then touch OK in the next screen that appears 7 Specify any other desired copy s...

Страница 358: ...printed together 2 Note 100 document batches can be set The Group Finishing setting is not available when programming jobs Instead select Sort 1 Position the document to be copied For details on posit...

Страница 359: ...e copy to be checked press the Proof Copy key Scanning begins 5 Touch Fix and then touch OK If the document was loaded on the original glass touch Finish in the screen that appears requesting confirma...

Страница 360: ...hen the memory is full a message appears Select whether to delete the last part of the data and scan it again delete the last part of the data and print or delete all of the document data To cancel ch...

Страница 361: ...od for the entire scanned document Is there more information about the settings Refer to the appropriate section 11 Using the keypad type in the desired number of copies 12 Touch Start or press the St...

Страница 362: ...color has been selected the colors including the selected background color are inversed 1 Position the document to be copied For details on positioning the document refer to Feeding the document on pa...

Страница 363: ...CS240 CS231 9 41 Application functions 9 4 Specify any other desired copy settings 5 Using the keypad type in the desired number of copies 6 Press the Start key...

Страница 364: ...h dimension is considered the document length refer to Descriptions and symbols for originals and paper on page 1 13 1 Position the document to be copied For details on positioning the document refer...

Страница 365: ...size touch Original Size and then specify the document size from any of the screens If a non standard sized document is loaded the document size cannot be detected Therefore specify the document size...

Страница 366: ...value To enter a value press the C clear key and then use the keypad to type in the new value What happens when a value outside of the allowable range is specified The message Input error appears If...

Страница 367: ...f the background colors refer to Background Color function on page 9 19 1 Position the document to be copied For details on positioning the document refer to Feeding the document on page 4 8 2 Touch A...

Страница 368: ...lor function touch No Can other background colors be displayed Touch or to display a different list of colors 5 Touch OK 6 Specify any other desired copy settings To cancel the setting and select the...

Страница 369: ...used to adjust the level of blue in the image Hue This parameter can be used to adjust the hue The hue is divided into red blue and yel low By adjusting the hue the image can be made either more reddi...

Страница 370: ...Touch Application and then touch Edit Color To cancel changes to the settings for all Application functions press the Reset key All changes to the settings are canceled The Edit Color screen appears 2...

Страница 371: ...ple copy on page 9 49 2 Note Even though the setting can be specified in 1 3 step increments the setting will appear at the nearest full increment in the Color Adjustment screen Checking the print res...

Страница 372: ...Load paper of a size listed under Paper that can be used into the paper tray 3 Place the document within the sample area of the original glass 4 Press the Start key The sample copy is printed 5 Touch...

Страница 373: ...before the back cover and then all page spreads are scanned in order How are the front and back covers copied Scan the front cover then the back cover and then scan the remainder of the document 2 Loa...

Страница 374: ...onal Finisher FS 608 is not installed CS231 Booklet Original does not appear if optional Finisher FS 608 or saddle stitcher on Finisher FS 519 is not installed The Book Copy screen appears 5 Touch the...

Страница 375: ...of the allowable range is specified The message Input error appears If Input error appears or if the erased width was incorrectly entered press the C clear key in the keypad and then specify the corr...

Страница 376: ...e been scanned touch Finish If Front and Back Cover was selected th e back cover is scanned after the front cover and then all page spreads are scanned in order If Front Cover was selected all page sp...

Страница 377: ...settings for all Application functions press the Reset key All changes to the settings are canceled The Book Copy Repeat screen appears Setting Description With Margin Multiple copies are printed of...

Страница 378: ...nal Finisher FS 608 is not installed The Image Repeat screen appears 5 Under Layout touch With Margin or Without Margin or touch 2 4 8 Repeat To cancel the Image Repeat function touch No Touching 2 4...

Страница 379: ...n inches be displayed Touch or to display a different list of sizes Can any size be specified Any size can be specified from the Custom Size screen Touch X or Y to select the dimension and then use th...

Страница 380: ...he paper If settings were specified in the 2 4 8 Repeat screen touch Zoom in the Basic screen and then specify the zoom ratio setting 8 Specify any other desired copy settings To cancel the setting an...

Страница 381: ...ize 1 Place the document on the original glass For details on positioning the document refer to Feeding the document on page 4 8 2 Touch Application and then touch Book Copy Repeat To cancel changes t...

Страница 382: ...ze select the finished image size and then touch OK Touch or to display a different list of standard sizes Touching Custom Size displays the Custom Size screen Touch X or Y to select the dimension and...

Страница 383: ...ment size and then touch OK If the document size cannot be detected automatically or to specify the document size touch Original Size and then specify the document size from any of the screens Touch P...

Страница 384: ...correct value To enter a value press the C clear key and then use the keypad to type in the new value What happens when a value outside of the allowable range is specified The message Input error app...

Страница 385: ...used when optional Finisher FS 608 or saddle stitcher on Finisher FS 519 is installed 1 Position the document to be copied Load a booklet with the staples removed The number of sheets that can be sta...

Страница 386: ...canceled The Book Copy Repeat screen appears 3 Touch Booklet Original 4 Touch Close 5 Specify any other desired copy settings 6 Using the keypad type in the desired number of copies 7 Press the Start...

Страница 387: ...t creating a binding margin Detail If the positions of the staples or punched holes are different from the binding position the positions of the staples or punched holes are given priority 1 Position...

Страница 388: ...document length is more than 297 mm a binding position along the short side of the paper is selected 4 Using the keypad specify the binding margin width If None is selected the binding margin width is...

Страница 389: ...7 If desired touch Original Direction and then select the setting appropriate for the document For details on specifying the document orientation refer to Selecting the document orientation Original...

Страница 390: ...e or Center Zoom is to be set position the document on the original glass 2 Touch Application and then touch Image Adjust To cancel changes to the settings for all Application functions press the Rese...

Страница 391: ...detected Therefore specify the document size in the Custom Size screen and then press the Start key 4 Check the document size and then touch OK If the document size cannot be detected automatically o...

Страница 392: ...value To enter a value press the C clear key and then use the keypad to type in the new value What happens when a value outside of the allowable range is specified The message Input error appears If...

Страница 393: ...le of 2 document pages is required with a double sided document If there are not enough pages blank pages are automatically added at the end For details on stapling refer to Binding copies at the cent...

Страница 394: ...ape orientation they will be bound at the top regardless of which setting is selected To cancel the setting and select the default press the Reset key To cancel the Booklet function touch No 4 Touch O...

Страница 395: ...e document refer to Feeding the document on page 4 8 2 Touch Application and then touch Frame Erase To cancel changes to the settings for all Application functions press the Reset key All changes to t...

Страница 396: ...settings press the C clear key to erase the value and then type in the setting What happens when a value outside of the allowable range is specified The message Input error appears If Input error appe...

Страница 397: ...r refer to page 9 101 Function Description Date Time Select a format and print the date or time on the specified pages Page Number Select a format and print page numbers starting with the specified pa...

Страница 398: ...the document on page 4 8 2 Touch Application and then touch Stamp Composition To cancel changes to the settings for all Application functions press the Reset key All changes to the settings are cance...

Страница 399: ...ouch Adjust Position Select the desired direction under Left Right Adjustment or Top Bottom Adjustment use the keypad or touch and to specify the adjustment setting and then touch OK What are the limi...

Страница 400: ...select the color To specify the text size touch Text Size and then select the size 7 Touch OK and then touch Close in the next screen that appears 8 Specify any other desired copy settings To cancel...

Страница 401: ...r to Feeding the document on page 4 8 2 Touch Application and then touch Stamp Composition To cancel changes to the settings for all Application functions press the Reset key All changes to the settin...

Страница 402: ...pied page To cancel the Page Number function touch No 5 Select a setting under Page Number Type 6 Touch Print Position and then select the printing position To make fine adjustments to the printing po...

Страница 403: ...numbers are not printed on them If Print on Back Cover Only or Do Not Print Page Number is selected under Cover Sheet page numbers are printed starting with 2 in single sided copies and starting with...

Страница 404: ...ion the document to be copied Use the Copy Protection Utility to register a registered stamp For details on registering stamps refer to the manual of the Copy Protection Utility For details on positio...

Страница 405: ...inserted using the Cover Sheet Insert Sheet and Chapters functions 6 Touch Print Position and then select the printing position To make fine adjustments to the printing position touch Adjust Position...

Страница 406: ...settings are selected Text Size Std Text Color Black 8 Touch OK and then touch Close in the next screen that appears 9 Specify any other desired copy settings 10 Using the keypad type in the desired n...

Страница 407: ...es so that the reader knows that it is a copy The copy protection text is printed on all pages The pages cannot be specified 1 Position the document to be copied For details on positioning the documen...

Страница 408: ...on text formats appear in a column at the center of the screen Up to eight text lines can be combined Multiple registered stamps or preset stamps cannot be selected Touching Date Time displays the Cop...

Страница 409: ...ouch Detailed Settings and then change the copy protection settings Touch the desired button in the Detailed Settings screen and then change the setting in the screen that appears As the factory defau...

Страница 410: ...9 Application functions 9 88 CS240 CS231 Density screen Copy Protect Pattern screen Text Size screen Pattern Overwrite screen...

Страница 411: ...ction text the angle can be changed If desired touch Change Pos Delete in the Position screen and then change the arrangement of the text in the Change Position Delete screen If there are no more than...

Страница 412: ...n the next screen that appears 6 Specify any other desired copy settings To cancel the setting and select the default press the Reset key 7 Using the keypad type in the desired number of copies 8 Pres...

Страница 413: ...Touch Stamp Repeat The Stamp Repeat screen appears 4 Select the desired type of repeating stamp To cancel the Stamp Repeat function touch No Touch Registered Stamp or Preset Stamp to display a screen...

Страница 414: ...ired stamp and then touch OK To cancel the changes to the settings in each repeating stamp settings screen touch No To print the copy job number touch Job Number To print the serial number of this mac...

Страница 415: ...1 9 93 Application functions 9 As the factory default the following settings are selected Text Color Black Density Std Text Size Std Pattern Overwrite Font Overwrite Color screen Density screen Text S...

Страница 416: ...elete in the Position screen and then change the arrangement of the text in the Change Position Delete screen If there are no more than four lines in the selected repeating stamp the angle can be chan...

Страница 417: ...r the repeating stamp text to be deleted 5 Touch OK and then touch Close 6 Specify any other desired copy settings 7 Using the keypad type in the desired number of copies 8 Press the Start key 2 Note...

Страница 418: ...es In addition a scanned document can be stored as a registered overlay and recalled and used later 1 Position the document for the overlay 2 Touch Application and then touch Stamp Composition The Sta...

Страница 419: ...ally or to specify the document size touch Original Size and then specify the document size from any of the screens To cancel changes to the settings touch Cancel 6 Touch Close 7 Specify any other des...

Страница 420: ...uch New To overwrite the registered overlay with the new image select a registered overlay and then touch Overwrite To delete a registered overlay select a registered overlay and then touch Delete The...

Страница 421: ...Specify any other desired copy settings 6 Press the Start key 7 The document is scanned then saved as a registered overlay 2 Note With the Restrict User Access parameter in Administrator mode changes...

Страница 422: ...o cancel the Overlay function touch No The Recall Overlay Image screen appears 2 Touch the button for the registered overlay to be used and then touch OK 3 Touch OK and then touch Close in the next sc...

Страница 423: ...rs footers on page 13 63 1 Position the document to be copied For details on positioning the document refer to Feeding the document on page 4 8 2 Touch Application and then touch Stamp Composition 3 T...

Страница 424: ...ed in the 2 Color count of the Total counter If Color is set to 2 Color copies where the second color is different from the stamp text color are included in the Full Color count of the Total counter T...

Страница 425: ...t to be copied 2 Touch Application and then touch Save in User Box 3 Touch User Box A screen for selecting a user box appears 4 Select the user box where the data is to be saved Touch the tab containi...

Страница 426: ...ng with the selected letter A user box can be selected from this screen 5 Touch OK 6 Select whether or not a copy will also be printed when the data is saved To print a copy touch Yes beside Save Prin...

Страница 427: ...Specify any other desired copy settings 12 Press the Start key If Yes beside Page Print was selected the scanned document is copied and the document data is saved in the specified user box If No besid...

Страница 428: ...9 Application functions 9 106 CS240 CS231...

Страница 429: ...10 Replacing toner cartridges and staples and emptying punch scrap box...

Страница 430: ......

Страница 431: ...e similar to the one shown below appears Detail When the message appears prepare to replace the toner cartridge according to your maintenance agreement When it is time to replace the toner cartridge a...

Страница 432: ...Replace the toner cartridge If toner other than black is empty printing can continue in black Touch Continue Operation and then select the job to be printed Detail For details on replacing the toner...

Страница 433: ...row toner or the toner cartridge into a fire Toner expelled from the fire may cause burns 7 CAUTION Precautions for toner spills Be careful not to spill toner inside the machine or get toner on your c...

Страница 434: ...1 Open the machine s upper front door Check that a toner cartridge of the same color as the one to be replaced has been prepared 2 Pull out the empty toner cartridge How are used toner cartridges disp...

Страница 435: ...compacted If it has be sure to shake the toner cartridge until the toner is mostly broken up before installing the cartridge 5 Remove the tape from the toner cartridge Remove the tape from the toner c...

Страница 436: ...according to your maintenance agreement Detail The number of copies that can be made from the time that the message Waste toner box needs to be replaced soon appears until the time that the message Wa...

Страница 437: ...dges and staples and emptying punch scrap box 10 Display in Enlarge Display mode When it is almost time to replace the waste toner box the screen shown below appears When the time to replace the part...

Страница 438: ...eplace the waste toner box 1 Open the machine s lower front door 2 Release the securing levers for the waste toner box and then remove the waste toner box 3 Attach the enclosed cap to the waste toner...

Страница 439: ...ay cause burns 7 CAUTION Precautions for toner spills Be careful not to spill toner inside the machine or get toner on your clothes or hands If your hands become soiled with toner immediately wash the...

Страница 440: ...according to your maintenance agreement When the time to replace the imaging unit is reached an advanced warning message similar to the one shown below appears 2 Note When the message appears replace...

Страница 441: ...ace the waste toner box the screen shown below appears When it is time to replace the part the screen shown below appears 2 Reminder Be sure to replace the imaging unit only after the message Please r...

Страница 442: ...ing unit black 1 Open the machine s lower front door Check that an imaging unit of the same color as the one to be replaced has been prepared 2 Release the securing levers for the waste toner box and...

Страница 443: ...Leave the imaging unit in the black protective bag until immediately before it is to be installed Do not hold the top part of the imaging unit otherwise the PC drum may be damaged resulting in decreas...

Страница 444: ...ve sheet for the PC drum along the perforation 11 Insert the new imaging unit into the machine Make sure that the imaging unit is the same color as the label on the imaging unit compartment Do not ins...

Страница 445: ...ilter when replacing the black imaging unit Make sure that the filter is fully inserted 16 Insert the used imaging unit into the empty black protective bag and box of the new imaging unit How are used...

Страница 446: ...ately wash them with soap and water If toner gets in your eyes immediately flush them with water and then seek professional medical attention To replace the imaging unit yellow magenta and cyan 1 Open...

Страница 447: ...ging The imaging unit can easily be damaged by light Leave the imaging unit in the black protective bag until immediately before it is to be installed Do not hold the top part of the imaging unit othe...

Страница 448: ...then tilt the unit to the right and lightly shake it twice in the direction of the tilt 9 Remove the securing material and tape 10 Tilt the imaging unit to the left and lightly shake it twice in the...

Страница 449: ...ake sure that the imaging unit is the same color as the label on the imaging unit compartment Do not insert the imaging unit into its compartment at an angle Make sure that the imaging unit is fully i...

Страница 450: ...r boxes to be collected by your technical representative 17 Adjust the gradation levels For details on adjusting the gradation levels refer to Gradation adjustment on page 13 61 7 CAUTION Precautions...

Страница 451: ...4 Replacing the staple cartridge When the staple cartridge is empty the message Replace staple cartridge appears Replace the staple cartridge Display in Enlarge Display mode 2 Reminder Be sure to repl...

Страница 452: ...ace the staple cartridge in Finisher FS 517 1 Open the front door 2 Grab handle FN7 and then pull out the stacker unit Slowly pull out the stacker unit as far as possible 3 Remove the staple cartridge...

Страница 453: ...idge holder 5 Load the new staple cartridge into the staple cartridge holder Do not remove the remaining staples otherwise the machine will not be able to staple after the cartridge is replaced 6 Slow...

Страница 454: ...and emptying punch scrap box 10 26 CS240 CS231 8 Return the stacker unit to its original position When returning the stacker unit to its original position grab handle FN7 otherwise your hand or finge...

Страница 455: ...ace the staple cartridge in Finisher FS 608 1 Open the front door 2 Grab handle FN6 and then pull out the stacker unit Slowly pull out the stacker unit as far as possible 3 Remove the staple cartridge...

Страница 456: ...der 5 Load the new staple cartridge into the staple cartridge holder Do not remove the remaining staples otherwise the machine will not be able to staple after the cartridge is replaced 6 Install the...

Страница 457: ...29 Replacing toner cartridges and staples and emptying punch scrap box 10 When returning the stacker unit to its original position grab handle FN6 otherwise your hand or fingers may be pinched 8 Close...

Страница 458: ...he staple cartridge holder Pull the staple cartridge holder toward you to remove it Only touch the blue parts of the staple cartridge 3 Remove the empty cartridge from the staple cartridge holder 4 Lo...

Страница 459: ...making sure the tabs on the holder slide along the rails in the compartment Check that the staple cartridge holder is securely installed 6 Close the front door 2 Reminder Replace the staple cartridge...

Страница 460: ...n saddle stitcher CS231 1 Raise the copy output tray and then push down the staple cartridge holder and remove it 2 Press in the area marked PUSH to unlock the staple cartridge holder 3 Remove the emp...

Страница 461: ...6 Insert the staple cartridge holder and then push it up until it locks into place When inserting the staple cartridge holder be sure to insert it so that it faces the correct direction 7 Return the c...

Страница 462: ...isher becomes full the message shown below appears if the box can be emptied by the user 2 Note The setting for emptying the punch scrap box should be specified by the technical representative For det...

Страница 463: ...he job being performed is paused To continue the job without canceling the Punch setting empty the punch scrap box To cancel the Punch setting and continue the job touch Cancel Punching When performed...

Страница 464: ...10 Replacing toner cartridges and staples and emptying punch scrap box 10 36 CS240 CS231 Display in Enlarge Display mode CS240 CS231...

Страница 465: ...10 To empty the punch scrap box in Finisher FS 517 FS 608 Follow the procedure described below to empty the punch scrap box 1 Open the front door 2 Pull out the punch scrap box 3 Empty the punch scra...

Страница 466: ...1 To empty the punch scrap box in Finisher FS 519 CS231 Follow the procedure described below to empty the punch scrap box 1 Open the front door 2 Pull out the punch scrap box FN3 1 3 Empty the punch s...

Страница 467: ...11 Care of the machine...

Страница 468: ......

Страница 469: ...ld detergent 2 Reminder Be sure to turn off the machine set the main power switch to o before cleaning it Never use solvents such as benzene or thinner to clean the housing Original glass Clean the su...

Страница 470: ...gent glass cleaner benzene or thinner to clean the control panel or touch panel Document pad Clean the document pad by wiping it with a soft cloth dampened with a mild household detergent 2 Reminder N...

Страница 471: ...lower front door 2 Slowly pull out the charger cleaning tool as far as possible Next slowly push in the charger cleaning tool as far as possible Repeat the above operations three times 3 Securely ins...

Страница 472: ...11 Care of the machine 11 6 CS240 CS231 3 Insert the cleaning tool into the print head cleaning opening pull it out and then repeat this back and forth movement two or three times...

Страница 473: ...an be printed 1 Press the Utility Counter key 2 Touch Meter Count and then touch Check Details in the left panel The Meter Count screen appears Can the list of counters be printed Touch Print List sel...

Страница 474: ...sed can be viewed in the Coverage Rate screen 1 Press the Utility Counter key 2 Touch Meter Count and then touch Check Details in the left panel The Meter Count screen appears 3 Touch Coverage Rate 4...

Страница 475: ...3 When the message It is time for the scheduled inspection of the device appears If the message It is time for the scheduled inspection of the device appears contact your technical representative and...

Страница 476: ...11 Care of the machine 11 10 CS240 CS231...

Страница 477: ...12 Managing jobs...

Страница 478: ......

Страница 479: ...he job number does not change until the job is deleted By using the Increase Priority function the selected job can be moved to the front of the queue so that it is printed first Multi job feature Whi...

Страница 480: ...isted above can be displayed from any other Job List screen However if a different tab is selected while a setting is being changed that setting is canceled A Current Jobs list and a Job History list...

Страница 481: ...ext job to be printed after the current job is finished can be changed For details refer to In creasing printing priority on page 12 16 The buttons that appear differ depending on the tab or list Curr...

Страница 482: ...lay other jobs Item Name Description No Job identification number assigned when the job is queued User Name Displays the type source of the job COPY is displayed for copy jobs Status Current Jobs list...

Страница 483: ...ult the display for the sub display area is that when Job Display Setting is set to List Display For details on specifying the default display for the left panel and the display method for the left pa...

Страница 484: ...List screen appears 2 In the Print tab display the job to be deleted Jobs on the Job History list cannot be deleted 3 Select the job to be deleted and then touch Delete If the job to be deleted is not...

Страница 485: ...ore Delete was touched appears again and the job is deleted from the Current Jobs list 5 Touch Close or press the Reset key The Basic screen appears again 2 Note If user authentication settings have b...

Страница 486: ...can be checked from the Job List screen Print tab Status Receiving PrintWait Printing StopPrint Print Err Job Stored 1 Result Job Complete Deleted Due To Error Deleted by User Reset Modes 2 Error Det...

Страница 487: ...the screen displayed before Job Details was touched touch Close To return to the Basic screen press the Reset key Detail To delete the job touch Delete in the Detail screen If Detail appears in the D...

Страница 488: ...om the Release Held Job screen For details refer to Printing a stored job on page 12 14 To give priority for output to a job touch Increase Priority in the Current Jobs list For more details refer to...

Страница 489: ...t of the Print tab touch Release Held Job The Release Held Job screen appears 2 From the job list select the job whose proof copy is to be printed and then touch Proof Copy key If the job to be remove...

Страница 490: ...b touch Release Held Job The Release Held Job screen appears 2 Select the job to be removed from the Held Jobs list If the job to be removed from the Held Jobs list is not displayed touch and until th...

Страница 491: ...ore information about the settings Refer to the appropriate section Can a proof copy be printed For details on printing a proof copy refer to Printing a proof copy of a stored job on page 12 13 5 In t...

Страница 492: ...ob has already been interrupted or a job was already given priority printing is interrupted after printing for the current job is finished 1 Display the Job History list of the Print tab For details o...

Страница 493: ...13 Utility mode...

Страница 494: ......

Страница 495: ...page 13 7 2 Group 3 E mail Settings 2 Create User Box 1 Public Personal User Box Refer to Create user box on page 13 7 2 Bulletin Board User Box 3 Relay User Box 3 Limiting Access to Des tinations 1 A...

Страница 496: ...t Jobs During Copy Operation Automatic Image Rotation 4 Scan Fax Settings JPEG Compression Level Refer to Scan Fax set tings on page 13 20 Black Compression Level TWAIN Lock Time Default Scan Fax Sett...

Страница 497: ...Destination Refer to One touch User box registration on page 13 28 2 Create User Box 3 One Touch User Box Registration List 4 Maximum Number of User Boxes 4 User Authentica tion Account Track 1 Genera...

Страница 498: ...sition 3 Line Parameter Setting 4 TX RX Settings 5 Function Settings 6 PBX Connection Set tings 7 Report Settings 8 Job Settings List 9 Multi Line Setting 0 Network Fax Setting 9 System Connection Ope...

Страница 499: ...installed or when Internet fax functions are available Limiting access to destinations Access level Using the Access Level settings on this machine the security of registered destinations can be manag...

Страница 500: ...rs is level 0 Group In addition to users and destinations groups with access permissions can be created and given a name When users and destinations are registered in these groups a destination regist...

Страница 501: ...Touch 8 Limiting Access to Destinations The Limiting Access to Destinations screen appears 4 Touch 1 Create Group A maximum of 20 groups can be registered In the Create Group screen touch the button f...

Страница 502: ...trator Settings screen For details on displaying the Administrator Settings screen refer to Displaying the administrator settings screen on page 13 35 2 Touch 4 User Authentication Account Track The U...

Страница 503: ...ission group can be specified for each destination Only one access permission group can be specified for a single destination To specify the destination level touch Apply Level Touch the button for th...

Страница 504: ...Box or Personal User Box as the user type and then touch the button for the desired User The Public User Box and Personal User Box settings appear only when access by a public user is permitted If us...

Страница 505: ...tion screen Follow the procedure described below to display the One Touch User Box Registration screen by pressing Utility Counter key 1 Press the Utility Counter key 2 Touch 1 One Touch User Box Regi...

Страница 506: ...User Box Registration screen appears 2 Note To finish specifying settings in the Utility mode press the Utility Counter key Otherwise exit the Utility mode by touching Close in each screen until the s...

Страница 507: ...addition specify the priority of the paper trays when the auto tray switch operation is performed Tray 1 Tray 2 Tray 3 Tray 4 LCT Appears only when the LCT is installed Auto Tray Switch ON OFF Select...

Страница 508: ...eter Description Default Setting Print Fax Output Settings Specify settings for faxing and printing For details refer to the User manual Fax Op erations Option and the User manual Print Operations Out...

Страница 509: ...y mode OFF Shortcut Key 2 Parameter Description Default Tab Specify settings for faxing and scanning For details refer to the User man ual Network Scanner Operations the User manual Fax Operations Op...

Страница 510: ...y Zoom Ratio The following zoom ratios are specified 2in1 Booklet 70 7 4in1 50 0 8in1 35 3 Off The zoom ratio is not selected automatically Auto Display Zoom Ra tio Auto Sort Group Selection Select wh...

Страница 511: ...or not the Auto Zoom setting is automat ically selected when a paper tray is selected except when the Auto Paper setting is selected while a document is placed on the original glass OFF Auto Zoom ADF...

Страница 512: ...r scanning For details refer to the User manual Network Scanner Operations Black Compression Level TWAIN Lock Time Default Fax Scan Settings Compact PDF Compression Level Parameter Description Basic S...

Страница 513: ...ouch 2 User Settings An item can also be selected by pressing the key in the keypad for the number beside the desired button For 2 User Settings press the 2 key in the keypad The User Settings screen...

Страница 514: ...up when Sleep mode is canceled therefore taking more preparation time than Power Save mode Low Power Enter Power Save Mode Specify settings for faxing For details refer to the User man ual Fax Operat...

Страница 515: ...chine is turned off with the weekly timer function select whether or not use is limited with a password In addition if Yes is selected specify the password that must be entered No Parameter Descriptio...

Страница 516: ...1 Adjust the stapling position between 12 8 and 12 7 mm when printing with the Center Staple Fold setting 0 0 mm Half Fold Posi tion 1 CS240 Adjust the folding position between 10 and 10 mm when print...

Страница 517: ...ust the paper position where the two sides are separated between 2 0 mm and 2 0 mm during double sided printing 0 0 mm Color Regis tration Ad just Color Registration Adjust Yellow Adjust the color reg...

Страница 518: ...eset operation is per formed Priority Mode Copy System Auto Reset Time 1 minute Auto Reset Select the setting between 1 and 9 minutes or OFF for the desired length of time until the au tomatic panel r...

Страница 519: ...ure Print Docu ments Auto Delete Secure Docu ment Specify settings for using boxes For details refer to the User manual Box Operations 1 day Encrypted PDF Delete Time 1 day Document Hold Setting ON Pa...

Страница 520: ...ted if User Authentication is set to OFF The machine can be used without authentication if ON Without Login is touched when logging on as a public user When logging on as an authorized user the Ac ces...

Страница 521: ...low User Registration Register the users of this machine In addition the password printing permissions number of prints allowed and function permissions can be speci fied for each user User Counter Th...

Страница 522: ...y Levels Groups to Users The access permission level and the group with access permissions can be specified for each user Parameter Description Default setting General Settings Specify the authenticat...

Страница 523: ...obs During Copy Operation Select whether or not print data or fax data can be accepted for printing while a copy operation is being performed Accept Print data and fax data can be accepted and printed...

Страница 524: ...or details refer to the User manual Box Operations Description Default Setting Specify the range of Administrator mode parameters available to users Level 1 Low Power Mode Settings Auto Magnification...

Страница 525: ...elect the items whose operation restric tions are canceled Users Accounts Operations for user authentication and account track Secure Print Operations for confidential documents User Box Operations fo...

Страница 526: ...the hard disk where image data is saved after printing or sending can be overwritten and the data can be erased This process prevents disclosure of image data on the hard disk NO Overwrite All Data S...

Страница 527: ...ng Utility Counter key 1 Press the Utility Counter key 2 Touch 3 Administrator Settings An item can also be selected by pressing the key in the keypad for the number beside the desired button For 3 Ad...

Страница 528: ...ose in each screen until the screen for the Copy Fax Scan or Box mode appears 2 Reminder The default administrator password is 12345678 The administrator of this machine should change the administrato...

Страница 529: ...ging unit M Imaging unit Y Imaging unit K Fusing unit Transfer roller unit Image transfer belt unit The usage levels are shown as graphs 2 Note The consumables mentioned above are replaceable For repl...

Страница 530: ...the list of usage levels touch Print List and then touch Start or press the Start key To finish specifying settings in the Utility mode press the Utility Counter key Otherwise exit the Utility mode b...

Страница 531: ...d into the electrical outlet even if the machine has been turned off 0 Press the Utility Counter key touch Administrator Settings then System Settings then Weekly Timer Setting and correctly specify t...

Страница 532: ...ch 7 Expert Adjustment The Expert Adjustment screen appears 4 Touch 2 Printer Adjustment The Printer Adjustment screen appears 5 Touch 1 Leading Edge Adjustment The Leading Edge Adjustment screen appe...

Страница 533: ...he starting print position is adjusted during manufacturing of the machine Normally the starting print position will not need to be adjusted 0 Only A4 v paper can be used to adjust the bypass tray 1 D...

Страница 534: ...ferent paper tray return to step 6 11 Touch OK To cancel the setting and select the default press the Reset key The print position is adjusted Leading edge adjustment Duplex side 2 The starting print...

Страница 535: ...er Check that the distance has been adjusted to 4 2 mm If more adjustment is necessary repeat steps 8 and 9 To adjust the print position for a different paper type return to step 6 11 Touch OK The pri...

Страница 536: ...tance is 3 6 mm or more touch to reduce the adjustment between 0 2 mm and 3 0 mm If the distance is between 2 5 and 3 5 mm continue with step 10 Each time or is touched the value is increased or decre...

Страница 537: ...ngs screen appears 3 Touch 7 Expert Adjustment The Expert Adjustment screen appears 4 Touch 3 Finisher Adjustment The Finisher Adjustment screen appears 5 Touch 1 2 Position Staple Pitch Adjustment Th...

Страница 538: ...enter Staple Fold setting refer to Binding copies at the center Center Staple Fold setting on page 4 75 For the procedure on adjusting the center folding position refer to Half fold position on page 1...

Страница 539: ...he saddle stitcher is installed on optional finisher FS 519 touch buttons for the paper size and for the paper type 7 Compare the width of the left pages of the copy sample with the width of the right...

Страница 540: ...on when printing with the Half Fold setting can be adjusted for each paper size and for each paper type 2 Note CS240 Half Fold Position does not appear if optional Finisher FS 608 is not installed CS2...

Страница 541: ...justment The Finisher Adjustment screen appears 5 Touch 3 Half Fold Position The Half Fold Position screen appears 6 Touch the button for the paper size to be adjusted If the paper size to be adjusted...

Страница 542: ...e folding position is adjusted to the center of the paper If more adjustment is necessary repeat steps 6 through 9 Tri fold position adjustment The folding position when printing with the Tri Fold set...

Страница 543: ...the value is increased or decreased by one increment If the folding position is too far on the left side of the paper touch under Adjust Value to increase the adjustment between 0 1 mm and 12 7 mm 8...

Страница 544: ...on displaying the Administrator Settings screen refer to Displaying the administrator settings screen on page 13 35 2 Touch 1 System Settings The System Settings screen appears 3 Touch 7 Expert Adjus...

Страница 545: ...touch under Adjust Value to increase the adjustment between 0 1 mm and 5 0 mm 8 Touch OK To cancel the setting and select the default press the Reset key The vertical position of the punched holes is...

Страница 546: ...ore making any adjustments use a Punch setting to print a sample copy Perform the adjustment while checking the sample that was created 1 Display the Administrator Settings screen For details on displ...

Страница 547: ...heck that the horizontal position of the punched holes was adjusted If more adjustment is necessary repeat steps 6 through 9 Punch regist loop size adjustment The angle of punched holes when printing...

Страница 548: ...If the angle cannot be adjusted by touching or if the paper is wrinkled touch to change the adjustment Each time or is touched the value is increased or decreased by one increment 7 Touch OK To cancel...

Страница 549: ...r FS 608 is installed For details on the Punch settings refer to Punching holes in copies Punch settings on page 4 69 1 Display the Administrator Settings screen For details on displaying the Administ...

Страница 550: ...13 Utility mode 13 58 CS240 CS231 6 Press the Start key Automatic adjustment of the punched hole edge sensor begins Once the adjustment is completed the results screen appears 7 Touch Close...

Страница 551: ...1 Display the Administrator Settings screen For details on displaying the Administrator Settings screen refer to Displaying the administrator settings screen on page 13 35 2 Touch 1 System Settings T...

Страница 552: ...direction as shown below touch under Y to increase the adjustment between 1 dot and 6 dots If the lines are not shifted from the reference lines continue with step 10 9 Press the Start key The adjustm...

Страница 553: ...with the main power switch wait at least 10 seconds to turn the machine on after turning it off The machine may not operate correctly if it is turned on immediately after being turned off 0 The test p...

Страница 554: ...as the printed test pattern page Why are blank pages placed on top of the test pattern Place 10 sheets of blank paper on top of the test pattern to prevent it from becoming transparent Otherwise the...

Страница 555: ...y the Administrator Settings screen For details on displaying the Administrator Settings screen refer to Displaying the administrator settings screen on page 13 35 2 Touch 1 System Settings The System...

Страница 556: ...refer to Entering text on page 14 3 The header foot name is specified 8 Under Header Settings or Footer Settings touch Header Settings and then select the type of header footer to be printed 9 Select...

Страница 557: ...y mode 13 Editing headers footers 1 In the Header Footer Settings screen touch the button of the header footer to be edited 2 Touch Check Edit To delete the header footer touch Delete The Check Edit s...

Страница 558: ...ble functions copy operations scanning operations fax operations printing document storing operations and transmitted document printing Counters for printing scanning by each user Limits on using colo...

Страница 559: ...e to be totaled separately With this setup statistics can be maintained for each employee each user and on each duty of the employee each account In addition totals can be maintained on each employee...

Страница 560: ...e been applied touch Allow ON Without Login allows the machine to be used without authentication when logging on as a public user When logging on as an authorized user the Access key must be pressed f...

Страница 561: ...data without changing the settings touch No If the setting for any of the following is changed the data is not cleared Public User Access When of Jobs Reach Maximum or Synchronize User Authentication...

Страница 562: ...nded that limitations be placed on the machine functions that can be used For details refer to User registration on page 13 73 If account track settings have been applied while User Authentication is...

Страница 563: ...ils on displaying the Administrator Settings screen refer to Displaying the administrator settings screen on page 13 35 2 Touch 4 User Authentication Account Track The User Authentication Account Trac...

Страница 564: ...canning or faxing a document saved in a box 1 Display the Administrator Settings screen For details on displaying the Administrator Settings screen refer to Displaying the administrator settings scree...

Страница 565: ...ss is set to On Without login press the Access key to display the Basic screen User registration The password printing permissions number of prints allowed and function permissions can be specified fo...

Страница 566: ...External Server Authentication 9 Type in the password up to 64 characters long and then touch OK For confirmation the Password screen appears again Retype the same password and then touch OK The user...

Страница 567: ...settings to all users At this time do not turn off the machine with the main power switch If color printing is restricted printing is not possible with the Full Color 2 Color or Single Color settings...

Страница 568: ...etric type 23 Touch Function Permission The Function Permission screen appears 24 Touch the button for the desired setting for each operation To permit the operation to be performed touch Allow To pro...

Страница 569: ...or setting the 2 Color setting and the Single Color setting Print This table shows the total number of pages printed with print operations Total Total number of printout pages printed using all Color...

Страница 570: ...pears 6 Touch the button for the counter to be viewed and then check the counter To clear the counters for the current user touch Clear Counter in the Counter Details screen for the current user A con...

Страница 571: ...istrator Settings screen refer to Displaying the administrator settings screen on page 13 35 2 Touch 4 User Authentication Account Track The User Authentication Account Track screen appears 3 Touch 3...

Страница 572: ...was set to Password Only the same password cannot be registered more than once The Password screen appears 9 Type in the password up to 8 characters long and then touch Enter A screen for retyping the...

Страница 573: ...specify the maximum number of combined color and black prints allowed touch Total Allowance To separately specify the maximum number of color and black prints allowed touch Individual Allowance To sp...

Страница 574: ...lor setting and the Single Color setting Large Size Total number of pages copied on large sized paper using all Color settings the Black setting the Full Color setting the 2 Color setting and the Sing...

Страница 575: ...n for the counter to be viewed and then check the counter To clear the counters for the current account touch Clear Counter in the Counter Details screen for the current account A confirmation message...

Страница 576: ...haracters numbers or as the fax transmission password for boxes Limitations on the number of characters Limitations on registering changing 8 alphanumeric characters and symbols A password that consis...

Страница 577: ...tative The settings that must be specified or are forcibly set cannot be changed after Enhanced Security Settings is set to ON Required settings The following settings must first be specified in order...

Страница 578: ...he user This machine s counter data cannot be retrieved by Net Care or VISUALCOUNT MASTER An application performing the write operation with SNMP v1 v2c cannot be connected Write users using SNMP v3 m...

Страница 579: ...14 Appendix...

Страница 580: ......

Страница 581: ...ow to use the keyboard that appears in the touch panel for typing in the names of registered accounts and custom paper sizes The keypad can also be used to type in numbers Any of the following keyboar...

Страница 582: ...he keyboard can be displayed larger so that it easier to read 1 While the keyboard is displayed touch Enlarge ON The keyboard is displayed enlarged 2 To cancel the enlarged display and return the keyb...

Страница 583: ...text box 2 Note To revert to the setting when the keyboard was displayed touch Cancel To clear all entered text press the C clear key Some buttons may not appear depending on the characters being ent...

Страница 584: ...kground color of the original to one of nine levels Blue Set this parameter to adjust the level of blue in the image for example if you wish to emphasize the blue of water or the sky Brightness Set th...

Страница 585: ...and to manage security H Hue Set this parameter to make the image either more reddish or more bluish I Insert Image Set this function to later scan multiple images from the original glass and insert...

Страница 586: ...o redden skin tones S Saturation Set this parameter to adjust the degree of vividness of the colors in the image Save in User Box Temporarily saves the job on the hard disk so that it can later be rec...

Страница 587: ...240 CS231 14 9 Appendix 14 X XY Zoom Touch this button to use the keypad to specify the zoom ratio for producing an enlarged reduced copy of the loaded original Z Zoom Specify the zoom ratio of the co...

Страница 588: ...14 Appendix 14 10 CS240 CS231...

Страница 589: ...15 Index...

Страница 590: ......

Страница 591: ...ls 2 15 Center staple fold 4 71 4 75 Center staple position 13 46 Centering 13 41 Centering duplex 2nd side 13 43 Chapters 9 33 Check consumable life 13 37 Cleaning 11 3 CMYK color adjustment 9 9 Colo...

Страница 592: ...29 Maintenance 11 3 Manual conventions 1 12 Memory 6 69 Message 6 69 6 70 6 71 6 72 6 76 11 9 Message display time 5 27 Meter count 11 7 Minimal 4 38 Mirror image 9 21 9 42 Mixed original 4 20 14 6 Mo...

Страница 593: ...nts 2 16 Special paper 8 6 8 19 Stamp Composition 9 75 Staple 10 23 Staple cartridge 10 23 Staple jam 6 58 Staple settings 4 60 4 65 Status indicator 3 6 Stored jobs 12 13 12 14 Supplying paper 6 68 S...

Страница 594: ...15 Index 15 6 CS240 CS231...

Отзывы: