background image


VX16s All-in-One Controller 

User Manual 


www.novastar.tech 


10


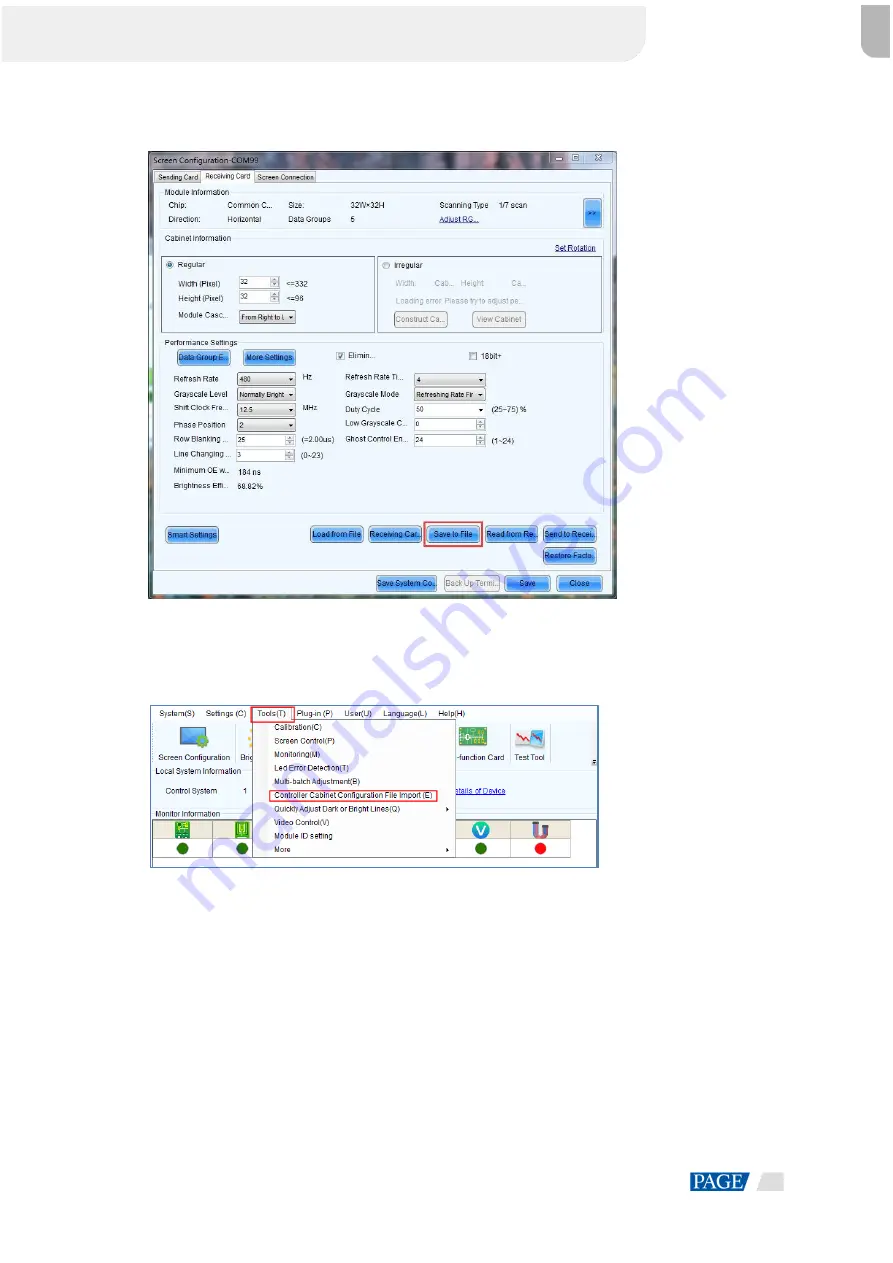
Figure 5-3 Saving receiving card configuration files 


Step 2  Choose 

Tools

 > 

Controller Cabinet Configuration File Import

 to enter the controller cabinet configuration 

file importing page. 

Figure 5-4 Importing controller cabinet configuration files 


Step 3  Click 

Add Configuration File

 to select the target file (*.rcfgx/*.rcfg) from your PC, and then click 

Open

Step 4  Click 

Save the Change to HW

 to send the configuration files to the VX16s. 

XI'AN 

NOVASTAR 

TECH 

CO.,LTD. 

Содержание VX16s

Страница 1: ...VX16s All in One Controller V1 0 0 User Manual XI AN N O VASTAR TECH CO LTD...

Страница 2: ...16s All in One Controller User Manual www novastar tech i Change History Document Version Firmware Version Release Date Description V1 0 0 V1 0 0 0 2020 06 16 First release XI AN N O VASTAR TECH CO LT...

Страница 3: ...s 14 5 4 5 4 1 Input Source Selection 14 5 4 2 Input Resolution Settings 15 5 4 3 DVI Mosaic 16 5 4 4 RGB Limited to RGB Full 17 Display Control 17 5 5 Preset Settings 18 5 6 Image Mosaic 19 5 7 Advan...

Страница 4: ...VX16s All in One Controller User Manual www novastar tech iii A 1 For a Single VX16s Unit 24 A 2 For Multiple VX16s Units 24 A 3 Notes 25 XI AN N O VASTAR TECH CO LTD...

Страница 5: ...l software it enables richer image mosaic effects and easier operations The VX16s supports a variety of video signals Ultra HD 4K 2K 60Hz image processing and sending capabilities as well as up to 10...

Страница 6: ...ayer TFT screen Display the device status menus submenus and messages Knob Rotate the knob to select a menu item or adjust the parameter value Press the knob to confirm the setting or operation ESC bu...

Страница 7: ...pport for custom resolutions Max width 3840 pixels Max height 3840 pixels HDCP 1 4 compliant DOES NOT support interlaced signal input HDMI 2 0 1 Max input resolution Up to 3840 2160 60Hz Support for c...

Страница 8: ...the control PC for communication Connect to the network USB 2 USB 2 0 Type B Connect to the PC for debugging Input connector to link another device USB 2 0 Type A Output connector to link another dev...

Страница 9: ...VX16s All in One Controller User Manual www novastar tech 5 3 Applications Note This product can only be worked horizontally Wall mounting is not permitted XI AN N O VASTAR TECH CO LTD...

Страница 10: ...cted This Ethernet port is not connected This Ethernet port is connected and serves as the backup output port C Resolution and frame rate of the configured screen Screen brightness D Synchronization T...

Страница 11: ...nput source The output image is frozen BKG The BKG function is turned on The BKG function is turned off Communication The VX16s is communicating with the control PC via USB The VX16s is communicating...

Страница 12: ...e LED screen Figure 5 1 Screen brightness Step 1 Press the knob to enter the main menu screen Step 2 Select Screen Brightness and press the knob to confirm the selection Step 3 Rotate the knob to adju...

Страница 13: ...quantity of the cabinets loaded by Ethernet port 1 Step 5 Rotate the knob to select Data Flow Front View and press the knob then select an appropriate data flow pattern of the cabinets During data fl...

Страница 14: ...ration File Import to enter the controller cabinet configuration file importing page Figure 5 4 Importing controller cabinet configuration files Step 3 Click Add Configuration File to select the targe...

Страница 15: ...You can set the cabinet row and column quantities horizontal offset vertical offset and data flow of the cabinets loaded by a single Ethernet port Operating Procedure Step 1 Press the knob to enter t...

Страница 16: ...t number and 001 stands for the cabinet number Note The receiving cards of the screen must support the Mapping function You can check the types of receiving cards on NovaStar s official website www no...

Страница 17: ...8 V Height The vertical height of the layer with a maximum of 32 768 Initial X The initial horizontal coordinate of the layer Initial Y The initial vertical coordinate of the layer Input Crop Display...

Страница 18: ...tings 5 4 5 4 1 Input Source Selection The supported input sources include HDMI SDI and DVI Rotate the knob to select the desired input source and press the knob to enter the input source resolution s...

Страница 19: ...solution Figure 5 13 Choosing a resolution setting method Note The SDI input source does not support resolution settings Standard Resolution Choose a standard resolution and frame rate Then rotate the...

Страница 20: ...2560 1600 50 59 94 60 Hz 2560 1600 120Hz 3840 1080 30Hz 3840 1080 50 59 94 60 Hz 3840 1080 120Hz 3840 2160 23 98 24 25 29 97 30 Hz 3840 2160 50 59 94 60 Hz Custom Resolution Rotate the knob to set a...

Страница 21: ...e backup device will take over the primary device to output the image Notes Only one interlaced SDI input is supported in the mosaic mode of four DVI connectors Mosaic Backup is set to Part by default...

Страница 22: ...ontrast value ranges from 180 to 180 and defaults to 0 The rotating stepping of the knob is 1 Reset Reset the image color parameters to the factory defaults Preset Settings 5 6 The VX16s supports 10 p...

Страница 23: ...160 Advanced Settings 5 8 5 8 1 Hot Backup You can set the VX16s as the primary device or backup device The data flow patterns in both the modes are the same Set as Primary The icon of the target Ethe...

Страница 24: ...height to the half of the resolution height of the 3D source if the source is top and bottom Figure 5 19 Hardware connections Step 1 Complete the hardware connections as shown in Figure 5 19 Step 2 R...

Страница 25: ...nd the maximum value is 3600s 5 8 7 Factory Reset You can reset all user data to factory settings 5 8 8 About Us You can view the following information Device hardware version Official website Email s...

Страница 26: ...the device IP address and subnet mask manually Auto The device reads the network parameters automatically Reset Reset the parameters to defaults Figure 5 21 Network settings Notes When the VX16s commu...

Страница 27: ...10 RH 85 RH non condensing Physical Specifications Dimensions 482 6 mm 372 5 mm 94 6 mm Net weight 6 22 kg Gross weight 9 78 kg Packing information Carrying case 530 0 mm 420 0 mm 193 0 mm Accessorie...

Страница 28: ...eed to adjust this parameter Step 7 Adjust the signal delay to keep the left right eye switching of the 3D glasses and the LED screen in sync It is recommended you adjust the signal delay according to...

Страница 29: ...source you do not need to adjust this parameter Step 8 Adjust the signal delay to keep the left right eye switching of the 3D glasses and the LED screen in sync It is recommended you adjust the signal...

Страница 30: ...XI AN N O VASTAR TECH CO LTD...

Отзывы: