


Operating instructiOns 8264
6
2018-09-12
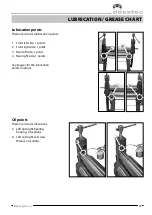
operaTion
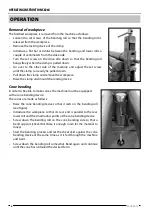
Removal of workpiece
The finished workpiece is removed from the machine as follows:
• Loosen the set screws of the bending roll so that the bending roll is
released from the workpiece.
• Remove the locking device of the clamp.
• Introduce a flat bar or similar between the bending and lower rolls a
couple of centimeters from the drive side.
• Turn the set screw on the drive side down so that the bending roll
hangs freely when the clamp is pulled down.
• Go over to the other side of the machine and adjust the set screw
until the clamp can easily be pulled down.
• Pull down the clamp and remove the workpiece.
• Raise the clamp and mount the locking device.
Cone bending
In order to be able to make cones, the machine must be equipped
with a cone bending device.
The cones are made as follows:
• Raise the cone bending device so that it rests on the bending roll
(see figure).
• Introduce the workpiece so that its rear end is parallel to the rear
lower roll and the small radius points at the cone bending device.
• Screw down the bending roll on the cone bending side so that a
bend appears (check that there is enough room for the material to
move).
• Start the bending process and let the sheet skid against the cone
bending device at the same time as it is fed through the machine
and bent.
• Screw down the bending roll somewhat. Bend again and continue
until the cone has obtained the desired form.
Содержание 8264
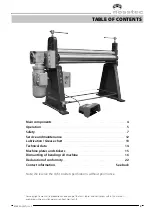
Страница 1: ...Bending Roll Machine 8264 Operating Instructions...
Страница 2: ......
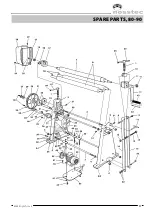
Страница 17: ...8264 English rev 3 17 Spare parts 80 90...
Страница 18: ...Operating Instructions 8264 18 2018 09 12 Spare parts 90 100...
Страница 19: ...8264 English rev 3 19 Spare parts 100 110...
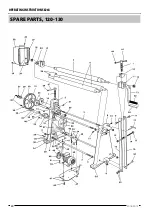
Страница 20: ...Operating Instructions 8264 20 2018 09 12 Spare parts 120 130...
Страница 23: ......


