44
|
Nord Wave User Manual OS V1.00
adjust the beginning of the selection.
Range End
This will indicate where the selection you have made in
the graph ends. Use the increment/decrement buttons to
adjust the end of the selection.
Assign button
This activates the assignment of the selected audio file,
using the settings you have entered for the parameters for
the MaSA function.
Deassign
This deactivates the assignment of the sample that is in
focus.
Enable box
This enables or disables the assignment of the sample in
focus. It will default to the checked state when you click
the Assign button. Un-check it to temporarily disable an
assignment to the sample in focus. The sample and the set-
tings will be kept in the Project, just check the box again to
put it right back in business.
Deassign All
Clicking on this button will permanently de-assign the
mapping of the focused sample, and also all the other
samples that originates from the same audio file. Use this
function with care, to quickly start with a clean slate with a
previously mapped audio file.
Sample Loop/Stop Tab
In this tab there are functions that will assist you in finding
a loop for the sample that is currently in focus, as indicated
by the yellow color in the Keyboard Grid. As soon as an
audio file or a selection from an audio file is assigned as a
sample, a loop will be automatically created by the Nord
Wave Manager.
Looping a sample is very useful in order to be able to play
the sample for a time period that is longer than the actual
sample itself. It also helps conserving the available memory
space, you can have more samples available.
A loop in a sample consists of two positional markers in the
audio, the loop start and the loop end markers. Visualize
the playback of a sample as a horizontal journey from the
start of the waveform at the extreme left, towards the end
at the right.
Somewhere along the line you will pass the loop start
marker, making a mental note of its location. You continue
to travel towards the end of the audio file but when you
reach the loop end marker, you immediately go back to the
loop start marker and resume the path towards the end.
And then you hit the loop end marker again, go back to the
loop start, and so on.
To create a perfect, seamless loop can sometimes be a
bit difficult. Sometimes the audio at the loop start is very
different compared to the audio at the loop end marker,
which will produce audible and perhaps unwanted arti-
facts in the sound.
In order to minimize certain loop artifacts, a crossfade
function can be used. This uses audio that is before the
loop start marker, and mixes this with audio that is before
the loop end marker when the loop is playing back.
A crossfade has usually several parameters to set the
length of the crossfade, and to adjust the taper of how
these two sound bites will blend into each other during
playback. This can help to smooth things out and create a
better sounding loop.
Any audio data after the loop end point will be auto-
F
matically discarded by the Nord Wave Manager when
you create the Sample Instrument from the Project.
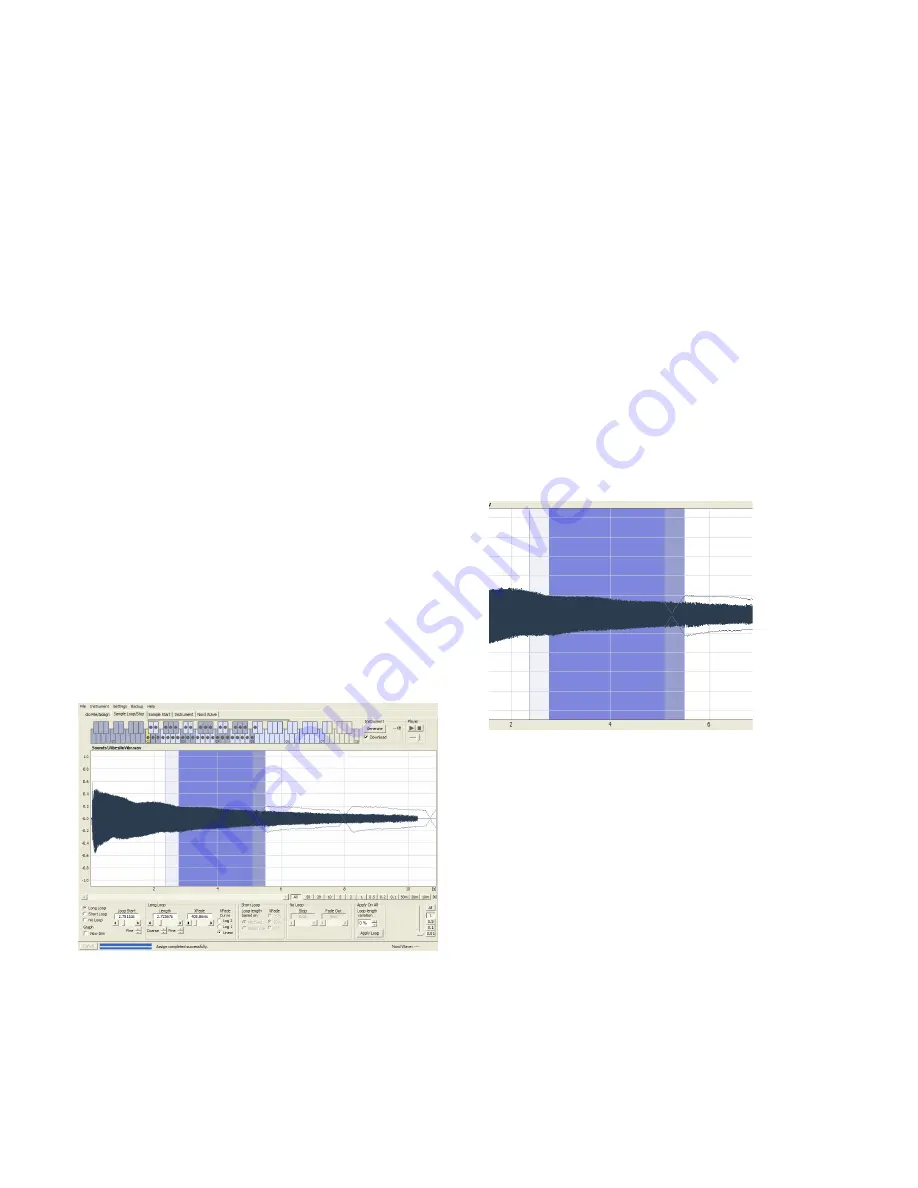
Waveform graph colors
The waveform graph presents the loop by showing certain
areas in different colors. The position of the loop start
marker is at the left edge of the blue area. The position of
the loop end marker is at the right end of the darker blue
area.
The crossfades first section is indicated with the light blue
area that is before the loop start, to the left of the blue
area. The crossfades end section is the darker area imme-
diately to the left of the loop end marker. As these set-
tings are changed by you, the indication in the graph will
change as well.
You can set the position of the loop start marker by clicking
anywhere in the graph. If you right-click to the right of the
loop start marker, you can set a new loop end marker – and
change the actual loop length.
The graph in the Sample Loop/Stop tab can be augmented
with a more detailed display of the waveform at the
loop start and the loop end markers. This is activated by
checking the View Trim box at the lower, left corner of the
Manager window.


