background image

19

8  TROUBLESHOOTING

 WARNING

Do not attempt to repair the tool by yourself. 

This will cause damage to the tool and danger to 

yourself when you use it again.

 If any of the following, or other symptoms occur, 

or if there are other matters concerning usage 

that you do not understand, please consult the 

sales agent from whom you purchased the tool or 

an authorized dealer.

Various errors are indicated by LED with this 

machine in which the contents of error can be 

identi

fi

ed by the color of LED.

Refer to “4-4 Various Safety Functions and 

Error Detection Functions” for details including 

countermeasures for various errors.

9  MAINTENANCE AND INSPECTION

 WARNING

 When performing maintenance or inspection work, 

turn the magnet switch off and remove the battery 

pack from the machine. Furthermore, unplug the 

power supply plug of the charger from the electric 

outlet.

 Periodically check for looseness of screws 

fastened at each part. Tighten the screw if it is 

loose.

 After work, store at a dry area where the 

temperature is less than 50°C and is out of reach 

of children.

 After work, do not store at an area where volatile 

that has possibility of ignition or explosion is kept.

 Do not put conductive items such as chips, nails 

and copper wires in the storage case.

 Attach a terminal cover to the battery pack when 

storing.

9-1 Greasing of sliding surfaces

From time to time, the sliding surfaces between the 

body and the Slide Board should be greased.

9-2 Loose Slide Board adjustment

When adjusting looseness of the slide board, 

check that the slide board is located at the slide 

b o a r d   a d jus t m e n t   s c r e w   p o si t ion   b e f o r e 

tightening.

Any looseness between the body and the Slide 

Board will adversely affect drilling precision, leading 

to premature wear on the cutter.  When looseness is 

encountered, eliminate it by uniformly re-tightening 

the four Slide Board adjustment screws on the 

lateral side of the body to the extent that the Drill 

Motor will not fall under its dead weight.  The screws 

are designed to work as a double-lock, so they 

should be securely tightened by turning the nuts.

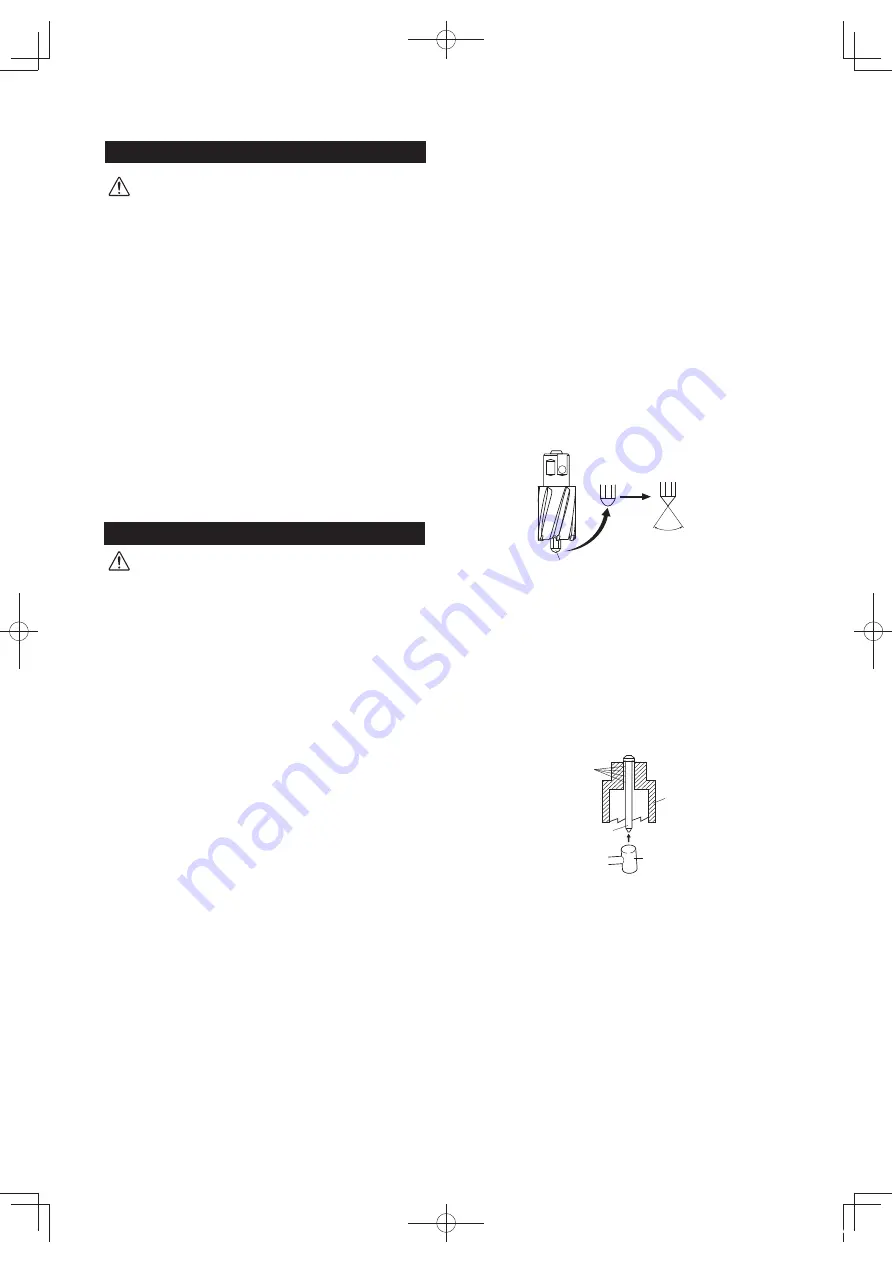
9-3 Sharpening of Pilot Pin tip

If the Pilot Pin tip is dull, the pin will not be able to 

fi

t

itself into the punching hole, causing poor drilling 

precision.  It should be inspected from time to time, 

and , if the Pilot Pin tip is found to be dull, sharpen the 

tip or replace with a new one.  Exercise caution during 

the sharpening operation as any rough grinding 

softens the tip due to annealing, even to the point of 

disabling it in some cases. (Fig. 34)

Pilot Pin

Sharpen

the tip

Optimal angle 70°

(Fig. 34)

9-4 Loosen a tight Pilot Pin

When the cutter needs to be replaced, pull out and 

change the Pilot Pin which acts as a guide.  However, if 

Metal chips are caught between the cutter and the pin, 

the pin may be dif

fi

cult to be pulled out.  Tap the end of 

the pin gently with a wooden mallet as you pull it out. 

(Fig. 35)

Pilot Pin

Cutter

Metal chips

Wooden mallet

(Fig. 35)

9-5 Cutter grinding

When the cutter needs re-grinding, consult the sales 

agent from whom you purchased the tool or an authorized 

dealer.

9-6 Inspection and Replacement of Carbon Brush

Periodically inspect the abrasion condition of the 

carbon brush.

Replace the carbon brush with a new carbon brush 

when the remaining length of the carbon brush is 8 to 

9 mm since the recti

fi

cation will deteriorate and may 

cause machine failure when left unreplaced. (Fig. 36)

15.+/2+..]AJ?+050.]C,glbb/7

/2,7,/.28//8.7NK

Содержание ATRA ACE CLA-2720

Страница 1: ......

Страница 2: ......

Страница 3: ...will cause severe injuries Always keep all parts of your body away from the cutting tip Always keep your hand and clothing away from the cutting tip ABOUT THE WORK AREA Keep Work Area Clean Always keep your work area clean Cluttered work areas cause accidents Always keep clear of other objects Never use the magnetic drilling machine when it is wet Always use the drilling machine in a dry area Do n...

Страница 4: ...nt and severe injuries Check all Parts for Damage Always inspect the magnetic drilling machine before use Always check that the pilot pin and cutter are in good condition Use of the machine with worn pilot pins or worn cutter can cause accidents and severe injuries Inspect all cutter before you put them on the magnetic drilling machine Do not operate the magnetic drilling machine with a damaged or...

Страница 5: ...hat cannot be controlled with the switch is dangerous and must be repaired Disconnect the battery pack from the power tool before making any adjustments changing accessories or storing power tools Such preventive safety measures reduce the risk of starting the power tool accidentally Store idle power tools out of the reach of children and do not allow persons unfamiliar with the power tool or thes...

Страница 6: ...ripheral areas of the battery pack and battery charger with wet hands It may cause electric shock Turn the switch of the machine off and disconnect the battery pack from the machine in cases described below When not in use or when repairing When replacing accessories such as a drill When work is finished and storing the machine When other dangerous situation is assumed Avoid abrupt starting Check ...

Страница 7: ......

Страница 8: ......

Страница 9: ... in normal condition and turns or blinks in red when it is in overload condition Decrease the feeding rate of the drill when LED is turned or blinking in red since the electric drill is in overload condition and obtain a load with LED in green or yellow when drilling The power of the electric drill drops when excessive load is applied to the electric drill and LED starts blinking rapidly in red Wh...

Страница 10: ...THE CONTENTS OF THE PACKAGE AND ACCESSORIES CLA 2720 Package Contents Q ty check ATRA ACE 1set Hex Socket Screw Key 3 1 Hex Socket Screw Key 4 1 Spanner 8 10 1 Battery Charger 1set Battery Pack 2set TUBE 4 7 1 Package Contents Q ty check Cutting Oil 0 5ℓ Can 1 Handle Assʼy 1 Lashing belt 1 Jet Oiler No 3013 1 Instruction Manual 1 Guard 1 Hex Socket Set Screw 8 28 1 Hex Socket Head Cap Screw 5 12 1...

Страница 11: ......

Страница 12: ......

Страница 13: ...s y can be attached on either right or left of the machine Fig 14 When the handle Ass y interferes with the lock screw attach the lock screw on the opposite side of the handle Ass y Refer to 7 2 3 Aligning with Punch Mark for attaching the lock screw 2 How to detach the handle Ass y The handle Ass y can be detached by pulling the sleeve of the handle Ass y toward the handle Pinion Shaft Sleeve Loc...

Страница 14: ......

Страница 15: ... Method of Storage Seal after use to prevent admixture with dirt and or water Store in a cool dark place away from direct sunlight and rain 6 Method of Disposal Disposal of undiluted and diluted fluid should be handled as waste fluid in accordance with the law by a waste disposal specialist Wash water should be treated by pH adjustment flocculation and settling activated sludge treatment activated...

Страница 16: ......

Страница 17: ......

Страница 18: ......

Страница 19: ......

Страница 20: ...ghtening Any looseness between the body and the Slide Board will adversely affect drilling precision leading to premature wear on the cutter When looseness is encountered eliminate it by uniformly re tightening the four Slide Board adjustment screws on the lateral side of the body to the extent that the Drill Motor will not fall under its dead weight The screws are designed to work as a double loc...

Страница 21: ......

Страница 22: ... Name Applicable Cutter TK01167 Pilot Pin 06025 C1 Hi Broach 12 to 17mm dia Jetbroach 12 to 17mm dia TJ12696 Pilot Pin 08025 A1 Hi Broach 17 5 to 27mm dia TJ15859 Pilot Pin 08035 A2 Jetbroach 17 5 to 27mm dia 10 3 Supporting Magnet Ass y Part No Part Name TB04374 Supporting Magnet Ass y 10 4 Oil tank Ass y Part No Part Name TB09657 Oil tank Ass y CAUTION Pay attention to prevent jamming hooking of...

Страница 23: ... 23 5 X 35 TK00301 17 5 X 35 A2 TK00314 24 X 35 TK00302 18 X 35 TK00315 24 5 X 35 TK00303 18 5 X 35 TK00316 25 X 35 TK00304 19 X 35 TK00317 26 X 35 TK00305 19 5 X 35 TK00318 26 5 X 35 TK00306 20 X 35 TK00319 27 X 35 TK00307 20 5 X 35 Hi broach One touch Type metric sizes Part No Diameter Depth mm PILOT PIN Part No Diameter Depth mm PILOT PIN TK00698 12 X 25 C1 TK00341 21 5 X 25 A1 TK00699 13 X 25 ...

Страница 24: ......

Страница 25: ...50 Hex Socket Set Screw With Flat Point 6X12 5 58 TQ04783 Supporter 5 59 TB09490 Body Sub Ass y 1SET 60 TP05136 Drive Rivet No 2x4 8 2 61 TQ10804 Plate Serial Number 1 No Part No Part Name Q ty Price 62 TP06390 External Retaining Ring C 11 2 63 TQ14110 Washer 11 2X24 5X1 2 64 TQ14105 Sleeve 1 65 TQ14103 Pinion Shaft 1 66 TP00200 Hex Socket Head Cap Screw 5X 8 8 67 TQ02129 Pan Head Screw 3X10 with ...

Страница 26: ......

Отзывы: