background image

Electrical System

54

Service Manual – SC1500

Troubleshooting

Note:

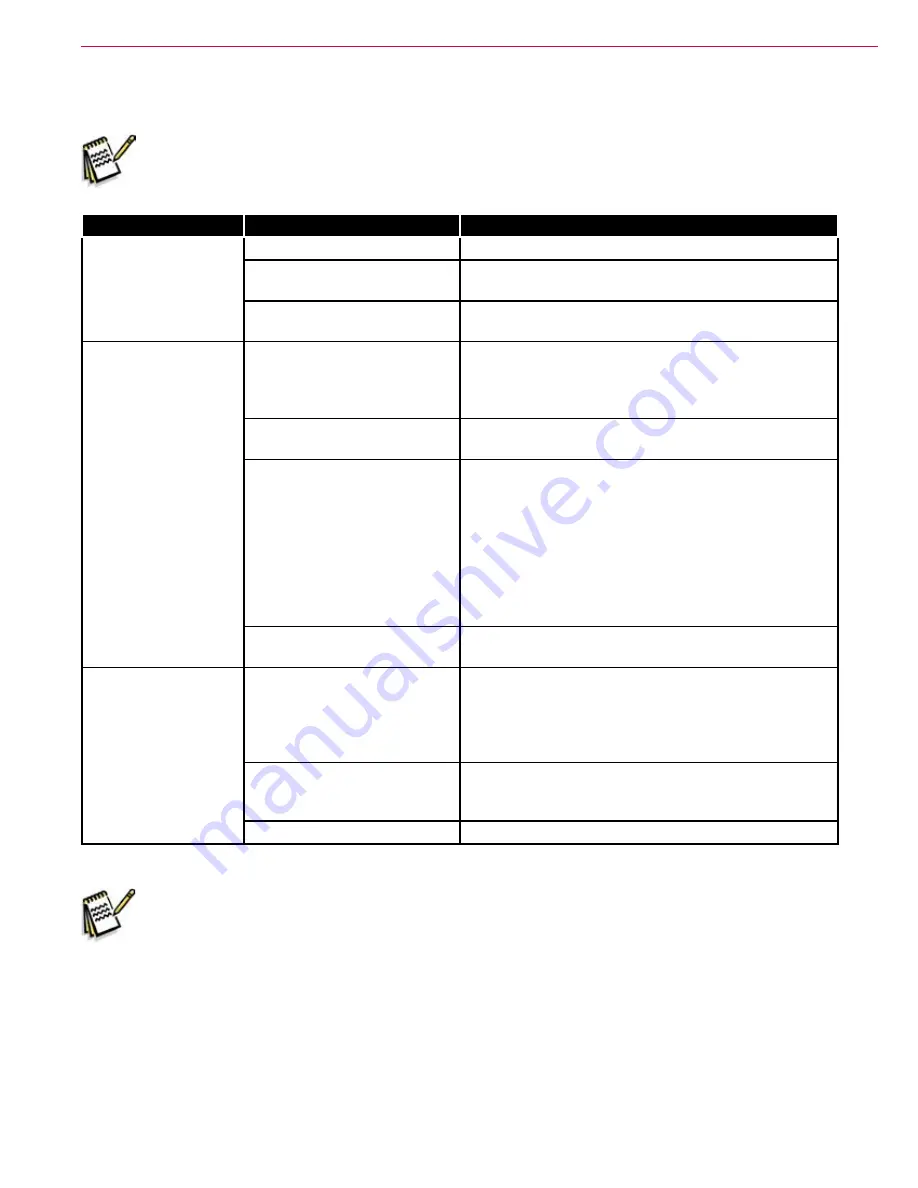
  Refer to the individual machine system sections for electrical troubleshooting procedures.

Problem

Cause

Correction

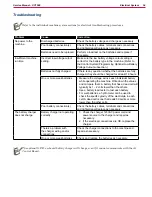
No power to the 
machine.

Discharged batteries.

Check the battery voltage and charge as necessary.

Poor battery connection(s).

Check the battery cables, terminals and connections 
and tighten/repair/replace as necessary.

Batteries need to be replaced.

Perform a load test on the batteries and replace if 
necessary.

Insufficient machine 

run time.

Incorrect low-voltage cutout 
setting.

Make sure the low battery voltage cutout setting is 
correct for the battery type in the machine. (Refer to 
the Control System/Programming Options/Low Battery 
Voltage Cutout subsection.)

Batteries not fully charged.

If there is any question whether the batteries are fully 
charged, they should be charged for at least 16 hours.

One or more weak batteries.

• 

Measure the voltage across each individual battery 
while operating the machine. Write down the values 
and compare them. A battery that has a dead cell will 
typically be 1 - 2 volts lower than the others.

• 

Use a battery load tester to test each battery.

• 

For wet batteries, a hydrometer can be used to 

check the specific gravity of the electrolyte in each 

cell. A dead cell is one that reads 50 points or more 
lower than the other cells.

Poor battery connection(s).

Check the battery cables, terminals and connections 
and tighten/repair/replace as necessary.

The battery charger 
does not charge.

Battery charger not operating 
correctly.

1.  Check the charger 120VAC power cord and 

power source to the charger and repair as 
necessary.

2.  If the electrical connections are OK, replace the 

charger.

There’s a problem with 
the charger wiring and/or 
connections.

Check the charger connections to the machine and 
repair as necessary.

One or more weak batteries

Check and replace the batteries as necessary.

Note:

  The optional S.P.E. on-board battery charger will charge, even if it cannot communicate with the A1 

Control Board.

Содержание 56104000

Страница 1: ...SC1500 5 2013 Revised 11 2017 Form No 56043166 English Service Manual Advance SC1500 Models 56104000 X20D 56104001 X20R Nilfisk SC1500 Models 56104002 SC1500 51D...

Страница 2: ...Schedule 13 Lubrication Locations 14 Major Machine Components 15 Machine Controls 16 Key Switch Emergency Stop and Horn Switch 16 Circuit Breakers 17 Speed and Direction Controls and Indicators 18 Sc...

Страница 3: ...43 A1 Control Board Shop Measurements 45 Electrical System 47 Functional Description 47 Overview 47 On board Battery Charger 47 Interlock Circuit 48 S P E Charging Profiles and Charging Progress 49 D...

Страница 4: ...n 88 Scrub Deck 88 Scrub Deck Actuator Assembly 92 Scrub Deck Actuator Adjustment 93 Specifications 94 Solution System 95 Functional Description 95 Solution Tank Water Filter and Valves 95 Solution So...

Страница 5: ...eral Troubleshooting 120 E1 Curtis Speed Controller Diagnostics 120 Diagnostics Method A Graphic Display and Detergent On Off Indicator 120 Diagnostics Method B Curtis Programmer 121 Diagnostic Histor...

Страница 6: ...fe Please read it thoroughly before servicing your machine Revision History Date Revisions 6 13 Initial publication 7 13 Revised Scrub Deck Actuator adjustment Added manual Revision History table to G...

Страница 7: ...be performed by an Authorized Advance Service Center that employs factory trained service personnel and maintains an inventory of Advance original replacement parts and accessories Call the Advance De...

Страница 8: ...ly trained and authorized personnel This machine is not intended for use by persons including children with reduced physical sensory or mental capabilities or lack of experience and knowledge Avoid su...

Страница 9: ...y Switch off O removing the key and applying the parking brake Turn the Key Switch off O and remove the key before changing the brushes and before opening any access panels Take precautions to prevent...

Страница 10: ...etic brake that engages whenever the Key Switch is Off or the Go Pedal is released You can manually override this brake if necessary by reaching up around the back of the front drive wheel and rotatin...

Страница 11: ...A Gross Vehicle Weight w full solution tank empty recovery tank heaviest batteries no Operator 718 lbs 326 kg Net Weight w empty solution and recovery tanks no batteries or brushes 354 lbs 161 kg Maxi...

Страница 12: ...lb 23 05 N m 11 ft lb 14 91 N m 3 8 31 ft lb 42 03 N m 20 ft lb 27 12 N m 1 2 75 ft lb 101 69 N m 50 ft lb 67 79 N m 3 4 270 ft lb 366 07 N m 180 ft lb 244 05 N m M5 61 in lb 6 89 N m 36 in lb 4 07 N...

Страница 13: ...ean the Brushes Pads X Check Clean the Squeegee X Check Clean Vacuum Shutoff Float X Empty Clean Debris Catch Tray in Recovery Tank X Check Each Battery Cell s Water Level X Inspect Scrub Housing Skir...

Страница 14: ...ing too much grease Hex Shaft Steering Tube Assembly Drive Wheel Chain Drive Chain Idler Sprocket grease fitting Steering Chain Once a month apply light machine oil to the Upper and Lower Steering Sha...

Страница 15: ...eneral Information 15 Service Manual SC1500 Major Machine Components Electrical System Recovery System Solution System Chassis System Squeegee Assembly Scrub System 20D Scrub System REV Control System...

Страница 16: ...ry power to the machine Note that you must turn the Key Switch to the on I position before stepping onto the machine platform Emergency Stop shuts off all battery power to the machine when pressed To...

Страница 17: ...e positive voltage to the key switch and to the battery positive inputs J3 1 and J3 8 on the A1 Control Board 20 amp Circuit Breaker labeled CB3 in the Ladder Diagram controls the positive voltage to...

Страница 18: ...Indicator lights to indicate that the Forward Drive Switch has been selected Note that this indicator is lighted in the adjacent drawing Reverse Drive Switch selects the reverse direction Reverse Dri...

Страница 19: ...ressure Bar Graph displays the scrub pressure on the graphic display as follows Bottom box filled standard scrub pressure as shown Top and bottom boxes filled extra scrub pressure Solution Controls an...

Страница 20: ...three seconds The Detergent On Off Indicator will flash and the purge cycle will last for approximately 10 seconds Burst of Power Switch and Indicator Burst of Power Switch temporarily overrides the c...

Страница 21: ...the vacuum mode from low quiet bottom box filled as shown to high standard both top and bottom boxes filled then to off no boxes filled Note that the vacuum motor will switch on when the machine is d...

Страница 22: ...of filled bars in the battery icon Five solid bars indicates a full battery charge No solid bars empty battery icon indicates that the batteries are discharged Battery Status and Charger Screens Batt...

Страница 23: ...Pedal The Battery Charger is mounted to the bottom of the Chassis Weldment The non traction Wheels are held by flat washers and M8 x 20 screws that thread into the axle in the Chassis Weldment The Dri...

Страница 24: ...uates the Operator Presence Switch called the Deadman Switch S2 in the Wiring Diagram The Operator Presence Switch must be actuated before the Go Pedal will drive the machine forward or reverse When t...

Страница 25: ...Test Mode The Programming Mode is used primarily for telling the A1 Control Board how the machine is equipped so that it can operate accordingly The Service Test Mode allows you to operate various ma...

Страница 26: ...ximately 1 amp 10 Brush Contactor K2 coil overload The Brush Contactor has drawn more than approximately 1 amp 11 Detergent Pump overload The Detergent Pump has drawn more than approximately 1 amp 21...

Страница 27: ...the Detergent Pump driver should have been off 70 On board Battery charger fault An error has been generated via the serial communications between the charger and the A1 Control Board due to an incorr...

Страница 28: ...g the machine systems Service Test Mode is accessed through the hidden menu system which is described in Programming Options on page 31 Note Service Test Mode is not available if the machine is being...

Страница 29: ...ation Switch see below SPD indicates the drive controller state In this case it would display R for reverse The three digits display the battery voltage 26 5 volts in this example REV indicates that t...

Страница 30: ...Pressing the Solution Flow Adjustment Switch toggles the solution solenoid ON and OFF When the solenoid is ON it will operate at 50 duty cycle 1 cycle 3 seconds ON 3 seconds OFF SOL indicates the sta...

Страница 31: ...submenu press the forward reverse switches to scroll through the options 9 Press the Scrub switch to save and exit the submenu The main menu contains the following links to the corresponding programmi...

Страница 32: ...pump automatically when the batteries discharge to the selected cutout level The 2 LOW VOLT CUTOUT submenus allow you to select the voltage cutout level for the type of battery installed in your machi...

Страница 33: ...to enable or disable the burst of power function When the burst of power function is enabled YES pressing the Burst Of Power Switch while scrubbing will attempt to make a temporary increase in the sol...

Страница 34: ...hat the 6 CHEMICAL RATE BIAS submenus only have an effect if the ECOFLEX INSTALLED YES option is selected see above The default setting is NONE Open Fault Detect Normally the A1 Control Board will per...

Страница 35: ...settings The Operator will not be able to select flow rate s that are locked out during normal operation The default setting is NONE PROGRAM OPTIONS LOCKOUT BRUSH NONE PROGRAM OPTIONS 9 LOCKOUT BRUSH...

Страница 36: ...horn volume The default setting is HIGH PROGRAM OPTIONS BACKUP ALARM VOL MEDIUM PROGRAM OPTIONS BACKUP ALARM VOL HIGH PROGRAM OPTIONS BACKUP ALARM VOL LOW PROGRAM OPTIONS BACKUP ALARM VOL OFF PROGRAM...

Страница 37: ...ing the machine Any logged fault codes will be shown on the display Fault codes 3 32 and 52 are shown here in this example If no fault code is present the display will show a Pressing the Burst Of Pow...

Страница 38: ...e but the selected information can be changed at will via the 17 EXTRA INFO ON LCD submenus Descriptions of the letter codes are as follows BV Battery Voltage LOK Battery Lock Level ACT Deck Actuator...

Страница 39: ...the time on the hour meter when the error code occurred 12 15 in this example The other nine first level submenus are links to the next second layer of submenus that display the 128 data points corre...

Страница 40: ...he Reverse Drive Switch will step you from data record 128 to 127 127 to 126 etc In the fast scrolling mode the increment decrement value is 10 one second Pressing the Forward Drive Switch will step y...

Страница 41: ...cators are used as described in the table below Membrane Switch Resulting LED Indicators Legacy Machines Resulting LED Indicators Newer Control Boards Horn Switch Burst Of Power Amber LED Burst Of Pow...

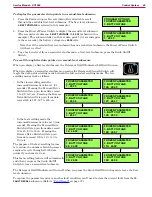
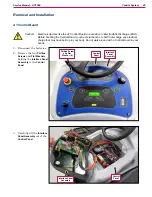
Страница 42: ...to discharge any electrical charge that may have built up in your body Do not walk around with a Control Board in your hands 1 Disconnect the batteries 2 Remove the four Phillips Screws and Flat Washe...

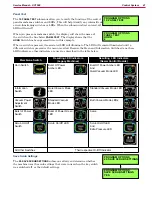
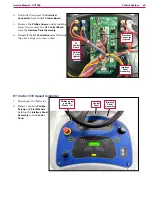
Страница 43: ...Assembly 6 Reinstall the A1 Control Board by following the above steps in reverse order E1 Curtis 1210 Speed Controller 1 Disconnect the batteries 2 Remove the four Phillips Screws and Flat Washers ho...

Страница 44: ...e E1 Curtis 1210 Speed Controller 5 Remove the two Socket Head Screws and remove the E1 Curtis 1210 Speed Controller from the Control Panel 6 Reinstall the E1 Curtis 1210 Speed Controller by following...

Страница 45: ...9v retracting J1 10 ORN BLK Brush Act B 2 1v or 3 8v at rest 0 2v retracting 22 9v extending J2 1 BLK B B 0 09v Vacuum On J2 2 BLK B B 0 09v Vacuum On J2 3 ORN Batt Chg Comm B 0 8v key off Plug in Cha...

Страница 46: ...24 4v key off or on J3 9 GRN BLK Horn B 14 9v horn off 0 004v horn on J3 10 ORN RED Horn B 14 9v horn off or on J3 11 VIO BLK Solution Solenoid B 24 4v solenoid off 0 12v solenoid on J3 12 GRA BLK Vac...

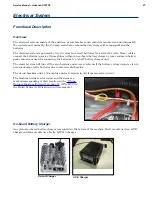
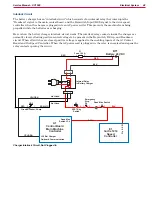
Страница 47: ...for connecting the batteries to a shelf battery charger unit The control system will turn off the scrub system and recovery systems if the battery voltage drops too low to prevent damage to the batter...

Страница 48: ...voltage to be present in the Keyswitch E Stop and Deadman circuit When all switches are closed positive voltage is applied to the enabling inputs of the A1 Control Board and the Speed Controller When...

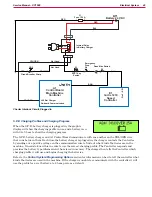
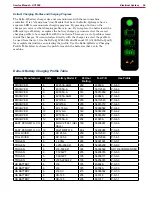
Страница 49: ...he charging progress The S P E battery charger and A1 Control Board communicate with one another on the YEL ORN wire that runs between them Each time the battery charger is plugged in the charger cont...

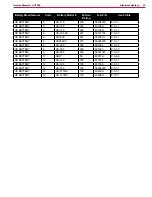
Страница 50: ...Profile Table Battery Manufacturer Volts Battery Model 20 Hour Rating N A P N Use Profile DISCOVER 6 EV250A AGM 260 40953A P 0 4 3 DISCOVER 6 EV305A A 312 56112546 P 0 4 3 DISCOVER 6 EV305A A 312 563...

Страница 51: ...1 56317154 P 0 7 2 US BATTERY 6 US1800 201 56206117 P 0 1 1 US BATTERY 6 US250HC 275 56026200 P 0 1 1 US BATTERY 6 US 305 305 891384 P 0 7 2 US BATTERY 6 US 305 305 891385 P 0 7 2 US BATTERY 6 US 305...

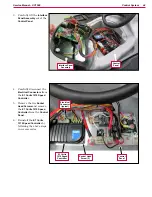
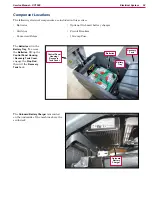
Страница 52: ...Contactors Relays 150 amp Fuse The Batteries sit in the Battery Tray To access the Batteries lift up the Control Panel Housing Recovery Tank Cover engage the Prop Rod then tilt the Recovery Tank back...

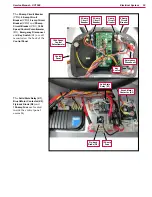
Страница 53: ...S1 are all mounted on the back of the Control Panel The Solid State Relay K1 Brush Motor Contactor K2 Fly back Diode D2 and 150 amp Fuse are located inside the control panel assembly 25 amp Circuit Br...

Страница 54: ...es Measure the voltage across each individual battery while operating the machine Write down the values and compare them A battery that has a dead cell will typically be 1 2 volts lower than the other...

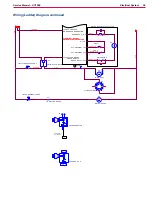
Страница 55: ...OPTIONAL SEE PAGE 2 A B 1 2 3 X001 X003 X004 X002 X006 TRACKCLEAN CONNECTIONS X001 B RED X002 B BLU X003 SCRUB WHT X004 KEY SW BRN X005 VACUUM GRA X006 DRIVE PNK X007 BYPASS BRN X008 MACHINE SUPPLY OR...

Страница 56: ...R POWER MODULE SOLID STATE RELAY 1 2 3 INLINE FUSE 3A P N 56383587 X005 C YEL ORN RED BLK BRN YEL YEL BLK RED VIO BLK WHT RED BLK BLU ORN WHT GRA BLK BRN BLU ORN BLK B B M M4 MOTOR VAC 1 2 M M3 MOTOR...

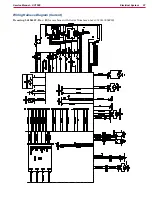
Страница 57: ...Electrical System 57 Service Manual SC1500 Wiring Harness Diagram Current Drawing 56104447 Rev B for machines with Serial Numbers above 3510143206293...

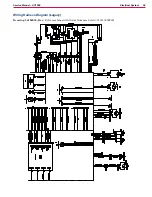
Страница 58: ...Electrical System 58 Service Manual SC1500 Wiring Harness Diagram Legacy Drawing 56104082 Rev C for machines with Serial Numbers below 3510143206293...

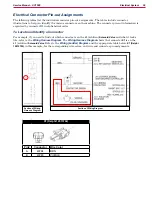
Страница 59: ...ntify a Connector For example if you need to find out which connector is on the L1 solution Solenoid Valve and what it looks like refer to the Wiring Harness Diagram The Wiring Harness Diagram shows t...

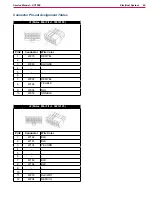
Страница 60: ...Fit Jr 39012105 Pin Conductor Wire Color 1 W279 RED YEL 2 3 W280 BLU GRA 4 5 6 7 W302 RED YEL 8 W165 YEL BLK 9 W054 BLU 10 W055 ORN BLK J2 Molex Mini Fit Jr 39012125 Pin Conductor Wire Color 1 W162 BL...

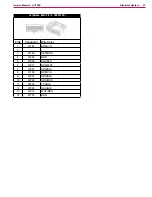
Страница 61: ...Molex Mini Fit Jr 39012145 Pin Conductor Wire Color 1 W181 BRN VIO 2 3 W166 RED BRN 4 W294 BRN 5 W066 BLU BLK 6 W277 RED WHT 7 W067 ORN BLU 8 W182 BRN VIO 9 W281 GRN BLK 10 W282 ORN RED 11 W283 VIO BL...

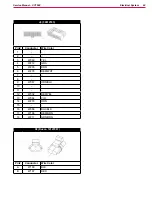
Страница 62: ...in Conductor Wire Color 1 2 3 W060 YEL 4 W272 GRA 5 W293 BRN 6 W276 RED WHT 7 8 9 W067 ORN BLU 10 11 12 W302 RED YEL 13 W064 VIO 14 W278 ORN 15 16 W066 BLU BLK 17 W166 RED BRN 18 W217 GRN ORN X2 Ducon...

Страница 63: ...nual SC1500 X6 Delphi 12052613 Pin Conductor Wire Color A W191 WHT B W194 BLK X7 Delphi 12015792 Pin Conductor Wire Color A W284 BRN B W283 VIO BLK X126 AMP 282087 1 Pin Conductor Wire Color 1 W172 BR...

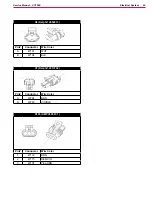
Страница 64: ...hi 15363990 Pin Conductor Wire Color A W170 RED B W171 BLK X139 Delphi 12020786 Pin Conductor Wire Color A W055 ORN BLK B W054 BLU C W204 RED VIO D W165 YEL BLK E F W218 BLK WHT X143 Ducon 12147067 Pi...

Страница 65: ...System 65 Service Manual SC1500 X144 Delphi 12015792 Pin Conductor Wire Color A W278 ORN B W275 RED WHT X161 Delphi 12020926 Pin Conductor Wire Color A W272 GRA B W271 YEL C W289 WHT BRN D W293 BRN E...

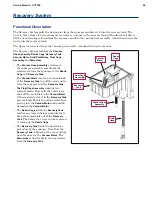
Страница 66: ...age and Recovery Tank The Vacuum Motor creates a vacuum inside of the Recovery Tank to pull the wastewater from the squeegee into the Recovery Tank The Float Cage Assembly contains two internal plasti...

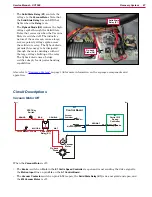
Страница 67: ...wer handing capabilities Also refer to Squeegee System on page 106 for more information on the squeegee components and operation Circuit Descriptions Vacuum Motor Off S1 2 1 Bat Pin 6 J3 6 24v Bat J3...

Страница 68: ...t loses the drive signal from the E1 Curtis Speed Controller When the Operator selects a drive direction and presses the go pedal The Brake switch on Pin 6 in the E1 Curtis Speed Controller closes to...

Страница 69: ...back Diode D2 The Recovery Tank is located underneath the control panel The Vacuum Motor is mounted below the Recovery Tank The Debris Cage filters any debris out of the wastewater before it can enter...

Страница 70: ...Drain Hose allows you to drain the wastewater from the Recovery Tank The Solid State Relay K1 and Fly back Diode D2 rectifier bridge are located inside the control panel assembly Drain Hose Control P...

Страница 71: ...cuum Motor M4 and repair as necessary The Vacuum Motor M4 is not connected to battery ground Check the ground connection to the Vacuum Motor M4 and repair as necessary Relay SSR1 is faulty Replace rel...

Страница 72: ...onnect the negative test lead to the negative terminal on the rectifier 3 One at a time touch the positive test lead to the remaining 3 terminals If the meter beeps or reads continuity for any of the...

Страница 73: ...in the upper left position as shown then fasten the Fly back Diode to the electrical panel with the Screw and Nut 9 Connect the White Wire to the Positive Tab and the Black Wire to the opposite tab a...

Страница 74: ...e Vacuum Motor from the Recovery Tank 6 Reinstall the Vacuum Motor by following the above steps in reverse order Note Make sure you install the Acoustic Insulation correctly around the Vacuum Motor wh...

Страница 75: ...nent Specifications Vacuum Motor Current Draw Low Speed 11 12 Amps High Speed 16 17 Amps Vacuum Water Lift Sealed 40 44 Inches of Water 1 open hole 9 5 Inches of Water Vacuum Motor Mounting Screws 3 N...

Страница 76: ...m the floor with no scrubbing The normal scrub pressure position lowers the scrub deck so the brush pad contacts the floor with normal scrub pressure The extra scrub pressure position lowers the scrub...

Страница 77: ...r which is bolted to the Deck Lift Plate Weldment Brush Housing and Lower Deck Plate The Solution Solenoid Valve Assembly controls the solution flow to the Brush The squeegee assembly snaps onto the S...

Страница 78: ...Plate Weldment and Rev Housing The Solution Solenoid Valve Assembly controls the solution flow to the Pad The squeegee assembly snaps onto the Squeegee Link Weldment Note that the 20R REV Scrub Decks...

Страница 79: ...ent positions The fully retracted up position is the Scrub Deck transport position and is used when the Scrub and Recovery Systems are not active Scrub Deck position 1 is the vacuum only position In t...

Страница 80: ...ated by rotating Cams provide actuator position feedback to the A1 Control Board Two internal Limit Switches top and bottom also actuated by rotating Cams switch off the actuator Motor at the fully re...

Страница 81: ...h Motor Brake K2 Brush Contactor A1 Control Board E1 Curtis 1210 Speed Controller Motion Input 24v When the machine is stationary The Brake switch on Pin 6 in the E1 Curtis Speed Controller is open an...

Страница 82: ...scrub deck is below the vacuum only position The A1 Control Board must receive a motion signal from the E1 Curtis Speed Controller When the Operator selects a drive direction and presses the go pedal...

Страница 83: ...Board switches on the power to the Brush Lift Actuator Motor M3 The Deck Actuator Assembly lowers the scrub deck to POS position 1 When the deck reaches POS 1 the Cam closes the S7 POS 1 switch which...

Страница 84: ...urst of Power switch is pressed the Gang Switch in the A1 Control Board switches on the power to the Brush Lift Actuator Motor The Deck Actuator Assembly lowers the scrub deck to the extra scrub press...

Страница 85: ...rub Deck Motor Brush Motor Contactor K2 Scrub Deck Actuator Assembly The Scrub Deck is suspended underneath the machine and pivots up and down on a mechanical mount The Scrub Deck Motor is mounted on...

Страница 86: ...2 controls the power to the scrub deck motor and is located inside the control panel assembly The Scrub Deck Actuator Assembly is attached to the Scrub Deck and machine frame and lowers and raises the...

Страница 87: ...ng from the K2 Brush Contactor to the Brush Motor and repair as necessary 6 Check the Brush Motor ground connection and repair as necessary Scrub Deck Actuator not running No voltage to the Deck Actua...

Страница 88: ...wire tie to do this 3 Turn the key switch off 4 Make sure the Ball Valve from the solution tank to the Filter is set to the off position 5 Loosen the Clamp and remove the Solution Hose from the Soluti...

Страница 89: ...and the two Linkage Bars Note that you ll need to hold the M10 Nyloc nuts with a 17mm wrench while you remove the Shoulder Screws 11 Remove the Shoulder Screw and nut that connect the scrub deck actu...

Страница 90: ...ub Deck Actuator is disconnected from the scrub deck This can cause the Scrub Deck Actuator to get out of adjustment 12 Lift up the link bar and rotate the scrub deck slightly counterclockwise as view...

Страница 91: ...to remove the deck from the machine 16 Reinstall the deck by following the above steps in reverse order Caution Note that the scrub deck actuator will automatically raise the scrub deck when you recon...

Страница 92: ...f 4 Disconnect and remove the battery closest to the scrub deck actuator to get enough clearance to remove the actuator 5 Remove the Shoulder Screw and nut that connect the scrub deck actuator to the...

Страница 93: ...ect the Actuator Electrical Connector and battery Scrub Deck Actuator Adjustment The Scrub Deck Actuator adjustment consists of setting the Tube position with the retracted travel limit switch actuate...

Страница 94: ...Voltage 24 VDC RPM 2200 Current Draw No load 8A Normal Operation 12 19 Amps depending on floor surface solution flow rate and scrub pressure Output Power 560 Watts 3 4 HP K2 Brush Contactor Nominal C...

Страница 95: ...that opens and closes the Valve to regulate the solution flow according to the flow rate selected with the solution flow adjustment switch The Solution System includes the Solution Tank Water Filter S...

Страница 96: ...through Pin J3 11 to switch the L1 Solution Solenoid Valve to ground and open the L1 Solution Solenoid Valve for a period of time corresponding to the selected solution flow rate The period of time du...

Страница 97: ...upstream of the scrub deck The A1 Control Board sends voltage pulses to the Detergent Pump that alternate polarity to move the pump plunger and diaphragm in and out to control the Detergent Pump outp...

Страница 98: ...n the machine is stationary The Brake switch on Pin 6 in the E1 Curtis Speed Controller is open and is not sending the drive signal to the Motion Input line on pin J3 6 on the A1 Control Board The Sol...

Страница 99: ...l Board must receive a motion signal from the E1 Curtis Speed Controller When the Operator selects a drive direction and presses the go pedal The Brake switch on Pin 6 in the E1 Curtis Speed Controlle...

Страница 100: ...peed Controller Motion Input 0 1v Bat Pin 6 J3 6 24v Pin 6 M2 M J1 3 J1 1 Bat Bat Bat RED YEL BLU GRA RED WHT Detergent Pump Detergent Pump Detergent Pump Brake A1 Control Board E1 Curtis 1210 Speed C...

Страница 101: ...ller Motion Input 24v When the Detergent System is off the Detergent Pump switches on pins J1 1 and J1 3 do not provide power to the Detergent Pump Component Locations The following components are inc...

Страница 102: ...rub brush pad The solution Ball Valve controls the solution flow from the solution tank to the Water Filter The Water Filter filters the solution upstream of the solution solenoid valve The 90 Ball Va...

Страница 103: ...the Control Panel Housing Recovery Tank Cover and sits below the Prop Rod Mounting Bracket The Detergent Cartridge is located at the front of the machine underneath the Control Panel Housing Recovery...

Страница 104: ...wiring from the Key Switch to the Solution Solenoid Valve and repair as necessary The Solution Solenoid Valve is not operating correctly 1 Check the Solution Solenoid Valve coil resistance If the resi...

Страница 105: ...tance 38 5 Ohms Pulse Frequency 3 5 Hz Pulse Width 110 ms Pulse Current 0 7 A Pulse Power Consumption 15 W Detergent Cartridge Capacity 1 gallon 4 liters Nominal Solution Flow Rates The nominal soluti...

Страница 106: ...Weldment The Squeegee Link Weldment attaches to a pivoting mount on the scrub deck that allows the Squeegee Assembly to rotate about the scrub deck This allows the Squeegee Assembly to pick up wastewa...

Страница 107: ...Squeegee Link Weldment Knob Assemblies Squeegee Blades Squeegee Casting Caster Wheel Squeegee Mount Bracket Squeegee Cover Rear Squeegee Strap Vacuum Hose Assembly Squeegee Link Weldment Knob Assembly...

Страница 108: ...hine on a flat even surface and lower the squeegee 2 Drive the machine forward enough to have the squeegee blades fold over to the rear 3 Adjust the squeegee tilt by adjusting the Caster Wheel height...

Страница 109: ...e Assembly when the Control Panel Housing Recovery Tank Cover is opened and closed to maintain steering alignment The Steering Tube Assembly is connected to the Lower Universal Joint which drives the...

Страница 110: ...Upper Universal Joint Hex Shaft and Steering Tube Assembly are located underneath the Control Panel Housing Recovery Tank Cover The Lower Universal Joint is connected to the Steering Tube Assembly and...

Страница 111: ...rection The steering is binding or the machine steers hard The upper and lower universal joints are out of phase Realign the upper and lower universal joints Refer to the Wheel System Traction Removal...

Страница 112: ...peed Controller provides pulse width modulated voltage to the Drive Wheel Motor to control the machine speed The Speed Controller will alternate the voltage polarity to control the machine direction T...

Страница 113: ...s 1210 Speed Controller The contacts in the Internal Relay in Battery Charger must be closed charger unplugged The Emergency Stop S4 switch and Dead Man Switch S2 must be closed If all of these condit...

Страница 114: ...ed Controller at Pin 18 Speed Limit The Speed Controller provides a power supply out Pin 14 24V Brake to the Y1 Brake solenoid Just before the Speed Controller provides power to the Wheel Drive Motor...

Страница 115: ...When the switch on Pin 6 closes the voltage on the wire drops to 0 volts Inhibit Output J1 7 Pin 12 Inhibit Input The A1 Control Board uses the inhibit signal to tell the Speed Controller when it is...

Страница 116: ...rcuit is identical to the Motion circuit When not in reverse the switch on Pin 16 Reverse Alarm in the Speed Controller is open leaving the signal at J3 5 high 24 volts When driving the wheel in rever...

Страница 117: ...Speed Control Adjustment Knob 100k Speed Control Potentiometer Drive Wheel Brake The Drive Wheel Assembly is fastened to the machine frame underneath the front of the machine Note that the adjacent p...

Страница 118: ...ntrols the machine speed in both forward and reverse The Drive Wheel Brake is built in to the Drive Wheel Motor and will engage to stop the machine whenever the key switch is Off or the Go Pedal is re...

Страница 119: ...ter set at maximum Smaller numbers provide faster response Accel Min Speed 0 2 8 0 4 0 Sets the forward acceleration rate with the speed potentiometer set at minimum Smaller numbers provide faster res...

Страница 120: ...voltage to the drive motor 1 Check the wiring from the Speed Controller to the drive motor and repair as necessary 2 If the wiring is OK replace the Speed Controller E1 Curtis Speed Controller Diagno...

Страница 121: ...Test the circuitry with the programmer 1 Correct the problem 1 Repeat the last three steps as necessary until the vehicle is operational Refer to the Status LED Fault Code Table on page 122 for sugges...

Страница 122: ...oken throttle pot or throttle mechanism 3 2 000 00 Brake On fault 1 Electromagnetic brake driver shorted 2 Electromagnetic brake coil open 3 3 000 000 Pre charge fault 1 Low battery voltage 2 KSI and...

Страница 123: ...n and recovery tanks 4 Disconnect and remove the batteries 5 Remove the four M8 x 30 Screws and flat washers holding each of the two Tip Pads to the machine and remove the Tip Pads Caution Tipping the...

Страница 124: ...ip Make sure the axes of the two Universal Joints are parallel when you reconnect the Steering Assembly Tube to the Lower Universal Joint If the two Universal Joints are out of phase the steering syst...

Страница 125: ...the M8 x 55 Screw with a wrench and loosen the M8 x 55 Screw 4 Slide the Idler Adjust Weldment and Sprocket Assembly as necessary to get some slack in the Chain 5 Remove the Master Link and remove the...

Страница 126: ...rame Weldment 8 To reinstall the Drive Motor into the Drive Wheel Frame Weldment follow the above steps in reverse order Service Tip When you set the chain tension with the M6 x 35 Idler Adjuster Scre...

Страница 127: ...three M6 x 14 Screws and flat washers holding the Steering Shaft Weldment to the Spindle Mount Weldment 4 Remove the chain from the sprocket on the Steering Shaft Weldment then remove the Steering Sh...

Страница 128: ...high quality lithium base grease before reassembly Bearing Cone Bearing Cup Shaft Seal Bearing Block Shaft Seal Bearing Cone Bearing Cup Bearing Block 8 Remove and replace the Ball Bearing as necessar...

Страница 129: ...3 2 Remove the Drive Wheel Motor described on page 125 3 Remove the Cap holding the brush in the motor 4 Carefully pry out the old Brush from the motor 5 Install a new Brush then reinstall the Cap 6 R...

Страница 130: ...rlock switches closed 6 RED WHT Brake B 22 2v off brake applied 0 1v on brake released 7 8 9 ORN BLU Status B Unstable voltage when there is a code If unplugged 23v from A1 control board 10 11 12 RED...

Страница 131: ...FWD high speed 0 17v REV low speed 12v REV high speed 20v M1 M2 FWD low speed 1 5v FWD high speed 23 2v REV low speed 1 3v REV high speed 16v General Specifications Component Specifications Drive Whe...

Страница 132: ...Wheel System Traction 132 Service Manual SC1500 Special Tools Curtis 1311 Handheld Programmer p n 56409441...

Отзывы: