background image

180

Bracketing

3

Take pictures.

Take the number of pictures in the bracketing 
program.

The modified values for shutter speed and aperture 
are shown in the display.

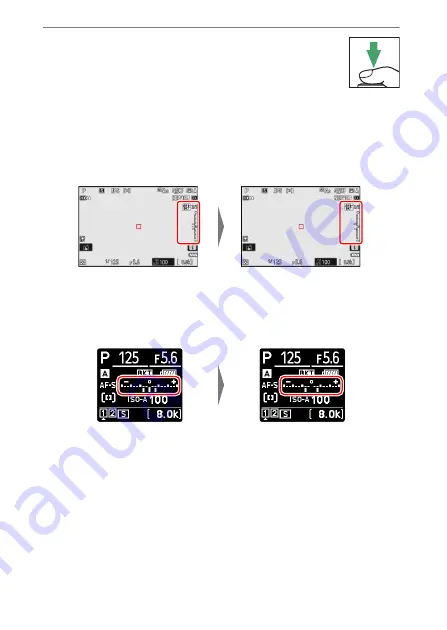
While bracketing is in effect, the shooting display shows a 
bracketing icon, a bracketing progress indicator, and the number 
of shots remaining in the bracketing sequence. After each shot, a 
segment will disappear from the indicator and the number of 
shots remaining will be reduced by one.

The control panel shows a 

M

 icon and a bracketing progress 

indicator. A segment disappears from the indicator after each 
shot.

Exposure changes due to bracketing are added to those made 
with exposure compensation.

No. shots: 3

Increment: 0.7

Display after first shot

No. shots: 3

Increment: 0.7

Display after first shot

Содержание Z 9

Страница 1: ... thoroughly before using the camera To ensure proper use of the camera be sure to read For Your Safety page 25 After reading this document keep it readily accessible for future reference DIGITAL CAMERA Reference Guide En ...

Страница 2: ...card 081 3 Attach a lens 083 Align the white dot on the lens with the white dot on the camera body q and rotate the lens in the direction shown w A strap can be attached to the camera For more information see Attaching the Strap 071 4 Turn the camera on and then choose a language and set the clock 085 When Your First Photo Can t Wait 128 GB Z 9 Model Name N2014 ...

Страница 3: ... focus press the shutter release button halfway i e lightly press the shutter release button stopping when it is pressed halfway 2 Without lifting your finger from the shutter release button press the button the rest of the way down to take the picture 3 View the picture ...

Страница 4: ...on software and manuals for Nikon products including cameras NIKKOR lenses and flash units https downloadcenter nikonimglib com Package Contents Camera BF N1 body cap EN EL18d rechargeable Li ion battery with terminal cover MH 33 battery charger EH 7P charging AC adapter supplied with a plug adapter attached in countries or regions where required shape depends on country of sale 075 HDMI USB cable...

Страница 5: ...s Throughout this document the display in camera monitor and viewfinder during shooting is referred to as the shooting display In most cases the illustrations show the monitor Throughout this document smartphones and tablets are referred to as smart devices Throughout this document the term default settings is used to refer to the settings in effect at shipment The explanations in this document as...

Страница 6: ...el 41 The Monitor 42 The Viewfinder 46 Touch Controls 53 The Menus 59 The G Button 59 The i Button the i Menu 65 First Steps 71 Attaching the Strap 71 Charging the Battery 72 The Battery Charger 72 The Charging AC Adapter Charging 75 Inserting the Battery 77 Removing the Battery 79 Battery Level 80 Inserting Memory Cards 81 Removing Memory Cards 82 Attaching a Lens 83 Detaching Lenses 84 Camera Se...

Страница 7: ...ngs 102 Adjusting Image Quality 105 Choosing an Image Size 108 Focus 110 Focus Mode 110 AF Area Mode 113 Choosing a Subject Type for Autofocus 119 Focus Point Selection 123 The Touch Shutter 124 Focus Lock 126 Manual Focus 129 Exposure 132 Choosing a Shooting Mode 132 Long Time Exposures Mode M Only 138 Autoexposure Lock 141 Exposure Compensation 143 Release Mode 145 Choosing a Release Mode 145 Hi...

Страница 8: ... Exposure and Flash Bracketing 178 White Balance Bracketing 183 ADL Bracketing 187 Picture Controls 192 About Picture Controls 192 Modifying Picture Controls 195 Custom Picture Controls 199 Location Data 204 Location Data Options 204 Two Button Reset 209 Photo Shooting Menu 209 Video Recording Menu 211 Custom Settings Menu 212 Other Settings 213 Video Recording 214 Video File Types 214 Tone Mode 2...

Страница 9: ...ail Playback 228 Photo Information 230 File Information 231 Exposure Data 232 Highlight Display 232 RGB Histogram 233 Shooting Data 235 Overview 239 The i Button Playback Mode 241 Photos 241 Videos 245 Videos Playback Paused 246 Playback Zoom 247 Using Playback Zoom 247 Protecting Pictures from Deletion 249 Rating Pictures 251 Selecting Pictures for Upload 253 Filtered Playback 255 Filtered Playba...

Страница 10: ...2 Perspective Control 283 Monochrome 284 Overlay Add 285 Lighten and Darken 287 Editing Videos 290 Trimming Videos 290 Saving Selected Frames as JPEG Stills 294 Voice Memos 295 Recording Voice Memos 295 Playing Voice Memos 298 Deleting Voice Memos 299 Connecting to HDMI TVs and Recorders 300 Connecting to HDMI Devices 300 TVs 301 Recorders 302 Adjusting Settings 302 YCbCr and Bit Depth 308 Externa...

Страница 11: ...rs Connecting via Ethernet or Wireless LAN 322 Computers Connecting via USB 323 Installing NX Studio 323 Copying Pictures to a Computer Using NX Studio 324 Computers Connecting via Ethernet or Wireless LAN 327 What Ethernet and Wireless LAN Can Do for You 327 The Wireless Transmitter Utility 328 Wireless LAN 329 Ethernet Connections 346 Uploading Pictures 354 Camera Control 361 Ending the Connecti...

Страница 12: ...Configuring and Using Synchronized Release 402 Synchronizing Camera Clocks 421 Flash Photography 422 On Camera Versus Remote 422 Camera Mounted Flash Units 422 Remote Flash Photography 422 Using an On Camera Flash 423 Flash Control Mode 426 Flash Modes 429 Flash Compensation 432 Adjusting Flash Compensation 432 FV Lock 434 Remote Flash Photography 437 What Is Remote Flash Photography 437 Using Rem...

Страница 13: ...Menu Shooting Options 491 Shooting Menu Bank 493 Renaming Shooting Menu Banks 494 Copying Shooting Menu Banks 494 Restoring Default Settings 495 Extended Menu Banks 496 Storage Folder 497 Renaming Folders 497 Select Folder by Number 498 Select Folder from List 500 File Naming 502 Role Played by Card in Slot 2 503 Deleting Copies 505 Image Area 506 Image Quality 506 Image Size 507 RAW Recording 507...

Страница 14: ...fo 524 Focus Mode 525 AF Area Mode 525 AF Subject Detection Options 525 Vibration Reduction 526 Auto Bracketing 527 Multiple Exposure 528 Creating a Multiple Exposure 530 HDR Overlay 537 Taking HDR Photographs 538 Interval Timer Shooting 542 Interval Timer Photography 545 Time Lapse Video 556 Recording Time Lapse Videos 558 Focus Shift Shooting 568 Focus Shift Photography 569 1 The Video Recording...

Страница 15: ...ette Control 584 Diffraction Compensation 584 Auto Distortion Control 584 Video Flicker Reduction 585 Metering 586 Focus Mode 586 AF Area Mode 586 AF Subject Detection Options 587 Subject Detection 587 AF When Subject Not Detected 587 Vibration Reduction 587 Electronic VR 587 Microphone Sensitivity 588 Attenuator 589 Frequency Response 589 Wind Noise Reduction 589 Mic Jack Plug in Power 590 Headph...

Страница 16: ... 601 a5 Store Points by Orientation 602 a6 AF Activation 604 a7 Focus Point Persistence 605 a8 Limit AF Area Mode Selection 606 a9 Focus Mode Restrictions 606 a10 Focus Point Wrap Around 606 a11 Focus Point Display 607 Manual Focus Mode 607 Dynamic Area AF Assist 607 AF C In Focus Display 608 a12 Built in AF Assist Illuminator 609 a13 Focus Peaking 610 Focus Peaking Display 610 Focus Peaking Sensi...

Страница 17: ...2 Maximum Shots per Burst 619 d3 Limit Release Mode Selection 620 d4 Sync Release Mode Options 620 d5 Extended Shutter Speeds M 621 d6 Limit Selectable Image Area 621 d7 File Number Sequence 622 d8 View Mode Photo Lv 624 d9 Starlight View Photo Lv 626 d10 Warm Display Colors 626 d11 LCD Illumination 627 d12 View All in Continuous Mode 629 d13 Release Timing Indicator 629 d14 Image Frame 630 d15 Gr...

Страница 18: ...fo 645 Split Screen Display Zoom 646 f2 Custom Controls Shooting 647 Command Dials 658 f3 Custom Controls Playback 659 Command Dials 663 f4 Control Lock 665 f5 Reverse Dial Rotation 666 f6 Release Button to Use Dial 666 f7 Reverse Indicators 667 f8 Reverse Ring for Focus 667 f9 Focus Ring Rotation Range 668 f10 Control Ring Response 669 f11 Full Frame Playback Flicks 670 Flick Up Flick Down 670 Fl...

Страница 19: ...reshold 686 Mid tone Range 687 g10 Limit Zebra Pattern Tone Range 688 g11 Grid Type 688 g12 Custom Monitor Shooting Display 689 g13 Custom Viewfinder Shooting Display 691 D The Playback Menu Managing Pictures 692 Delete 693 Playback Folder 694 Playback Display Options 694 Delete Pictures from Both Slots 695 Dual Format Recording PB Slot 695 Filtered Playback Criteria 696 Picture Review 696 After D...

Страница 20: ...n 713 Auto Rotate Info Display 713 AF Fine Tuning Options 714 Creating and Saving Fine Tuning Values 716 Choosing a Default Fine Tuning Value 717 Non CPU Lens Data 718 Save Focus Position 718 Sensor Shield Behavior at Power Off 719 Clean Image Sensor 719 Image Dust Off Ref Photo 720 Acquiring Image Dust Off Reference Data 720 Pixel Mapping 723 Image Comment 724 Input Comment 724 Attach Comment 724...

Страница 21: ...utput Playback 732 Camera Sounds 733 Shutter Sound 733 Beep On Off 733 Volume 733 Pitch 734 Silent Mode 735 Touch Controls 736 Enable Disable Touch Controls 736 Glove Mode 736 HDMI 736 USB Connection Priority 737 Location Data Built In 737 Wireless Remote WR Options 738 LED Lamp 738 Link Mode 739 Assign Remote WR Fn Button 741 Conformity Marking 741 Battery Info 742 USB Power Delivery 744 Energy S...

Страница 22: ...elect Pictures for Upload 758 Wi Fi connection 758 Upload While Off 759 Location Data Smart Device 759 Connect to Computer 760 Network Settings 760 Connection Type 762 Options 763 Connect to FTP Server 765 Network Settings 765 Options 768 Connect to Other Cameras 770 Synchronized Release 770 Network Settings 770 Group Name 772 Master Remote 772 Remote Camera List 772 Synchronize Date and Time 772 ...

Страница 23: ...ay 783 Shooting 784 Playback 790 Bluetooth and Wi Fi Wireless Networks 792 Miscellaneous 793 Alerts and Error Messages 794 Alerts 794 Error Messages 797 Technical Notes 801 Compatible Lenses and Accessories 801 Camera Displays 802 The Monitor 802 The Viewfinder 809 The Control Panel 813 Compatible Flash Units 816 The Nikon Creative Lighting System CLS 816 Features Available with CLS Compatible Fla...

Страница 24: ...ing 860 Caring for the Camera and Battery Cautions 862 Cautions Using the Camera 862 Cautions Using Batteries 866 Cautions Using the Charger 869 Cautions Using the Charging AC Adapter 869 Specifications 870 Nikon Z 9 Digital Camera 870 Approved Memory Cards 886 Memory Card Capacity 887 Battery Endurance 889 Trademarks and Licenses 892 Cautions Location Data GPS GLONASS 897 Notices 898 Bluetooth an...

Страница 25: ...ry A CAUTION Failure to observe the precautions marked with this icon could result in injury or property damage A WARNING Do not use while walking or operating a vehicle Failure to observe this precaution could result in accidents or other injury Do not disassemble or modify this product Do not touch internal parts that become exposed as the result of a fall or other accident Failure to observe th...

Страница 26: ...Failure to observe this precaution could result in accidents Keep this product out of reach of children Failure to observe this precaution could result in injury or product malfunction In addition note that small parts constitute a choking hazard Should a child swallow any part of this product seek immediate medical attention Do not entangle wrap or twist the straps around your neck Failure to obs...

Страница 27: ...of the frame Sunlight focused into the camera when the sun is close to the frame could cause fire Turn the product off when its use is prohibited Disable the location data feature End location tracking Disable wireless features when the use of wireless equipment is prohibited The radio frequency emissions produced by this product could interfere with equipment onboard aircraft or in hospitals or o...

Страница 28: ...r viewfinder The memory card will be hot potentially causing burns or causing the card to be dropped and damaged when removed A DANGER Batteries Do not mishandle batteries Failure to observe the following precautions could result in the batteries leaking overheating rupturing or catching fire Use only rechargeable batteries approved for use in this product Do not expose batteries to flame or exces...

Страница 29: ...ter or expose to rain Failure to observe this precaution could result in fire or product malfunction Immediately dry the product with a towel or similar object should it become wet Discontinue use immediately should you notice any changes in the batteries such as discoloration or deformation Cease charging EN EL18d rechargeable batteries if they do not charge in the specified period of time Failur...

Страница 30: ...tative in your area address provided separately Notice Concerning Prohibition of Copying or Reproduction Note that simply being in possession of material that has been digitally copied or reproduced by means of a scanner digital camera or other device may be punishable by law Items prohibited by law from being copied or reproduced Do not copy or reproduce paper money coins securities government bo...

Страница 31: ...e may be restricted in the case of photographs or recordings of exhibits or live performances Use Only Nikon Brand Electronic Accessories Nikon cameras are designed to the highest standards and include complex electronic circuitry Only Nikon brand electronic accessories including lenses chargers batteries AC adapters and flash accessories certified by Nikon specifically for use with this Nikon dig...

Страница 32: ...s of data or in damage to the camera or card Do not remove or insert memory cards Do not turn the camera off Do not remove the battery Do not disconnect AC adapters Do not touch the card terminals with your fingers or metal objects Do not use excessive force when handling memory cards Failure to observe this precaution could damage the card Do not bend or drop memory cards or subject them to stron...

Страница 33: ... support and education continually updated information is available on line at the following sites For users in the U S A https www nikonusa com For users in Europe https www europe nikon com support For users in Asia Oceania the Middle East and Africa https www nikon asia com Visit these sites to keep up to date with the latest product information tips answers to frequently asked questions FAQs a...

Страница 34: ...mode dial lock release 0145 2 BKT button 0177 3 c button 0429 4 Stereo microphone for videos 093 5 Video record button 093 6 S Q button 0154 7 E button 0143 8 Eyelet for camera strap 071 9 E focal plane mark 0131 10 Control panel 041 813 11 GNSS antenna 0204 12 Accessory shoe for optional flash unit 0423 816 13 I button 0132 14 c button 0145 ...

Страница 35: ...emote terminal cover 7 Cover for microphone headphone and Ethernet connectors 8 Cover for USB and HDMI connectors 9 Focus mode button 0110 10 Battery chamber cover latch 077 11 Battery chamber cover 077 12 Lens mounting mark 083 13 Flash sync terminal 0425 14 Ten pin remote terminal 15 Charge lamp 075 16 Ethernet connector 0346 382 17 Connector for external microphone 0845 18 Headphone connector 0...

Страница 36: ...ce memos 0295 2 U button 0158 3 T button 0105 4 b button 0295 5 Network indicator 0360 395 6 Monitor 053 124 7 Speaker 099 8 Eyepiece release 0843 9 O Q button 0101 259 10 g Fn4 button 0192 249 11 Release mode dial 0145 12 Rubber eyecup 0843 13 Viewfinder 046 14 Eye sensor 050 ...

Страница 37: ...3 126 141 6 Main command dial 0666 7 i button 065 241 8 J button 060 9 Multi selector 060 10 X button 0129 228 247 11 G button 059 464 12 K button 097 227 13 W Q button 063 228 247 14 AF ON button for vertical shooting 0128 15 Main command dial for vertical shooting 0666 16 Multi selector for vertical shooting 0123 17 Memory card access lamp 091 94 18 i button for vertical shooting 065 241 ...

Страница 38: ...and dial for vertical shooting 0666 8 Shutter release button lock for vertical shooting 092 9 Fn button for vertical shooting 0143 10 Security slot for anti theft cable 040 11 S button for vertical shooting 0154 12 Shutter release button for vertical shooting 13 Memory card slot cover latch 081 14 Memory card slot cover 082 15 Fn2 button 0102 16 Fn1 button 0493 17 Sub command dial 0666 ...

Страница 39: ...subject them to powerful air currents from a blower Failure to observe this precaution could scratch or otherwise damage the sensor or shield For information on cleaning the image sensor see Image Sensor Cleaning 0858 A Notes on the Monitor The angle of the monitor can be adjusted A Product Serial Number The serial number for this product can be found by opening the monitor ...

Страница 40: ...hts will remain lit for a few seconds after the power switch is released The backlights turn off when the switch is rotated to D a second time or the shutter is released Activating the button backlight makes the camera easier to use in the dark A The Security Slot The security slot serves as an attachment point for third party anti theft cables It is compatible and intended for use with Kensington...

Страница 41: ...de 0132 2 Shutter speed 0133 135 3 Aperture 0134 135 4 Battery indicator 080 5 Exposure indicator Exposure 0136 Exposure compensation 0143 6 ISO sensitivity 0154 7 Number of exposures remaining 081 887 Available recording time 093 8 ISO sensitivity indicator 0154 Auto ISO sensitivity indicator 0156 9 Release mode 0145 10 Memory card icon Slot 2 0503 11 Memory card icon Slot 1 0503 12 AF area mode ...

Страница 42: ... information see Camera Displays 0802 in Technical Notes Photo Mode 1 10 2 3 4 5 6 7 8 9 11 1 Shooting mode 0132 2 Release mode 0145 3 Focus mode 0123 4 AF area mode 0113 5 t icon 087 6 White balance 0158 7 Active D Lighting 0512 8 Picture Control 0192 9 Image area 0102 10 Image size 0108 11 Image quality 0105 ...

Страница 43: ... 3 Battery indicator 080 4 Number of exposures remaining 081 887 5 ISO sensitivity 0154 6 ISO sensitivity indicator 0154 Auto ISO sensitivity indicator 0156 7 Aperture 0134 135 8 Shutter speed 0133 135 9 Metering 0520 10 Touch shooting 0124 11 Vibration reduction indicator 0526 12 Focus point 0123 13 View mode photo live view 0624 ...

Страница 44: ...ait orientation the display in the monitor rotates to match photo mode only A Choosing a Display Press the DISP button to cycle the shooting display Choose from up to five displays each with a customizable selection of icons and indicators The items displayed can be selected using Custom Setting d17 Custom monitor shooting display 0634 ...

Страница 45: ... 3 8 6 7 9 1 Recording indicator 093 No video indicator 094 2 Video recording time 093 3 Frame size and rate 0216 4 Destination 0578 5 Time remaining 093 6 Image area 0218 7 Video file type 0214 8 Sound level 0588 9 Microphone sensitivity 0588 ...

Страница 46: ...formation see Camera Displays 0802 in Technical Notes Photo Mode 2 4 5 7 8 9 6 1 3 11 10 1 View mode photo live view 0624 2 t icon 087 3 Release mode 0145 4 Focus mode 0110 5 AF area mode 0113 6 White balance 0158 7 Active D Lighting 0512 8 Picture Control 0192 9 Image quality 0105 10 Image size 0108 11 Image area 0102 ...

Страница 47: ...emaining 081 887 3 ISO sensitivity 0154 4 ISO sensitivity indicator 0154 Auto ISO sensitivity indicator 0156 5 Exposure indicator Exposure 0136 Exposure compensation 0143 6 Aperture 0134 7 Shutter speed 0133 135 8 Shooting mode 0132 9 Vibration reduction 0526 10 Metering 0520 11 Focus point 0123 ...

Страница 48: ...it orientation the display in the viewfinder rotates to match photo mode only A Choosing a Display Press the DISP button to cycle the shooting display Choose from up to four displays each with a customizable selection of icons and indicators The items displayed can be selected using Custom Setting d18 Custom viewfinder shooting display 0636 ...

Страница 49: ...6 4 7 8 9 1 Recording indicator 093 No video indicator 094 2 Video recording time 093 3 Destination 0578 4 Time remaining 093 5 Frame size frame rate 0216 6 Image area 0218 7 Video file type 0214 8 Sound level 0588 9 Microphone sensitivity 0588 ...

Страница 50: ...ctivates the eye sensor switching the display from the monitor to the viewfinder Note that the eye sensor will also respond to other objects such as your fingers The viewfinder can be used for menus and playback if desired Press the M monitor mode button to cycle between viewfinder and monitor displays ...

Страница 51: ...onitor remains blank The viewfinder is used for shooting menus and playback Monitor only The monitor is used for shooting menus and playback The viewfinder display will remain blank even if you put your eye to the viewfinder Prioritize viewfinder The camera functions in a manner similar to existing digital SLR cameras During photo mode placing your eye to the viewfinder turns the viewfinder on the...

Страница 52: ...ot trigger the viewfinder if both the following conditions are met Automatic display switch or Prioritize viewfinder is selected for monitor mode and a menu picture or other display currently appears in the monitor A Extended Use When using the viewfinder for extended periods you can select Adjust for ease of viewing for Custom Setting d8 View mode photo Lv to ensure that viewfinder brightness and...

Страница 53: ...annot be used for focus or the like Focusing and Releasing the Shutter Touch the monitor to focus on the selected point touch AF In photo mode the shutter will be released when you lift your finger from the display touch shutter Touch shutter AF settings can be adjusted by tapping the W icon 0124 Adjusting Settings Tap highlighted settings in the display You can then choose the desired option by t...

Страница 54: ... In full frame playback touching the bottom of the display brings up a frame advance bar Slide your finger left or right over the bar to scroll rapidly to other pictures To zoom in on a picture displayed during full frame playback use a stretch gesture or give the display two quick taps You can adjust the zoom ratio using stretch gestures to zoom in and pinch gestures to zoom out ...

Страница 55: ...ancels zoom To zoom out to a thumbnail view use a pinch gesture during full frame playback Use pinch and stretch to choose the number of pictures displayed from 4 9 and 72 frames Viewing Videos Videos are indicated by a 1 icon to start playback tap the on screen guide Tap the display to pause Tap again to resume Tap Z to exit to full frame playback ...

Страница 56: ... items displayed in the i menu 070 Text Entry When a keyboard is displayed you can enter text by tapping the keys To position the cursor tap e or f or tap directly in the text display area To cycle through the upper and lower case and symbol keyboards tap the keyboard selection button 1 2 3 1 Text display area 2 Keyboard area 3 Keyboard selection ...

Страница 57: ...a Navigating the Menus Slide up or down to scroll Tap a menu icon to choose a menu Tap menu items to display options You can then choose the desired option by tapping icons or sliders To exit without changing settings tap Z ...

Страница 58: ...th gloves select ON for Touch controls Glove mode in the setup menu Do not touch the screen with sharp objects Do not use excessive force The screen may not respond when covered with third party protective films The screen may not respond when touched simultaneously in multiple locations A Enabling or Disabling Touch Controls Touch controls can be enabled or disabled using the Touch controls item ...

Страница 59: ... displayed The default is MY MENU The Menus 9 8 1 2 3 4 5 6 7 1 C PHOTO SHOOTING MENU 0491 2 1 VIDEO RECORDING MENU 0576 3 A CUSTOM SETTINGS MENU 0593 4 D PLAYBACK MENU 0692 5 B SETUP MENU 0706 6 F NETWORK MENU 0755 7 O MY MENU m RECENT SETTINGS 0775 8 d help icon 063 9 Current settings ...

Страница 60: ...or the current menu Press 4 to place the cursor in the menu selection area 2 Select a menu Press 1 or 3 to select the desired menu 1 Move cursor up 2 Select the highlighted item 3 Display sub menu select highlighted item or move cursor right 4 Move cursor down 5 Cancel and return to previous menu or move cursor left ...

Страница 61: ...ion the cursor in the selected menu Press 2 to position the cursor in the selected menu 4 Highlight a menu item Press 1 or 3 to highlight a menu item 5 Display options Press 2 to display options for the selected menu item ...

Страница 62: ...tion press the G button To exit the menus and return to shooting mode press the shutter release button halfway D Grayed Out Items Some items and menu options may be unavailable depending on camera status Unavailable items are displayed in gray In some cases pressing J when a grayed out item is highlighted will display a message explaining why the item is unavailable ...

Страница 63: ...imply by pressing J pressing the multi selector right 2 or tapping the item in the display A The d Help Icon Where available a description of the currently selected item can be viewed by pressing the W Q button Press 1 or 3 to scroll Press W Q again to return to the menus A Touch Controls You can also navigate the menus using touch controls 053 ...

Страница 64: ...ht in the text display area rotate the main command dial To cycle through the upper and lower case and symbol keyboards highlight the keyboard selection icon and press J The keyboard selection icon may not be available in some cases If a character is entered when the text display area is full the rightmost character will be deleted To delete the character under the cursor press the O Q button To c...

Страница 65: ... and video modes Options can be viewed by tapping items in the display or by highlighting items and pressing J selections can then be made using the multi selector Items for which the camera displays an on screen guide can be adjusted by highlighting them in the i menu and rotating a command dial In some cases adjustments can be made using both the main and sub command dials ...

Страница 66: ...ns may be unavailable depending on camera status Unavailable items are displayed in gray A Using the i Menu with the Camera in Tall Orientation When the camera is rotated to take pictures in tall portrait orientation the i menu for photo mode rotates to match ...

Страница 67: ...lti selector and press J to view options 1 2 3 4 5 6 8 7 9 10 11 12 1 Set Picture Control 0192 2 White balance 0158 3 Image quality 0105 4 Image size 0108 5 AF area mode subj detection 0113 6 Focus mode 0110 7 Metering 0520 8 Vibration reduction 0526 9 Shooting menu bank 0493 10 Custom controls shooting 0597 11 Airplane mode 0756 12 View memory card info 0645 ...

Страница 68: ...or and press J to view options 1 2 3 4 5 6 8 7 9 10 11 12 1 Set Picture Control 0192 2 White balance 0158 3 Frame size frame rate 0216 4 Microphone sensitivity 0588 5 AF area mode subj detection 0113 6 Focus mode 0110 7 Electronic VR 0587 8 Vibration reduction 0587 9 Shooting menu bank 0493 10 Custom controls 0597 11 Airplane mode 0756 12 Destination 0578 ...

Страница 69: ...69 The Menus The Playback i Menu Pressing the i button during playback displays a context sensitive i menu of playback options Photos Videos Videos playback paused ...

Страница 70: ...59 for information on using the menus 2 Highlight the position you want to change and press J A list of the items available for the selected position will be displayed 3 Highlight the desired item and press J The item will be assigned to the selected position and the options shown in Step 2 will be displayed Repeat Steps 2 and 3 as desired 4 Press the G button Changes will be saved and the Custom ...

Страница 71: ...71 Attaching the Strap First Steps To attach a strap whether the supplied strap or one that has been purchased separately Attaching the Strap ...

Страница 72: ...ing for the Camera and Battery Cautions 0862 The Battery Charger Before charging the battery connect the EH 7P charging AC adapter to the MH 33 battery charger Choose a location where the charger will remain stable and free from vibration during use Charging the Battery 6h 4h 2h 100 80 50 CH AR GE CA LIB RA TIO N CHARGE 6h 4h 2h 100 80 50 1 Signal contacts 2 Charge lamps green ...

Страница 73: ...battery with the guide and then sliding the battery in the direction indicated until it clicks into place An exhausted battery will fully charge in about 4 hours As charging progresses the charge lamps will light one at a time until charging is complete and all three lamps are lit Battery status is shown by the charge lamps Charge lamps Charge state 50 50 80 80 100 100 100 I off I off H flashes K ...

Страница 74: ...ge Lamps Flash Rapidly If the charge lamps flash rapidly 8 times a second The battery was not inserted correctly Unplug the charger and remove and reinsert the battery The ambient temperature is too hot or too cold Use the battery charger at temperatures within the designated temperature range 0 40 C 32 104 F If the problem persists unplug the charger and end charging Bring the battery and charger...

Страница 75: ...ing AC adapter q and plug the adapter in The battery will charge while the camera is off Keep the plug straight during insertion and removal The camera charge lamp w lights amber while charging is in progress The lamp turns off when charging is complete An exhausted battery will fully charge in about 3 hours and 40 minutes When charging is complete unplug the charging AC adapter and disconnect it ...

Страница 76: ...eries with a 4 l showing for Battery info Battery age in the setup menu cannot be charged A The Charging AC Adapter Power Delivery If ON is selected for USB power delivery in the setup menu the charging AC adapter will supply power to the camera when the camera is on The battery will not charge while the camera is powered by an outside power source For more information see Power Delivery Versus Ch...

Страница 77: ...n A position q and remove the battery chamber cover w 2 Attach the cover to the battery If the battery release is positioned so that the arrow H is visible slide the battery release to cover the arrow H Insert the two projections on the battery into the matching slots in the cover as shown The battery release will slide aside to completely reveal the arrow H Inserting the Battery ...

Страница 78: ...t the battery fully and securely as shown 4 Latch the cover Rotate the battery chamber cover latch to the closed position q and fold it down as shown w Be sure the cover is securely latched to prevent the battery from becoming dislodged during operation ...

Страница 79: ...it can be removed from the battery slide the battery release in the direction indicated by the arrow H until it stops D The Battery Chamber Cover Use BL 7 battery chamber covers only other battery chamber covers cannot be used with this camera You can leave the cover attached when charging batteries in a charger To prevent dust accumulating inside the battery chamber replace the battery chamber co...

Страница 80: ...displayed charge or exchange the battery D The Standby Timer The camera uses a standby timer to help reduce the drain on the battery If no operations are performed for about 30 seconds the standby timer will expire and the monitor viewfinder and control panel will turn off A few seconds prior to turning off the monitor and viewfinder will dim They can be reactivated by pressing the shutter release...

Страница 81: ...n shown slide it straight into the slot until it clicks into place A Number of Exposures Remaining When the camera is on the shooting display and control panel show the number of photographs that can be taken at current settings Values over 1000 are rounded down to the nearest hundred For example values between 8000 and 8099 are shown as 8 0 k If no memory cards are inserted an E indicator will be...

Страница 82: ... Card High Temperature Warning As indicated on the inside of the memory card slot cover memory cards inserted in the camera may become hot Do not attempt to remove memory cards if a high temperature warning appears in the shooting display instead wait for the camera to cool and the warning to clear from the display A Slot Icons The location of the current picture is shown by an icon at the bottom ...

Страница 83: ...rative purposes is a NIKKOR Z 50mm f 1 8 S Be careful to prevent dust entering the camera Confirm that the camera is off before attaching the lens Remove the camera body cap q w and rear lens cap e r Align the mounting marks on the camera t and lens y Do not touch the image sensor or lens contacts Attaching a Lens ...

Страница 84: ...FTZ mount adapter available separately before using F mount lenses 0844 Attempting to attach F mount lenses directly to the camera could damage the lens or image sensor Detaching Lenses After turning the camera off press and hold the lens release button q while turning the lens in the direction shown w After removing the lens reattach the lens caps and camera body cap ...

Страница 85: ...me and date will be recorded with any pictures you take 1 Press G and in the setup menu highlight Language and press 2 For information on using the menus see Using the Menus 060 2 Select a language Press 1 or 3 to highlight the desired language and press J the languages available vary with the country or region in which the camera was originally purchased 3 Highlight Time zone and date and press 2...

Страница 86: ...aylight saving time on or off Select Daylight saving time in the Time zone and date display Select ON daylight saving time on or OFF daylight saving time off Selecting ON advances the clock one hour to undo the effect select OFF 6 Set the clock Select Date and time in the Time zone and date display Press J after using the multi selector to set the clock to the date and time in the selected time zo...

Страница 87: ... t icon in the shooting display indicates that the camera clock has been reset The date and time recorded with new photographs will not be correct use the Time zone and date Date and time option in the setup menu to set the clock to the correct time and date The camera clock is powered by an independent clock battery The clock battery charges when the main battery is inserted in the camera It take...

Страница 88: ...g photographs are described below D Lenses with Retractable Barrels Lenses with retractable barrels must be extended before use Rotate the zoom ring as shown until the lens clicks into the extended position 1 Select photo mode by rotating the photo video selector to C Taking Photographs ...

Страница 89: ...grip in your right hand and cradling the camera body or lens with your left bring your elbows in against the sides of your chest 3 Frame the photograph Position the main subject near the center of the frame Landscape wide orientation Portrait tall orientation ...

Страница 90: ...he focus point will be displayed in green when the camera focuses If the camera is unable to focus the focus point will flash red The AF assist illuminator may light to assist the focus operation if the subject is poorly lit You can also focus by pressing the AF ON button D The AF Assist Illuminator Do not obstruct the AF assist illuminator while it is lit ...

Страница 91: ...own to take the picture D The Memory Card Access Lamp The memory card access lamp will light while the photograph is being recorded Do not remove the memory card or battery A The Touch Shutter You can also take a photograph by touching the monitor Touch your subject to focus and lift your finger to release the shutter 0124 ...

Страница 92: ...hutter release button lock to L to avoid accidentally operating these controls when the camera is in landscape wide orientation A Using Zoom in Photo Mode To zoom in on the display in photo mode to a maximum of approximately 16 press the X button Use the X and W Q buttons to zoom in and out A navigation window showing the area currently visible will appear at the bottom right corner of the display...

Страница 93: ...ed when the camera is in video mode 2 Press the video record button to start recording A recording indicator will be displayed in the monitor The monitor also shows the time remaining or in other words the approximate amount of new footage that can be recorded to the memory card Shooting Videos 1 2 3 1 Recording indicator 2 Video recording time length of footage recorded 3 Time remaining ...

Страница 94: ... video microphone during recording You can also focus by tapping your subject in the monitor 3 Press the video record button again to end recording D The Memory Card Access Lamp The memory card access lamp will light while the video is being recorded Do not remove the memory card or battery D The 0 Icon A 0 icon indicates that videos cannot be recorded ...

Страница 95: ...de by the camera may be audible in footage recorded during autofocus during vibration reduction or when power aperture is used D Memory Card High Temperature Warning During video recording memory cards may become hot and a high temperature warning may appear in the shooting display Do not attempt to remove the memory card instead wait for the camera to cool and the warning to clear from the displa...

Страница 96: ... and other intermittent light sources or when the subject is briefly illuminated by a strobe or other bright momentary light source or flicker when power aperture is used during video recording Note that noise randomly spaced bright pixels fog or lines and unexpected colors may appear if you use the X button to zoom in on the view through the lens When recording avoid pointing the camera at the su...

Страница 97: ...inder after shooting Press 4 or 2 or flick left or right to view additional pictures Videos are indicated by a 1 icon Tap the a icon in the display or press the J button to start playback To end playback and return to shooting mode press the shutter release button halfway Playback ...

Страница 98: ... video playback the display shows the length of the video the current playback position and the other indicators listed below Your approximate position in the video can also be ascertained from the video progress bar 1 2 3 4 5 7 6 1 1 icon 2 Length 3 a icon 4 Current position total length 5 Volume 6 Progress bar 7 Guide ...

Страница 99: ...yback Press 3 while the video is paused to start slow motion playback Jog rewind advance Press 4 or 2 while the video is paused to rewind or advance one frame at a time Keep 4 or 2 pressed for continuous rewind or advance Skip 10 s Rotate the sub command dial one stop to skip ahead or back 10 s Skip 10 frames Rotate the main command dial one stop to skip ahead or back 10 frames Skip to last or fir...

Страница 100: ...d Adjust volume Press X to increase volume W Q to decrease Edit video To display video i menu pause playback and press the i button Exit Press 1 or K to exit to full frame playback Resume shooting Press the shutter release button halfway to return to shooting mode Operation Description ...

Страница 101: ...Q button to display a confirmation dialog Press the O Q button again to delete the picture and return to playback To exit without deleting the picture press K A The Playback Menu Delete Item Use Delete in the playback menu to delete multiple pictures delete all pictures currently rated d candidate for deletion delete all pictures taken on selected dates or delete all pictures in selected folders ...

Страница 102: ...gs Adjusting Image Area Settings At default settings image area can be selected by holding the Fn2 button and rotating a command dial Image area settings can be displayed by selecting Image area in the photo shooting menu Image Recording Options Image Area Quality and Size ...

Страница 103: ...ew equivalent to a 35 mm format camera a DX 24 16 Pictures are recorded in DX format To calculate the approximate focal length of the lens in 35 mm format multiply by 1 5 Image area selection is fixed at DX 24 16 when a DX lens is attached m 1 1 24 24 Pictures are recorded with an aspect ratio of 1 1 Z 16 9 36 20 Pictures are recorded with an aspect ratio of 16 9 1 FX 36 24 2 DX 24 16 3 1 1 24 24 ...

Страница 104: ...04 Image Recording Options Image Area Quality and Size DX Crop Alert If ON is selected for this option in the camera menus the image area icon in the shooting display will flash when DX 24 16 is selected ...

Страница 105: ...ose the image quality option used when photographs are recorded Choosing an Image Quality Option Hold the T button and rotate the main command dial A The Photo Shooting Menu Image Quality Option Image quality can also be adjusted using the Image quality item in the photo shooting menu ...

Страница 106: ...copies can only be viewed using a computer If the photo was recorded with only one memory card inserted or with Overflow or Backup selected for Role played by card in Slot 2 and two memory cards inserted deleting the JPEG copy on the camera will also delete the NEF RAW picture RAW JPEG fine RAW JPEG normalm RAW JPEG normal RAW JPEG basicm RAW JPEG basic RAW Record photos in NEF RAW format JPEG fin...

Страница 107: ...cted by NEF RAW processing and their quality will remain intact even if the pictures are processed multiple times at different settings NEF RAW processing can be performed using Retouch RAW processing current picture or RAW processing multiple pictures in the playback i menu or on a computer using Nikon s NX Studio software NX Studio is available free of charge from the Nikon Download Center A NEF...

Страница 108: ... for new JPEG pictures The size for JPEG pictures can be selected from Large Medium and Small Choosing an Image Size Hold the T button and rotate the sub command dial A The Photo Shooting Menu Image Size Item Image size can also be adjusted using the Image size item in the photo shooting menu ...

Страница 109: ...prox 52 4 35 0 cm 20 6 13 8 in Small 4128 2752 pixels Approx 35 0 23 3 cm 13 8 9 2 in DX 24 16 Large 5392 3592 pixels Approx 45 7 30 4 cm 18 0 12 0 in Medium 4032 2688 pixels Approx 34 1 22 8 cm 13 4 9 0 in Small 2688 1792 pixels Approx 22 8 15 2 cm 9 0 6 0 in 1 1 24 24 Large 5504 5504 pixels Approx 46 6 46 6 cm 18 3 18 3 in Medium 4128 4128 pixels Approx 35 0 35 0 cm 13 8 13 8 in Small 2752 2752 ...

Страница 110: ...s Choosing a Focus Mode The focus mode can be selected by holding the focus mode button and rotating the main command dial A Focus Mode The focus mode can also be selected using the Focus mode items in the photo shooting and video recording menus Focus ...

Страница 111: ...er moving subjects The camera adjusts focus continuously in response to changes in the distance to the subject while the shutter release button is pressed halfway At default settings the shutter can be released whether or not the subject is in focus release priority AF F Full time AF The camera adjusts focus continuously in response to subject movement or changes in composition When you press the ...

Страница 112: ...por sodium vapor or similar lighting a cross star filter or other special filter is used the subject appears smaller than the focus point or the subject is dominated by regular geometric patterns e g blinds or a row of windows in a skyscraper The display may brighten or darken while the camera focuses The focus point may sometimes be displayed in green when the camera is unable to focus The camera...

Страница 113: ...he focus point can be positioned using the sub selector 0123 or multi selector Choosing an AF Area Mode To choose the AF area mode hold the focus mode button and rotate the sub command dial A AF Area Mode The AF area mode can also be selected using the AF area mode items in the photo shooting and video recording menus ...

Страница 114: ... in the frame Focusing may be slower than with single point AF Recommended for shots involving static subjects such as buildings in studio product photography or close ups This option is only available when photo mode is selected and Single AF is chosen for focus mode d Single point AF The camera focuses on a point selected by the user Use with stationary subjects ...

Страница 115: ...AF The size of the area used for focus can be selected from S small M medium and L large S is the smallest and L the largest Dynamic area AF S Choose when there is time to compose the photograph or when photographing subjects that are moving predictably e g runners or race cars on a track Dynamic area AF M Choose when photographing subjects that are moving unpredictably e g players at a football g...

Страница 116: ... for Wide area AF L are larger than those for Wide area AF S g Wide area AF L u 3D tracking The camera tracks focus on a selected subject Position the focus point over your subject and start tracking by pressing J or AF ON or by pressing the shutter release button halfway focus will then track the selected subject as it moves through the frame To end tracking and restore the previously selected fo...

Страница 117: ...subject Position the reticle over the target and start tracking by pressing the shutter release button halfway or by pressing the J or AF ON the focus point will track the selected subject as it moves through the frame To end tracking and restore the starting focus point press J This option is only available in video mode h Auto area AF The camera automatically detects the subject and selects the ...

Страница 118: ...rnating points for Custom Setting a4 Focus points used to use only a quarter of the available focus points Selecting Alternating points does not affect the number of points available for Pinpoint AF If you prefer to use the sub selector for focus point selection you can choose Select center focus point for Custom Setting f2 Custom controls shooting Sub selector center to allow the center of the su...

Страница 119: ...s made via AF subject detection options Subject detection Separate subject types can be selected for photo and video modes Subject detection is available when Wide area AF S Wide area AF L 3D tracking Subject tracking AF or Auto area AF is selected for AF area mode Human faces detected by the camera when People is selected are identified by a border indicating the focus point If the camera detects...

Страница 120: ... of trains the camera will detect only the front end With planes the camera will detect the body nose or cockpit depending on the aircraft s size If Auto is selected the camera will detect humans animals and vehicles and choose a subject for focus automatically To disable AF subject detection altogether choose Subject detection off If more than one subject of the selected type is detected a gray f...

Страница 121: ...tection may not perform as expected if the subject s face is too large or small relative to the frame the subject s face is too brightly or dimly lit the subject s face or eyes are obscured by fur or the like the subject s face and eyes are of similar colors or the subject moves excessively during shooting The camera may display a border around subjects that are not dogs cats or birds but which re...

Страница 122: ...unding objects or moving quickly The camera may fail to detect vehicles of some shapes and colors Alternatively it may display a border around subjects that are not vehicles D Subject Detection The performance of subject detection may drop during high speed frame capture or if either HLG or N Log is selected as the tone mode for Video file type ProRes 422 HQ 10 bit MOV or H 265 10 bit MOV in the v...

Страница 123: ...nd focus lock while the center of the sub selector is pressed Be careful not to put your fingers in your eye while using the sub selector with your eye to the viewfinder A Portrait Tall Orientation You may find it convenient to use the vertical multi selector when taking photographs in portrait tall orientation A Using the Sub Selector and Vertical Multi Selector You can press the centers of the s...

Страница 124: ...h AF Touch the display to focus on the selected point and lift your finger to release the shutter When choosing an eye using touch controls note that the camera may not focus on the eye on the side you intend Use the multi selector to choose the desired eye If Auto area AF is selected for AF area mode the camera will focus on the chosen point release the shutter and track the selected subject Pres...

Страница 125: ...umber of shots selected is greater than 1 the remaining shots will be taken in a single burst f Position focus point Touch the display to position the focus point The camera will not focus and lifting your finger from the display will not release the shutter If Subject tracking AF or Auto area AF is selected for AF area mode focus will track the subject at the chosen point Press J to end subject t...

Страница 126: ...uto area AF 1 Position the subject in the selected focus point and press the shutter release button halfway 2 Press the center of the sub selector Keeping the shutter release button pressed halfway q press the center of the sub selector w to lock focus Focus will remain locked while the center of the sub selector is pressed even if you lift your finger from the shutter release button Exposure will...

Страница 127: ... Focus Mode Focus locks while the shutter release button is pressed halfway You can also lock focus by pressing the center of the sub selector D Taking Multiple Shots at the Same Focus Distance If you locked focus by pressing the center of the sub selector focus will remain locked between shots if you keep the center of the sub selector pressed If you locked focus by pressing the shutter release b...

Страница 128: ...ease button When AF ON only is selected for Custom Setting a6 AF activation focus can be initiated only by pressing the AF ON button the camera will not focus when the shutter release button is pressed halfway Focus will remain locked after the AF ON button is released To end focus lock press the AF ON button again ...

Страница 129: ...Use manual focus when for example autofocus does not produce the desired results Position the focus point over your subject and rotate the focus or control ring until the subject is in focus For greater precision press the X button to zoom in on the view through the lens ...

Страница 130: ... suited to autofocus note that the in focus indicator I may be displayed when the subject is not in focus Zoom in on the view through the lens and check focus Use of a tripod is recommended when the camera is having trouble focusing 1 2 1 Focus distance indicator 2 Focus indicator Focus indicator Description steady The subject is in focus steady The focus point is in front of the subject steady Th...

Страница 131: ...ance to your subject for manual focus or macro photography The distance between the focal plane and the lens mounting flange is known as the flange back distance w On this camera the flange back distance is 16 mm 0 63 in A Focus Peaking If ON is selected for Custom Setting a13 Focus peaking Focus peaking display objects that are in focus will be indicated by colored outlines that appear when focus...

Страница 132: ...djust camera settings The camera chooses both shutter speed and aperture automatically S Shutter priority auto 0133 Use to freeze or blur motion You choose the shutter speed the camera adjusts aperture automatically A Aperture priority auto 0134 Use to blur backgrounds or bring both foreground and background into focus You choose the aperture the camera adjusts shutter speed automatically M Manual...

Страница 133: ...ault shutter speed and aperture settings rotate the main command dial until the indicator is no longer displayed Flexible program can also be ended by choosing another mode or turning the camera off S Shutter Priority Auto In shutter priority auto you choose the shutter speed while the camera automatically adjusts aperture for optimal exposure Choose fast shutter speeds to freeze motion slow shutt...

Страница 134: ... choose the aperture while the camera automatically adjusts shutter speed for optimal exposure Aperture can be adjusted by rotating the sub command dial The minimum and maximum values for aperture vary with the lens Aperture can be locked at the selected value 0665 682 ...

Страница 135: ... be adjusted with reference to the exposure indicators by rotating the command dials Rotate the main command dial to choose the shutter speed Shutter speed can be set to values between 1 32000 s and 30 s or to Bulb or Time Aperture can be adjusted by rotating the sub command dial The minimum and maximum values for aperture vary with the lens Shutter speed and aperture can be locked at the selected...

Страница 136: ...th the option selected for Custom Setting b2 EV steps for exposure cntrl The orientation of the exposure indicators can be reversed using Custom Setting f7 Reverse indicators D Exposure Warning The displays will flash if the selected settings exceed the limits of the exposure metering system Display 1 3 step selected for EV steps for exposure cntrl Optimal exposure Underexposed by 1 3 EV Overexpos...

Страница 137: ...er from the actual exposure time The actual exposure times at shutter speeds of 15 and 30 seconds for example are respectively 16 and 32 seconds The exposure time will again match the selected shutter speed at speeds of 60 seconds and slower A Auto ISO Sensitivity Control Mode M If auto ISO sensitivity control 0156 is enabled ISO sensitivity will automatically be adjusted for optimal exposure at t...

Страница 138: ...ep the camera steady for example by using a tripod 2 Hold the I button and rotate the main command dial to select mode M A 35 second exposure shot at a shutter speed of Bulb and an aperture of f 25 Shutter speed Description Bulb The shutter remains open while the shutter release button is held down Time The exposure starts when the shutter release button is pressed and ends when the button is pres...

Страница 139: ...s and start the exposure Bulb Press the shutter release button all the way down to start the exposure Keep the shutter release button pressed during the exposure Time Press the shutter release button all the way down to start the exposure 5 End the exposure Bulb Lift your finger from the shutter release button Time Press the shutter release button all the way down a second time Bulb Time ...

Страница 140: ...reduced by choosing ON for Long exposure NR in the photo shooting menu Nikon recommends using a fully charged battery the supplied charging AC adapter or an optional AC adapter and power connector to prevent loss of power during long exposures To prevent blur use of a tripod or a device such as an optional remote cord or wireless remote controller is recommended ...

Страница 141: ...han its surroundings 1 With the subject positioned in the selected focus point and the shutter release button pressed halfway press the center of the sub selector to lock exposure While the center of the sub selector is pressed exposure will lock at the value metered in an area of the subject determined by the selected metering option An AE L icon will appear in the shooting display If autofocus i...

Страница 142: ...Spot metering exposure will be locked at the value metered in a circle centered on the current focus point With Center weighted metering exposure will be locked at the value metered in a 12 mm circle in the center of the display A Adjusting Shutter Speed and Aperture The following settings can be adjusted while the center of the sub selector is pressed The new values can be confirmed in the shooti...

Страница 143: ...and rotate a command dial Choose from values between 5 EV underexposure and 5 EV overexposure Values between 3 EV and 3 EV are available in video mode At default settings changes to exposure compensation are made in increments of 1 3 EV The size of the increments can be changed using Custom Setting b2 EV steps for exposure cntrl Higher values make the subject brighter lower values darker 1 EV No e...

Страница 144: ...ned off A Mode M In mode M exposure compensation affects only the exposure indicator shutter speed and aperture do not change When auto ISO sensitivity control 0156 is in effect ISO sensitivity is automatically adjusted according to the value selected for exposure compensation A Using a Flash When an optional flash is used exposure compensation affects both flash level and exposure altering the br...

Страница 145: ... photograph each time the shutter release button is pressed V Continuous low speed The camera takes photographs at a selected rate while the shutter release button is pressed Choose from rates of from 10 to 1 fps To choose the frame rate hold the c button and rotate a command dial W Continuous high speed The camera takes photographs at a selected rate while the shutter release button is pressed Us...

Страница 146: ...tes may slow during flash photography in silent mode when flicker is detected with ON selected for Photo flicker reduction in the photo shooting menu if aperture is stopped down to a very high f number or at slow shutter speeds When ON is selected for Photo flicker reduction in the photo shooting menu 0518 the shooting display will briefly go dark during burst photography E Self timer Take picture...

Страница 147: ...all pictures in the buffer have been recorded If the battery is exhausted while pictures remain in the buffer the shutter release will be disabled and the pictures transferred to the memory card Bursts shot at a frame rate of 20 fps in continuous high speed mode will be limited to a maximum of about 3 seconds if a RAW JPEG option is selected for image quality or JPEG Slot 1 JPEG Slot 2 is selected...

Страница 148: ...e mode by holding the c button and rotating the main command dial Settings for the selected mode can be adjusted by holding the c button and rotating the sub command dial High speed frame capture modes with frame advance rates of 30 or 120 fps are available only when the release mode dial is rotated to c 0149 ...

Страница 149: ... high speed burst photography at frame rates of 30 or 120 fps set the release mode dial to c and then hold the c button and rotate the main command dial to choose C30 or C120 The maximum length for bursts taken in these modes is approximately four seconds ...

Страница 150: ...though settings between 5 and 5 EV can be selected If a DX lens is attached when C120 is selected the release mode will change to C30 and image area will be fixed at DX 24 16 The touch shutter can be used only to take one picture at a time Use the shutter release button for high speed frame capture Option C30 C120 Shutter speed 1 32000 to 1 60 s 1 32000 to 1 125 s Image area FX 36 24 or DX 24 16 F...

Страница 151: ...ons High speed frame capture cannot be combined with some camera features including flexible program photo flicker reduction flash photography bracketing multiple exposures HDR overlay interval timer photography time lapse video recording and focus shift ...

Страница 152: ...art if the shutter cannot be released as may be the case for example if the camera is unable to focus when AF S is selected for focus mode 3 Start the timer Press the shutter release button all the way down to start the timer the self timer lamp will begin to flash The lamp stops flashing two seconds before the timer expires To turn the self timer off before a photograph is taken rotate the releas...

Страница 153: ...153 Release Mode A Setting the Timer To choose the timer duration press and hold the c button and rotate a command dial ...

Страница 154: ...isplay and control panel At default settings changes to ISO sensitivity are made in increments of 1 3 EV The size of the increments can be changed using Custom Setting b1 ISO sensitivity step value D High ISO Sensitivities The higher the ISO sensitivity the less light needed to make an exposure allowing pictures to be taken when lighting is poor and helping prevent blur when the subject is in moti...

Страница 155: ...o an ISO sensitivity approximately 2 EV higher ISO 102400 equivalent Note that pictures taken at these settings are particularly prone to noise in the form of randomly spaced bright pixels fog or lines A Lo 0 3 Lo 1 0 Lo 0 3 corresponds to an ISO sensitivity about 0 3 EV below ISO 64 ISO 50 equivalent Lo 1 0 is roughly 1 EV below ISO 100 ISO 32 equivalent Use for larger apertures or slower shutter...

Страница 156: ...ISO Sensitivity Control Hold the S button and rotate the sub command dial to select from ISO AUTO auto ISO sensitivity control enabled and ISO auto ISO sensitivity control disabled When auto ISO sensitivity control is enabled the shooting display will show ISO AUTO and control panel ISO A When sensitivity is altered from the value selected by the user the ISO sensitivity will be shown in the displ...

Страница 157: ... range defined by the values selected for Custom Settings e1 Flash sync speed and e2 Flash shutter speed If the value selected for Minimum shutter speed is not in this range the value selected for Custom Setting e2 Flash shutter speed becomes the effective minimum shutter speed Except in mode M videos are recorded using auto ISO sensitivity control Auto ISO sensitivity control can be enabled for v...

Страница 158: ...fails to produce the desired results other settings can be selected according to the weather or light source Adjusting White Balance To choose a white balance option hold the U button and rotate the main command dial The selected option is shown by an icon in the shooting display Options for the selected setting if any can be selected by holding the U button and rotating the sub command dial White...

Страница 159: ... 8000 K Partially preserve the warm color cast produced by incandescent lighting k Keep warm lighting colors Approx 3500 8000 K Preserve the warm color cast produced by incandescent lighting D Natural light auto Approx 4500 8000 K White balance is adjusted for non artificial light sources producing more life like colors than does Auto when used under natural light H Direct sunlight Approx 5200 K U...

Страница 160: ...hotography K Choose color temperature Approx 2500 10000K Direct color temperature selection To choose a color temperature hold the U button and rotate the sub command dial L Preset manual Measure white balance directly from a subject or light source or copy white balance from an existing photograph To choose a white balance preset hold the U button and rotate the sub command dial To enter direct m...

Страница 161: ...e to 5 Flash and use fine tuning to adjust white balance A Auto The photo info Basic shooting data page for pictures shot with 4 Auto or D Natural light auto selected for white balance lists the color temperature selected by the camera at the time the picture was taken 0235 You can use this as reference when choosing a value for K Choose color temperature To view the Basic shooting data page durin...

Страница 162: ...blue Color temperature is an objective measure of the color of a light source expressed in Kelvins K The lower the color temperature the redder the cast q the higher the temperature the bluer the cast w A Choosing a Color Temperature In general choose lower values if your pictures have a red cast or to intentionally make pictures bluer higher values if your pictures are tinged blue or to intention...

Страница 163: ...ctor to position the cursor on the grid The cursor can be moved up to six steps from the center along either of the A amber B blue and G green M magenta axes The selected value is displayed to the right of the grid The A amber B blue axis corresponds to color temperature and is ruled in increments of 0 5 A change of 1 is equivalent to approximately 5 mired The G green M magenta axis has effects si...

Страница 164: ...164 White Balance 3 Save changes Press J to save changes and exit to the menus If white balance has been fine tuned an asterisk U will appear in the white balance icon ...

Страница 165: ... tuning options can be displayed by pressing 3 Any changes to fine tuning options can be previewed in the display Tap the arrows in the display or use the multi selector to fine tune white balance Press J to save changes and return to the i menu If white balance has been fine tuned an asterisk U will appear in the white balance icon G Increase green B Increase blue A Increase amber M Increase mage...

Страница 166: ...escent is selected will make pictures slightly colder but will not actually make them blue A Mired Values in mired are calculated by multiplying the inverse of the color temperature by 106 Any given change in color temperature produces a greater difference in color at low color temperatures than it would at higher color temperatures For example a change of 1000 K produces a much greater change in ...

Страница 167: ... Choose color temperature and press 2 2 Choose a color temperature Press 4 or 2 to highlight digits on the amber A blue B axis and press 1 or 3 to change Press 4 or 2 to highlight the value for the green G magenta M axis and press 1 or 3 to change 3 Save changes Press J to save changes and exit to the menus If a value other than 0 is selected for the green G magenta M axis an asterisk U will appea...

Страница 168: ...n mireds To highlight a digit hold the U button and press 4 or 2 Press 1 or 3 to edit the highlighted digit Changes apply only to the A amber B blue axis The selected setting takes effect when the U button is released D Cautions Color Temperature Selection Do not use color temperature selection with fluorescent light sources instead use the I Fluorescent option When using color temperature selecti...

Страница 169: ...ns can be viewed by pressing 3 Press 4 or 2 to highlight digits on the A B amber blue axis You can also highlight the G M green magenta axis Press 1 or 3 to edit the selected item Press J to save changes and return to the i menu If a value other than 0 is selected for the green G magenta M axis an asterisk U will appear in the white balance icon Value for Amber Blue axis Value for Green Magenta ax...

Страница 170: ... in the final photograph Two methods are available for setting preset white balance D White Balance Presets Changes to white balance presets d 1 through d 6 apply to all shooting menu banks A D For example changes to presets made when shooting menu bank A is selected also apply to shooting menu banks B through D Method Description Direct measurement Measure white balance in a selected area of the ...

Страница 171: ...and dial to select L 2 Select a preset Hold the U button and rotate the sub command dial until the desired white balance preset d 1 to d 6 is displayed 3 Select direct measurement mode Release the U button briefly and then press the U button until the L icon in the monitor starts to flash A white balance target r will appear in the center of the frame ...

Страница 172: ... measure white balance by tapping the display Target selection will not be available if an optional flash unit is attached Frame the shot so that the white or gray reference object is in the center of the display If the camera is unable to measure white balance a message will be displayed and the camera will return to direct measurement mode Try measuring white balance again for example with the t...

Страница 173: ...d and cannot be changed D Preset Manual Selecting a Preset At shipment presets d 1 through d 6 are set to 5200 K equivalent to the H Direct sunlight white balance option White balance presets can be viewed by selecting White balance L Preset manual in the photo shooting menu To recall a stored value highlight a preset using the multi selector and press J D Direct Measurement Mode Direct measuremen...

Страница 174: ...ted preset 1 Select White balance in the photo shooting menu then highlight Preset manual and press 2 2 Select a destination Using the multi selector highlight the destination preset d 1 to d 6 Press X to view the preset manual white balance menu 3 Choose Select picture Highlight Select picture and press 2 to view the pictures on the current memory card ...

Страница 175: ...ctor To view the highlighted picture full frame press and hold the X button 5 Copy white balance Press J to copy the white balance value for the highlighted photograph to the selected preset If the highlighted photograph has a comment the comment will be copied to the comment for the selected preset ...

Страница 176: ... enter a descriptive comment of up to 36 characters for the current white balance preset select Edit comment in the preset manual white balance menu Enter a comment as described in Text Entry 064 A Protect To protect the current white balance preset select ON for Protect in the preset manual white balance menu The preset cannot be modified as long as ON is selected for Protect ...

Страница 177: ...g Set Bracketing is adjusted using the Auto bracketing Auto bracketing set item in the photo shooting menu which contains the following options Bracketing Option Description AE flash bracketing The camera varies exposure and flash level over a series of photographs AE bracketing The camera varies exposure over a series of photographs Flash bracketing The camera varies flash level over a series of ...

Страница 178: ... exposure and or flash bracketing 1 Choose the number of shots Hold the BKT button and rotate the main command dial to choose the number of shots in the bracketing sequence At settings other than 0F a bracketing icon and indicator will appear in the shooting display and control panel No exposure compensation 1 EV 1 EV ...

Страница 179: ...0 and 3 0 EV Bracketing programs with an increment of 2 0 or 3 0 EV offer a maximum of 5 shots If a value of 7 or 9 was selected in Step 1 the number of shots will automatically be set to 5 The bracketing programs with an increment of 0 3 EV are listed below Control panel Exposure and flash bracketing indicator No of shots Bracketing order 0F 0 3 0 0 3F 0 3 3 0 0 3 0 3 5F 0 3 5 0 0 7 0 3 0 3 0 7 7...

Страница 180: ...umber of shots remaining in the bracketing sequence After each shot a segment will disappear from the indicator and the number of shots remaining will be reduced by one The control panel shows a M icon and a bracketing progress indicator A segment disappears from the indicator after each shot Exposure changes due to bracketing are added to those made with exposure compensation No shots 3 Increment...

Страница 181: ...nly 0425 816 A Exposure and Flash Bracketing Number of shots and Increment can also be selected via the Auto bracketing item in the photo shooting menu In continuous release modes shooting will pause after the number of shots specified in the bracketing program have been taken Shooting will resume the next time the shutter release button is pressed If the camera is turned off before all shots in t...

Страница 182: ...eting mode M to choose whether the camera varies both shutter speed and aperture or any one of shutter speed aperture and ISO sensitivity when OFF is selected for ISO sensitivity settings Auto ISO sensitivity control in the photo shooting menu Cancelling Bracketing To cancel bracketing press the BKT button and rotate the main command dial until the number of shots in the bracketing sequence is zer...

Страница 183: ... different white balance To use white balance bracketing 1 Choose the number of shots Hold the BKT button and rotate the main command dial to choose the number of shots in the bracketing sequence At settings other than 0F a bracketing icon and indicator will appear in the shooting display and control panel ...

Страница 184: ...equivalent to 5 mired Higher A values correspond to increased amounts of amber Higher B values correspond to increased amounts of blue The bracketing programs with an increment of 1 are listed below Control panel White balance bracketing indicator No of shots White balance increment Bracketing order 0F 1 0 1 0 3F 1 3 1A 1B 0 A1 B1 5F 1 5 1A 1B 0 A2 A1 B1 B2 7F 1 7 1A 1B 0 A3 A2 A1 B1 B2 B3 9F 1 9 ...

Страница 185: ...ot available at image quality settings of NEF RAW or NEF RAW JPEG A White Balance Bracketing Number of shots and Increment can also be selected via the Auto bracketing item in the photo shooting menu White balance bracketing affects only color temperature the amber blue axis in the white balance fine tuning display No adjustments are made on the green magenta axis If the camera is turned off while...

Страница 186: ...il the number of shots in the bracketing sequence is zero 0F The program last in effect will be restored the next time bracketing is activated Bracketing can also be cancelled by performing a two button reset 0209 although in this case the bracketing program will not be restored the next time bracketing is activated ...

Страница 187: ...of exposures To use ADL bracketing 1 Choose the number of shots Hold the BKT button and rotate the main command dial to choose the number of shots in the bracketing sequence At settings other than 0F a bracketing icon and indicator will appear in the shooting display and control panel ...

Страница 188: ...eting sequences H1 and H2 by holding the BKT button and rotating the sub command dial If you chose more than two shots proceed to Step 3 No of shots Bracketing sequence 2 Off Value selected in Step 2 3 Off Low Normal 4 Off Low Normal High 5 H1 Off Low Normal High Extra high 1 H2 Low Normal High Extra high 1 Extra high 2 ...

Страница 189: ...to choose the Active D Lighting setting for the second shot when the number of shots in the bracketing sequence is 2 The bracketing sequence varies with the Active D Lighting amount as follows Amount Bracketing sequence L Off Low N Off Normal H Off High H1 Off Extra high 1 H2 Off Extra high 2 AUTO Off Auto ...

Страница 190: ...ment disappears from the indicator after each shot D ADL Bracketing Number of shots and Amount can also be selected via the Auto bracketing item in the photo shooting menu In continuous release modes shooting will pause after the number of shots specified in the bracketing program have been taken Shooting will resume the next time the shutter release button is pressed If the camera is turned off b...

Страница 191: ...il the number of shots in the bracketing sequence is zero 0F The program last in effect will be restored the next time bracketing is activated Bracketing can also be cancelled by performing a two button reset 0209 although in this case the bracketing program will not be restored the next time bracketing is activated ...

Страница 192: ...Picture Controls can be selected by holding the g Fn4 button and rotating the main command dial The selected option is shown by an icon in the shooting display When a Creative Picture Control is selected the effect level can be chosen by holding the g Fn4 button and rotating the sub command dial The Picture Control for videos can be selected by pressing the g Fn4 button in video mode Picture Contr...

Страница 193: ...ivid photoprint effect Choose for photographs that emphasize primary colors T Monochrome Take monochrome photographs o Portrait Smooth complexions for natural looking portraits p Landscape Shoot vibrant landscapes and cityscapes q Flat Details are preserved over a wide tone range from highlights to shadows Choose for photographs that will later be extensively processed or retouched k01 k20 Creativ...

Страница 194: ...elected using the Set Picture Control items in the photo shooting and video recording menus The Set Picture Control item in the video recording menu also offers a Same as photo settings option that sets the Picture Control for videos to the same as that used for photographs ...

Страница 195: ...ht settings Press 4 or 2 to choose a value in increments of 1 or rotate the sub command dial to choose a value in increments of 0 25 The options available vary with the Picture Control selected To quickly adjust levels for balanced Sharpening Mid range sharpening and Clarity highlight Quick sharp and press 4 or 2 To abandon any changes and start over from default settings press the O Q button 3 Sa...

Страница 196: ...between Sharpening and Clarity Clarity Adjust overall sharpness and the sharpness of thicker outlines without affecting brightness or dynamic range Contrast Adjust contrast Brightness Raise or lower brightness without loss of detail in highlights or shadows Saturation Control the vividness of colors Hue Adjust hue Filter effects Simulate the effect of color filters on monochrome pictures Toning Ch...

Страница 197: ...e D Filter Effects Choose from the following Filter effects The term in parentheses is the name of the corresponding third party color filter for black and white photography D The Auto Picture Control Settings can be adjusted in the range A 2 to A 2 Option Description Y yellow These options enhance contrast and can be used to tone down the brightness of the sky in landscape photographs Orange O pr...

Страница 198: ...isplay Press 1 or 3 to highlight settings Press 4 or 2 to choose a value in increments of 1 or rotate the sub command dial to choose a value in increments of 0 25 The options available vary with the Picture Control selected To abandon any changes and start over from default settings press the O Q button Press J to save changes Picture Controls that have been modified from default settings are indi...

Страница 199: ...ng menu and press 2 2 Select Save edit Highlight Save edit and press 2 to view Choose Picture Control options Option Description Save edit Create a new custom Picture Control based on an existing preset or custom Picture Control or edit existing custom Picture Controls Rename Rename custom Picture Controls Delete Delete custom Picture Controls Load save Copy custom Picture Controls to and from a m...

Страница 200: ...modification press J Save as options will be displayed proceed to Step 5 4 Adjust settings The options and procedure are the same as for Set Picture Control Press J to display Save as options when settings are complete To abandon any changes and start over from default settings press the O Q button 5 Select a destination Choose a destination for the custom Picture Control C 1 through C 9 ...

Страница 201: ...ing a two digit number to the name of the existing Picture Control appears in the text display area The two digit number is generated automatically by the camera Custom Picture Control names can be up to nineteen characters long For information on text entry see Text Entry 064 7 Press the X button Text entry will end The new Picture Control will be added to the Picture Control list ...

Страница 202: ...nal preset Picture Control on which the custom Picture Control is based is indicated by an icon in the edit display D Custom Picture Control Options The options available with custom Picture Controls are the same as those on which the custom Picture Control was based ...

Страница 203: ...ory cards inserted in Slot 2 will not be detected Copy to camera Copy import custom Picture Controls from the memory card to the camera The Picture Controls are copied to custom Picture Controls C 1 through C 9 on the camera and can be named as desired Delete from card Delete selected custom Picture Controls from the memory card Copy to card Copy export a custom Picture Control from the camera to ...

Страница 204: ... data function Standby timer If ON is selected when Record location data is set to ON the standby timer will expire if no operations are performed for the period chosen using Custom Setting c3 Power off delay Standby timer Choose this option to reduce the drain on the battery Set clock from satellite Select ON to synchronize the camera clock with the time reported by the location data function Cre...

Страница 205: ...ot be recorded with pictures taken when the icon is not displayed Note however that location data previously acquired may be recorded with pictures taken after the icon has cleared from the display Log list List track logs by date Where multiple logs were recorded on the same day an identifier appears after the date The camera can store up to 100 track logs To delete a log highlight it and press O...

Страница 206: ...signals may be blocked or reflected in the locations listed below rendering the data acquired less accurate or preventing its acquisition altogether In buildings or under ground Between tall buildings Under bridges In tunnels Near power lines or similar structures In dense forest In metal briefcases or other containers The presence of cellular telephones or other devices that produce strong electr...

Страница 207: ...cation data built in display while logging is in progress Logs are not interrupted when the camera is turned off or the standby timer expires Be sure to monitor the battery level while logging is in progress Logs are stored in the NIKON GNSS folder on the memory card and have names of the form Nyymmddx log Here yy is the last two digits of the current year mm the month dd the day x a single charac...

Страница 208: ...n when location data cannot be acquired using the camera s built in location data unit See SnapBridge online help for details Location data downloaded from the smart device will be recorded with pictures even if OFF is selected for Location data built in Record location data Location data recording can be ended by disabling the location data feature in the SnapBridge app ...

Страница 209: ...settings are reset Photo Shooting Menu With the exceptions of multiple exposure interval timer time lapse video and focus shift only settings in the current shooting menu bank are affected Two Button Reset Option Default ISO sensitivity settings ISO sensitivity 100 Auto ISO sensitivity control ON Maximum sensitivity 25600 Maximum sensitivity with c Same as without flash Minimum shutter speed Auto ...

Страница 210: ...ures recorded to that point If On series or On single photo is selected the multiple exposure mode will be reset to Off Number of shots Overlay mode Save individual pictures RAW and Overlay shooting are not reset 3 On series and On single photo are reset to Off HDR strength and Save individual pictures RAW are not reset Set Picture Control Auto Active D Lighting Off Photo flicker reduction OFF Met...

Страница 211: ...itivity 25600 Auto ISO control mode M ON ISO sensitivity mode M 100 White balance Same as photo settings Set Picture Control Same as photo settings HLG quality Quick sharp 0 Contrast 0 Saturation 0 Hue 0 Active D Lighting Off Focus mode Full time AF AF area mode Single point AF Electronic VR OFF ...

Страница 212: ...to Lv Show effects of settings d9 Starlight view photo Lv OFF d10 Warm display colors OFF e2 Flash shutter speed 1 60 s f4 Control lock Shutter speed lock OFF Aperture lock OFF Focus point lock OFF g3 Control lock Shutter speed lock OFF Aperture lock OFF Focus point lock OFF g5 Focus mode restrictions No restrictions ...

Страница 213: ...t Other Settings Option Default Focus point Center Preset focus point Center Shooting mode P Flexible program Off Exposure compensation Off 0 0 AE lock hold Off Flash mode Fill flash Flash compensation Off 0 0 FV lock Off ...

Страница 214: ... Audio is recorded in Linear PCM format 4 2 2 H 265 10 bit MOV This format assumes the footage will be processed on a powerful computer You have a choice of three tone modes SDR HLG and N Log Footage is recorded using long GOP inter frame compression Audio is recorded in Linear PCM format 4 2 0 H 265 8 bit MOV This format offers superior compression Footage is recorded using long GOP inter frame c...

Страница 215: ...de supports a normal range of brightnesses dynamic range HLG This mode supports HDR high dynamic range 0223 It has a wider dynamic range than SDR It is available only when H 265 10 bit MOV is selected for Video file type N Log This mode uses Nikon s unique log curve Choose for pictures with a wide dynamic range 3D LUTs for use with N Log curves can be applied post production for pictures that disp...

Страница 216: ...ding menu Video Frame Size and Rate Options Option 1 Video file type ProRes 422 HQ 10 bit H 265 10 bit 8 bit H 264 8 bit 7680 4320 30p 2 3 4 7680 4320 25p 2 3 4 7680 4320 24p 2 3 4 3840 2160 120p 2 4 4 3840 2160 100p 2 4 4 3840 2160 60p 4 4 4 3840 2160 50p 4 4 4 3840 2160 30p 4 4 4 3840 2160 25p 4 4 4 3840 2160 24p 4 4 4 1920 1080 120p 2 4 4 1920 1080 100p 2 4 4 1920 1080 60p 4 4 4 1920 1080 50p 4...

Страница 217: ...ame rate option is shown below ProRes 422 HQ data specifications are available from the Apple website Option Video file type H 265 10 bit H 265 8 bit H 264 8 bit 7680 4320 30p Approx 400 Mbps Approx 370 Mbps 7680 4320 25p 7680 4320 24p 3840 2160 120p 3840 2160 100p 3840 2160 60p Approx 340 Mbps Approx 300 Mbps 3840 2160 50p 3840 2160 30p Approx 190 Mbps Approx 150 Mbps 3840 2160 25p 3840 2160 24p ...

Страница 218: ...selected the aspect ratio is 16 9 Select FX to shoot videos in what is referred to as FX based video format DX to shoot in DX based video format Selecting DX for Choose image area or mounting a DX lens on the camera with 3840 2160 120p 3840 2160 100p 1920 1080 120p or 1920 1080 100p chosen for Frame size frame rate increases the apparent focal length by approximately 2 3 when compared to FX format...

Страница 219: ...he sizes of the different crops are shown below DX based video format is selected automatically when a DX lens is attached When 7680 4320 is selected for frame size image area is fixed at FX The frame size changes to 3840 2160 when a DX lens is attached Selecting ON for Electronic VR in the video recording menu reduces the size of the crop Format Size FX based video format Approx 35 9 20 2 mm DX b...

Страница 220: ...ns selected for Frame size frame rate If ProRes 422 HQ 10 bit MOV is selected for Video file type in the video recording menu and the memory card has a capacity of 32 GB or less recording will automatically end when the file reaches 4 GB in size Videos are not recorded across multiple files Depending on memory card write speed shooting may end before the maximum length is reached A 0 icon 094 indi...

Страница 221: ...he upper limit for ISO sensitivity can be selected using the ISO sensitivity settings Maximum sensitivity item in the video recording menu 4 If ON is selected for ISO sensitivity settings Auto ISO control mode M in the video recording menu the upper limit for ISO sensitivity can be selected using Maximum sensitivity A Adjusting White Balance During Video Recording White balance can be adjusted dur...

Страница 222: ...m Setting g2 Custom controls Shutter release button the shutter release buttons on optional wireless remote controllers and remote cords can be pressed halfway to focus or pressed all the way down to start and end video recording A Using an External Microphone Third party microphones with 3 5 mm mini jack plugs can be used to record audio for videos Use Mic jack plug in power in the video recordin...

Страница 223: ... the video recording menu is ISO 400 ISO sensitivities of Hi 0 3 through Hi 2 0 are not available Picture Control settings cannot be adjusted using the Set Picture Control item in the video recording menu You can control the appearance of HLG videos using HLG quality in the video recording menu The Active D Lighting item in the video recording menu is set to Off and cannot be changed The display i...

Страница 224: ...splay during HLG recording lacks contrast Selecting ON for Custom Setting g8 View assist simplifies colors for enhanced contrast p will appear in the shooting display Colors in the actual recorded footage are unaffected Contrast is also enhanced when HLG footage is viewed on the camera ...

Страница 225: ...rs when recording videos n will appear in the shooting display N Log recording is intended for footage that will be processed using color grading post production Color grading can be used to achieve multiple effects from a single sequence by processing it in different ways Compatible third party software is required for color grading Applying N Log 3D LUTs during color grading produces video that ...

Страница 226: ...n the video recording menu The Active D Lighting item in the video recording menu is set to Off and cannot be changed The display in the monitor may flicker or appear grainy The camera may have trouble focusing using autofocus but this does not indicate a malfunction View Assist You may find that the preview in the shooting display during N Log recording lacks contrast Selecting ON for Custom Sett...

Страница 227: ... Frame Playback Press the K button to view the most recent picture full frame in the display Press 4 to return to the previous frame 2 to skip to the next frame Press 1 3 or the DISP button to view more information on the current picture 0230 Viewing Pictures ...

Страница 228: ...tiple pictures press the W Q button when a picture is displayed full frame The number of pictures displayed increases from 4 to 9 to 72 each time the W Q button is pressed and decreases with each press of the X button Highlight pictures using 1 3 4 or 2 ...

Страница 229: ...selected for Picture review in the playback menu photographs are automatically displayed after shooting there is no need for you to press the K button If On monitor only is selected photos will not be displayed in the viewfinder In continuous release modes display begins when shooting ends with the first photograph in the current series displayed Pictures are not rotated automatically during pictu...

Страница 230: ...r the DISP button to cycle through photo information as shown below Displayed only if the corresponding option is selected for Playback display options in the playback menu Photo Information 1 File information 2 Exposure data 3 Highlight display 4 RGB histogram 5 Shooting data 6 Overview data 7 None picture only ...

Страница 231: ...16 1 Voice memo indicator 0295 2 Protect status 0249 3 Retouch indicator 0264 4 Upload marking 0253 5 IPTC preset indicator 0726 6 Focus point 0123 7 Frame number total number of frames 8 Image quality 0105 9 Image size 0108 10 Image area 0102 11 Time of recording 0709 12 Date of recording 0709 13 Current card slot 14 Rating 0251 15 Folder name 0497 16 File name 0502 ...

Страница 232: ...tivity control enabled Highlight Display 5 4 3 6 7 2 1 1 Current card slot 2 Folder number frame number 0497 3 Shooting mode 0132 4 Shutter speed 0133 135 5 Aperture 0134 135 6 Exposure compensation value 0143 7 ISO sensitivity 0154 1 1 Highlights areas that may be overexposed flash in the display ...

Страница 233: ...a for the portion of the picture visible in the display Use the multi selector to scroll to areas of the frame not visible in the monitor Press W Q to zoom out 2 3 4 5 1 1 White balance 0158 Color temperature 0167 Preset manual 0170 White balance fine tuning 0163 2 Histogram RGB channel 3 Histogram red channel 4 Histogram green channel 5 Histogram blue channel ...

Страница 234: ...e left If the picture is bright the distribution will be shifted to the right Increasing exposure compensation shifts the distribution of tones to the right while decreasing exposure compensation shifts the distribution to the left Histograms can provide a rough idea of overall exposure when bright ambient lighting makes it difficult to see pictures in the monitor D The Histogram Display RGB histo...

Страница 235: ...ty control enabled 2 Displayed if Custom Setting b6 Fine tune optimal exposure has been set to a value other than zero 3 Also includes the color temperature for pictures taken using 4 Auto or D Natural light auto 1 Metering 0520 Shutter speed 0133 135 Aperture 0134 135 2 Shooting mode 0132 ISO sensitivity 1 0154 6 5 4 3 2 1 7 8 9 10 11 3 Exposure compensation value 0143 Optimal exposure tuning 2 0...

Страница 236: ...ta The items displayed vary with the Picture Control in effect when the picture was taken The display for HLG videos shows the options selected for HLG quality in the video recording menu 3 2 1 4 1 Flash type 2 Remote flash control 3 Flash mode 0429 4 Flash control mode 0426 Flash compensation 0432 1 1 Picture Control 0192 HLG quality 0582 ...

Страница 237: ...setup menu at the time the picture was taken 4 3 2 1 5 6 1 High ISO NR 0515 Long exposure noise reduction 0514 2 Active D Lighting 0512 3 HDR strength 0537 4 Vignette control 0516 5 History of retouches made using Retouch option in playback i menu 0264 Changes are listed in the order applied 6 Image comment 0724 1 2 1 Photographer 0725 2 Copyright holder 0725 ...

Страница 238: ...it was taken IPTC Data 3 2 1 4 1 Latitude 2 Longitude 3 Altitude 4 Universal Coordinated Time UTC 12 11 10 9 8 13 14 5 4 3 2 1 6 7 1 Caption 2 Event ID 3 Headline 4 Object name 5 City 6 State 7 Country 8 Category 9 Supp Cat Supplemental categories 10 Byline 11 Byline title 12 Writer Editor 13 Credit 14 Source ...

Страница 239: ...11 10 1 Frame number total number of frames 2 Camera name 3 Histogram 0234 4 Image quality 0105 5 Image size 0108 6 Image area 0102 7 File name 0502 8 Time of recording 0709 9 Date of recording 0709 10 Current card slot 11 Folder name 0497 12 Rating 0251 ...

Страница 240: ...4 Upload marking 0253 5 IPTC preset indicator 0726 6 Location data indicator 0204 7 Image comment indicator 0724 8 Metering 0520 9 Shooting mode 0132 10 Shutter speed 0133 135 11 Aperture 0134 135 12 ISO sensitivity 1 0154 13 Focal length 14 Active D Lighting 0512 15 Picture Control 0192 16 Color space 0511 17 Flash mode 2 0429 18 White balance 0158 Color temperature 0167 Preset manual 0170 White ...

Страница 241: ...he i Button Playback Mode Option Description Quick crop 1 Save a copy of the current picture cropped to the area visible in the display This option is not available when RGB histograms are displayed 0233 Rating Rate the current picture 0251 Select for upload to smart device Select the current picture for upload 0253 The option displayed varies with the destination currently selected for upload Sel...

Страница 242: ...o the current picture 0295 Play voice memo Play the voice memo for the current picture 0298 Retouch Create a retouched copy of the current picture 0264 Jump to copy on other card If the current picture is one of a pair created with Backup RAW Slot 1 JPEG Slot 2 or JPEG Slot 1 JPEG Slot 2 selected for Role played by card in Slot 2 choosing this option displays the copy on the card in the other slot...

Страница 243: ... remove protection from the current picture 0249 Unprotect all 2 Remove protection from all pictures in the folder currently selected for Playback folder in the playback menu IPTC Embed a selected IPTC preset in the current photo 0726 Side by side comparison 3 Compare retouched copies to the originals Slide show View a slide show the current picture and all following pictures are displayed one at ...

Страница 244: ...source pictures press 1 or 3 to view the other pictures If the source has been copied multiple times press 1 or 3 to view the other copies To view the highlighted picture full screen press and hold the X button Press J to return to playback with the highlighted picture displayed full frame To exit to playback press the K button The source picture will not be displayed if the copy was created from ...

Страница 245: ... camera is connected to a computer or FTP server Videos over 4 GB in size cannot be selected for upload Select all for upload FTP Filtered playback View only pictures that match selected criteria 0255 Filtered playback criteria Choose filter criteria Volume control Adjust playback volume Trim video Trim footage from the current video and save the edited copy in a new file 0290 Choose slot and fold...

Страница 246: ...n the folder currently selected for Playback folder in the playback menu Slide show View a slide show the current picture and all following pictures are displayed one at a time in the order recorded 0257 Option Description 9 Trim video Trim unwanted footage 0290 4 Save current frame Save a selected frame as a JPEG still 0294 Volume control Adjust playback volume Option Description ...

Страница 247: ...rs rotate the sub command dial to view other faces Using Playback Zoom Playback Zoom To Description Zoom in zoom out Press the X button or use stretch gestures to zoom in To zoom out press W Q or use pinch gestures A navigation window is displayed during the zoom ratio is altered with the area currently visible indicated by a yellow border A bar below the navigation window shows the zoom ratio tur...

Страница 248: ... in the navigation window Rotate the sub command dial or tap the on screen guide to view other faces View other pictures Rotate the main command dial to view the same location in other photos without changing the zoom ratio selecting a video cancels zoom You can also view other photos by tapping the e or f icon at the bottom of the display Protect pictures Press the g Fn4 button to toggle protecti...

Страница 249: ...ted 0708 1 Select a picture Display the picture in full frame playback or playback zoom Alternatively you can highlight the picture in the thumbnail list using the multi selector 2 Press the g Fn4 button Protected pictures are marked with a P icon To remove protection display the picture or highlight it in the thumbnail list and press g Fn4 again Protecting Pictures from Deletion ...

Страница 250: ...ploading Protected Pictures via FTP The copies on the FTP server will not be protected even if the originals are Markings can be added using ratings A Removing Protection from All Pictures To remove protection from all pictures in the folder or folders currently selected for Playback folder in the playback menu press the g Fn4 and O Q buttons for about two seconds during playback ...

Страница 251: ...or and press the i button 2 Highlight Rating and press 2 3 Choose a rating Rotate the main command dial to highlight the desired rating and press J to select Choose from ratings of from zero to five stars or select d to mark the picture as a candidate for later deletion Rating Pictures ...

Страница 252: ...an also be viewed in NX Studio A Rating Pictures Using Camera Controls If Rating has been assigned to a control using Custom Setting f3 Custom controls playback pictures can be rated by holding the control and rotating the main command dial ...

Страница 253: ... using Connect to smart device in the network menu 0757 Select for upload to computer Displayed when the camera is connected to a computer using Connect to computer in the network menu 0760 Select for upload FTP Displayed when the camera is connected to an FTP server using Connect to FTP server in the network menu 0765 Videos cannot be selected for upload when the camera is connected to a smart de...

Страница 254: ...elect for upload to smart device Select for upload to computer or Select for upload FTP and press J Pictures destined for a smart device are marked with a W icon while those destined for a computer or ftp server are marked with s D Removing Upload Marking To remove upload marking repeat Steps 1 and 2 ...

Страница 255: ...back Option Description Protect M Include protected pictures Picture type M Include pictures of the selected types Rating M Include pictures with selected ratings Select for upload to computer Select M Uploaded pictures to include pictures previously uploaded to a computer or ftp server Select M Pictures not uploaded to include pictures that have yet to be uploaded Select M both options to include...

Страница 256: ...256 Filtered Playback During filtered playback a white border appears around the display To end filtered playback select Filtered playback again ...

Страница 257: ...ts with the selected picture and continues through all the pictures recorded after it 2 Highlight Slide show and press 2 To choose how long photos are displayed highlight Frame interval and press 2 3 Highlight Start and press J The slide show will start In the case of videos the option selected for Frame interval is ignored instead the starting frame will be displayed for short time before video p...

Страница 258: ... ahead Press 4 to return to the previous frame 2 to skip to the next frame View additional photo info Press 1 3 or DISP to choose the photo info displayed To hide photo info select None picture only Adjust volume Press X to increase volume W Q to decrease Exit to playback mode Press K to end the slide show and return to the playback display ...

Страница 259: ...and press the O Q button A confirmation dialog will be displayed To exit without deleting the picture press K 2 Press the O Q button again The picture will be deleted A Deleting Copies If the picture selected in the playback display when the O Q button is pressed was recorded with two memory cards inserted and an option other than Overflow selected for Role played by card in Slot 2 you will be pro...

Страница 260: ...scription Q Selected pictures Delete selected pictures d Candidates for deletion Delete pictures rated d candidate for deletion i Pictures shot on selected dates Delete all pictures taken on selected dates 0262 R All pictures Delete all pictures in the folder currently selected for Playback folder in the playback menu If two memory cards are inserted you can select the card from which pictures wil...

Страница 261: ...ked with a check To remove the check and deselect the current picture press the W Q button again Repeat until all the desired pictures are selected To view the highlighted picture full screen press and hold the X button 2 Delete the pictures Press J a confirmation dialog will be displayed Highlight Yes and press J to delete the selected pictures ...

Страница 262: ...Delete the pictures Press J a confirmation dialog will be displayed Highlight Yes and press J to delete the selected pictures Pictures Shot on Selected Dates 1 Select dates Highlight dates using the multi selector and press 2 to select selected dates are marked with M icons Selected dates can be deselected by pressing 2 again Repeat until you have selected all the desired dates 2 Delete the pictur...

Страница 263: ...and press J 2 Delete the pictures A confirmation dialog will be displayed showing the name of the folder containing the photos to be deleted Highlight Yes and press J to delete all pictures from the folder The folder is that previously selected via Playback folder in the playback menu Note that depending on the number of pictures some time may be required for deletion ...

Страница 264: ...rsion to JPEG or other formats 0269 Trim Create a cropped copy of the current photograph 0273 Resize current picture Create a small copy of the current photograph 0274 Resize multiple pictures Create small copies from one or more existing photos 0276 D Lighting Brighten shadows 0280 Straighten Straighten pictures 0281 Distortion control Reduce barrel distortion in pictures taken with wide angle le...

Страница 265: ...ection for the selected item To exit without creating a retouched copy press K This will return you to the playback display 5 Create a retouched copy For more information see the section for the selected item Retouched copies are indicated by a p icon Overlay add Overlay two pictures to create a new picture in JPEG format 0285 Lighten Compare the pixels at each point in multiple pictures and selec...

Страница 266: ...tural colors The effect produced may vary with the order in which edits are performed Some items may be unavailable depending on the items used to create the copy Retouch items in the i menu that cannot be applied to the current picture are grayed out and unavailable D Image Quality Copies created from NEF RAW pictures are saved at an Image quality of JPEG fine m Copies created from JPEG pictures ...

Страница 267: ...ocessing RAW processing is available only with NEF RAW images created with this camera Pictures in other formats and NEF RAW photos taken with other cameras or Camera Control Pro 2 cannot be selected Processing the Current Picture 1 Select Retouch in the i menu then highlight RAW processing current picture and press 2 2 Choose a destination Press 1 or 3 to highlight a card slot and press J You wil...

Страница 268: ...To view the unedited picture press and hold the DISP button Exposure compensation can only be set to values between 2 and 2 EV 4 Copy the photograph Highlight EXE and press J to create a JPEG copy of the selected photographs 4 3 2 1 5 9 8 7 6 10 1 Image quality 0105 2 Image size 0108 3 White balance 0158 4 Exposure compensation 0143 5 Set Picture Control 0192 6 High ISO NR 0515 7 Color space 0511 ...

Страница 269: ...ource slot Highlight the slot with the card containing the NEF RAW images and press 2 You will not be prompted to select the slot if only one memory card is inserted Option Description Select picture s Create JPEG copies of selected NEF RAW pictures Multiple NEF RAW pictures can be selected Select date Create JPEG copies of all NEF RAW pictures taken on selected dates Select folder Create JPEG cop...

Страница 270: ...he current picture press the W Q button again All pictures will be processed using the same settings Press J to proceed once selection is complete If you chose Select date Highlight dates using the multi selector and press 2 to select M or deselect U All images taken on dates marked with a check M will be processed using the same settings Press J to proceed once selection is complete If you chose ...

Страница 271: ... edit display To view the unedited picture press and hold the DISP button Exposure compensation can only be set to values between 2 and 2 EV 4 3 2 1 5 9 8 7 6 10 1 Image quality 0105 2 Image size 0108 3 White balance 0158 4 Exposure compensation 0143 5 Set Picture Control 0192 6 High ISO NR 0515 7 Color space 0511 8 Vignette control 0516 9 Active D Lighting 0512 10 Diffraction compensation 0517 ...

Страница 272: ...and press J to display a confirmation dialog and then highlight Yes and press J to create JPEG copies of the selected photos To cancel the operation before all copies have been created press the G button when a confirmation dialog is displayed highlight Yes and press J ...

Страница 273: ...back zoom may not be available when cropped copies are displayed The crop size appears at upper left in the crop display The size of the copy varies with crop size and aspect ratio To Description Size the crop Press X or W Q to choose the crop size Change the crop aspect ratio Rotate the main command dial to choose the crop aspect ratio Position the crop Use the multi selector to position the crop...

Страница 274: ...y size playback zoom may not be available when resized copies are displayed D Resizing Cropped Pictures Pictures cropped to aspect ratios of 4 3 or 3 4 cannot be resized Resizing the Current Picture 1 Select Retouch in the i menu then highlight Resize current picture and press 2 2 Choose a destination Press 1 or 3 to highlight a card slot and press J You will not be prompted to select the slot if ...

Страница 275: ...275 Creating Retouched Copies 3 Highlight the desired size and press J A copy will be saved at the selected size ...

Страница 276: ... Resizing Multiple Pictures 1 Select Retouch in the i menu then highlight Resize multiple pictures and press 2 2 Choose a size Highlight Choose size and press 2 Highlight the desired size length in pixels using 1 and 3 and press J ...

Страница 277: ...he slot with the card containing the desired pictures and press 2 You will not be prompted to select the slot if only one memory card is inserted Option Description Select picture s Resize selected pictures Multiple pictures can be selected Select date Resize all pictures taken on selected dates Select folder Resize all pictures in a selected folder ...

Страница 278: ...re press the W Q button again The selected pictures will all be copied at the size selected in Step 2 Press J to proceed once selection is complete If you chose Select date Highlight dates using the multi selector and press 2 to select M or deselect U All pictures taken on dates marked with a check M will be copied at the size selected in Step 2 Press J to proceed once selection is complete If you...

Страница 279: ...ed copies A confirmation dialog will be displayed highlight Yes and press J to save the resized copies To cancel the operation before all copies have been created press the G button when a confirmation dialog is displayed highlight Yes and press J ...

Страница 280: ...l for dark or backlit photographs The effect is shown in the display To view the unedited picture press and hold the DISP button Press 1 or 3 to choose the amount of correction performed The effect can be previewed in the edit display Press J to save the retouched copy Before After ...

Страница 281: ...approximately 0 25 The effect can be previewed in the edit display To view the unedited picture press and hold the DISP button The greater the rotation the more will be trimmed from the edges Press 1 or 3 to choose the amount of straightening performed Press J to save the retouched copy ...

Страница 282: ...ortion the only option available will be Manual Select Manual to reduce distortion manually Note that Manual must be used with copies created using the Auto option and with photos taken using the Auto distortion control option in the photo shooting menu When Manual is selected the effect can be previewed in the display To view the unedited picture press and hold the DISP button Press 1 to reduce p...

Страница 283: ...it display To view the unedited picture press and hold the DISP button Note that greater amounts of perspective control result in more of the edges being cropped out For horizontal correction highlight J and press 2 Press 1 to stretch the left edge 3 to stretch the right For vertical correction highlight K and press 2 Press 1 to stretch the top edge 3 to stretch the bottom Press J to save the reto...

Страница 284: ...utton Highlighting Sepia or Cyanotype and pressing 2 displays saturation options for the selected monochrome tint choose from High Normal and Low Press J to save changes and return to the tint menu Press J to save the retouched copy Option Description Black and white Copy photographs in black and white Sepia Copy photographs in sepia Cyanotype Copy photographs in blue and white monochrome ...

Страница 285: ...elect the pictures Highlight pictures using the multi selector To view the highlighted picture full screen press and hold the X button To select the highlighted picture press the W Q button Selected pictures are marked with a check To remove the check and deselect the current picture press the W Q button again Pictures with different image areas cannot be selected Press J to proceed once the secon...

Страница 286: ...reated with this camera can be selected Pictures created with other models cannot be selected The overlay will be the same size as the smallest of the two component pictures The overlay has the same photo info including date of recording metering shutter speed aperture shooting mode exposure compensation focal length and picture orientation and values for white balance and Picture Control as the f...

Страница 287: ...Lighten The camera compares the pixels in each picture and uses only the brightest Darken The camera compares the pixels in each picture and uses only the darkest 2 Choose how pictures are selected Option Description Select individual pictures Select pictures for the overlay one by one Select consecutive pictures Select two pictures the overlay will include the two pictures and all the pictures be...

Страница 288: ...elected pictures will be combined using the option selected in Step 1 Press J to proceed once selection is complete If you chose Select consecutive pictures All pictures in a range chosen using the multi selector will be combined using the option selected in Step 1 Use the W Q button to select the first and last pictures in the desired range The first and last pictures are indicated by icons and t...

Страница 289: ...out adding the remaining pictures highlight Save and exit and press J To exit without creating an overlay highlight Discard and exit and press J D Cautions Lighten Darken Only pictures created with this camera can be selected Pictures created with other models cannot be selected The overlay will include only pictures created with the same options selected for Image area Choose image area in the ph...

Страница 290: ...ng menu Trimming Videos 1 Display a video full frame 2 Pause the video on the new opening frame Press J to start playback Press 3 to pause Your approximate position in the video can be ascertained from the video progress bar Press 4 or 2 or rotate the command dials to locate the desired frame Editing Videos Option Description 9 Trim video Trim unwanted footage 4 Save current frame Save a selected ...

Страница 291: ... that begins from the current frame highlight Start point and press J 5 Confirm the new start point If the desired frame is not currently displayed press 4 or 2 to advance or rewind a frame at a time Rotate the main command dial one stop to skip ahead or back 10 frames Rotate the sub command dial one stop to skip ahead or back 10 s ...

Страница 292: ...ion tool x and then select the closing frame x as described in Step 5 7 Press 1 to create the copy 8 Preview the copy To preview the copy highlight Preview and press J to interrupt the preview and return to the save options menu press 1 To abandon the current copy and return to Step 5 highlight Cancel and press J ...

Страница 293: ...s than two seconds long cannot be edited using Trim video Copies have the same time and date of creation as the original A Removing Opening or Closing Footage To remove only the closing footage from a video highlight End point and press J in Step 4 select the closing frame and proceed to Step 7 without pressing the center of sub selector in Step 6 To remove only the opening footage proceed to Step...

Страница 294: ...ate the command dials to locate the desired frame 2 Choose Save current frame Press the i button then highlight Save current frame and press J to create a JPEG copy of the current frame D Save Current Frame Stills are saved at the dimensions selected for Frame size frame rate in the video recording menu when the video was recorded They cannot be retouched Some categories of photo information are n...

Страница 295: ...er picture additional voice memos cannot be recorded for pictures already marked with a h icon The existing voice memo must be deleted before another can be recorded 0299 2 Hold the b button Audio is recorded while the button is pressed During recording the camera displays a b icon and a countdown of the remaining recording time in seconds Recording Voice Memos ...

Страница 296: ... if the photo video selector is rotated to 1 or a multiple exposure is in progress D Caution Recording Voice Memos Touch controls are disabled and other pictures cannot be displayed while recording is in progress D Interrupting Recording Pressing the shutter release button or operating other camera controls may end recording During interval timer photography recording ends about two seconds before...

Страница 297: ...h it is associated For example the voice memo for the picture DSC_0002 JPG would have the file name DSC_0002 WAV Voice memo file names can be viewed on a computer Voice memos for photos recorded with Adobe RGB selected for Color space in the photo shooting menu have names of the form _DSCnnnn WAV Voice memos for photos recorded with a prefix other than DSC selected for File naming in the photo sho...

Страница 298: ...ng Playback Pressing the shutter release button or operating other camera controls may end playback Playback ends automatically when another picture is selected or the camera is turned off A The i Menu Voice memos can also be played by highlighting Play voice memo in the playback i menu and pressing J Playing Voice Memos ...

Страница 299: ...ce memo highlight Picture and voice memo and press O Q To delete only the voice memo highlight Voice memo only and press O Q To exit without deleting either the photo or the voice memo press D With dual format pictures you may opt to delete the voice memo only from the picture on the card in the current slot by choosing Selected picture in the confirmation dialog and then selecting Voice memo only...

Страница 300: ...ctors Use a third party type A HDMI cable The cable must be purchased separately Always turn the camera off before connecting or disconnecting a cable Choose a cable with a connector that matches the connector on the HDMI device Connecting to HDMI Devices 1 2 1 HDMI connector for connection to camera 2 HDMI connector for connection to external device ...

Страница 301: ...justed using the controls on the TV Camera controls cannot be used If the camera is paired with a smart device running the SnapBridge app the device can be used to control playback remotely while the camera is connected to a TV See SnapBridge online help for details Use an HDMI input connector compliant with HDMI 2 1 to connect to televisions that support 8K input TVs ...

Страница 302: ...s can be selected from Auto 4320p progressive 2160p progressive 1080p progressive and 720p progressive Output range The RGB video signal input range varies with the HDMI device Auto which matches the output range to the HDMI device is recommended in most situations If the camera is unable to determine the correct RGB video signal output range for the HDMI device you can choose from the following o...

Страница 303: ... be recorded with the footage saved to external recorders Mirror camera info display Choose whether the display in the camera monitor remains on while an HDMI device is connected If OFF is selected the display will remain off reducing the drain on the camera battery Mirror camera info display will be fixed at ON while OFF is selected for Output shooting info Option Description ...

Страница 304: ...memory card inserted in camera Frame size frame rate Output resolution frame rate search order 7680 4320 30p 4320 30p V 2160 30p V 1080 30p 7680 4320 25p 4320 25p V 2160 25p V 1080 25p 7680 4320 24p 4320 24p V 2160 24p V 1080 24p 3840 2160 120p 2160 120p V 1080 120p V 2160 60p V 1080 60p V 2160 30p V 1080 30p 3840 2160 100p 2160 100p V 1080 100p V 2160 50p V 1080 50p V 2160 25p V 1080 25p 3840 216...

Страница 305: ... 60p V 1080 30p 1920 1080 100p 1080 100p V 1080 50p V 1080 25p 1920 1080 60p 1080 60p V 1080 30p 1920 1080 50p 1080 50p V 1080 25p 1920 1080 30p 1080 30p 1920 1080 25p 1080 25p 1920 1080 24p 1080 24p Frame size frame rate Output resolution frame rate search order 7680 4320 30p 1080 30p 7680 4320 25p 1080 25p 7680 4320 24p 1080 24p 3840 2160 120p 1080 60p V 1080 30p 3840 2160 100p 1080 50p V 1080 2...

Страница 306: ... The frame rate will drop to 30p 50p The frame rate will drop to 25p D Frame Rates for an Output Resolution of 720p progressive Footage filmed at a frame rate of 120p 60p 30p or 24p is output at 60p Footage filmed at 100p 50p or 25p is output at 50p D Caution Filming with Memory Cards Footage filmed at a frame size of 7680 4320 or at a frame size and rate of 3840 2160 120p or 3840 2160 100p will n...

Страница 307: ...the recorder If no footage is currently being recorded changes to zoom using the X button will be reflected both in the camera display and in the output to the recorder The output resolution however switches to 1080p progressive even if the option last selected for HDMI Output resolution in the setup menu was 4320p progressive or 2160p progressive ...

Страница 308: ...ding menu varies with the frame size and rate Frame size frame rate Video file type H 265 10 bit H 265 8 bit 7680 4320 30p 4 2 0 10 bit 4 2 0 8 bit 7680 4320 25p 7680 4320 24p 3840 2160 120p 3840 2160 100p 3840 2160 60p 4 2 2 10 bit 4 2 2 8 bit 3840 2160 50p 3840 2160 30p 3840 2160 25p 3840 2160 24p 1920 1080 120p 1920 1080 100p 1920 1080 60p 1920 1080 50p 1920 1080 30p 1920 1080 25p 1920 1080 24p...

Страница 309: ...for Frame size frame rate H 264 8 bit MP4 footage is output at a YCbCr value of 4 2 2 and a bit depth of 8 bits regardless of the option selected for Frame size frame rate D Recording to External Recorders That Support a Bit Depth of 10 Bits The HDMI signal will be output at a bit depth of 10 bits only to HDMI recorders that support this option ...

Страница 310: ...selected for Custom Setting c3 Power off delay Standby timer expires ending HDMI output When recording videos to an external device select Standby timer and choose No limit or a time longer than the anticipated recording time An icon will be displayed in the camera monitor when ON is selected A is displayed if no footage is currently being recorded B while videos are being recorded During recordin...

Страница 311: ...ur smartphone or tablet smart device SnapBridge apps can be downloaded from the Apple App Store or on Google Play Visit the Nikon website for the latest SnapBridge news Carefully read any license agreements or the like displayed when SnapBridge is launched and only proceed if you are willing to accept them The SnapBridge App ...

Страница 312: ... html Downloading Pictures from the Camera Download existing pictures to your smart device They can also be downloaded automatically as they are taken Remote Photography Control the camera and take pictures from the smart device D Can t Connect If you have trouble establishing a connection with the smart device try turning the camera and smart device off and then on again or checking wireless sett...

Страница 313: ...aken Connecting via Bluetooth Pairing Before connecting via Bluetooth for the first time you will need to pair the camera and smart device D Before Pairing Enable Bluetooth on the smart device For details see the documentation provided with the device Ensure that the batteries in the camera and smart device are fully charged to prevent the devices turning off unexpectedly Check that there is space...

Страница 314: ...tions are performed using the camera others on the smart device Additional instructions are available via SnapBridge online help 1 Camera Select Connect to smart device Pairing Bluetooth in the network menu then highlight Start pairing and press J The camera name will be displayed in the monitor ...

Страница 315: ...d to choose the connection type Tap the camera name when prompted 4 Camera smart device After confirming that the camera and smart device display the same authentication code follow the on screen instructions on both devices to complete pairing Tap the pairing button on the smart device and press the J button on the camera The camera and smart device will each display a message when pairing is com...

Страница 316: ...ck that it is not running in the background then request iOS to forget the camera before returning to Step 1 The request to forget the camera is made via the iOS Settings app D Disabling Bluetooth To disable Bluetooth select OFF for Connect to smart device Pairing Bluetooth Bluetooth connection in the camera network menu Connecting to a Previously Paired Smart Device Once the smart device has been...

Страница 317: ...Bluetooth pairing required D Before Connecting Wi Fi Mode Enable Wi Fi on the smart device For details see the documentation provided with the device Ensure that the batteries in the camera and smart device are fully charged to prevent the devices turning off unexpectedly Check that there is space available on the camera memory card ...

Страница 318: ... SnapBridge online help 1 Smart device Launch the SnapBridge app open the tab tap and select Wi Fi mode If this is the first time you have launched the app you should instead tap Connect to camera in the welcome display When prompted tap the category for your camera and then tap the Wi Fi option when prompted to choose the connection type 2 Camera smart device Turn the camera on when prompted Do n...

Страница 319: ...ill be displayed 4 Smart device Follow the on screen instructions to establish a Wi Fi connection On iOS devices the Settings app will launch Tap Settings to open Settings then scroll up and tap Wi Fi which you ll find near the top of the settings list to display Wi Fi settings In the Wi Fi settings display select the camera SSID and enter the password displayed by the camera in Step 3 ...

Страница 320: ...a the smart device will display Wi Fi mode options The camera will display a message stating that the connection is complete The camera and smart device are now connected via Wi Fi For information on using the SnapBridge app see online help D Terminating Wi Fi Mode To end the Wi Fi connection tap in the SnapBridge tab When the icon changes to tap and select Exit Wi Fi mode ...

Страница 321: ...ter or FTP server using any of the methods below Computers Connecting via USB Connect the camera and computer via USB and use NX Studio to upload pictures to the computer 0323 The camera can be controlled remotely from the computer using optional Camera Control Pro 2 software Making the Connection Type C ...

Страница 322: ...via Ethernet or Wireless LAN Upload pictures to an FTP server via Ethernet or using the camera s built in wireless LAN 0366 D Can t Connect If you have trouble establishing a connection with a computer or FTP server try turning the camera off and then on again checking wireless settings on the computer or FTP server or restarting the computer or FTP server A Wireless LAN and Ethernet Errors For in...

Страница 323: ...ernet connection when installing NX Studio Visit the Nikon website for the latest information including system requirements Download the latest NX Studio installer from the website below and follow the on screen instructions to complete installation https downloadcenter nikonimglib com Note that you may be unable to download pictures from the camera using earlier versions of NX Studio Computers Co...

Страница 324: ...ader Pictures can also be copied from a memory card inserted in a third party card reader You should however check that the card is compatible with the card reader 2 Turn the camera on The Nikon Transfer 2 component of NX Studio will start Nikon Transfer 2 image transfer software is installed as part of NX Studio If a message is displayed prompting you to choose a program select Nikon Transfer 2 I...

Страница 325: ...be copied to the computer 4 Turn the camera off Disconnect the USB cable when transfer is complete D Windows 10 and Windows 8 1 Windows 10 and Windows 8 1 may display an AutoPlay prompt when the camera is connected Click the dialog and then click Nikon Transfer 2 to select Nikon Transfer 2 ...

Страница 326: ...ould result in the videos being deleted without being transferred D Cautions Connecting to Computers Do not turn the camera off or disconnect the USB cable while transfer is in progress Do not use force or attempt to insert the connectors at an angle Be sure also to keep the connectors straight when disconnecting the cable Always turn the camera off before connecting or disconnecting a cable To en...

Страница 327: ... Do for You Ethernet and wireless LAN connections can be used for the following tasks Uploading Pictures Existing pictures can be uploaded to the computer They can also be uploaded automatically as they are taken Controlling Cameras Remotely Installing Camera Control Pro 2 available separately on a networked computer gives you control over the details of exposure and other camera settings while ta...

Страница 328: ...e camera with the computer using Nikon s Wireless Transmitter Utility software Once the devices are paired you will be able to connect to the computer from the camera The Wireless Transmitter Utility is available for download from the Nikon Download Center Check the version and system requirements and be sure to download the latest version https downloadcenter nikonimglib com ...

Страница 329: ...cts as a wireless LAN access point letting you connect when working outdoors and in other situations in which the computer is not already connected to a wireless network and eliminating the need for complicated adjustments to settings The computer cannot connect to the Internet while connected to the camera Before proceeding check that the Wireless Transmitter Utility 0328 is installed on the comp...

Страница 330: ...nging the default name press X Whatever name you choose will appear in the network menu Connect to computer Network settings list To rename the profile press J For information on text entry see Text Entry 064 Press X to proceed after entering a name 4 Highlight Direct connection to computer and press J The camera SSID and encryption key will be displayed ...

Страница 331: ... to enter the network security key enter the encryption key displayed by the camera in Step 4 The computer will initiate a connection to the camera macOS Click the wireless LAN icon in the menu bar Select the SSID displayed by the camera in Step 4 When prompted to enter the network security key enter the encryption key displayed by the camera in Step 4 The computer will initiate a connection to th...

Страница 332: ...Ethernet or Wireless LAN 6 Start pairing When prompted launch the Wireless Transmitter Utility on the computer 7 Select the camera in the Wireless Transmitter Utility Select the name displayed by the camera in Step 6 and click Next ...

Страница 333: ...s LAN 8 In the Wireless Transmitter Utility enter the authentication code displayed by the camera The camera will display an authentication code Enter the authentication code in the dialog displayed by the Wireless Transmitter Utility and click Next ...

Страница 334: ...sage stating that pairing is complete press J In the Wireless Transmitter Utility click Next you will be prompted to choose a destination folder For more information see online help for the Wireless Transmitter Utility A wireless connection will be established between the camera and computer when pairing is complete ...

Страница 335: ...profile name is not displayed in green connect to the camera via the wireless network list on your computer A wireless connection has now been established between the camera and the computer Pictures taken with the camera can be uploaded to the computer as described in Uploading Pictures 0354 For information on controlling the camera from a computer using Camera Control Pro 2 see Camera Control 03...

Страница 336: ...ernet while connected to the camera Before proceeding check that the Wireless Transmitter Utility 0328 is installed on the computer Confirm that OFF is selected for Wired LAN in the network menu D Infrastructure Mode Connection to computers beyond the local area network is not supported You can connect only to computers on the same network 1 Select Connect to computer in the network menu then high...

Страница 337: ...he new profile To proceed to the next step without changing the default name press X Whatever name you choose will appear in the network menu Connect to computer Network settings list To rename the profile press J For information on text entry see Text Entry 064 Press X to proceed after entering a name ...

Страница 338: ...an SSID or encryption key press X in Step 4 Next press J and choose from the following options After connecting proceed to Step 7 Option Description Push button WPS For routers that support push button WPS Press the WPS button on the router and then press the camera J button to connect PIN entry WPS The camera will display a PIN Using a computer enter the PIN on the router For more information see...

Страница 339: ...o enter the encryption key If the network is not encrypted proceed to Step 7 If the desired network is not displayed press X to search again D Hidden SSIDs Networks with hidden SSIDs are indicated by blank entries in the network list To connect to a network with a hidden SSID highlight a blank entry and press J Next press J the camera will prompt you to provide an SSID Enter the network name and p...

Страница 340: ... Press J and enter the encryption key for the wireless router For more information see the documentation for the wireless router Press X when entry is complete Press X again to initiate the connection A message will be displayed for a few seconds when the connection is established ...

Страница 341: ...y A configuration complete message will be displayed once an IP address has been assigned Enter manually Enter the IP address and sub net mask manually Press J you will be prompted to enter the IP address Rotate the main command dial to highlight segments Press 4 or 2 to change the highlighted segment and press J to save changes Next press X a configuration complete message will be displayed Press...

Страница 342: ...Ethernet or Wireless LAN 8 Start pairing When prompted launch the Wireless Transmitter Utility on the computer 9 Select the camera in the Wireless Transmitter Utility Select the name displayed by the camera in Step 8 and click Next ...

Страница 343: ...s LAN 10In the Wireless Transmitter Utility enter the authentication code displayed by the camera The camera will display an authentication code Enter the authentication code in the dialog displayed by the Wireless Transmitter Utility and click Next ...

Страница 344: ...sage stating that pairing is complete press J In the Wireless Transmitter Utility click Next you will be prompted to choose a destination folder For more information see online help for the Wireless Transmitter Utility A wireless connection will be established between the camera and computer when pairing is complete ...

Страница 345: ...d in green in the camera Connect to computer menu A wireless connection has now been established between the camera and the computer Pictures taken with the camera can be uploaded to the computer as described in Uploading Pictures 0354 For information on controlling the camera from a computer using Camera Control Pro 2 see Camera Control 0361 ...

Страница 346: ...ectly or via existing networks using a third party Ethernet cable inserted in the camera s Ethernet connector Connecting an Ethernet Cable Connect an Ethernet cable to the camera s Ethernet connector Do not use force or attempt to insert the connectors at an angle Connect the other end of the cable to a computer or router ...

Страница 347: ...eck that an Ethernet cable is connected to the camera and the Wireless Transmitter Utility 0328 is installed on the computer 1 Select ON for Wired LAN in the network menu 2 Select Connect to computer in the network menu then highlight Network settings and press 2 3 Highlight Create profile and press J ...

Страница 348: ...oceed to the next step without changing the default name press X Whatever name you choose will appear in the network menu Connect to computer Network settings list To rename the profile press J For information on text entry see Text Entry 064 Press X to proceed after entering a name ...

Страница 349: ...y A configuration complete message will be displayed once an IP address has been assigned Enter manually Enter the IP address and sub net mask manually Press J you will be prompted to enter the IP address Rotate the main command dial to highlight segments Press 4 or 2 to change the highlighted segment and press J to save changes Next press X a configuration complete message will be displayed Press...

Страница 350: ...Ethernet or Wireless LAN 6 Start pairing When prompted launch the Wireless Transmitter Utility on the computer 7 Select the camera in the Wireless Transmitter Utility Select the name displayed by the camera in Step 6 and click Next ...

Страница 351: ...s LAN 8 In the Wireless Transmitter Utility enter the authentication code displayed by the camera The camera will display an authentication code Enter the authentication code in the dialog displayed by the Wireless Transmitter Utility and click Next ...

Страница 352: ... message stating that pairing is complete press J In the Wireless Transmitter Utility click Next you will be prompted to choose a destination folder For more information see online help for the Wireless Transmitter Utility A connection will be established between the camera and computer when pairing is complete ...

Страница 353: ...played in green in the camera Connect to computer menu A connection has now been established between the camera and the computer Pictures taken with the camera can be uploaded to the computer as described in Uploading Pictures 0354 For information on controlling the camera from a computer using Camera Control Pro 2 see Camera Control 0361 ...

Страница 354: ...oaded automatically as they are taken Before uploading pictures connect the camera and computer via Ethernet or a wireless network Connect using a host profile selected via the network menu Connect to computer Network settings list When a connection is established the profile name will be displayed in green in the camera Connect to computer menu ...

Страница 355: ...er Utility The destination folder can be selected using the Wireless Transmitter Utility For more information see online help for the Wireless Transmitter Utility D Caution Access Point Mode Select a host profile and enable camera Wi Fi before connecting D Firewall Settings TCP port 15740 and UDP port 5353 are used for connections to computers File transfer may be blocked if the server firewall is...

Страница 356: ... select full frame or thumbnail playback 3 Select a picture and press the i button 4 Highlight Select for upload to computer and press J A white priority upload icon will appear on the picture If the camera is currently connected to a network upload will begin immediately and the icon will turn green Otherwise upload will begin when a connection is established Repeat Steps 3 4 to upload additional...

Страница 357: ...rking from all pictures select Connect to computer Options Deselect all in the network menu A Filtering Pictures for Upload The Filtered playback item in the playback i menu can be used to display only pictures that meet chosen criteria 0255 The pictures can then all be selected for upload by highlighting Select all for computer upload in the i menu and pressing J ...

Страница 358: ...is inserted in the camera Videos are not uploaded automatically They must instead be uploaded manually from the playback display The Upload Icon Upload status is indicated by the upload icon s white Priority upload The picture has been manually selected for upload Pictures marked with this icon will be uploaded before pictures marked W upload W white Upload The picture has been selected for upload...

Страница 359: ...o the host The profile name is displayed in green when a connection is established While files are being transferred the status display shows Now uploading preceded by the name of the file being sent Errors are also displayed here 2 Signal strength Ethernet connections are shown by d When the camera is connected to a wireless network the icon instead shows the wireless signal strength 3 Band The b...

Страница 360: ...Timer Photography Choose a long standby time before starting the interval timer as upload will be interrupted if the standby timer expires while interval timer photography is in progress D Turning the Camera Off The camera saves transfer marking when turned off and resumes upload when next turned on A Connection Status Connection status is shown by the camera network indicator Network indicator St...

Страница 361: ...inserted in the camera You will still need to insert a memory card when filming videos Note that the camera standby timer does not expire in camera control mode Before using Camera Control Pro 2 connect the camera and computer via Ethernet or a wireless network Connect using a host profile selected via the network menu Connect to computer Network settings list When a connection is established the ...

Страница 362: ...computer Connection type in the network menu 2 Launch the copy of Camera Control Pro 2 installed on the host computer 3 Control the camera using Camera Control Pro 2 For information on taking pictures using Camera Control Pro 2 see the online help or other documentation for Camera Control Pro 2 ...

Страница 363: ...n When the signal is re established the camera will reconnect to Camera Control Pro 2 and resume upload of any pictures that have yet to be transferred Note that upload cannot be resumed if you turn the camera off before transfer is complete 1 3 2 1 Status The status of the connection to the host The profile name is displayed in green when a connection is established Errors are also displayed here...

Страница 364: ... wireless networks D Firewall Settings TCP port 15740 and UDP port 5353 are used for connections to computers File transfer may be blocked if the server firewall is not configured to allow access to these ports A Connection Status Connection status is shown by the camera network indicator Network indicator Status I off No connection K green Waiting to connect H flashes green Connected H flashes am...

Страница 365: ... by turning the camera off selecting End current connection for Connect to computer Network settings in the network menu or connecting to a smart device via Wi Fi or Bluetooth D Access Point Mode An error will occur if the computer s wireless connection is disabled before the camera s Disable camera s connection first ...

Страница 366: ...rted in the camera s Ethernet connector The camera can also be connected to FTP servers directly D FTP Servers Servers can be configured using standard FTP services including IIS Internet Information Services available with Windows 10 Enterprise Pro Home Internet FTP connections and connection to FTP servers running third party software are not supported FTPServers ConnectingviaEthernetor Wireless...

Страница 367: ...FTP server connect via direct wireless link The camera acts as a wireless LAN access point letting you connect when working outdoors and in other situations in which the computer is not already connected to a wireless network and eliminating the need for complicated adjustments to settings Create a host profile using the camera connection wizard Confirm that OFF is selected for Wired LAN in the ne...

Страница 368: ...ng via Ethernet or Wireless LAN 2 Highlight Create profile and press J 3 Highlight Connection wizard and press 2 The connection wizard will launch D Manual Configuration Choose Configure manually to configure settings manually ...

Страница 369: ...ame press X Whatever name you choose will appear in the network menu Connect to FTP server Network settings list To rename the profile press J For information on text entry see Text Entry 064 Press X to proceed after entering a name 5 Highlight Direct connection to computer and press J The camera SSID and encryption key will be displayed ...

Страница 370: ...d to enter the network security key enter the encryption key displayed by the camera in Step 5 The computer will initiate a connection to the camera macOS Click the wireless LAN icon in the menu bar Select the SSID displayed by the camera in Step 5 When prompted to enter the network security key enter the encryption key displayed by the camera in Step 5 The computer will initiate a connection to t...

Страница 371: ...rough 61000 for SFTP File transfer may be blocked if the server firewall is not configured to allow access to these ports Option Description Anonymous login Select this option if the server does not require a user ID or password This option can only be used with servers that are configured for anonymous login If login is successful the camera will prompt you to choose a destination Enter user ID E...

Страница 372: ...reless connection has now been established between the camera and the FTP server Pictures taken with the camera can be uploaded to the FTP server as described in Uploading Pictures 0389 Option Description Home folder Select this option to select the server s home folder as the destination for pictures uploaded from the camera A setup complete dialog will be displayed if the operation is successful...

Страница 373: ... Create a host profile using the camera connection wizard Before connecting to a wireless network confirm that OFF is selected for Wired LAN in the network menu A Infrastructure Mode Infrastructure mode supports connection to FTP servers on different networks 1 Select Connect to FTP server in the network menu then highlight Network settings and press 2 2 Highlight Create profile and press J FTP ...

Страница 374: ...Configure manually to configure settings manually 4 Name the new profile To proceed to the next step without changing the default name press X Whatever name you choose will appear in the network menu Connect to FTP server Network settings list To rename the profile press J For information on text entry see Text Entry 064 Press X to proceed after entering a name ...

Страница 375: ... an SSID or encryption key press X in Step 5 Next press J and choose from the following options After connecting proceed to Step 8 Option Description Push button WPS For routers that support push button WPS Press the WPS button on the router and then press the camera J button to connect PIN entry WPS The camera will display a PIN Using a computer enter the PIN on the router For more information se...

Страница 376: ...to enter the encryption key If the network is not encrypted proceed to Step 8 If the desired network is not displayed press X to search again D Hidden SSIDs Networks with hidden SSIDs are indicated by blank entries in the network list To connect to a network with a hidden SSID highlight a blank entry and press J Next press J the camera will prompt you to provide an SSID Enter the network name and ...

Страница 377: ...y Press J and enter the encryption key for the wireless router For more information see the documentation for the wireless router Press X when entry is complete Press X again to initiate the connection A message will be displayed for a few seconds when the connection is established ...

Страница 378: ...ly A configuration complete message will be displayed once an IP address has been assigned Enter manually Enter the IP address and sub net mask manually Press J you will be prompted to enter the IP address Rotate the main command dial to highlight segments Press 4 or 2 to change the highlighted segment and press J to save changes Next press X a configuration complete message will be displayed Pres...

Страница 379: ...ht FTP or SFTP secure FTP and press J to display a dialog where you can enter the server address 10Enter the server address Press J to enter the server URL or IP address Press X when entry is complete Press X again to connect to the FTP server You will be prompted to choose a login method ...

Страница 380: ... firewall is not configured to allow access to these ports Option Description Anonymous login Select this option if the server does not require a user ID or password This option can only be used with servers that are configured for anonymous login If login is successful the camera will prompt you to choose a destination Enter user ID Enter a user ID and password Press J to log in when entry is com...

Страница 381: ...era and the FTP server Pictures taken with the camera can be uploaded to the FTP server as described in Uploading Pictures 0389 Option Description Home folder Select this option to select the server s home folder as the destination for pictures uploaded from the camera A setup complete dialog will be displayed if the operation is successful Enter folder name Enter the destination folder name manua...

Страница 382: ...via existing networks using a third party Ethernet cable inserted in the camera s Ethernet connector Connecting an Ethernet Cable Connect an Ethernet cable to the camera s Ethernet connector Do not use force or attempt to insert the connectors at an angle Connect the other end of the cable to the FTP server or a router FTP ...

Страница 383: ...onnecting via Ethernet or Wireless LAN 1 Select ON for Wired LAN in the network menu 2 Select Connect to FTP server in the network menu then highlight Network settings and press 2 3 Highlight Create profile and press J ...

Страница 384: ...Configure manually to configure settings manually 5 Name the new profile To proceed to the next step without changing the default name press X Whatever name you choose will appear in the network menu Connect to FTP server Network settings list To rename the profile press J For information on text entry see Text Entry 064 Press X to proceed after entering a name ...

Страница 385: ...ly A configuration complete message will be displayed once an IP address has been assigned Enter manually Enter the IP address and sub net mask manually Press J you will be prompted to enter the IP address Rotate the main command dial to highlight segments Press 4 or 2 to change the highlighted segment and press J to save changes Next press X a configuration complete message will be displayed Pres...

Страница 386: ...ht FTP or SFTP secure FTP and press J to display a dialog where you can enter the server address 8 Enter the server address Press J to enter the server URL or IP address Press X when entry is complete Press X again to connect to the FTP server You will be prompted to choose a login method ...

Страница 387: ... firewall is not configured to allow access to these ports Option Description Anonymous login Select this option if the server does not require a user ID or password This option can only be used with servers that are configured for anonymous login If login is successful the camera will prompt you to choose a destination Enter user ID Enter a user ID and password Press J to log in when entry is com...

Страница 388: ...and the FTP server Pictures taken with the camera can be uploaded to the FTP server as described in Uploading Pictures 0389 Option Description Home folder Select this option to select the server s home folder as the destination for pictures uploaded from the camera A setup complete dialog will be displayed if the operation is successful Enter folder name Enter the destination folder name manually ...

Страница 389: ...re uploading pictures connect the camera and FTP server via Ethernet or a wireless network Connect using a host profile selected via the Connect to FTP server Network settings list When a connection is established the profile name will be displayed in green in the camera Connect to FTP server menu D Caution Access Point Mode Select a host profile and enable camera Wi Fi before connecting ...

Страница 390: ...ck 2 Select a picture and press the i button 3 Highlight Select for upload FTP and press J A white priority upload icon will appear on the picture If the camera is currently connected to a network upload will begin immediately and the icon will turn green Otherwise upload will begin when a connection is established Repeat Steps 2 3 to upload additional pictures ...

Страница 391: ...marking from all pictures select Connect to FTP server Options Deselect all in the network menu A Filtering Pictures for Upload The Filtered playback item in the playback i menu can be used to display only pictures that meet chosen criteria 0255 The pictures can then all be selected for upload by highlighting Select all for upload FTP in the i menu and pressing J ...

Страница 392: ...d is inserted in the camera Videos are not uploaded automatically They must instead be uploaded manually from the playback display The Upload Icon Upload status is indicated by the upload icon s white Priority upload The picture has been manually selected for upload Pictures marked with this icon will be uploaded before pictures marked W upload W white Upload The picture has been selected for uplo...

Страница 393: ...st The profile name is displayed in green when a connection is established While files are being transferred the status display shows Now uploading preceded by the name of the file being sent Errors and error codes are also displayed here 0399 2 Signal strength Ethernet connections are shown by d When the camera is connected to a wireless network the icon instead shows the wireless signal strength...

Страница 394: ...Markings can be added using ratings 0251 D Voice Memos Voice memos will be included when the associated pictures are transmitted They cannot however be uploaded separately D Interval Timer Photography Choose a long standby time before starting the interval timer as upload will be interrupted if the standby timer expires while interval timer photography is in progress D Turning the Camera Off The c...

Страница 395: ... via Ethernet or Wireless LAN A Connection Status Connection status is shown by the camera network indicator Network indicator Status I off No connection K green Waiting to connect H flashes green Connected H flashes amber Error ...

Страница 396: ... by turning the camera off selecting End current connection for Connect to FTP server Network settings in the network menu or connecting to a smart device via Wi Fi or Bluetooth D Access Point Mode An error will occur if the FTP server s wireless connection is disabled before the camera s Disable camera s connection first ...

Страница 397: ...em Solution The camera displays a wireless error The camera displays a TCP IP error The camera displays an FTP error Connection settings require adjustment Check settings for the wireless router FTP server or host computer and adjust camera settings appropriately 0329 367 Check the error code if any For more information see Error Codes 0399 Connecting to computer does not clear from the camera dis...

Страница 398: ...ectly or not at all Check that card is inserted correctly 081 Upload is interrupted and fails to resume Upload will resume if the camera is turned off and then on again 0359 The connection is unreliable If the camera is connected in infrastructure mode check that the router is set to a channel between 1 and 8 0760 765 Problem Solution ...

Страница 399: ...ou are attempting to connect is on Check the SSID 0765 Err 12 Confirm that you are using the correct password for the selected SSID Confirm that you are using the correct authentication method 0765 Err 13 Confirm that the device to which you are attempting to connect is on Turn the camera off and then on again Err 1F Turn the camera off and then on again Error code Solution Err 21 Check that the T...

Страница 400: ...heck that the FTP server address is correct 0765 Err 32 Check that the login name and password are correct 0765 Err 34 Check that the destination folder name is correct 0765 Err 35 Confirm that the destination folder is not write protected Err 36 Check the DNS 0765 Err 37 Check firewall settings 0371 Check PASV mode settings 0765 Err 3F Turn the camera off and then on again ...

Страница 401: ...emote Photography Synchronized Release A master camera can be used to release the shutters on up to ten remote cameras in the same group 0402 Clock Synchronization Synchronize Date and Time Synchronize the clocks on multiple cameras via a network 0421 WhatInter cameraConnectionsCanDo for You ...

Страница 402: ...amera saves the pictures it takes to its own memory card Repeat the process to create identical profiles for each camera Wireless LAN To create host profiles when connecting via wireless LAN 1 Select Connect to other cameras in the network menu then highlight Network settings and press 2 2 Highlight Create profile and press J Synchronized Release ...

Страница 403: ... step without changing the default name press X Whatever name you choose will appear in the network menu Connect to other cameras Network settings list To rename the profile press J For information on text entry see Text Entry 064 Press X to proceed after entering a name ...

Страница 404: ...ryption key press X in Step 4 Next press J and choose from the following options After connecting proceed to Step 7 Option Description Push button WPS For routers that support push button WPS Press the WPS button on the router and then press the camera J button to connect PIN entry WPS The camera will display a PIN Using a computer enter the PIN on the router For more information see the documenta...

Страница 405: ...ryption key If the network is not encrypted proceed to Step 7 If the desired network is not displayed press X to search again D Hidden SSIDs Networks with hidden SSIDs are indicated by blank entries in the network list To connect to a network with a hidden SSID highlight a blank entry and press J Next press J the camera will prompt you to provide an SSID Enter the network name and press X Press X ...

Страница 406: ... key for the wireless router For more information on the wireless router encryption key see the documentation for the wireless router Press X when entry is complete Press X again to initiate the connection A message will be displayed for a few seconds when the connection is established ...

Страница 407: ... will be displayed once an IP address has been assigned It is recommended that you note the remote camera IP address as you will need it in subsequent steps Enter manually Enter the IP address and sub net mask manually Press J you will be prompted to enter the IP address Rotate the main command dial to highlight segments Press 4 or 2 to change the highlighted segment and press J to save changes Ne...

Страница 408: ... master and remote Master camera Pressing the shutter release button on the master camera releases the shutters on the remote cameras Each group can have only one master If the group has multiple master cameras only the first to connect to the network will actually serve in that capacity Remote camera The shutters on the remote cameras are synchronized with the shutter on the master camera 10Repea...

Страница 409: ...amera role in Step 9 are added to the master camera s remote camera list The master camera can store information for up to 10 remote cameras in slots 01 through 10 12Highlight the desired slot and press 2 Remote camera options will be displayed 13Highlight Address and press 2 You will be prompted to enter an IP address ...

Страница 410: ... to change the highlighted segment and press J to proceed Press X to add the remote camera to the master camera remote camera list and establish a connection A Viewing Remote Camera IP Addresses To view a remote camera s IP address select Connect to other cameras Network settings in the camera s network menu highlight a synchronized release host profile press 2 and select TCP IP ...

Страница 411: ... the selected SSID The master camera shows the number of cameras in the group currently connected or not connected 16Take pictures Pressing the shutter release button on the master camera releases the shutters on the remote cameras Note that the standby timers will not expire automatically when the cameras are in synchronized release mode ...

Страница 412: ...rnet cable to the camera s Ethernet connector Do not use force or attempt to insert the connectors at an angle Connect the other end of the cable to a router 1 Select ON for Wired LAN in the network menu 2 Select Connect to other cameras in the network menu then highlight Network settings and press 2 3 Highlight Create profile and press J ...

Страница 413: ...ptions without changing the default name press X Whatever name you choose will appear in the network menu Connect to other cameras Network settings list To rename the profile press J For information on text entry see Text Entry 064 Press X to proceed after entering a name ...

Страница 414: ... will be displayed once an IP address has been assigned It is recommended that you note the remote camera IP address as you will need it in subsequent steps Enter manually Enter the IP address and sub net mask manually Press J you will be prompted to enter the IP address Rotate the main command dial to highlight segments Press 4 or 2 to change the highlighted segment and press J to save changes Ne...

Страница 415: ...om master and remote Master camera Pressing the shutter release button on the master camera releases the shutters on the remote cameras Each group can have only one master If the group has multiple master cameras only the first to connect to the network will actually serve in that capacity Remote camera The shutters on the remote cameras are synchronized with the shutter on the master camera 8 Rep...

Страница 416: ...amera role in Step 7 are added to the master camera s remote camera list The master camera can store information for up to 10 remote cameras in slots 01 through 10 10Highlight the desired slot and press 2 Remote camera options will be displayed 11Highlight Address and press 2 You will be prompted to enter an IP address ...

Страница 417: ...nge the highlighted segment and press J to proceed Press X to add the remote camera to the master camera remote camera list and establish a connection A Viewing Remote Camera IP Addresses To view a remote camera s IP address select Connect to other cameras Network settings in the camera s network menu highlight a synchronized release host profile press 2 and select TCP IP ...

Страница 418: ...mber of cameras in the group currently connected or not connected 14Take pictures Pressing the shutter release button on the master camera releases the shutters on the remote cameras Note that the standby timers will not expire automatically when the cameras are in synchronized release mode ...

Страница 419: ... Normal connection Busy The camera is being controlled from another master camera Error The remote camera is off or its standby timer has expired A third possibility is that the group name is incorrect OFF OFF is selected for Synchronized release on the remote camera or a remote camera has yet to be assigned to the slot Highlighting a remote camera with the Connected label and pressing 2 displays ...

Страница 420: ...lected camera select OFF for Connect to remote camera To temporarily suspend synchronized release on the selected camera select OFF for Synchronized release If desired you can then edit the camera s IP address by highlighting Address and pressing 2 To reconnect select ON for Connect to remote camera No connection will be established if no remote camera exists at the specified address ...

Страница 421: ...etwork menu For more information see Synchronized Release 0402 2 On the master camera select Connect to other cameras then highlight Synchronize date and time and press 2 Master camera clock settings will be displayed Synchronize date and time is not available on the remote cameras Synchronize date and time will not be available if no camera is connected to the network 3 Press J The clocks on the ...

Страница 422: ...lect OFF for Silent mode in the setup menu Camera Mounted Flash Units Take pictures using a flash unit mounted on the camera See the following pages for more information 0423 Remote Flash Photography Take pictures with one or more remote flash units using wireless flash control Advanced Wireless Lighting or AWL For more information see Remote Flash Photography 0437 On Camera Versus Remote ...

Страница 423: ...information on mounting the unit on the camera 2 Turn on the camera and flash unit The flash will begin charging the flash ready indicator c will appear in the shooting display when charging is complete 3 Choose the flash control mode 0426 and flash mode 0429 4 Adjust shutter speed and aperture 5 Take pictures Using an On Camera Flash ...

Страница 424: ...e D Caution Third Party Flash Units The camera cannot be used with flash units that would apply voltages over 250 V to the camera s X contacts or short circuit contacts on the accessory shoe Use of such flash units could not only interfere with normal operation of the camera but also damage the flash sync circuits of the camera and or flash Shooting mode Shutter speed P A Set automatically by came...

Страница 425: ...a a sync cable when performing rear curtain sync flash photography with a flash unit mounted on the camera accessory shoe Flash control Description i TTL balanced fill flash The camera uses i TTL balanced fill flash flash control for a natural balance between the main subject and ambient background lighting After the shutter release button is pressed and immediately before the main flash the flash...

Страница 426: ...vary with the flash used The options available in the flash control display vary with the option selected for Flash control mode Settings for flash units other than the SB 5000 SB 500 SB 400 and SB 300 can only be adjusted using flash unit controls Settings for an SB 5000 mounted on the accessory shoe can also be adjusted using the controls on the flash unit Flash Control Mode Option Description T...

Страница 427: ... distance to the subject is selected using Distance priority options Distance while flash output can be adjusted using Flash compensation Manual Choose the flash level manually Flash output is selected using Manual output amount Repeating flash The flash fires repeatedly while the shutter is open producing a multiple exposure effect Use Repeating flash Output to adjust flash output and Times to ch...

Страница 428: ...rol allows the camera and flash unit to share settings Changes to flash settings made with either the camera or flash unit are reflected on both devices as are changes made using optional Camera Control Pro 2 software The flash unit must support unified flash control ...

Страница 429: ...ns available vary with the shooting mode Flash Modes Option Description Available in I Fill flash front curtain sync This mode is recommended in most situations In modes P and A shutter speed will automatically be set to values between 1 200 s or 1 8000 s with auto FP high speed sync and 1 60 s P S A M ...

Страница 430: ...or fill flash except that shutter speed slows automatically to capture background lighting at night or under low light Note that photos may be prone to blurring due to camera shake at slow shutter speeds Use of a tripod is recommended P A K Slow sync red eye red eye reduction with slow sync Use to include background lighting in portraits Red eye reduction is combined with slow shutter speeds to ca...

Страница 431: ...e shutter closes creating the effect of a stream of light behind moving light sources Selecting mode P or A after choosing this option sets the flash mode to slow sync Note that photos may be prone to blurring due to camera shake at slow shutter speeds Use of a tripod is recommended P S A M s Flash off The flash does not fire P S A M Option Description Available in ...

Страница 432: ...e main subject appear brighter reduced to prevent glare or otherwise fine tuned to produce the desired result Adjusting Flash Compensation Hold the c button and rotate the sub command dial Choose from values of from 3 to 1 EV At default settings changes to flash output are made in increments of 1 3 EV The size of the increment can be selected using Custom Setting b2 EV steps for exposure cntrl Fla...

Страница 433: ...At values other than 0 0 a Y icon will appear in the shooting display and the control panel Flash compensation can be viewed in the shooting display and control panel by pressing the c button Normal flash output can be restored by setting flash compensation to 0 0 Flash compensation is not reset when the camera is turned off Monitor Control panel ...

Страница 434: ...ng the flash level Your subject need not be in the center of the frame giving you more freedom when composing shots Flash output is adjusted automatically for any changes in ISO sensitivity and aperture 1 Assign FV lock to a control using Custom Setting f2 Custom controls shooting 2 Mount a flash unit that supports FV lock on the camera accessory shoe FV Lock ...

Страница 435: ... 5000 SB 500 SB 400 or SB 300 mounted on the camera accessory shoe choose TTL or Auto external flash for Flash control Flash control mode For information on other flash units see the documentation provided with the unit 4 Focus Position the subject in the center of the frame and press the shutter release button halfway to focus ...

Страница 436: ...ash output will lock and an FV lock icon r will appear in the shooting display 6 Recompose the shot 7 Press the shutter release button the rest of the way down to shoot If desired additional pictures can be taken without releasing FV lock Repeat Steps 6 to 7 to take additional shots 8 Release FV lock Press the FV lock control to release FV lock and confirm that the FV lock icon r is no longer disp...

Страница 437: ... information on using a flash unit mounted on the camera accessory shoe see Flash Photography 0422 Throughout this chapter operations involving an accessory connected to the camera are indicated by C operations involving remote flash units by f For more information on using remote flash units f see the documentation provided with the flash unit What Is Remote Flash Photography ...

Страница 438: ...be controlled via radio signals 0439 optical signals from a flash unit mounted on the camera accessory shoe 0453 or radio signals with additional lighting provided by a shoe mounted flash unit 0452 Radio flash control is available only when a WR R11a or WR R10 is connected to the camera ...

Страница 439: ...ion between the WR R11a or WR R10 and the remote flash units D The WR R10 Wireless Remote Controller A WR A10 adapter is required when using the WR R10 Be sure to update the firmware for the optional WR R10 wireless remote controller to version 3 0 or later before using radio AWL Information on performing firmware updates is available via the Nikon website for your country or region 1 C Connect th...

Страница 440: ...Radio AWL 2 C Select Radio AWL for Flash control Wireless flash options in the photo shooting menu 3 C Choose a channel for the WR R11a WR R10 Set the WR R11a WR R10 channel selector to the desired channel ...

Страница 441: ...rference from other devices in the vicinity Given that each device must be paired separately however PIN is recommended when connecting to a large number of devices PIN Communication is shared among all devices with the same four digit PIN This option is a good choice for photography featuring a large number of remote devices If there are multiple cameras present that share the same PIN the flash ...

Страница 442: ...itiate pairing on the remote unit and press the WR R11a WR R10 pairing button Pairing is complete when the LINK lamps on the WR R11a WR R10 and flash unit flash orange and green Once a connection is established the LINK lamp on the remote flash unit will light green PIN Use the controls on the remote flash unit to enter the PIN you selected in the previous step Pairing begins when the PIN is enter...

Страница 443: ...emote flash info in the camera photo shooting menu The identifier remote flash unit name for each unit can be changed using flash unit controls D Reconnecting As long as the channel link mode and other settings remain the same the WR R11a WR R10 will automatically connect to previously paired flash units when remote mode is selected on the flash unit and Steps 3 6 can be omitted The flash unit LIN...

Страница 444: ...ing menu Choose a remote flash control mode and take pictures as described below Group Flash Select this item if you want to adjust settings separately for the flash units in each group 1 C Select Group flash for Flash control Remote flash control 2 C Highlight Group flash options in the Flash control display and press 2 ...

Страница 445: ...are available 4 f Group the remote flash units Choose a group A F for each of the remote flash units The master flash can control up to 18 flash units in any combination Option Description TTL i TTL flash control qA Auto aperture Available only with compatible flash units M Choose the flash level manually off The remote units do not fire Comp cannot be adjusted ...

Страница 446: ...nd confirm that they are functioning normally To test fire the units use the Test flash item in the i menu which can be added to the menu using Custom Setting f1 Customize i menu 6 C Take the photograph A Flash Info Group flash options can be viewed using the Flash info item in the i menu which can be added to the menu using Custom Setting f1 Customize i menu ...

Страница 447: ...e between the remote flash units in groups A and B and adjust flash output for group C Output for group C is adjusted manually 1 C Select Quick wireless control for Flash control Remote flash control 2 C Highlight Quick wireless control options in the Flash control display and press 2 ...

Страница 448: ... settings Choose the balance between groups A and B Adjust flash compensation for groups A and B Adjust settings for group C Select M to enable or to disable the units in group C When M is selected the units in group C will fire at the chosen output ...

Страница 449: ...he flash units for more information Test fire the units and confirm that they are functioning normally To test fire the units use the Test flash item in the i menu which can be added to the menu using Custom Setting f1 Customize i menu 6 C Take the photograph A Flash Info Quick wireless control settings can be viewed using the Flash info item in the i menu which can be added to the menu using Cust...

Страница 450: ...sure effect 1 C Select Remote repeating for Flash control Remote flash control 2 C Highlight Remote repeating options in the Flash control display and press 2 3 C Adjust remote repeating options Adjust output times and frequency Enable or disable selected groups Select ON to enable or to disable the selected group ...

Страница 451: ...on provided with the flash units for more information Test fire the units and confirm that they are functioning normally To test fire the units use the Test flash item in the i menu which can be added to the menu using Custom Setting f1 Customize i menu 6 C Take the photograph A Flash Info Remote repeating options can be viewed using the Flash info item in the i menu which can be added to the menu...

Страница 452: ...epeating flash control Once the unit is attached settings can be adjusted from the camera menus or using the controls on the SB 5000 In the case of the camera menus use the options listed under Group flash options Master flash or under M in the Remote repeating options display SB 910 SB 900 SB 800 SB 700 SB 600 Configure the flash for standalone use Use the controls on the flash unit to adjust fla...

Страница 453: ... with CLS Compatible Flash Units 0816 If the flash unit in question is an SB 5000 or SB 500 settings can be adjusted from the camera For more information see Using Optical AWL with the SB 5000 or SB 500 0454 See the documentation provided with the flash units for more information Settings for other flash units must be adjusted using flash unit controls For more information see the documentation pr...

Страница 454: ...flash Choose a remote flash control mode and take pictures as described below D The SB 5000 When an SB 5000 is mounted on the camera accessory shoe Flash control settings can also be changed using the controls on the flash unit Group Flash Select this item if you want to adjust settings separately for the flash units in each group 1 C Select Group flash for Flash control Remote flash control 2 C H...

Страница 455: ...channel 1 4 the master flash will use for optical remote flash control If the remote flash units include an SB 500 you must choose Channel 3 4 f Choose a channel for the remote flash units Set the remote flash units to the channel selected for Channel in Step 3 Option Description TTL i TTL flash control qA Auto aperture Available only with compatible flash units M Choose the flash level manually o...

Страница 456: ...C f Compose the shot and arrange the flash units See the documentation provided with the flash units for more information Test fire the units and confirm that they are functioning normally To test fire the units use the Test flash item in the i menu which can be added to the menu using Custom Setting f1 Customize i menu 7 C f Take the photograph after confirming that the flash ready lights for all...

Страница 457: ...e balance between the remote flash units in groups A and B and adjust flash output for group C Output for group C is adjusted manually 1 C Select Quick wireless control for Flash control Remote flash control 2 C Highlight Quick wireless control options in the Flash control display and press 2 ...

Страница 458: ...and B Adjust settings for group C Select M to enable or to disable the units in group C When M is selected the units in group C will fire at the chosen output Choose the channel For Channel choose the channel 1 4 the master flash will use for optical remote flash control If the remote flash units include an SB 500 you must choose Channel 3 ...

Страница 459: ...units are used 6 C f Compose the shot and arrange the flash units See the documentation provided with the flash units for more information Test fire the units and confirm that they are functioning normally To test fire the units use the Test flash item in the i menu which can be added to the menu using Custom Setting f1 Customize i menu 7 C f Take the photograph after confirming that the flash rea...

Страница 460: ...ly The flash units fire repeatedly while the shutter is open producing a multiple exposure effect 1 C Select Remote repeating for Flash control Remote flash control 2 C Highlight Remote repeating options in the Flash control display and press 2 ...

Страница 461: ...requency Enable or disable selected groups Select ON to enable or to disable the selected group Choose the channel For Channel choose the channel 1 4 the master flash will use for optical remote flash control If the remote flash units include an SB 500 you must choose Channel 3 ...

Страница 462: ...light emitted by the remote flash units will interfere with performance if more flash units are used 6 C f Compose the shot and arrange the flash units See the documentation provided with the flash units for more information Test fire the units and confirm that they are functioning normally To test fire the units use the Test flash item in the i menu which can be added to the menu using Custom Set...

Страница 463: ... Otherwise light from the flash units may interfere with exposure Even if is selected for Master flash Mode the master flash may emit low intensity timing flashes These flashes may appear in photographs taken at short range This can be prevented by choosing low ISO sensitivities or small apertures high f numbers After positioning the remote flash units take a test shot and view the results in the ...

Страница 464: ... Defaults Defaults Photo shooting menu option Default Shooting menu bank A Extended menu banks OFF Storage folder Rename NCZ_9 Select folder by number 100 Select folder from list File naming DSC Role played by card in Slot 2 Overflow Image area Choose image area FX 36 24 DX crop alert OFF Image quality JPEG normal Image size Large RAW recording High efficiencym ...

Страница 465: ...nce Auto Keep white reduce warm colors Fine tune A B 0 G M 0 Choose color temperature 5000 K Preset manual d 1 Set Picture Control Auto Manage Picture Control Color space sRGB Active D Lighting Off Long exposure NR OFF High ISO NR Normal Vignette control Normal Diffraction compensation ON Auto distortion control ON Photo flicker reduction OFF Metering Matrix metering Photo shooting menu option Def...

Страница 466: ...Auto Vibration reduction Sport Auto bracketing Auto bracketing set AE flash bracketing Number of shots 0 Increment 1 0 Multiple exposure Multiple exposure mode Off Number of shots 2 Overlay mode Average Save individual pictures RAW ON Overlay shooting ON Select first exposure RAW HDR overlay HDR mode Off HDR strength Auto Save individual pictures RAW OFF Photo shooting menu option Default ...

Страница 467: ...s before each shot OFF Options Off Starting storage folder New folder U Reset file numbering U Time lapse video Interval 5 s Shooting time 25 min Exposure smoothing ON Choose image area FX Video file type H 265 8 bit MOV Frame size frame rate 3840 2160 30p Interval priority OFF Focus before each shot OFF Destination Slot 1 Photo shooting menu option Default ...

Страница 468: ...w folder U Reset file numbering U Video recording menu option Default Shooting menu bank A Extended menu banks OFF Storage folder Rename NCZ_9 Select folder by number 100 Select folder from list File naming DSC Destination Slot 1 Video file type H 265 8 bit MOV Frame size frame rate 3840 2160 30p Image area Choose image area FX DX crop alert OFF Photo shooting menu option Default ...

Страница 469: ...0 K Preset manual d 1 Set Picture Control Same as photo settings Manage Picture Control HLG quality Quick sharp 0 Contrast 0 Saturation 0 Hue 0 Active D Lighting Off High ISO NR Normal Vignette control Normal Diffraction compensation ON Auto distortion control ON Video flicker reduction Auto Metering Matrix metering Focus mode Full time AF AF area mode Single point AF Video recording menu option D...

Страница 470: ...photo settings Electronic VR OFF Microphone sensitivity Auto Attenuator OFF Frequency response Wide range Wind noise reduction OFF Mic jack plug in power ON Headphone volume 15 Timecode Record timecodes Off Count up method Record run Timecode origin Drop frame ON External rec cntrl HDMI OFF Video recording menu option Default ...

Страница 471: ...lock on Blocked shot AF response 3 Subject motion Steady a4 Focus points used All points a5 Store points by orientation Off a6 AF activation Shutter AF ON a7 Focus point persistence Auto a8 Limit AF area mode selection Pinpoint AF M Single point AF L cannot be deselected Dynamic area AF S M Dynamic area AF M M Dynamic area AF L M Wide area AF S M Wide area AF L M 3D tracking M Auto area AF M ...

Страница 472: ...ivity 2 standard Focus peaking highlight color Red a14 Manual focus ring in AF mode ON b1 ISO sensitivity step value 1 3 step b2 EV steps for exposure cntrl 1 3 EV comp 1 3 EV b3 Easy exposure compensation Off b4 Matrix metering face detection ON b5 Center weighted area Standard b6 Fine tune optimal exposure Matrix metering 0 Center weighted metering 0 Spot metering 0 Highlight weighted metering 0...

Страница 473: ...release button AE L Off c2 Self timer Self timer delay 10 s Number of shots 1 Interval between shots 0 5 s c3 Power off delay Playback 10 s Menus 1 min Picture review 4 s Standby timer 30 s Custom Settings menu option Default ...

Страница 474: ...t be deselected Continuous L M Continuous H M C30 M C120 M Self timer M d4 Sync release mode options Sync d5 Extended shutter speeds M OFF d6 Limit selectable image area FX 36 24 L cannot be deselected DX 24 16 M 1 1 24 24 M 16 9 36 20 M d7 File number sequence On d8 View mode photo Lv Show effects of settings d9 Starlight view photo Lv OFF Custom Settings menu option Default ...

Страница 475: ...3 Release timing indicator Type B d14 Image frame ON d15 Grid type 3 3 d16 Virtual horizon type Type A d17 Custom monitor shooting display Display 1 L cannot be deselected Display 2 M Display 3 M Display 4 M Display 5 M d18 Custom viewfinder shooting display Display 1 L cannot be deselected Display 2 M Display 3 M Display 4 M Custom Settings menu option Default ...

Страница 476: ...6 Auto bracketing mode M Flash speed e7 Bracketing order MTR under over e8 Flash burst priority Prioritize precise flash control f1 Customize i menu Set Picture Control White balance Image quality Image size AF area mode subj detection Focus mode Metering Vibration reduction Shooting menu bank Custom controls shooting Airplane mode View memory card info Custom Settings menu option Default ...

Страница 477: ...F lock OK button Select center focus point Audio button None QUAL button Image quality size Vertical multi selector center AE AF lock AF ON button for vertical shooting Same as AF ON button Video record button None Command dials Exposure setting P 3 yP S 3 yTv A 3Av y M 3Av yTv Focus AF area mode selection 3t ys Sub command dial zoom role Exposure setting Lens Fn button AE AF lock Lens Fn2 button ...

Страница 478: ... button Voice memo QUAL button Rating WB button Select for upload to computer Vertical shooting multi selector Unswitch Main command dial Frame advance 1 frame Video playback 10 frames Sub command dial Frame advance 1 frame Video playback 10 s Video record button None f4 Control lock Shutter speed lock OFF Aperture lock OFF Focus point lock OFF Custom Settings menu option Default ...

Страница 479: ...on linear f10 Control ring response High f11 Full frame playback flicks Flick up None Flick down None Flick advance direction LeftVRight g1 Customize i menu Set Picture Control White balance Frame size frame rate Microphone sensitivity AF area mode subj detection Focus mode Electronic VR Vibration reduction Shooting menu bank Custom controls Airplane mode Destination Custom Settings menu option De...

Страница 480: ...utton Select center focus point Sub selector center AE AF lock QUAL button None Audio button Microphone sensitivity AF ON button for vertical shooting Same as AF ON button Vertical multi selector center AE AF lock Command dials Exposure setting A 3Av y M 3Av yTv Focus AF area mode selection 3t ys Sub command dial zoom role Exposure setting Shutter release button None Lens Fn2 button AF ON Lens Fn ...

Страница 481: ...a AF L M Subject tracking AF M Auto area AF M g5 Focus mode restrictions No restrictions g6 AF speed 0 When to apply Always g7 AF tracking sensitivity 4 g8 View assist OFF g9 Zebra pattern Pattern tone range Zebra pattern off Pattern Pattern 1 Highlight threshold 250 Mid tone range Value 160 range 10 g10 Limit zebra pattern tone range No restrictions Custom Settings menu option Default ...

Страница 482: ...2 Custom monitor shooting display Display 1 L cannot be deselected Display 2 M Display 3 M Display 4 M g13 Custom viewfinder shooting display Display 1 L cannot be deselected Display 2 M Display 3 M Custom Settings menu option Default ...

Страница 483: ... point U Exposure info U Highlights U RGB histogram U Shooting data U Overview U None picture only M Basic shooting data M Flash data M Picture Control HLG data M Other shooting data M Copyright info M Location data M IPTC data M Delete pictures from both slots Yes confirmation required Dual format recording PB slot Slot 1 ...

Страница 484: ...Picture type U Rating U Select for upload to computer U Select for upload FTP U Voice memo U Retouched pictures U Picture review Off After delete Show next After burst show Last picture in burst Rotate tall ON Copy image s Playback menu option Default ...

Страница 485: ...hase Date and time Date format Default varies with country of purchase Daylight saving time OFF Monitor brightness 0 Monitor color balance A B 0 G M 0 Viewfinder brightness Auto Viewfinder color balance A B 0 G M 0 Finder display size photo Lv Standard Limit monitor mode selection Automatic display switch M Viewfinder only M Monitor only M Prioritize viewfinder M Auto rotate info display ON ...

Страница 486: ... data Lens number 1 Focal length mm Maximum aperture Save focus position OFF Sensor shield behavior at power off Sensor shield stays open Clean image sensor Automatic cleaning Clean at shutdown Image Dust Off ref photo Pixel mapping Image comment Attach comment Off Copyright information Attach copyright information OFF Setup menu option Default ...

Страница 487: ...nd hold Audio output playback Speaker headphones Camera sounds Shutter sound ON Beep on off Off Volume 2 Pitch Low Silent mode OFF Touch controls Enable disable touch controls Enable Glove mode OFF HDMI Output resolution Auto Output range Auto Output shooting info ON Mirror camera info display ON Setup menu option Default ...

Страница 488: ...te OFF Create log Log list Position Wireless remote WR options LED lamp ON Link mode Pairing Assign remote WR Fn button None Conformity marking Battery info USB power delivery ON Energy saving photo mode OFF Slot empty release lock Enable release Save load menu settings Reset all settings Firmware version Setup menu option Default ...

Страница 489: ...tooth connection OFF Select pictures for upload Auto select for upload ON Wi Fi connection Upload while off ON Location data smart device Connect to computer Network settings Connection type Picture transfer Options Auto upload OFF Delete after upload OFF Upload RAW JPEG as RAW JPEG JPEG JPEG slot selection Slot 1 Upload folder Deselect all ...

Страница 490: ...Overwrite if same name OFF Protect if marked for upload OFF Upload marking OFF Upload folder Deselect all Connect to other cameras Synchronized release ON Network settings Group name Master remote Master camera Remote camera list Synchronize date and time USB MTP PTP Start via LAN OFF Router frequency band 2 4 GHz 5 GHz MAC address Network menu option Default ...

Страница 491: ... by card in Slot 2 503 Image area 506 Image quality 506 Image size 507 RAW recording 507 ISO sensitivity settings 508 White balance 510 Set Picture Control 510 Manage Picture Control 510 Color space 511 Active D Lighting 512 Long exposure NR 514 High ISO NR 515 Vignette control 516 Diffraction compensation 517 Auto distortion control 517 Photo flicker reduction 518 Metering 520 Flash control 521 F...

Страница 492: ...e Photo Shooting Menu Shooting Options D See Also Photo Shooting Menu Defaults 0464 Multiple exposure 528 HDR overlay 537 Interval timer shooting 542 Item 0 Time lapse video 556 Focus shift shooting 568 Item 0 ...

Страница 493: ...to the following photo shooting menu settings apply to all banks Extended menu banks White balance presets Multiple exposure Interval timer shooting Time lapse video Focus shift shooting Changes to the following video recording menu setting also apply to all banks Extended menu banks Shooting menu banks can also be edited via the Shooting menu bank item in the video recording menu Changes made in ...

Страница 494: ...ming Shooting Menu Banks A descriptive caption can be added to the bank name A B C or D by highlighting the bank pressing 2 and selecting Rename Captions can be up to 20 characters long Copying Shooting Menu Banks To create a copy of a shooting menu bank highlight the bank press 2 select Copy and choose a destination for the copy ...

Страница 495: ...lected shooting menu bank To do so highlight the bank and press O Q a confirmation dialog will be displayed Highlight Yes and press J to restore default settings for the selected bank Shooting menu banks cannot be reset while a multiple exposure is in progress Storage folder and Manage Picture Control are not reset ...

Страница 496: ...to mode are shooting mode shutter speed modes S and M only aperture modes A and M only and flash mode The additional settings stored in extended banks for use in video mode are shooting mode shutter speed mode M only and aperture modes A and M only Selecting OFF restores the shooting and flash modes shutter speed and aperture in effect before ON was selected Exposure settings can also be edited vi...

Страница 497: ... Renaming Folders The default folder name which appears after the folder number is NCZ_9 To choose a different five character folder name for new folders select Rename Existing folders cannot be renamed If desired the default name can be restored for subsequent folders by pressing and holding the O Q button while the keyboard is displayed Storage Folder G button U C photo shooting menu 3 1 2 1 Fol...

Страница 498: ...ghlight Select folder by number and press 2 to display the Select folder by number dialog The card on which the new folder will be created is underlined in the card slot display area at the top right corner of the Select folder by number dialog The card used for new folders depends on the option currently selected for Role played by card in Slot 2 in the photo shooting menu 2 Choose a folder numbe...

Страница 499: ...or new pictures If you chose a folder number that does not already exist a new folder will be created with that number when you press J In either case subsequent pictures will be stored in the chosen folder To exit without changing the storage folder press the G button D Folder Icons Folders in the Select folder by number dialog are shown by W if empty by Y if full containing either 5000 pictures ...

Страница 500: ...t folder from list Highlight Select folder from list and press 2 to display the Select folder from list dialog 2 Highlight a folder Press 1 or 3 to highlight a folder 3 Select the highlighted folder Press J to select the highlighted folder and return to the main menu Subsequent photographs will be stored in the selected folder ...

Страница 501: ... files or the current folder contains a picture numbered 9999 in addition video recording will be disabled if the camera calculates that the number of files needed to record a video of the maximum length would result in a file numbered over 9999 If there is space on the memory card you will nevertheless be able to continue shooting by creating a folder with a number less than 999 and selecting it ...

Страница 502: ... from 0001 to 9999 and xxx is one of the following extensions assigned according to the options selected for image quality and file type NEF NEF RAW photos JPG JPEG fine normal or basic photos MOV MOV videos MP4 MP4 videos NDF Dust off reference data Pictures created with Adobe RGB selected for Color space in the photo shooting menu have file names of the form _DSCnnnn xxx In each pair of photogra...

Страница 503: ...only to the card in Slot 1 JPEG copies only to the card in Slot 2 Pictures taken at other image quality settings are recorded twice at the same setting once to the card in Slot 1 and again to the card in Slot 2 O JPEG Slot 1 JPEG Slot 2 Two JPEG copies are recorded one to each memory card The copy saved to the card in Slot 1 is recorded at the image quality and size selected via the T button or ph...

Страница 504: ... option selected for image quality A Backup RAW Slot 1 JPEG Slot 2 and JPEG Slot 1 JPEG Slot 2 The shooting display and control panel show the number of exposures remaining on the card with the least amount of space available The shutter release is disabled when either card is full A Viewing Dual Format Photos Use the Dual format recording PB slot item in the playback menu to choose the slot from ...

Страница 505: ...highlighted during playback displays a confirmation message To delete only the copy on the card in the current slot highlight Selected picture and press O Q again To delete both copies highlight Same pictures on 1 and 2 and press O Q If a voice memo is appended to the picture a confirmation dialog will be displayed To delete only the voice memo highlight Voice memo only and press O Q A Delete Opti...

Страница 506: ...cording Options Image Area Quality and Size in the Shooting Settings chapter Choose a file format for photographs For more information see Adjusting Image Quality 0105 part of the section on Image Recording Options Image Area Quality and Size in the Shooting Settings chapter Image Area G button U C photo shooting menu Image Quality G button U C photo shooting menu ...

Страница 507: ...tings chapter Choose a compression type for NEF RAW photographs In descending order by the size of the files produced the options are Lossless compression High efficiencym and High efficiency High efficiencym produces pictures that compare favorably in quality to those produced by Lossless compression and are higher in quality than those produced by High efficiency Image Size G button U C photo sh...

Страница 508: ... by about 0 3 0 7 1 and 2 EV ISO 102400 equivalent Auto ISO sensitivity control Select ON to enable auto ISO sensitivity control If OFF is selected ISO sensitivity will remain fixed at the value selected by the user Maximum sensitivity Maximum sensitivity with c and Minimum shutter speed options are available when ON is selected Maximum sensitivity Choose an upper limit for ISO sensitivity to prev...

Страница 509: ...he camera will automatically choose faster minimum shutter speeds to prevent blur caused by camera shake when a long lens is attached To view auto shutter speed selection options highlight Auto and press 2 Auto shutter speed selection can be fine tuned by choosing faster or slower minimums Faster settings can be used to reduce blur when photographing fast moving subjects Shutter speeds may drop be...

Страница 510: ...new photos according to the scene or your creative intent For more information see Picture Controls 0192 in the Shooting Settings chapter Save modified Picture Controls as custom Picture Controls For more information see Custom Picture Controls 0199 in the Shooting Settings chapter White Balance G button U C photo shooting menu Set Picture Control G button U C photo shooting menu Manage Picture Co...

Страница 511: ...B is a better choice for professional publication and commercial printing D Caution Color Space The selected color space may be overwritten when pictures are opened in third party software NX Studio can open pictures in the color space selected on the camera D Adobe RGB For accurate color reproduction Adobe RGB pictures require applications displays and printers that support color management Color...

Страница 512: ...d subjects on a sunny day Active D Lighting is most effective when used with matrix metering Active D Lighting G button U C photo shooting menu Off Y Auto Option Description Y Auto The camera automatically adjusts Active D Lighting in response to shooting conditions t Extra high 2 Choose the amount of Active D Lighting performed from in order from high to low Extra high 2 Extra high 1 High Normal ...

Страница 513: ...ghting Noise in the form of randomly spaced bright pixels fog or lines may appear in photos taken with Active D Lighting In mode M Y Auto is equivalent to Q Normal Uneven shading may be visible with some subjects This function does not apply at high ISO sensitivities Hi 0 3 Hi 2 0 including high sensitivities selected via auto ISO sensitivity control ...

Страница 514: ...reduction will appear in the shooting display and Job NR will flash in the control panel Pictures cannot be taken until the message has cleared from the display The time required to process photos after shooting roughly doubles D Caution Long Exposure Noise Reduction If the camera is turned off before processing is complete the picture will be saved but noise reduction will not be performed Long E...

Страница 515: ...shooting menu Option Description High Reduce noise in photographs taken at all ISO sensitivities The higher the sensitivity the greater the effect Choose the amount of noise reduction performed from in order from high to low High Normal and Low Normal Low Off Noise reduction is performed only as required The amount of noise reduction performed is always lower than when Low is selected ...

Страница 516: ...frame that introduces variations in peripheral brightness In addition custom Picture Controls and preset Picture Controls that have been modified from default settings may not produce the desired effect Take test shots and view the results in the monitor D Vignette Control Changes to Vignette control in the photo shooting menu apply in the video recording menu and vice versa Vignette Control G but...

Страница 517: ...el distortion when shooting with wide angle lenses and to reduce pin cushion distortion when shooting with long lenses Note that ON may be selected automatically with some lenses in which case this item will be grayed out and unavailable D Auto Distortion Control Changes to Auto distortion control in the photo shooting menu apply in the video recording menu and vice versa Diffraction Compensation ...

Страница 518: ...tected when the shutter is released a green I will appear next to the FLICKER icon in the shooting display If ON is selected flicker reduction will behave differently during burst photography depending on the chosen release mode continuous high speed or continuous low speed Continuous high speed Priority is given to frame rate The display will briefly go dark with the first shot in each burst but ...

Страница 519: ...The desired results may also not be achieved with decorative lighting displays and other non standard lighting The actual effects of photo flicker reduction may differ from those visible in the display D Continuous High Speed When Focus is selected for Custom Setting a1 AF C priority selection flicker reduction for continuous high speed release mode behaves in the same way as it does for continuou...

Страница 520: ...ed when using filters with an exposure factor filter factor over 1 The size of the area assigned the greatest weight can be selected using Custom Setting b5 Center weighted area N Spot metering The camera meters a circle with a diameter of 4 mm 0 16 in equivalent to approximately 1 5 of the frame This ensures that the subject will be correctly exposed even when the background is much brighter or d...

Страница 521: ...ts mounted on the camera accessory shoe For information on adjusting settings for optional flash units mounted on the camera accessory shoe see Flash Photography 0422 For information on adjusting settings for wireless remote flash units see Remote Flash Photography 0437 Flash Control G button U C photo shooting menu ...

Страница 522: ...using flash unit controls Settings for an SB 5000 mounted on the accessory shoe can also be adjusted using the controls on the flash unit Option Description TTL Flash output is adjusted automatically in response to shooting conditions Auto external flash Light from the flash is reflected from the subject to an auto external flash sensor and flash output adjusted automatically Distance priority man...

Страница 523: ...SB 5000 or SB 500 flash unit or a WR R11a or WR R10 wireless remote controller is mounted on the camera Option Description Y Optical AWL The remote flash units are controlled using low intensity flashes emitted by the master flash 0453 Z Radio AWL The remote flash units are controlled by radio signals from a WR R11a WR R10 attached to the camera 0439 Off Remote flash photography disabled ...

Страница 524: ...control Radio Remote Flash Info View the flash units currently controlled via radio AWL Option Description Group flash Choose a separate flash control mode for each group of remote flash units 0444 454 Quick wireless control Choose the balance between groups A and B and adjust output for group C manually 0447 457 Remote repeating The flash units fire repeatedly while the shutter is open producing ...

Страница 525: ...on see Choosing an AF Area Mode 0113 part of the section on Focus in the Shooting Settings chapter Choose the type of subject to which the camera gives priority when focusing using autofocus For more information see Choosing a Subject Type for Autofocus 0119 part of the section on Focus in the Shooting Settings chapter Focus Mode G button U C photo shooting menu AF Area Mode G button U C photo sho...

Страница 526: ... how vibration reduction is performed and does not indicate a malfunction Sport or Off can be used should you find the motion distracting Normal or Sport is recommended for panning shots In Normal and Sport modes vibration reduction applies only to motion that is not part of the pan If the camera is panned horizontally for example vibration reduction will be applied only to vertical shake Vibratio...

Страница 527: ...for more information If an F mount lens with a vibration reduction switch is attached via an optional FTZ II FTZ mount adapter Vibration reduction will be grayed out and unavailable Use the lens switch for vibration reduction Bracketing automatically varies exposure flash level Active D Lighting ADL or white balance slightly with each shot bracketing the current value For more information see Auto...

Страница 528: ...tiple exposure mode On series Take a series of multiple exposures To end multiple exposure photography select Multiple exposure mode again and choose Off On single photo End multiple exposure photography after creating a single multiple exposure Off End multiple exposure photography Number of shots Choose the number of exposures that will be combined to form a single photograph ...

Страница 529: ... 1 3 Lighten The camera compares the pixels in each picture and uses only the brightest Darken The camera compares the pixels in each picture and uses only the darkest Save individual pictures RAW ON Save both the multiple exposure and the shots that make it up the pictures are saved in NEF RAW format OFF Discard the individual shots and save only the multiple exposure Overlay shooting If ON is se...

Страница 530: ...n for Multiple exposure mode Highlight Multiple exposure mode and press 2 Highlight a multiple exposure mode using 1 or 3 and press J If On series or On single photo is selected an icon will appear in the display 3 Choose a value for Number of shots number of exposures Highlight Number of shots and press 2 Choose the number of exposures using 1 or 3 and press J ...

Страница 531: ...lay mode and press 2 Highlight an option using 1 or 3 and press J 5 Choose a setting for Save individual pictures RAW To save both the multiple exposure and the shots that make it up select ON the individual shots are saved in NEF RAW format To save only the multiple exposure select OFF ...

Страница 532: ...r exposures as a guide when composing subsequent shots 7 Choose an option for Select first exposure RAW To choose the first exposure from existing NEF RAW photos highlight Select first exposure RAW and press 2 Highlight the desired picture using the multi selector To view the highlighted picture full screen press and hold the X button After highlighting the desired picture press J ...

Страница 533: ...have taken the selected number of shots the pictures will be overlaid to create a multiple exposure Multiple exposures are recorded in JPEG format regardless of the option selected for image quality If On series is selected for Multiple exposure mode you can continue to take additional multiple exposures until Off is selected If On single photo is selected the camera will exit multiple exposure mo...

Страница 534: ...ghlight items and press J to select You also have the option of using touch controls after pressing the i button Option Description View progress View a preview created from the exposures recorded to the current point Retake last exposure Retake the most recent exposure Save and exit Create a multiple exposure from the exposures taken to current point Discard and exit Exit without recording a mult...

Страница 535: ...cted multiple exposure shooting will end after the first multiple exposure is recorded If On series is selected an additional multiple exposure will be recorded each time the shutter release button is pressed In self timer mode the interval between each shot in the exposure is selected using Custom Setting c2 Self timer Interval between shots Regardless of the value selected for the c2 Number of s...

Страница 536: ...ltiple exposure before the specified number of exposures have been taken select Off for multiple exposure mode A multiple exposure will be created from the exposures that have been recorded to that point if Average is selected for Overlay mode gain will be adjusted to reflect the number of exposures actually recorded The multiple exposure will also end if the standby timer expires after the first ...

Страница 537: ...button U C photo shooting menu Option Description HDR mode On series Take a series of HDR photographs To end HDR photography select HDR mode again and choose Off On single photo End HDR photography after recording a single HDR photograph Off End HDR photography HDR strength Adjust HDR strength If Auto is selected the camera will automatically adjust HDR strength to suit the scene Save individual p...

Страница 538: ...u and press 2 2 Select an HDR mode Highlight HDR mode and press 2 Highlight one of the following options using 1 or 3 and press J Option Description 0 On series Take a series of HDR photographs HDR shooting will continue until you select Off for HDR mode On single photo Normal shooting will resume after you have taken a single HDR photograph Off Proceed without taking additional HDR photographs ...

Страница 539: ...s or On single photo is selected an icon will appear in the display 3 Choose an HDR strength Highlight HDR strength and press 2 Highlight an option using 1 or 3 and press J If Auto is selected the camera will automatically adjust HDR strength to suit the scene ...

Страница 540: ... exposures when the shutter release button is pressed all the way down Busy will flash in the control panel while the pictures are combined No photographs can be taken until recording is complete If On series is selected for HDR mode you can continue to take HDR photographs until Off is selected If On single photo is selected HDR will turn off automatically after a single shot HDR photographs are ...

Страница 541: ...oticeable Uneven shading may be visible with some subjects When spot or center weighted metering is selected an HDR strength setting of Auto is equivalent to Normal Optional flash units will not fire In continuous release modes only one photograph will be taken each time the shutter release button is pressed all the way down Shutter speeds of Bulb and Time are not available D HDR Restrictions HDR ...

Страница 542: ... shots have been taken Choose start day time Choose a start option Select Now to start shooting immediately Choose day time to start shooting at a chosen date and time Interval Specify the interval between shots in hours minutes and seconds Intervals shots interval Choose the number of intervals and the number of shots per interval Exposure smoothing Selecting ON allows the camera to adjust exposu...

Страница 543: ...riority selection and a2 AF S priority selection If ON is selected for ISO sensitivity settings Auto ISO sensitivity control and the time chosen for Minimum shutter speed is longer than the interval the time selected for the interval will take priority over the selected shutter speed OFF Disable interval priority to ensure that photos are correctly exposed Focus before each shot If ON is selected ...

Страница 544: ...cting 1 1 24 24 for Image area Choose image area in the photo shooting menu disables the shutter release Videos created using Time lapse video are recorded in the sRGB color space regardless of the option selected for Color space in the photo shooting menu Off Do not perform additional operations during interval timer photography Starting storage folder Highlight options and press J or 2 to select...

Страница 545: ...ing select Time zone and date in the setup menu and make sure that the camera clock is set to the correct time and date To ensure that shooting is not interrupted use a fully charged battery the supplied charging AC adapter or an optional AC adapter and power connector 1 Highlight Interval timer shooting in the photo shooting menu and press 2 ...

Страница 546: ... immediately select Now To start shooting at a chosen date and time select Choose day time Choose the date and time and press J Choose the interval between shots Highlight Choose start day time and press 2 Highlight an option and press J Highlight Interval and press 2 Choose an interval in hours minutes and seconds and press J ...

Страница 547: ... taken at the rate for continuous high speed release mode Enable or disable exposure smoothing Selecting ON allows the camera to adjust exposure to match the previous shot Highlight Intervals shots interval and press 2 Choose the number of intervals and the number of shots per interval and press J Highlight Exposure smoothing and press 2 to select ON or OFF ...

Страница 548: ...the camera focuses between shots If ON is selected for Focus before each shot the camera will focus before each shot according to the option currently selected for focus mode Highlight Interval priority and press 2 to select ON or OFF Highlight Focus before each shot and press 2 to select ON or OFF ...

Страница 549: ...you selected Time lapse video choose settings for Video file type Frame size frame rate and Destination Choose starting folder options Highlight Options and press 2 Highlight AE bracketing or Time lapse video and press J Highlight Starting storage folder and press 2 After highlighting the desired options and pressing J to turn them on M or off U press 4 ...

Страница 550: ... shooting Shooting will continue at the selected interval until all shots have been taken D During Shooting A 7 icon is displayed in the control panel during interval timer photography If Time lapse video is selected for Options a 8 icon will also be displayed If the display is turned on by pressing the shutter release button halfway the message Interval timer shooting will be displayed and the 7 ...

Страница 551: ... is pressed if the time selected for Interval is very short If Time lapse video is selected for Options pressing J between intervals will end interval timer photography Resuming Interval Timer Photography Interval timer shooting can be resumed as described below To resume shooting immediately To resume shooting at a specified time Highlight Restart and press J Highlight Restart option and press 2 ...

Страница 552: ...erval timer shooting in the photo shooting menu highlight Off and press J Note that the menus may not be displayed when the G button is pressed if the time selected for Interval is very short In this case you will need to press J to pause interval timer photography and then select Interval timer shooting in the photo shooting menu highlight Off and press J ...

Страница 553: ...or Intervals shots interval If you are using a flash choose an interval longer than the time needed for the flash to charge If the interval is too short the flash may fire at less than the power needed for full exposure If shooting cannot proceed at current settings for example if shutter speed is set to Bulb or Time the Interval is 00 00 00 or the start time is in less than a minute a warning wil...

Страница 554: ...ff and then on again when the camera is off batteries and memory cards can be replaced without ending interval timer photography or self timer or high speed frame capture is selected for release mode Changing camera settings while the interval timer is active may cause shooting to end D Release Mode Regardless of the release mode selected the camera will take the specified number of shots at each ...

Страница 555: ...ing long time exposures Bulb or Time the self timer high speed frame capture bracketing multiple exposures HDR overlay and focus shift D Interval Timer Settings Turning the camera off or selecting a new release mode does not affect interval timer photography settings D Shooting Menu Banks You cannot change or reset shooting menu banks while interval timer photography is in progress ...

Страница 556: ...seconds Shooting time Choose how long the camera will continue to take pictures in hours and minutes Exposure smoothing Selecting ON smooths abrupt changes in exposure Large changes in subject brightness during shooting may result in apparent variations in exposure This can be addressed by shortening the interval between shots Exposure smoothing will not take effect in mode M if OFF is selected fo...

Страница 557: ...for Custom Settings a1 AF C priority selection and a2 AF S priority selection If ON is selected for ISO sensitivity settings Auto ISO sensitivity control and the time chosen for Minimum shutter speed is longer than the interval the time selected for the interval will take priority over the selected shutter speed OFF Disable interval priority to ensure that photos are correctly exposed Focus before...

Страница 558: ...esults in the monitor Before proceeding select Time zone and date in the setup menu and make sure that the camera clock is set to the correct time and date To ensure that shooting is not interrupted use a fully charged battery the supplied charging AC adapter or an optional AC adapter and power connector 1 Highlight Time lapse video in the photo shooting menu and press 2 ...

Страница 559: ... an interval longer than the slowest anticipated shutter speed Choose the total shooting time The maximum shooting time is 23 hours and 59 minutes Highlight Interval and press 2 Choose an interval in minutes and seconds and press J Highlight Shooting time and press 2 Choose a shooting time in hours and minutes and press J ...

Страница 560: ...ing ON smooths abrupt changes in exposure Choose the image area Choose a video file type Highlight Exposure smoothing and press 2 to select ON or OFF Highlight Choose image area and press 2 Highlight an option and press J Highlight Video file type and press 2 Highlight an option and press J ...

Страница 561: ...g Menu Shooting Options Choose the frame size and rate Choose an interval priority option Highlight Frame size frame rate and press 2 Highlight an option and press J Highlight Interval priority and press 2 to select ON or OFF ...

Страница 562: ...h shot the camera will focus before each shot according to the option currently selected for focus mode Choose a destination Highlight Focus before each shot and press 2 to select ON or OFF Highlight Destination and press 2 Highlight the slot that will be used to record time lapse videos when two memory cards are inserted and press J ...

Страница 563: ...ing The camera takes pictures at interval selected for Interval for the time selected for Shooting time in Step 2 D During Shooting A 8 icon is displayed in the control panel during shooting If the display is turned on by pressing the shutter release button halfway the message Interval timer shooting will be displayed and the 8 icon will flash ...

Страница 564: ...ss J or select Time lapse video in the photo shooting menu highlight Off and press J Note that the menus may not be displayed when the G button is pressed if the time selected for Interval is very short A video will be created from the frames shot to the point where shooting ended and normal photography will resume ...

Страница 565: ... 48 frame video recorded with 1920 1080 24p selected for Frame size frame rate will be about two seconds long D Picture Review The K button cannot be used to view pictures while shooting is in progress The current frame will however be displayed for a few seconds after each shot if On or On monitor only is selected for Picture review in the playback menu Note that other playback operations cannot ...

Страница 566: ...r Frame size frame rate shooting will not start if a DX lens is attached or DX selected for Choose image area The K button cannot be used to view pictures while time lapse recording is in progress For consistent coloration choose a white balance setting other than 4 Auto or D Natural light auto when recording time lapse videos Regardless of the option selected for Custom Setting c3 Power off delay...

Страница 567: ...e monitor will turn off approximately 2 s before the next shot is taken D Time Lapse Videos Restrictions Time lapse video recording cannot be combined with some camera features including video recording long time exposures Bulb or Time the self timer high speed frame capture bracketing multiple exposures HDR overlay interval timer photography and focus shift ...

Страница 568: ...hots Choose the number of shots maximum 300 Focus step width Focus shift varies the focus distance over a series of photographs Choose the amount the focus distance changes with each shot Interval until next shot Choose the interval between shots in seconds Select 00 to take photos at up to about 5 fps To ensure correct exposure when using a flash choose an interval long enough for the flash to ch...

Страница 569: ... AC adapter and power connector 1 Focus During focus shift the camera takes a series of shots starting from a selected focus position and continuing toward infinity Given that shooting ends when infinity is reached the starting focus position should be slightly in front of i e closer to the camera than the closest point on the subject Do not move the camera after focusing 2 Highlight Focus shift s...

Страница 570: ...ng more shots than you think you ll need You can winnow them down during focus stacking More than 100 shots may be required for photographs of insects or other small objects On the other hand only a few may be needed to photograph a landscape from front to back with a wide angle lens Highlight No of shots and press 2 Choose the number of shots and press J ...

Страница 571: ...perimenting with different settings before shooting Choose the interval until next shot Choose the interval between shots in seconds Select 00 to take photos at up to about 5 fps To ensure correct exposure when using a flash choose an interval long enough for the flash to charge A setting of 00 is recommended when shooting without a flash Highlight Focus step width and press 2 Choose a focus step ...

Страница 572: ...xposure at the value for the first shot ensuring that all photos have the same exposure Large changes in subject brightness during shooting may however result in apparent variations in exposure This can be addressed by selecting OFF Choose starting folder options Highlight First frame exposure lock and press 2 to select ON or OFF Highlight Starting storage folder and press 2 After highlighting the...

Страница 573: ... turns off during shooting The camera takes photographs at the selected interval starting at the focus distance selected at the start of shooting and progressing out toward infinity by the selected focus step distance with each shot Shooting ends when the selected number of shots has been taken or focus reaches infinity ...

Страница 574: ...interval Shooting ends when focus reaches infinity and consequently depending on the focus position at the start of shooting shooting may end before the selected number of shots has been taken Regardless of the option selected for Custom Setting c3 Power off delay Standby timer the standby timer will not expire while shooting is in progress If you are using a flash choose an interval longer than t...

Страница 575: ...cketing multiple exposures HDR overlay interval timer photography and time lapse video recording A Aperture Given that pictures shot at very small apertures high f numbers may lack definition we recommend that you choose apertures wider f numbers lower than f 8 f 11 A Close ups Because focus depth is reduced at short focus distances we recommend choosing smaller focus steps and increasing the numb...

Страница 576: ...9 Image area 579 ISO sensitivity settings 580 White balance 581 Set Picture Control 581 Manage Picture Control 581 HLG quality 582 Active D Lighting 583 High ISO NR 583 Vignette control 584 Diffraction compensation 584 Auto distortion control 584 Video flicker reduction 585 Metering 586 Focus mode 586 AF area mode 586 AF subject detection options 587 Vibration reduction 587 Electronic VR 587 Micro...

Страница 577: ...More information is available in the section devoted to the Extended menu banks item in the photo shooting menu 0496 Choose the folder in which subsequent pictures will be stored More information is available in the section devoted to the Storage folder item in the photo shooting menu 0497 D Storage Folder Changes to Storage folder in the photo shooting menu apply in the video recording menu and v...

Страница 578: ... when two memory cards are inserted The menu shows the time available on each card Recording ends automatically when no time remains on the current card Choose the video file type For more information see the section on Video File Types 0214 in the Video Recording chapter File Naming G button U 1 video recording menu Destination G button U 1 video recording menu Video File Type G button U 1 video ...

Страница 579: ...formation see the section on Video Frame Size and Rate Options 0216 in the Video Recording chapter Choose a video crop For more information see the section on Video Image Area Options 0218 in the Video Recording chapter Frame Size Frame Rate G button U 1 video recording menu Image Area G button U 1 video recording menu ...

Страница 580: ...Settings G button U 1 video recording menu Option Description Maximum sensitivity Choose the upper limit for auto ISO sensitivity control from values between ISO 200 and Hi 2 0 The selected value serves as the upper limit for ISO sensitivity in modes P S and A and when ON is selected for Auto ISO control mode M in mode M Auto ISO control mode M ON Enable auto ISO sensitivity control in mode M OFF ...

Страница 581: ...d for photos 0158 Choose a Picture Control for videos Select Same as photo settings to use the option currently selected for photos 0192 Save modified Picture Controls as custom Picture Controls 0199 White Balance G button U 1 video recording menu Set Picture Control G button U 1 video recording menu Manage Picture Control G button U 1 video recording menu ...

Страница 582: ...p to quickly adjust levels for balanced Sharpening Mid range sharpening and Clarity These parameters can also be adjusted individually Sharpening Control the sharpness of details and outlines Mid range sharpening Adjust the sharpness of patterns and lines in the range between Sharpening and Clarity Clarity Adjust overall sharpness and the sharpness of thicker outlines without affecting brightness ...

Страница 583: ...spaced bright pixels in videos recorded at high ISO sensitivities 0515 Active D Lighting G button U 1 video recording menu Option Description Z Extra high Choose the amount of Active D Lighting performed from in order from high to low Extra high High Normal and Low P High Q Normal R Low Off Active D Lighting off High ISO NR G button U 1 video recording menu ...

Страница 584: ... Changes to Diffraction compensation in the photo shooting menu apply in the video recording menu and vice versa Choose whether to reduce barrel and pin cushion distortion in videos 0517 D Auto Distortion Control Changes to Auto distortion control in the photo shooting menu apply in the video recording menu and vice versa Vignette Control G button U 1 video recording menu Diffraction Compensation ...

Страница 585: ...Flicker Reduction If Auto fails to produce the desired results and you are unsure as to the frequency of the local power supply test both the 50 and 60 Hz options and choose the one that produces the best results Flicker reduction may not produce the desired results if the subject is very bright If this is the case try choosing a smaller aperture higher f number Flicker reduction may fail to produ...

Страница 586: ...deo mode Spot metering is not available in the video recording menu 0520 Choose a focus mode for video recording 0110 Choose an AF area mode for video recording 0113 Metering G button U 1 video recording menu Focus Mode G button U 1 video recording menu AF Area Mode G button U 1 video recording menu ...

Страница 587: ... or not a subject of the selected type is detected Select OFF to disable autofocus when no subject of the selected type is detected Adjust vibration reduction settings for video mode Select Same as photo settings to use the option currently selected for photos 0526 Choose whether to enable electronic vibration reduction in video mode Electronic vibration reduction is fixed at OFF at a frame size o...

Страница 588: ...ound Videos recorded with Microphone off selected for Microphone sensitivity are indicated by a 2 icon Microphone Sensitivity G button U 1 video recording menu Option Description Auto Microphone sensitivity is adjusted automatically Manual Adjust microphone sensitivity manually Choose from values of from 1 to 20 The higher the value the higher the sensitivity the lower the value the lower the sens...

Страница 589: ... sounds may also be affected Selecting ON for Wind noise reduction has no effect on optional stereo microphones Wind noise reduction for optional stereo microphones that support this feature can be enabled or disabled using microphone controls Attenuator G button U 1 video recording menu Frequency Response G button U 1 video recording menu Option Description S Wide range Record a wide range of fre...

Страница 590: ...ce generated by the power supply we recommend turning plug in power OFF when using microphones that do not require plug in power For information on whether your microphone requires plug in power consult the manufacturer Press 1 or 3 to adjust headphone volume Mic Jack Plug in Power G button U 1 video recording menu Headphone Volume G button U 1 video recording menu ...

Страница 591: ...mecodes On Record time codes The time code appears in the shooting display On with HDMI output Time codes will be included with footage saved to external recorders connected to the camera via an HDMI cable The camera supports Atomos SHOGUN NINJA and SUMO series Monitor recorders Off Time codes are not recorded Count up method Record run Time codes are incremented only while recording is in progres...

Страница 592: ...rs chapter Timecode origin Reset Reset the time code to 00 00 00 00 Enter manually Enter the hour minute second and frame number manually Current time Set the time code to the current time as reported by the camera clock Before proceeding select Time zone and date in the setup menu and make sure that the camera clock is set to the correct time and date Drop frame Select ON to compensate for discre...

Страница 593: ...ngs To view Custom Settings select the A tab in the camera menus Custom Settings are used to customize camera settings to suit individual preferences The Custom Settings menu is divided into two levels A Custom Settings Fine Tuning Camera Settings ...

Страница 594: ...mode selection 606 a9 Focus mode restrictions 606 a10 Focus point wrap around 606 a11 Focus point display 607 a12 Built in AF assist illuminator 609 a13 Focus peaking 610 a14 Manual focus ring in AF mode 2 611 b Metering exposure b1 ISO sensitivity step value 612 b2 EV steps for exposure cntrl 612 b3 Easy exposure compensation 613 b4 Matrix metering face detection 613 b5 Center weighted area 614 b...

Страница 595: ... photo Lv 626 d10 Warm display colors 626 d11 LCD illumination 627 d12 View all in continuous mode 629 d13 Release timing indicator 629 d14 Image frame 630 d15 Grid type 630 d16 Virtual horizon type 631 d17 Custom monitor shooting display 634 d18 Custom viewfinder shooting display 636 Item 0 e Bracketing flash e1 Flash sync speed 637 e2 Flash shutter speed 639 e3 Exposure comp for flash 639 e4 Aut...

Страница 596: ...e button to use dial 666 f7 Reverse indicators 667 f8 Reverse ring for focus 667 f9 Focus ring rotation range 668 f10 Control ring response 669 f11 Full frame playback flicks 670 Item 0 g Video g1 Customize i menu 672 g2 Custom controls 674 g3 Control lock 682 g4 Limit AF area mode selection 683 g5 Focus mode restrictions 683 g6 AF speed 684 g7 AF tracking sensitivity 685 g8 View assist 685 g9 Zeb...

Страница 597: ...highlighting the bank pressing 2 and selecting Rename Captions can be up to 20 characters long Copying Custom Settings Banks To create a copy of a custom settings bank highlight the bank press 2 select Copy and choose a destination for the copy Restoring Default Settings You can restore default settings for a selected Custom Settings bank To do so highlight the bank and press O Q a confirmation di...

Страница 598: ...r release button is pressed release priority B Focus release Priority is normally given to release but if the subject is dark or low contrast and the camera is in continuous release mode priority will be given to focus for the first shot in each series For the remaining shots priority will be given to release regardless of focus This helps ensure that the first shot in each series is in focus F Fo...

Страница 599: ...e the camera focuses when AF S is selected a2 AF S Priority Selection G button U A Custom Settings menu Option Description G Release Photos can be taken whenever the shutter release button is pressed release priority F Focus Photos can be taken only when the camera is in focus focus priority ...

Страница 600: ... of view Regardless of the option selected blocked shot AF response functions in mode 3 when 3D tracking is selected for AF area mode If Auto area AF is selected for AF area mode blocked shot AF response will function in mode 3 when 2 or 1 is selected Subject Motion a3 Focus Tracking with Lock On G button U A Custom Settings menu Option Description Steady Choose for smooth focus when photographing...

Страница 601: ...n U A Custom Settings menu Option Description 4 All points Every focus point available in the current AF area mode can be selected The number of points available varies with the AF area mode 5 Alternating points The number of available focus points is reduced to one quarter of the number available when All points is selected Use for quick focus point selection The number of points available for Pi...

Страница 602: ...ait orientation with the camera rotated 90 clockwise and for tall orientation with the camera rotated 90 counterclockwise Select Off to use the same focus point regardless of camera orientation a5 Store Points by Orientation G button U A Custom Settings menu Camera rotated 90 counter clockwise Landscape wide orientation Camera rotated 90 clockwise ...

Страница 603: ...lect Focus point to enable separate focus point selection To enable separate selection of both the focus point and AF area mode choose Focus point and AF area mode Camera rotated 90 counter clockwise Landscape wide orientation Camera rotated 90 clockwise ...

Страница 604: ...Description Shutter AF ON The camera focuses when the shutter release button is pressed halfway AF ON only The camera does not focus when the shutter release button is pressed halfway Option Description Enable Photos can be taken whenever the shutter release button is pressed release priority Disable Photos can be taken only when the camera is in focus focus priority Focus using the AF ON button o...

Страница 605: ...es while focusing with the shutter release button pressed halfway Focus point persistence applies if while the control is pressed you switch from an AF area mode such as Auto area AF in which the focus point is chosen automatically to a mode in which the focus point is selected manually a7 Focus Point Persistence G button U A Custom Settings menu Option Description Auto The focus point last chosen...

Страница 606: ...otating the main command dial while holding the focus mode button will not change the focus mode Choose whether focus point selection wraps around from one edge of the display to another If ON is selected focus point selection will wrap around from top to bottom bottom to top right to left and left to right so that for example pressing 2 when a focus point at the right edge of the display is highl...

Страница 607: ...s points are displayed in dynamic area AF mode a11 Focus Point Display G button U A Custom Settings menu Option Description ON The focus point is displayed at all times in manual focus mode OFF The focus point is displayed only during focus point selection Option Description ON Display both the selected focus point and surrounding focus points OFF Display only the selected focus point ON Dynamic a...

Страница 608: ...focus point changes color when the subject is in focus in focus mode AF C Option Description ON The focus point is displayed in green when the camera judges that the subject is in focus OFF The active focus point is displayed in red or yellow at all times whether or not the camera is in focus ...

Страница 609: ...f about 1 3 m 3 ft 4 in 9 ft 10 in Remove lens hoods when using the illuminator Do not obstruct the AF assist illuminator while it is lit a12 Built in AF Assist Illuminator G button U A Custom Settings menu Option Description ON In photo mode the illuminator will light as required when AF S is selected for focus mode OFF The illuminator does not light to assist the focus operation The camera may n...

Страница 610: ...can choose the color Focus Peaking Display Select ON to enable focus peaking Focus Peaking Sensitivity Choose focus peaking sensitivity from 3 high sensitivity 2 standard and 1 low sensitivity The higher the value the greater the depth that will be shown as being in focus Focus Peaking Highlight Color Choose the highlight color a13 Focus Peaking G button U A Custom Settings menu ...

Страница 611: ... button U A Custom Settings menu Option Description ON Autofocus can be over ridden by rotating the lens focus ring autofocus with manual override The focus ring can be used for manual focus while the shutter release button is pressed halfway To refocus using autofocus lift your finger from the shutter release button and then press it halfway again OFF The lens focus ring cannot be used for manual...

Страница 612: ...vailable value Select the increments used for adjustments to shutter speed aperture bracketing and exposure and flash compensation If 1 EV comp 1 3 EV is selected changes to shutter speed aperture and bracketing will be made in increments of 1 EV and changes to exposure and flash compensation in increments of 1 3 EV b Metering Exposure b1 ISO sensitivity Step Value G button U A Custom Settings men...

Страница 613: ...u Option Description On Auto reset Exposure compensation can be adjusted using only a command dial The setting selected with the command dial is reset when the camera turns off or the standby timer expires On Exposure compensation can be adjusted using only a command dial Exposure compensation is not reset when the camera turns off or the standby timer expires Off Exposure compensation is set by p...

Страница 614: ...g display when setting exposure b5 Center Weighted Area G button U A Custom Settings menu Option Description R Small The camera assigns the greatest weight to an area equivalent to a circle 8 mm in diameter S Standard The camera assigns the greatest weight to an area equivalent to a circle 12 mm in diameter T Average Weighting is based on the average of the entire frame ...

Страница 615: ... b6 Fine tune optimal exposure fine tunes exposure separately for each Custom Settings bank Be aware of different fine tuning values for Custom Setting b6 when switching banks Regardless of the option selected for Custom Setting b6 Fine tune optimal exposure the exposure compensation icon E will not be displayed The only way to determine how much exposure has been altered is to view the amount in ...

Страница 616: ...s current value Other cases in which settings may be automatically adjusted to maintain exposure include when lenses with different maximum apertures at minimum and maximum zoom are zoomed in or out or the focus distance changes while a micro lens is attached The setting adjusted to maintain exposure when aperture changes can be chosen from Shutter speed and ISO sensitivity Select Exposure mainten...

Страница 617: ...shutter release button halfway locks exposure P On burst mode Exposure only locks while the shutter release button is pressed all the way down Off Pressing the shutter release button does not lock exposure c2 Self Timer G button U A Custom Settings menu Option Description Self timer delay Choose the length of the shutter release delay Number of shots Press 1 and 3 to choose the number of shots tak...

Страница 618: ...Standby timer determines how long the control panel and the monitor or viewfinder display remain on after the shutter release button is pressed halfway The monitor and viewfinder dim a few seconds before the standby timer expires If 10 s is selected the timer will be extended to 20 seconds while the i menu is displayed Longer power off delays reduce battery endurance c3 Power Off Delay G button U ...

Страница 619: ...lect the number of shots that can be taken in a single burst The number of shots that can be taken before the memory buffer fills and shooting slows varies with image quality and other settings When the buffer is full the camera will display r000 and the frame advance rate will drop d Shooting Display d1 Continuous Shooting Speed G button U A Custom Settings menu Option Description Continuous high...

Страница 620: ...mplete the operation press G Choose whether the shutters on the remote cameras are synchronized with the shutter on the master camera when using an optional wireless remote controller or the Connect to other cameras item in the network menu For information on synchronized release using Connect to other cameras in the network menu see the section on Synchronized Release 0402 in the Connecting to Ot...

Страница 621: ...speeds of 15 and 30 seconds for example are respectively 16 and 32 seconds The exposure time will again match the selected shutter speed at speeds of 60 seconds and slower Choose the options that can be accessed by rotating a command dial in the i menu or while pressing a control to which image area has been assigned Highlight options and press J or 2 to select M or deselect U Modes marked with a ...

Страница 622: ...ry card is inserted file numbering restarts from 0001 If the current folder already contains pictures file numbering will instead continue from the highest file number in the current folder If you select Off after selecting On the camera will store the current file number File numbering will resume from the previously stored value the next time On is selected Reset Reset the file numbering for On ...

Страница 623: ...containing over 5000 files or the current folder contains a picture numbered 9999 in addition video recording will be disabled if the camera calculates that the number of files needed to record a video of the maximum length would result in a file numbered over 9999 To resume shooting choose Reset for Custom Setting d7 File number sequence and then either format the current memory card or insert a ...

Страница 624: ...of the final picture Regardless of the option selected the effects of camera settings are always visible in video mode d8 View Mode Photo Lv G button U A Custom Settings menu Option Description V Show effects of settings The effects of changes to settings such as white balance Picture Controls and exposure compensation are visible in the shooting display V will appear in the shooting display ...

Страница 625: ...f use Custom Press 2 to make individual adjustments to White balance Set Picture Control and Brighten shadows White balance Choose from Preview current setting Auto and Choose color temperature Select Choose color temperature to choose the color temperature for the shooting display Set Picture Control Choose from Preview current setting and Adjust for ease of viewing Brighten shadows Choose whethe...

Страница 626: ...Lv G button U A Custom Settings menu d10 Warm Display Colors G button U A Custom Settings menu Option Description Warm display color options Choose from the following options Mode 1 Use warmer colors in the shooting menu and playback displays Mode 2 Use warmer colors in the menu display Warmer colors are also used for the icons and other information in the shooting and playback displays but not fo...

Страница 627: ...ated to D The backlights turn off when the shutter release button is pressed If ON is selected the backlights will light while the standby timer is active Note that this increases the drain on the battery The backlights will turn off while the shutter release button is pressed but will turn on again when the button is released d11 LCD Illumination G button U A Custom Settings menu ...

Страница 628: ...following are equipped with backlights 2 5 6 7 9 8 4 151413 12 11 10 3 1 1 c button 2 BKT button 3 c button 4 I button 5 g Fn4 button 6 O Q button 7 X button 8 i button 9 G button 10 K button 11 W Q button 12 i button for vertical shooting 13 U button 14 T button 15 b button ...

Страница 629: ...he option selected release timing indicators are not displayed at slow shutter speeds d12 View All in Continuous Mode G button U A Custom Settings menu d13 Release Timing Indicator G button U A Custom Settings menu Option Description Type A The display goes dark when the shutter is released Type B Borders appear at the top bottom and sides of the frame when the shutter is released Type C Borders a...

Страница 630: ...ewfinder Choose a framing grid for the shooting display The selected grid can be displayed by placing a check M next to b in the list for Custom Setting d17 Custom monitor shooting display 0634 or d18 Custom viewfinder shooting display 0636 d14 Image Frame G button U A Custom Settings menu d15 Grid Type G button U A Custom Settings menu ...

Страница 631: ...r Custom Setting d17 Custom monitor shooting display 0634 or d18 Custom viewfinder shooting display 0636 Type A A large indicator showing roll and pitch fills the display Type B A roll indicator appears at the bottom of the display and a pitch indicator at its right edge The indicators are displayed in green when the camera is level d16 Virtual Horizon Type G button U A Custom Settings menu ...

Страница 632: ...632 A Custom Settings Fine Tuning Camera Settings Roll Option Camera rotated clockwise Camera rotated counterclockwise Type A Type B ...

Страница 633: ... Display Note that the display may not be accurate when the camera is tilted at a sharp angle forward or back The camera will not display pitch and roll indicators when held at angles at which tilt cannot be measured Option Camera tilted forward Camera tilted back Type A Type B ...

Страница 634: ...DISP button during shooting Highlight items Display 2 through Display 5 and press J to select M or deselect U Only displays marked with a check M can be accessed by pressing the DISP button during shooting Display 1 cannot be deselected d17 Custom Monitor Shooting Display G button U A Custom Settings menu ...

Страница 635: ...ting mode shutter speed aperture and other basic shooting info B Detailed shooting info View the focus mode AF area mode white balance and other detailed shooting info C Touch controls View options that can be accessed via touch controls including touch AF and the i menu D Virtual horizon Enable the virtual horizon The display type can be selected using Custom Setting d16 Virtual horizon type E Hi...

Страница 636: ...ing the DISP button during shooting Display 1 cannot be deselected To choose indicators that appear in displays Display 1 through Display 4 highlight the corresponding option and press 2 You can then highlight items and press J to select M or deselect U Apart from Touch controls the options are the same as those for Custom Setting d17 Custom monitor shooting display 0634 To complete the operation ...

Страница 637: ...speeds faster than 1 250 or 1 200 s In modes P and A auto FP high speed sync will be activated if the actual shutter speed is faster than 1 250 or 1 200 s If the flash supports auto FP high speed sync the camera can select shutter speeds as fast as 1 8000 s In modes S and M the user can select shutter speeds as fast as 1 8000 s when using flash units that support auto FP high speed sync 1 200 s Au...

Страница 638: ... choosing a slower shutter speed or adjusting flash output A Auto FP High Speed Sync Auto FP high speed sync allows the flash to be used at shutter speeds as fast as 1 8000 s When 1 250 s Auto FP or 1 200 s Auto FP is selected the camera automatically enables auto FP high speed sync at shutter speeds faster than the flash sync speed This makes it possible to choose the maximum aperture for reduced...

Страница 639: ... slow sync slow rear curtain sync or red eye reduction with slow sync Choose how the camera adjusts flash level when exposure compensation is used e2 Flash Shutter Speed G button U A Custom Settings menu e3 Exposure Comp for Flash G button U A Custom Settings menu Option Description YE Entire frame The camera adjusts both the flash level and exposure This changes the exposure for the entire frame ...

Страница 640: ...which Preview has been assigned using Custom Setting f2 Custom controls shooting will emit a modeling flash e4 Auto c ISO Sensitivity Control G button U A Custom Settings menu Option Description e Subject and background The camera takes both the main subject and background lighting into account when adjusting ISO sensitivity f Subject only ISO sensitivity is adjusted only to ensure that the main s...

Страница 641: ...level and or ISO sensitivity as per Flash ISO sensitivity regardless of the option selected for Custom Setting e6 Auto bracketing mode M D Flash Bracketing Flash bracketing is performed only with i TTL or qA auto aperture flash control e6 Auto Bracketing Mode M G button U A Custom Settings menu Custom Setting e6 Auto bracketing mode M Photo shooting menu Auto bracketing Auto bracketing set AE flas...

Страница 642: ... taken when ADL bracketing is selected for Auto bracketing Auto bracketing set in the photo shooting menu e7 Bracketing Order G button U A Custom Settings menu Option Description H MTR under over The unmodified shot is taken first followed by the shot with the lowest value followed by the shot with the highest value I Under MTR over Shooting proceeds in order from the lowest to the highest value ...

Страница 643: ...ce rate The flash unit emits a monitor pre flash before the first shot in each sequence and locks output at the metered value for the remaining shots The frame advance rate drops less than when Prioritize precise flash control is selected An FV lock icon r will appear in the shooting display during burst photography q Prioritize precise flash control The flash unit emits a monitor pre flash before...

Страница 644: ...0 n Shooting menu bank 493 j Select custom settings bank 597 J Choose image area 102 8 Image quality 105 o Image size 108 N View memory card info 645 E Exposure compensation 143 9 ISO sensitivity settings 154 m White balance 158 h Set Picture Control 192 p Color space 511 y Active D Lighting 512 q Long exposure NR 514 r High ISO NR 515 w Metering 520 c Flash mode 429 Y Flash compensation 432 q Wir...

Страница 645: ...an be selected using Role played by card in Slot 2 in the photo shooting menu s Focus mode 110 t AF area mode subj detection 113 u Vibration reduction 526 t Auto bracketing 527 Multiple exposure 528 2 HDR overlay 537 7 Interval timer shooting 542 8 Time lapse video 556 9 Focus shift shooting 568 F Focus tracking with lock on 600 Option 0 L Silent mode 735 w Custom controls shooting 647 y View mode...

Страница 646: ...gation window in the bottom right corner of the display Zooming in simultaneously on two widely separated but horizontally aligned areas of the frame makes it easier to level pictures of buildings or other wide objects Use the X and W Q buttons to zoom in and out Press 4 or 2 to scroll the selected area left or right Use the J button to switch between the two areas Press 1 or 3 to scroll both area...

Страница 647: ...hlight the desired control and press J f2 Custom Controls Shooting G button U A Custom Settings menu Option w Fn1 button y Fn2 button 1 Fn3 button n Fn button for vertical shooting b Protect Fn4 button V AF ON button 8 Sub selector center p OK button W Audio button B QUAL button F Vertical multi selector center j AF ON button for vertical shooting z Video record button y Command dials S Lens Fn bu...

Страница 648: ...points can be selected for wide landscape orientation and for each of the two tall portrait orientations if an option other than Off is selected for Custom Setting a5 Store points by orientation The behavior of the selected control can be chosen by pressing 2 when Preset focus point is highlighted Press to recall focus point Pressing the control recalls the preset focus point Hold to recall focus ...

Страница 649: ...ighlighted A AF ON Pressing the control initiates autofocus duplicating the function of the AF ON button F AF lock only Focus locks while the control is pressed E AE lock Hold Exposure locks when the control is pressed Exposure lock does not end when the shutter is released Exposure remains locked until the control is pressed a second time or the standby timer expires N AWB lock hold If Auto or Na...

Страница 650: ...til the control is pressed a second time the shutter is released or the standby timer expires C AE lock only Exposure locks while the control is pressed B AE AF lock Focus and exposure lock while the control is pressed r FV lock Press the control to lock flash value for optional flash units press again to cancel FV lock h c Disable enable If the flash is currently enabled it will be disabled while...

Страница 651: ...e the button is pressed Highlight items using 1 or 3 and press 2 to view options Press J to save changes and exit To store current camera settings for later recall using this option select Save current settings Settings such as shutter speed and aperture can be changed by holding the control and rotating a command dial In mode P you can adjust flexible program settings If an option other than Off ...

Страница 652: ...release mode the camera will take all the shots in the current bracketing program and repeat the bracketing burst while the shutter release button is pressed In single frame release mode shooting will end after the first bracketing burst If WB bracketing is selected for Auto bracketing set the camera will take pictures while the shutter release button is pressed and apply white balance bracketing ...

Страница 653: ...ync release mode options The following options are available when Sync is selected for Sync release mode options Master release only c Keep the control pressed to take pictures with the master camera only Remote release only d Keep the control pressed to take pictures only with the remote cameras The following options are available when No sync is selected for Sync release mode options Synchronize...

Страница 654: ...tly selected for RAW recording in the photo shooting menu L Silent mode Press the control to enable silent mode Press again to disable b Live view info display off Press the control to hide icons and other information in the shooting display Press again to view b Framing grid Press the control to display a framing grid To hide the grid press the control again The display type can be selected using...

Страница 655: ...Press the control to jump to the top item in MY MENU Select this option for quick access to a frequently used menu item K Playback Press the control to start playback l Filtered playback Press the control to view only pictures that meet the criteria selected for Filtered playback criteria in the playback menu e Same as AF ON button The control performs the role currently selected for the AF ON but...

Страница 656: ...ntrol and rotate the main command dial to choose the number of shots and the sub command dial to select the bracketing increment or Active D Lighting amount Multiple exposure Press the control and rotate the main command dial to choose the mode and the sub command dial to choose the number of shots 2 HDR overlay Press the control and rotate the main command dial to choose the mode and the sub comm...

Страница 657: ...he sub command dial w Choose non CPU lens number Press the control and rotate a command dial to choose a lens number saved using the Non CPU lens data item in the setup menu v Shooting mode Press the control and rotate the main command dial to choose a shooting mode X Focus M A Autofocus can be over ridden by rotating the lens control ring autofocus with manual override The control ring can be use...

Страница 658: ...g 9 ISO sensitivity Rotate the lens control ring to adjust ISO sensitivity None The control has no effect Role Description Exposure setting Reverse the roles of the main and sub command dials in selected modes Press 4 or 2 to highlight a mode and 1 or 3 to switch roles Focus AF area mode selection Switch the roles played by rotating the main and sub command dials while the focus mode button is pre...

Страница 659: ...ntrols below Highlight the desired control and press J f3 Custom Controls Playback G button U A Custom Settings menu Option w Fn1 button y Fn2 button 1 Fn3 button k Fn button for vertical shooting a Protect Fn4 button p OK button W Audio button B QUAL button m WB button R Vertical shooting multi selector y Main command dial 3 Sub command dial z Video record button Option ...

Страница 660: ...Press the control to zoom the display in on the area around the current focus point the zoom ratio is selected in advance Press again to cancel zoom To choose the zoom ratio highlight Zoom on off and press 2 Zoom on off is available in both full frame and thumbnail playback l Filtered playback Press the control to view only pictures that meet the criteria selected for Filtered playback criteria in...

Страница 661: ...t of the upload queue Protect If this option is selected M pressing the control to mark a picture for upload will simultaneously protect it Rating If this option is selected M pressing the control to mark a picture for upload will simultaneously assign it a preset rating Press 2 to choose the rating N Select for upload FTP c Rating To rate the current picture in playback mode press the control and...

Страница 662: ...nail playback u Choose slot and folder Press the control to display the Choose slot and folder dialog where you can then choose a slot and folder for playback C D switched Press the multi selector for vertical shooting up or down to view other pictures left or right to page through photo information C D unswitched Press the multi selector for vertical shooting up or down to page through photo info...

Страница 663: ...tion Description 1 frame Skip forward or back 1 frame at a time 10 frames Skip forward or back 10 frames at a time 50 frames Skip forward or back 50 frames at a time c Rating Skip to the next or previous picture with the selected rating P Protect Skip to the next or previous protected picture C Photos only Skip to the next or previous photo 1 Videos only Skip to the next or previous video u Folder...

Страница 664: ...back Option Description 1 frame Advance or rewind a frame at a time 5 frames Advance or rewind 5 frames at a time 10 frames Advance or rewind 10 frames at a time 2 s Skip forward or back 2 s at a time 5 s Skip forward or back 5 s at a time 10 s Skip forward or back 10 s at a time First last frame Skip to the first or last frame ...

Страница 665: ... panel when shutter speed lock is in effect Aperture lock Select ON to lock aperture at its current value in modes A and M O icons appear in the shooting display and control panel when aperture lock is in effect Focus point lock Select ON to lock focus point selection on the currently selected focus point Focus point lock does not apply when Auto area AF is selected for AF area mode When 3D tracki...

Страница 666: ...on and rotating a command dial to be made by rotating the command dial after the button is released This ends when the button is pressed again the shutter release button is pressed halfway or the standby timer expires Release button to use dial applies to the E S Q BKT c I c g Fn4 T U and focus mode buttons Release button to use dial also applies to controls to which certain roles have been assign...

Страница 667: ...ngs on Z mount lenses during manual focus This option does not support certain Z mount lenses that can only be focused manually or F mount lenses connected via an FTZ II FTZ mount adapter f7 Reverse Indicators G button U A Custom Settings menu Option Description V The indicator is displayed with positive values on the left and negative values on the right W The indicator is displayed with negative...

Страница 668: ... changes by a large amount when the ring is rotated rapidly and by a small amount when the ring is rotated slowly without regard to how far the ring is rotated 90 Choose how far the ring must be rotated to go all the way from the minimum focus distance to infinity To take focus from the minimum distance to infinity when for example 90 is selected the ring need only be rotated 90 Larger values perm...

Страница 669: ...se how responsive the lens control ring is when assigned the Aperture Power aperture Exposure compensation or ISO sensitivity using Custom Setting f2 Custom controls shooting or g2 Custom controls f10 Control Ring Response G button U A Custom Settings menu ...

Страница 670: ...e same direction f11 Full Frame Playback Flicks G button U A Custom Settings menu Option Description c Rating Assign the current picture a pre selected rating The rating can be chosen by pressing 2 K Select for upload to computer Mark the current picture for priority upload to a computer N Select for upload FTP Mark the current picture for priority upload to an FTP server g Protect Protect the cur...

Страница 671: ...ning Camera Settings Flick Advance Direction Choose the gesture used for frame advance Option Description S Left Right Flick from right to left to view the next picture T Left Right Flick from left to right to view the next picture ...

Страница 672: ...493 j Select custom settings bank 597 J Choose image area 218 G Frame size frame rate 216 N Destination 578 E Exposure compensation 143 9 ISO sensitivity settings 154 m White balance 158 h Set Picture Control 192 6 HLG quality 582 y Active D Lighting 512 w Metering 520 s Focus mode 110 7 AF area mode subj detection 113 u Vibration reduction 587 4 Electronic VR 587 H Microphone sensitivity 588 5 At...

Страница 673: ...ding 3 narrows the aperture Multi Selector Exposure Comp Choose whether the multi selector can be used to adjust exposure compensation Selecting Enable allows exposure compensation to be set by pressing 1 or 3 9 Zebra pattern 686 3 Monitor viewfinder brightness 709 711 u Airplane mode 756 8 Multi selector power aperture 673 Option 0 9 Multi selector exposure comp 673 v Warm display colors 626 Opti...

Страница 674: ...the desired control and press J g2 Custom Controls G button U A Custom Settings menu Option w Fn1 button y Fn2 button 1 Fn3 button k Fn button for vertical shooting u Focus mode button V AF ON button b Protect Fn4 button p OK button 8 Sub selector center A QUAL button X Audio button j AF ON button for vertical shooting F Vertical multi selector center y Command dials G Shutter release button 3 Len...

Страница 675: ... Press again to view b Framing grid Press the control to display a framing grid To hide the grid press the control again The display type can be selected using Custom Setting d15 Grid type A AF ON Pressing the control initiates autofocus duplicating the function of the AF ON button F AF lock only Focus locks while the control is pressed E AE lock Hold Exposure locks when the control is pressed Exp...

Страница 676: ...tural light auto is selected for white balance Exposure and white balance lock do not end when recording begins The lock will however be released when the control is pressed a second time or the standby timer expires C AE lock only Exposure locks while the control is pressed B AE AF lock Focus and exposure lock while the control is pressed p Zoom on off Press the control to zoom the display in on ...

Страница 677: ...he Fn1 button is pressed Use in combination with Custom Setting g2 Custom controls Fn2 button Power aperture close for button controlled aperture adjustment q Power aperture close Aperture narrows while the Fn2 button is pressed Use in combination with Custom Setting g2 Custom controls Fn1 button Power aperture open for button controlled aperture adjustment i Exposure compensation Exposure compens...

Страница 678: ...he control and press the focus mode button until the focus point flashes The behavior of the selected control can be chosen by pressing 2 when Preset focus point is highlighted Press to recall focus point Pressing the control recalls the preset focus point Hold to recall focus point The preset focus point is selected while the control is pressed Releasing the control restores the focus point selec...

Страница 679: ...e a shooting menu bank J Choose image area Press the control and rotate a command dial to choose the image area for videos Note that the image area cannot be changed while recording is in progress h Set Picture Control Press the control and rotate a command dial to choose a Picture Control y Active D Lighting Press the control and rotate a command dial to adjust Active D Lighting for videos w Mete...

Страница 680: ...al focus regardless of the option selected for focus mode To refocus using autofocus press the shutter release button halfway or press a control to which AF ON has been assigned q Power aperture Rotate the lens control ring to adjust aperture E Exposure compensation Assigning this function to the Fn button for vertical shooting allows exposure compensation to be adjusted by holding the button and ...

Страница 681: ... and press 2 Role Description Exposure setting Reverse the roles of the main and sub command dials in selected modes Press 4 or 2 to highlight a mode and 1 or 3 to switch roles Focus AF area mode selection Switch the roles played by rotating the main and sub command dials while the focus mode button is pressed Sub command dial zoom role Choose the role played by the sub command dial in the zoom di...

Страница 682: ...hen shutter speed lock is in effect Aperture lock Select ON to lock aperture at its current value in modes A and M O icons appear in the shooting display and control panel when aperture lock is in effect Focus point lock Select ON to lock focus point selection on the currently selected focus point Focus point lock does not apply when Auto area AF is selected for AF area mode When Subject tracking ...

Страница 683: ...arked with a check M are available for selection via the sub command dial To complete the operation press G Limit focus mode selection to a single focus mode If an option other than No restrictions is selected rotating the main command dial while holding the focus mode button will not change the focus mode g4 Limit AF Area Mode Selection G button U A Custom Settings menu g5 Focus Mode Restrictions...

Страница 684: ...with AF speed The effect is particularly noticeable at a setting of 5 so choose lower values if you find the noise distracting g6 AF Speed G button U A Custom Settings menu Option Description D Always The camera focuses at the selected speed at all times in video mode E Only while recording Focus is adjusted at the selected speed only while video recording is in progress At other times the camera ...

Страница 685: ...ond by quickly shifting focus to a new subject in the same area Choose ON for a live preview of video footage recorded with HLG or N Log selected for video tone mode but note that the colors in the preview are simplified for enhanced contrast Colors in the actual recorded footage are unaffected Contrast is also enhanced when HLG or N Log footage is viewed on the camera g7 AF Tracking Sensitivity G...

Страница 686: ...ing Highlight threshold and Mid tone range respectively Pattern To enable the zebra display select Pattern 1 or Pattern 2 Highlight Threshold Choose the brightness needed to trigger the zebra display when Highlights is selected for Pattern tone range Choose from values of from 120 to 255 The lower the value the greater the range of brightnesses that will be shown as highlights If 255 is selected t...

Страница 687: ... defined as a brightness Value and Range of brightnesses centered around the selected value Press 4 or 2 to highlight items and press 1 or 3 to change D Zebra Pattern If both the zebra display and focus peaking are enabled in manual focus mode only focus peaking will take effect To view the zebra display in manual focus mode select OFF for Custom Setting a13 Focus peaking Focus peaking display ...

Страница 688: ...attern only over areas in the selected tone range pressing the button a second time hides the zebra pattern Choose a framing grid for video mode The selected grid can be displayed by placing a check M next to b in the list for Custom Setting g12 Custom monitor shooting display 0689 or g13 Custom viewfinder shooting display 0691 g10 Limit Zebra Pattern Tone Range G button U A Custom Settings menu g...

Страница 689: ... DISP button in video mode Highlight items Display 2 through Display 4 and press J to select M or deselect U Only displays marked with a check M can be accessed by pressing the DISP button during shooting Display 1 cannot be deselected g12 Custom Monitor Shooting Display G button U A Custom Settings menu ...

Страница 690: ...her basic shooting info B Detailed shooting info View the focus mode AF area mode white balance and other detailed shooting info C Touch controls View options that can be accessed via touch controls including touch AF and the i menu D Virtual horizon Enable the virtual horizon The display type can be selected using Custom Setting d16 Virtual horizon type E Histogram Enable the RGB histogram b Fram...

Страница 691: ...the DISP button during shooting Display 1 cannot be deselected To choose indicators that appear in displays Display 1 through Display 3 highlight the corresponding option and press 2 You can then highlight items and press J to select M or deselect U Apart from Touch controls the options are the same as those for Custom Setting g12 Custom monitor shooting display 0689 To complete the operation pres...

Страница 692: ...ollowing items D See Also Playback Menu Defaults 0483 D The Playback Menu Managing Pictures Item 0 Delete 693 Playback folder 694 Playback display options 694 Delete pictures from both slots 695 Dual format recording PB slot 695 Filtered playback criteria 696 Picture review 696 After delete 697 After burst show 698 Rotate tall 698 Copy image s 699 Item 0 ...

Страница 693: ...d pictures Delete selected pictures d Candidates for deletion Delete pictures rated d candidate for deletion i Pictures shot on selected dates Delete all pictures taken on selected dates R All pictures Delete all pictures in the folder currently selected for Playback folder in the playback menu If two memory cards are inserted you can select the card from which pictures will be deleted ...

Страница 694: ... press 2 to select M or deselect U To complete the operation press G Playback Folder G button U D playback menu Option Description Folder name Pictures in all folders with the selected name will be visible during playback Folders can be renamed using the Storage folder Rename option in the photo shooting menu All Pictures in all folders will be visible during playback Current Only pictures in the ...

Страница 695: ... Role played by card in Slot 2 in the photo shooting menu are played back Delete Pictures from Both Slots G button U D playback menu Option Description Yes confirmation required Before deleting one copy you will be prompted to choose whether to delete the other To choose the option highlighted by default press 2 Yes Same pictures on 1 and 2 is always selected selecting Yes in the confirmation dial...

Страница 696: ...ia G button U D playback menu Picture Review G button U D playback menu Option Description On Pictures appear in the currently selected display monitor or viewfinder as they are taken On monitor only Pictures are displayed after shooting only when the monitor is used to frame shots Pictures are not displayed in the viewfinder when Viewfinder only is selected for monitor mode Off Pictures can only ...

Страница 697: ... the preceding picture will be displayed T Show previous The preceding picture is displayed If the deleted picture was the first picture the next picture will be displayed U Continue as before If you were scrolling through pictures in the order recorded the following picture will be displayed as described for Show next If you were scrolling through pictures in reverse order the preceding picture w...

Страница 698: ...trait orientation pictures will be automatically rotated for display during playback D Caution Rotate Tall Pictures are not rotated automatically during picture review even when ON is selected for Rotate tall After Burst Show G button U D playback menu DSC_0001 jpg DSC_0002 jpg DSC_0003 jpg DSC_0004 jpg DSC_0014 jpg DSC_0015 jpg 1 2 3 1 Most recent shots burst 2 Displayed if First picture in burst...

Страница 699: ...o be copied Highlight the slot for the card containing the pictures to be copied and press J to select the highlighted slot and return to the Copy image s menu Copy Image s G button U D playback menu Option Description Select source Choose the card from which pictures will be copied Select picture s Select pictures to be copied Select destination folder Select the destination folder on the remaini...

Страница 700: ...ss 2 to view the Select picture s display 4 Select the source folder Highlight the folder containing the pictures to be copied and press 2 to display the Images selected by default menu To copy all pictures from the card in the selected slot highlight All pictures in slot press J and proceed to Step 10 ...

Страница 701: ...in the chosen folder will be selected by default Choose this option when you want to select pictures individually Select all pictures All of the pictures in the chosen folder will be selected by default Choose this option if you want to copy all or most of the pictures in the folder Select protected pictures Only the protected pictures in the folder will be selected by default ...

Страница 702: ...the check and deselect the current picture press the W Q button again To view the highlighted picture full screen press and hold the X button After confirming that all the pictures you want to copy have marks press J to return to the Copy image s menu 7 Choose Select destination folder Highlight Select destination folder and press 2 to display Select destination folder options ...

Страница 703: ...following options and press 2 Option Description Select folder by number Enter the number of the destination folder 0498 If a folder with the selected number does not already exist a new folder will be created Select folder from list Choose the destination folder from a list of existing folders ...

Страница 704: ...older and return to the Copy image s menu 10Choose Copy picture s Highlight Copy picture s and press J to display a confirmation dialog 11Choose Yes The camera will display the message Copy together with the number of pictures that will be copied Highlight Yes and press J to copy the selected pictures Press J again to exit when copying is complete ...

Страница 705: ...e existing picture or Replace all to replace the existing file or files Protected files in the destination folder will not be replaced Select Skip to continue without replacing existing files Select Cancel to exit without copying any further pictures Ratings and protection are copied with the pictures To prevent loss of power while copying is in progress be sure the battery is fully charged or con...

Страница 706: ... brightness 711 Viewfinder color balance 712 Finder display size photo Lv 712 Limit monitor mode selection 713 Auto rotate info display 713 AF fine tuning options 714 Non CPU lens data 718 Save focus position 718 Sensor shield behavior at power off 719 Clean image sensor 719 Image Dust Off ref photo 720 Pixel mapping 723 Image comment 724 Copyright information 725 IPTC 726 Voice memo options 732 C...

Страница 707: ...ta built in 737 Wireless remote WR options 738 Assign remote WR Fn button 741 Conformity marking 741 Battery info 742 USB power delivery 744 Item 0 Energy saving photo mode 746 Slot empty release lock 747 Save load menu settings 748 Reset all settings 754 Firmware version 754 Item 0 ...

Страница 708: ...ot turn the camera off or remove memory cards until the message Formatting memory card clears from the display A The Format Buttons Keeping both format O Q and S Q buttons pressed for over two seconds displays a dialog prompting you to select a card for formatting Choose a language for camera menus and messages The languages available vary with the country or region in which the camera was origina...

Страница 709: ...en Viewfinder only is selected for monitor mode or when your eye is to the viewfinder Higher values increase the drain on the battery Time Zone and Date G button U B setup menu Option Description Time zone Choose a time zone The time selected for Date and time is automatically adjusted for the new time zone Date and time Set the camera clock to the current time in the selected Time zone Date forma...

Страница 710: ...r mode or when your eye is to the viewfinder Color balance is adjusted using the multi selector Press 1 3 4 or 2 to adjust color balance as shown below Press J to save changes Monitor color balance applies only to menus playback and the shooting display photos and videos taken with the camera are not affected Monitor Color Balance G button U B setup menu 1 Increase green 2 Increase amber 3 Increas...

Страница 711: ...ure full frame press and hold X Adjust viewfinder brightness Viewfinder brightness can only be adjusted when the viewfinder is the active display It cannot be adjusted when the monitor is on or when Monitor only is selected for monitor mode Higher values increase the drain on the battery Viewfinder Brightness G button U B setup menu Option Description Auto Viewfinder brightness is adjusted automat...

Страница 712: ...djusted when the monitor is on or when Monitor only is selected for monitor mode Otherwise the procedure is the same as for Monitor color balance 0710 Choose a magnification for the viewfinder display from Standard and Small Selecting Small makes it easier to see the entire subject Viewfinder Color Balance G button U B setup menu Finder Display Size Photo Lv G button U B setup menu ...

Страница 713: ...to select M or deselect U Options marked with a check M are available for selection To complete the operation press G When ON is selected the indicators in the shooting display will automatically be rotated to match camera orientation Limit Monitor Mode Selection G button U B setup menu Auto Rotate Info Display G button U B setup menu ...

Страница 714: ...us for the current lens Press 1 or 3 to highlight items and press 4 or 2 to choose from values between 20 and 20 The larger the fine tuning value the farther the focal point is from the lens the smaller the value the closer the focal point The display shows the current and previous values The camera can store values for up to 40 lens types If a value already exists for the current lens you can cho...

Страница 715: ... saved using Fine tune and save lens Highlighting a lens in the list and pressing 2 displays a Choose lens number dialog The Choose lens number dialog is used to enter the lens identifier In the case of Z mount lenses and some F mount lenses the lens serial number is entered automatically Choose value for current lens Choose from multiple fine tuning values saved for lenses of the same type Option...

Страница 716: ... Press 4 or 2 to fine tune autofocus Choose from values between 20 and 20 The current value is shown by g the previously selected value by j If a zoom lens is attached you can choose separate fine tuning values for maximum angle WIDE and maximum zoom TELE Use 1 and 3 to choose between the two The larger the fine tuning value the farther the focal point is from the lens the smaller the value the cl...

Страница 717: ...ighlight Default and press 2 2 Press 4 or 2 to fine tune autofocus Choose from values between 20 and 20 The current value is shown by g the previously selected value by j The larger the fine tuning value the farther the focal point is from the lens the smaller the value the closer the focal point 3 Press J to save the new value ...

Страница 718: ...n Note that this increases camera startup times Note that even when ON is selected if the temperature zoom position or other conditions change while the camera is off focus may resume from a different position when the camera is turned on Similarly note that even when OFF is selected focus may resume from the previously selected position depending on the state of the camera and lens Non CPU Lens D...

Страница 719: ... to the mount If inserted at an angle lenses could contact the sensor shield and damage the shield or the image sensor Dirt or dust entering the camera when lenses are exchanged or the body cap is removed may adhere to the image sensor and affect your photographs The clean image sensor option vibrates the sensor to remove dust Sensor Shield Behavior at Power Off G button U B setup menu Clean Image...

Страница 720: ... s online help Acquiring Image Dust Off Reference Data 1 Choose a start option Highlight Start and press J to immediately display the Image Dust Off ref photo dialog Highlight Clean sensor and then start and press J to clean the image sensor before starting The Image Dust Off ref photo dialog will be displayed when image sensor cleaning is complete To exit without acquiring Image Dust Off referenc...

Страница 721: ... focus mode set focus to infinity manually 3 Press the shutter release button the rest of the way down to acquire Image Dust Off reference data The monitor turns off when the shutter release button is pressed If the reference object is too bright or too dark the camera may be unable to acquire Image Dust Off reference data in which case a message will appear and the camera will return to the displ...

Страница 722: ...st Off reference data will not be used with existing photographs D Cautions Acquiring Image Dust Off Reference Data An FX format lens with a focal length of at least 50 mm is recommended When using a zoom lens zoom all the way in The same reference data can be used for photographs taken with different lenses or at different apertures Reference images cannot be viewed using computer imaging softwar...

Страница 723: ...o prevent unexpected loss of power use a fully charged battery the supplied charging AC adapter or an optional AC adapter and power connector To start pixel mapping select Start A message is displayed while the operation is in progress D Cautions Pixel Mapping Do not attempt to operate the camera while pixel mapping is in progress Do not turn the camera off or remove or disconnect the power source...

Страница 724: ...a text entry dialog For information on text entry see Text Entry 064 Attach Comment Comments will be attached to pictures taken while Attach comment is ON D Photo Info Comments can be viewed on the Other shooting data page in the photo information display To display the Other shooting data page select M both Shooting data and Other shooting data for Playback display options in the playback menu Im...

Страница 725: ... names of the photographer maximum 36 characters and copyright holder maximum 54 characters Highlight Artist or Copyright and press 2 to display a text entry dialog For information on text entry see Text Entry 064 Attach Copyright Information Copyright information will be attached to pictures taken while Attach copyright information is ON Copyright Information G button U B setup menu ...

Страница 726: ...arising from the use of the Copyright information option D Viewing Copyright Information Copyright information can be viewed on the Copyright info page in the photo information display To display the Copyright info page select M both Shooting data and Copyright info for Playback display options in the playback menu IPTC presets can be created or edited on the camera and embedded in new photographs...

Страница 727: ... To edit or rename a preset highlight it and press 2 To create a new preset highlight Unused and press 2 Rename Rename the preset Edit IPTC information Display the selected preset 0730 Selected fields can be edited as desired To copy a preset highlight it and press X Highlight the destination press J and name the copy Deleting Presets To delete presets highlight Delete and press 2 ...

Страница 728: ...ing IPTC Data Embedded presets can be viewed on the IPTC data page in the photo information display To display the IPTC data page select M both Shooting data and IPTC data for Playback display options in the playback menu Copying Presets to a Memory Card To copy IPTC presets from the camera to a memory card select Load save Slot 1 or Slot 2 then highlight Copy to card and press 2 Select the desire...

Страница 729: ...w the highlighted preset press W Q instead of pressing J After previewing the preset press J to proceed to the Select destination list Highlight a destination and press J to display a dialog where you can name the preset Name the preset as desired and press J to copy the preset to the camera In addition to the ten presets mentioned above the camera can store up to three XMP IPTC presets created on...

Страница 730: ...et with a longer name is created using a computer all characters after the eighteenth will be deleted The number of characters that may appear in each field is given below Any characters over the limit will be deleted Field Max length Caption 2000 Event ID 64 Headline 256 Object name 256 City 256 State 256 Country 256 Category 3 Supp Cat supplemental categories 256 Byline 256 Byline title 256 Writ...

Страница 731: ...fying the information required when photographs are shared with a variety of publications D IPTC Preset Manager IPTC presets can be created on a computer and saved to memory cards using IPTC Preset Manager software IPTC Preset Manager can be downloaded free of charge from the URL below Instructions on use are available via online help https downloadcenter nikonimglib com ...

Страница 732: ...ressed 4 Press to start stop Recording begins when b button is pressed and ends after about 60 seconds or when the control is pressed a second time Option Description 5 Speaker headphones Voice memos are played back over headphones if connected or the camera s built in speaker Press 1 or 3 to choose a volume between 1 and 15 Press J to save changes and exit 7 HDMI Voice memos are output to the HDM...

Страница 733: ...n interval timer photography time lapse video recording or focus shift ends the camera focuses in photo mode note that this does not apply if AF C is selected for focus mode or if Release is selected for Custom Setting a2 AF S priority selection or touch controls are used Select Off touch controls only to disable the beep for touch controls while enabling it for other purposes Volume Adjust beep v...

Страница 734: ...from High and Low The pitch of the shutter sound cannot be changed D Silent Mode Selecting ON for Silent mode in the setup menu disables the shutter release sound and beep speaker D Caution Camera Sounds Overlapping beeps and or shutter sounds may play as a single sound ...

Страница 735: ... at apertures smaller i e at f numbers higher than f 5 6 The frame advance rate may drop in some circumstances Long exposure noise reduction is disabled Silent mode mutes the electronic shutter and beep speaker and dampens other camera sounds but does not absolve photographers of the need to respect their subjects privacy and image rights A The Standby Timer Even when ON is selected for Silent mod...

Страница 736: ...sable touch controls Select Playback only to enable touch controls in playback mode only Glove Mode Selecting ON raises the sensitivity of the touch screen making it easier to use while wearing gloves Adjust settings for connection to HDMI devices 0302 Touch Controls G button U B setup menu HDMI G button U B setup menu ...

Страница 737: ...see Location Data 0204 USB Connection Priority G button U B setup menu Option Description Upload The monitor remains blank while the camera is connected to a computer The monitor turns on when the shutter release button is pressed halfway but upload speeds may drop Shooting The monitor remains on while the camera is connected to a computer Upload speeds may drop Location Data Built In G button U B...

Страница 738: ...e Controllers A WR A10 adapter is required when using the WR R10 Be sure the firmware for the WR R10 has been updated to the latest version version 3 0 or later For information on firmware updates see the Nikon website for your area LED Lamp Enable or disable the status LEDs on the WR R11a or WR R10 wireless remote controller mounted on the camera For more information see the documentation supplie...

Страница 739: ...on Pairing The camera connects only to devices with which it has previously been paired Press the pairing button on the wireless remote controller connected to the camera to pair it with other devices As camera will not communicate with devices with which it has not been paired this option can be used to prevent signal interference from other devices in the vicinity Given that each device must be ...

Страница 740: ... digit PIN Enter a four digit PIN of your choosing Press 4 or 2 to highlight digits and press 1 or 3 to change Press J to enter and display the selected PIN This option is a good choice for photography featuring a large number of remote devices If there are multiple cameras present that share the same PIN the flash units will be under the sole control of the camera that connects first preventing a...

Страница 741: ...ustom controls shooting for more information View some of the standards with which the camera complies Assign Remote WR Fn Button G button U B setup menu Option A AF ON F AF lock only D AE lock Reset on release C AE lock only B AE AF lock r FV lock h c Disable enable q Preview o Recall shooting functions 4 RAW None Option Conformity Marking G button U B setup menu ...

Страница 742: ...of whether the battery requires calibration Calibration ensures the accuracy of the battery level display after the battery has been charged a certain number of times j will be displayed We recommend that you calibrate the battery when j is displayed 0850 A indicates that calibration not required Battery age A five level display showing battery age A value of 0 k indicates that battery performance...

Страница 743: ...hen measuring preset manual white balance D Charging Batteries at Low Temperatures Batteries in general exhibit a drop in capacity at low ambient temperatures Even fresh batteries charged at temperatures under about 5 C 41 F may show a temporary increase from 0 to 1 in the value shown for Battery age but the display will return to normal once the battery has been recharged at a temperature of abou...

Страница 744: ...amera when the battery is inserted A USB power delivery icon appears in the shooting display and the control panel when the camera is powered by an external source USB Power Delivery G button U B setup menu Option Description ON The camera draws power from connected devices while on Connected devices will also supply power when the camera is off if Bluetooth upload is in progress or the memory car...

Страница 745: ...der which the power supplied by external devices is used to power the camera or charge the battery are shown below 1 Includes instances in which the power switch is in the OFF position but Bluetooth upload is in progress or the memory card access lamp is lit 2 EN EL18d EN EL18c and EN EL18b batteries inserted in the camera will charge when the camera is connected to the supplied charging AC adapte...

Страница 746: ...y timer or if the delay selected is less than 30 seconds during zoom while the camera is connected to another device via HDMI while the camera is connected to and exchanging data with a computer via USB or while the camera is connected to an AC adapter Energy Saving Photo Mode G button U B setup menu Option Description ON Enable energy saving The display refresh rate may drop OFF Disable energy sa...

Страница 747: ...ed in the camera Slot Empty Release Lock G button U B setup menu Option Description a Release locked The shutter cannot be released when no memory card is inserted b Enable release The shutter can be released with no memory card inserted No pictures will be recorded during playback the camera displays Demo ...

Страница 748: ...u settings to a memory card You can also load saved settings allowing menu settings to be shared among cameras of the same model If two memory cards are inserted the settings will be saved to the card in Slot 1 Save Load Menu Settings G button U B setup menu ...

Страница 749: ...ty Image size RAW recording ISO sensitivity settings White balance Set Picture Control Custom Picture Controls are saved as Auto Color space Active D Lighting Long exposure NR High ISO NR Vignette control Diffraction compensation Auto distortion control Photo flicker reduction Metering Flash control Focus mode AF area mode AF subject detection options Vibration reduction the options available vary...

Страница 750: ...e rate Image area ISO sensitivity settings White balance Set Picture Control Custom Picture Controls are saved as Auto HLG quality Active D Lighting High ISO NR Vignette control Diffraction compensation Auto distortion control Video flicker reduction Metering Focus mode AF area mode AF subject detection options Settings that can be saved and loaded ...

Страница 751: ...vity Attenuator Frequency response Wind noise reduction Mic jack plug in power Headphone volume Timecode excepting Timecode origin External rec cntrl HDMI CUSTOM SETTINGS MENU All items PLAYBACK MENU Playback display options Dual format recording PB slot Picture review After delete After burst show Rotate tall Settings that can be saved and loaded ...

Страница 752: ...e focus position Sensor shield behavior at power off Clean image sensor Image comment Copyright information IPTC Voice memo options Camera sounds Silent mode Touch controls HDMI USB connection priority Location data built in excepting Position Wireless remote WR options Assign remote WR Fn button USB power delivery Energy saving photo mode Slot empty release lock Settings that can be saved and loa...

Страница 753: ... card Note that Load menu settings is available only when a memory card containing saved settings is inserted D Caution Saved Settings Settings are saved to files named NCSET where is an identifier that varies from camera to camera The camera will not be able to load settings if the file name is changed MY MENU The current contents of My Menu Choose tab RECENT SETTINGS The current contents of the ...

Страница 754: ...tes Updates can be performed using a computer or smart device Computer Check the Nikon Download Center for new versions of the camera firmware For more information see the firmware download page Smart device If the smart device has been paired with the camera using the SnapBridge app the app will automatically notify you when updates become available and you can then download the update to the cam...

Страница 755: ...ontains the following items D See Also Network Menu Defaults 0489 F The Network Menu Network Connections Item 0 Airplane mode 756 Wired LAN 756 Connect to smart device 757 Connect to computer 760 Connect to FTP server 765 Connect to other cameras 770 USB 773 Start via LAN 773 Router frequency band 774 MAC address 774 Item 0 ...

Страница 756: ...ctions Select ON to disable the camera s built in Bluetooth and Wi Fi functions Select ON to connect to Ethernet networks Connect an Ethernet cable to the camera Airplane Mode G button U F network menu Wired LAN G button U F network menu ...

Страница 757: ...g Bluetooth Pair with or connect to smart devices using Bluetooth Connect to Smart Device G button U F network menu Option Description Start pairing Pair the camera with a smart device 0313 Paired devices List paired smart devices To connect select a device from the list Bluetooth connection Select ON to enable Bluetooth ...

Страница 758: ...the smart device and enter the password 0317 Once a connection is established this option will change to Close Wi Fi connection Use Close Wi Fi connection to end the connection when desired Option Description Auto select for upload Select ON to mark pictures for upload as they are taken Photos are uploaded in JPEG format at a size of 2 megapixels even if other upload size and format options are se...

Страница 759: ...at the camera may be unable to download or display location data from smart devices depending on the version of the device operating system and or SnapBridge app used Option Description SSID Choose the camera SSID Authentication encryption Choose OPEN WPA2 PSK WPA3 SAE or WPA2 PSK WPA3 SAE Password Choose the camera password Channel Choose a channel Select Auto to have the camera choose the channe...

Страница 760: ...than one profile already exists you can press J to choose a profile and connect to the selected network To edit an existing profile highlight it and press 2 Connect to Computer G button U F network menu Option Description General Profile name Rename the profile The default profile name is the same as the network SSID Password protection Select On to require that a password be entered before the pr...

Страница 761: ...o the camera SSID Choose the camera SSID Channel Choose Auto or Manual Authentication encryption Select the type of encryption used on the wireless network Password If an option other than OPEN is selected for Authentication encryption this item can be used to change the camera password TCP IP Adjust TCP IP settings for infrastructure connections An IP address is required If ON is selected for Obt...

Страница 762: ...py profile from card Copy profiles from the root directory of the memory card to the camera profile list Copy profile to card Copy profiles from the camera to the memory card Highlight a profile and press J to copy it to the memory card Password protected profiles cannot be copied Option Description Picture transfer Upload photos to a computer as they are taken or upload existing pictures from the...

Страница 763: ...53 Delete After Upload Select ON to delete photographs from the camera memory card automatically once upload is complete Files marked for transfer before you selected ON are not deleted Deletion may be suspended during some camera operations Upload RAW JPEG As When uploading RAW JPEG pictures choose whether to upload both the NEF RAW and JPEG files or only the JPEG copy When RAW Slot 1 JPEG Slot 2...

Страница 764: ...n the photo shooting menu Upload Folder Mark all photos in a selected folder for upload Marking will be applied to all photos regardless of whether they have been uploaded previously Videos will not be marked for upload They must instead be uploaded from the playback display Deselect All Remove upload marking from all pictures Upload of pictures with an uploading icon will immediately be terminate...

Страница 765: ...than one profile already exists you can press J to choose a profile and connect to the selected network To edit an existing profile highlight it and press 2 Connect to FTP Server G button U F network menu Option Description General Profile name Rename the profile The default profile name is the same as the network SSID Password protection Select On to require that a password be entered before the ...

Страница 766: ...cation encryption Select the type of encryption used on the wireless network Password If an option other than OPEN is selected for Authentication encryption this item can be used to change the camera password TCP IP Adjust TCP IP settings for infrastructure connections An IP address is required Obtain automatically If ON is selected the IP address and sub net mask for infrastructure mode connectio...

Страница 767: ... PASV mode Select ON to enable PASV mode Anonymous login Select ON for anonymous login This option can only be used with servers that are configured for anonymous login Select OFF to supply a user ID and password Proxy server Enable this option as required Option Description Copy profile from card Copy profiles from the root directory of the memory card to the camera profile list Copy profile to c...

Страница 768: ...53 Delete After Upload Select ON to delete photographs from the camera memory card automatically once upload is complete Files marked for transfer before you selected ON are not deleted Deletion may be suspended during some camera operations Upload RAW JPEG As When uploading RAW JPEG pictures choose whether to upload both the NEF RAW and JPEG files or only the JPEG copy When RAW Slot 1 JPEG Slot 2...

Страница 769: ... automatically protect files marked for upload Protection is removed as the files are uploaded Upload Marking Select ON to add a timestamp to the pictures on the camera memory card giving the time of upload The timestamp can be viewed using NX Studio For more information see NX Studio s online help Upload Folder Mark all photos in a selected folder for upload Marking will be applied to all photos ...

Страница 770: ...reate Profile Create new network profiles 0402 If more than one profile already exists you can press J to choose a profile and connect to the selected network To edit an existing profile highlight it and press 2 Connect to Other Cameras G button U F network menu Option Description General Profile name Rename the profile The default profile name is the same as the network SSID Password protection S...

Страница 771: ...or Obtain automatically the IP address and sub net mask for infrastructure mode connections will be acquired via a DHCP server or automatic IP addressing Select OFF to enter the IP address Address and sub net mask Mask manually Option Description Copy profile from card Copy profiles from the root directory of the memory card to the camera profile list Copy profile to card Copy profiles from the ca...

Страница 772: ... Choose a role for each camera from master and remote Pressing the shutter release button on the master camera releases the shutters on all remote cameras that are both on the same network and in the same group Remote Camera List The master camera lists the remote cameras connected Synchronize Date and Time Set the clocks on the remote cameras to the date and time reported by the master camera 042...

Страница 773: ...ightning cable in order to use NX MobileAir for information on compatible USB C to Lightning cables see the online help for NX MobileAir D iPhone Selecting iPhone disables the camera s built in network features Select MTP PTP except when using NX MobileAir If ON is selected the standby timer can be activated by signals from a computer connected via Ethernet USB G button U F network menu Start via ...

Страница 774: ...arches for networks active in the vicinity it will list only those operating on the chosen band or bands The band is listed to the left of the network SSID If you select 2 4 GHz 5 GHz when connecting via wireless routers that operate on both bands the list will include the SSIDs in the band or bands detected by the camera View the MAC address Router Frequency Band G button U F network menu MAC Add...

Страница 775: ...n be used to create and edit a customized list of up to 20 items from the photo shooting video recording Custom Settings playback setup and network menus Items can be added deleted and reordered as described below Adding Items to My Menu 1 Select Add items in O MY MENU Highlight Add items and press 2 O My Menu m Recent Settings ...

Страница 776: ...lect an item Highlight the desired menu item and press J 4 Position the new item Press 1 or 3 to position the new item and press J to add it to My Menu 5 Add more items The items currently displayed in My Menu are indicated by a check mark L Items indicated by a V icon cannot be selected Repeat Steps 1 4 to select additional items ...

Страница 777: ... deselect Continue until all the items you wish to remove are selected L 3 Remove the selected items Press O Q a confirmation dialog will be displayed Press J to remove the selected items D Removing Items While in My Menu Items can also be removed by highlighting them in O MY MENU and pressing the O Q button a confirmation dialog will be displayed Press O Q again to remove the selected item ...

Страница 778: ...U Highlight Rank items and press 2 2 Select an item Highlight the item you wish to move and press J 3 Position the item Press 1 or 3 to move the item up or down in My Menu and press J Repeat Steps 2 3 to reposition additional items 4 Exit to O MY MENU Press the G button to return to O MY MENU ...

Страница 779: ...ing RECENT SETTINGS 1 Select Choose tab in O MY MENU Highlight Choose tab and press 2 2 Select m RECENT SETTINGS Highlight m RECENT SETTINGS in the Choose tab menu and press J The name of the menu will change from MY MENU to RECENT SETTINGS ...

Страница 780: ...y used settings are listed D Removing Items from the Recent Settings Menu To remove an item from the RECENT SETTINGS menu highlight it and press the O Q button a confirmation dialog will be displayed Press O Q again to remove the selected item D Displaying My Menu Selecting RECENT SETTINGS Choose tab menu displays the items shown in Step 2 of Displaying RECENT SETTINGS 0779 Highlight O MY MENU and...

Страница 781: ...d Solutions 0783 Alerts and Error Messages 0794 STEP 2 Turn the camera off and remove the battery then wait about a minute re insert the battery and turn the camera on D The camera may continue to write data to the memory card after shooting Wait at least a minute before removing the battery STEP 3 Search Nikon websites For support information and answers to frequently asked questions visit the we...

Страница 782: ...be unavailable To access menu items that are grayed out or features that are otherwise unavailable try restoring default settings using the Reset all settings item in the setup menu Note however that wireless network profiles copyright information and other user generated entries will also be reset Once reset settings cannot be restored ...

Страница 783: ...ou changed the monitor mode Choose a different monitor mode using the M button Have you limited the choice of monitor modes available using the Limit monitor mode selection item in the setup menu Adjust settings as required Dust lint or other foreign matter on the eye sensor may prevent it functioning normally Clean the eye sensor with a blower The viewfinder is out of focus Rotate the diopter adj...

Страница 784: ...e before the standby timer expires automatically can be selected using Custom Setting c3 Power off delay Standby timer The camera takes time to turn on More time will be needed to find files if the memory card contains large numbers of files or folders The shutter cannot be released Is a memory card inserted and if so does it have space available If you selected mode S after selecting a shutter sp...

Страница 785: ...r lighting a cross star filter or other special filter is used the subject appears smaller than the focus point or the subject is dominated by regular geometric patterns e g blinds or a row of windows in a skyscraper In focus mode AF C the focus point may flash while the shutter release button is pressed halfway or the AF ON button is pressed indicating that the camera is no longer able to focus T...

Страница 786: ... selected for AF area mode Focus mode selection is not available Select No restrictions for Custom Settings a9 and g5 Focus mode restrictions The camera is slow to record photos Is ON selected for Long exposure NR in the photo shooting menu Photographs and videos do not appear to have the same exposure as the preview shown in the display The effects of changes to settings that affect exposure and ...

Страница 787: ...hing a lens hood or by composing shots with bright light sources well out of the frame You can also try such techniques as removing lens filters or choosing a different shutter speed Bokeh is irregular With fast shutter speeds and or fast lenses you may notice irregularities in how bokeh is shaped The effect can be mitigated by choosing slower shutter speeds and or higher f numbers Shooting ends u...

Страница 788: ... in on the view through the lens during shooting Note that the distribution of noise in the display may differ from that in the final picture This issue can sometimes be addressed by checking and optimizing the image sensor Perform pixel mapping using Pixel mapping in the setup menu The camera cannot measure a value for preset manual white balance The subject is too dark or too bright Certain pict...

Страница 789: ...apply only to the exposure indicator and have no effect on shutter speed or aperture Uneven shading appears in long exposures Uneven shading may appear in long exposures shot at shutter speeds of Bulb or Time The effect can be mitigated by selecting ON for Long exposure NR in the photo shooting menu The AF assist illuminator does not light Is OFF selected for Custom Setting a12 Built in AF assist ...

Страница 790: ...yback menu Auto picture rotation is not available during picture review Camera orientation may not be correctly recorded in photos taken with the camera pointing up or down Pictures cannot be deleted Are the pictures protected Pictures cannot be retouched The pictures cannot be further edited with this camera There is insufficient space on the memory card to record the retouched copy The camera di...

Страница 791: ...ired effect if Image Dust Off reference data recorded after image sensor cleaning is performed are used with photographs taken before image sensor cleaning is performed or Image Dust Off reference data recorded before image sensor cleaning is performed are used with photographs taken after image sensor cleaning is performed The effects of Set Picture Control Active D Lighting or Vignette control a...

Страница 792: ...uto upload If Foreground is selected for Auto link Link mode in the SnapBridge tab pictures will not be uploaded to the smart device automatically while the SnapBridge app is running in the background Pictures will only be uploaded when the SnapBridge app is displayed running in the foreground on the smart device Check that the camera is paired with the smart device Check that the camera and smart...

Страница 793: ...rect Is the camera clock set correctly The clock is less accurate than most watches and household clocks check it regularly against more accurate timepieces and reset as necessary Menu items cannot be selected Some items are not available at certain combinations of settings ...

Страница 794: ...w battery Ready spare battery l Lens is not correctly attached Ensure that the lens is correctly attached Ensure that retractable lenses are extended This indicator is also displayed when a non CPU lens is attached via a mount adapter but in this case no action need be taken Bulb flashes Bulb selected in mode S Change shutter speed Select mode M Time flashes Time selected in mode S Change shutter ...

Страница 795: ...er speed Mode A Choose smaller aperture higher f number Subject too dark limits of camera exposure metering system exceeded Increase ISO sensitivity Mode P Use optional flash unit flash can also be used if alert is still displayed after following settings are adjusted in mode S or A Mode S Choose slower shutter speed Mode A Choose wider aperture lower f number c flashes Flash has fired at full pow...

Страница 796: ...g Insert new memory card Camera has run out of file numbers Delete pictures from memory card until there is room for additional pictures to be recorded Copy pictures you wish to keep to computer or other device before proceeding Insert new memory card Err flashes Camera malfunction Press shutter release button again If error persists or appears frequently consult Nikon authorized service represent...

Страница 797: ...ery is unable to pro vide data to the camera and cannot be used For safety choose a battery designated for use in this camera Battery info not available Battery cannot be used Contact Nikon authorized service representative Battery level is extremely low charge battery Battery cannot supply data to camera Replace third party batteries with genuine Nikon batteries No memory card E The memory card i...

Страница 798: ...ervice representative Unable to create new folder Insert new memory card This card is not formatted Format the card For flashes Memory card is not correctly formatted Format memory card Replace with correctly formatted memory card FTZ mount adapter firmware version not supported Upgrade FTZ firmware Mount adapter firmware out of date Update to the latest version of the mount adapter firmware For m...

Страница 799: ... until it cools Please wait Camera will turn itself off Camera s internal temperature is elevated Suspend shooting until camera has cooled High battery temperature Remove battery and wait for it to cool Folder contains no pictures Folder contains no pictures Insert memory card that contains pictures No pictures in folder selected for playback Use Playback folder item in playback menu to select fol...

Страница 800: ...ken with or previously retouched on camera This video cannot be edited Selected video cannot be edited Videos created with other devices cannot be edited Videos under two seconds long cannot be edited This file cannot be saved to the destination memory card See the camera manual for details Files 4 GB or larger can only be saved to memory cards formatted for exFAT They will not be saved to cards i...

Страница 801: ...le from the Nikon Download Center A Compatible F Mount Lenses F mount lenses can be mounted on Z mount cameras using an FTZ II FTZ mount adapter Some features may not be available depending on the lens used Information on the F mount lenses that can be used with Z mount cameras and on any restrictions that may apply can be found in Compatible F Mount Lenses available from the Nikon Download Center...

Страница 802: ...amera Displays 41 40 42 43 46 47 48 45 44 22 39 3 5 13 12 8 15 6 1 4 2 7 9 10 11 14 16 17 18 24 25 23 19 20 21 32 34 36 28 38 30 31 37 26 27 33 35 29 1 Shooting mode 0132 2 Flexible program indicator 0133 3 AF area brackets 0113 4 Temperature warning 5 Release mode 0145 6 Interval timer indicator 0542 t icon 087 No memory card indicator 081 804 Memory card high temperature warning 082 ...

Страница 803: ...g indicator 0187 HDR indicator 0538 Multiple exposure indicator 0530 21 Number of shots in exposure and flash bracketing sequence 0178 Number of shots in WB bracketing sequence 0183 Number of shots in ADL bracketing sequence 0187 HDR strength 0538 Number of shots in multiple exposure 0530 22 Exposure indicator Exposure 0136 Exposure compensation 0143 Auto bracketing 0177 23 i icon 065 24 Battery i...

Страница 804: ...clear from the display D No Memory Card Inserted If no memory card is inserted a no memory card indicator will appear in the shooting display and E will appear in both the control panel and the shooting display 29 ISO sensitivity 0154 30 ISO sensitivity indicator 0154 Auto ISO sensitivity indicator 0156 31 Exposure compensation indicator 0143 32 Flash compensation indicator 0432 33 Aperture 0134 1...

Страница 805: ...1 2 3 5 7 1 Shooting mode 0132 2 Flexible program indicator 0133 3 Shutter speed lock icon 0665 4 Shutter speed 0133 135 5 Aperture lock icon 0665 6 Aperture 0134 135 7 Exposure indicator Exposure 0136 Exposure compensation 0143 Auto bracketing 0177 ...

Страница 806: ...acketing indicator 0183 ADL bracketing indicator 0187 HDR indicator 0538 Multiple exposure indicator 0530 5 Number of exposures remaining 081 887 Camera control mode 0854 6 i icon 065 7 ISO sensitivity 0154 8 ISO sensitivity indicator 0154 Auto ISO sensitivity indicator 0156 9 FV lock indicator 0434 10 Autoexposure AE lock 0141 11 Flash compensation indicator 0432 12 Exposure compensation indicato...

Страница 807: ...on indicator 0514 5 Beep indicator 0733 6 Battery indicator 080 7 USB power delivery 0744 8 Image size 0108 9 AF area mode subject detection 0113 10 Focus mode 0110 11 View memory card info 0645 12 Airplane mode 0756 13 Custom controls shooting 0647 14 Shooting menu bank 0493 15 Vibration reduction indicator 0526 16 Metering 0520 17 Picture Control 0192 18 White balance 0158 19 Image quality 0105 ...

Страница 808: ...ng control 0302 3 Video recording time 093 Timecode 0591 4 Frame size and rate 0216 5 Destination 0578 6 Time remaining 093 7 Picture Control 0192 Tone mode 0215 8 Image area 0218 9 Video file type 0214 10 Sound level 0588 11 Microphone sensitivity 0588 12 Electronic VR indicator 0587 13 Headphone volume 0590 14 Zebra pattern 0686 ...

Страница 809: ... 14 28 27 33 31 34 35 36 32 30 24 22 23 37 25 29 26 1 Teleconverter indicator 2 View mode 0624 3 Release mode 0145 4 Focus mode 0110 5 AF area mode 0113 6 Subject detection 0119 7 Flash mode 0429 8 White balance 0158 9 Active D Lighting 0512 10 Picture Control 0192 11 Image quality 0105 12 Image size 0108 13 Image area 0102 ...

Страница 810: ...0204 20 Satellite signal indicator 0205 21 Wi Fi connection indicator 0317 329 367 Bluetooth connection indicator 0757 Airplane mode 0756 22 USB power delivery 0744 23 Battery indicator 080 24 Flash ready indicator 0423 25 Number of exposures remaining 081 887 Camera control mode 0854 26 ISO sensitivity 0154 27 ISO sensitivity indicator 0154 Auto ISO sensitivity indicator 0156 28 Exposure compensa...

Страница 811: ...oexposure AE lock 0141 41 Auto white balance AWB lock 0647 42 FV lock indicator 0434 43 Time lapse video indicator 0556 44 Interval timer indicator 0542 t icon 087 No memory card indicator 081 804 Memory card high temperature warning 082 45 Temperature warning 46 Flicker detection 0518 ...

Страница 812: ... Tone mode 0215 4 Frame size and rate 0216 5 Image area 0218 6 Video file type 0214 7 Time remaining 093 8 Destination 0578 9 Video recording time 093 Timecode 0591 10 Electronic VR indicator 0587 11 Microphone sensitivity 0588 12 Sound level 0588 13 External recording control 0302 14 Recording indicator 093 No video indicator 094 ...

Страница 813: ... compensation value 0432 Number of shots in exposure and flash bracketing sequence 0178 Number of shots in WB bracketing sequence 0183 Intervals remaining in interval timer sequence 0545 Shots remaining in focus shift sequence 0569 Track log indicator 0204 5 Exposure compensation indicator 0143 6 Exposure and flash bracketing indicator 0178 WB bracketing indicator 0183 ADL bracketing indicator 018...

Страница 814: ...osure compensation 0143 Exposure and flash bracketing 0178 WB bracketing 0183 ADL bracketing 0187 12 ISO sensitivity 0154 13 Number of exposures remaining 081 887 Preset manual white balance measurement mode 0170 Camera control mode 0854 14 ISO sensitivity indicator 0154 Auto ISO sensitivity indicator 0156 15 Release mode 0145 Buffer capacity 0145 Buffer capacity high speed frame capture 0149 Inte...

Страница 815: ...815 Camera Displays Video Mode 2 1 1 Exposure compensation value videos 0143 2 Available recording time 0578 ...

Страница 816: ...rts a variety of features thanks to improved communication between the camera and compatible flash units Features Available with CLS Compatible Flash Units Compatible Flash Units Flash unit 0 SB 5000 817 SB 910 SB 900 SB 800 819 SB 700 821 SB 600 823 SB 500 825 SB R200 827 SB 400 829 SB 300 831 SU 800 833 Flash unit 0 ...

Страница 817: ...o GN Distance priority manual 4 M Manual 4 RPT Repeating flash 4 Optical Advanced Wireless Lighting Master Remote flash control 4 i TTL i TTL 4 A B Quick wireless flash control 4 qA Auto aperture 4 A Non TTL auto M Manual 4 RPT Repeating flash 4 Remote i TTL i TTL 4 A B Quick wireless flash control 4 qA A Auto aperture non TTL auto 4 3 M Manual 4 RPT Repeating flash 4 ...

Страница 818: ...TL qA A GN and M flash control modes 6 Available only in i TTL flash control mode or when the flash is configured to emit monitor preflashes in qA or A flash control mode Radio controlled Advanced Wireless Lighting 4 4 Color Information Communication flash 4 Color Information Communication LED light Auto FP high speed sync 4 5 FV lock 4 6 Red eye reduction 4 Camera modeling illumination 4 Unified ...

Страница 819: ...n TTL auto 4 3 GN Distance priority manual 4 M Manual 4 RPT Repeating flash 4 Optical Advanced Wireless Lighting Master Remote flash control 4 i TTL i TTL 4 A B Quick wireless flash control qA Auto aperture 4 A Non TTL auto M Manual 4 RPT Repeating flash 4 Remote i TTL i TTL 4 A B Quick wireless flash control 4 qA A Auto aperture non TTL auto 4 4 M Manual 4 RPT Repeating flash 4 ...

Страница 820: ...des 6 Available only in i TTL flash control mode or when the flash is configured to emit monitor preflashes in qA or A flash control mode 7 Firmware updates for the SB 910 and SB 900 can be performed from the camera Radio controlled Advanced Wireless Lighting Color Information Communication flash 4 Color Information Communication LED light Auto FP high speed sync 4 5 FV lock 4 6 Red eye reduction ...

Страница 821: ...auto GN Distance priority manual 4 M Manual 4 RPT Repeating flash Optical Advanced Wireless Lighting Master Remote flash control 4 i TTL i TTL 4 A B Quick wireless flash control 4 qA Auto aperture A Non TTL auto M Manual 4 RPT Repeating flash Remote i TTL i TTL 4 A B Quick wireless flash control 4 qA A Auto aperture non TTL auto M Manual 4 RPT Repeating flash 4 ...

Страница 822: ...e only in i TTL flash control mode Radio controlled Advanced Wireless Lighting Color Information Communication flash 4 Color Information Communication LED light Auto FP high speed sync 4 2 FV lock 4 3 Red eye reduction 4 Camera modeling illumination 4 Unified flash control Camera flash unit firmware update 4 Supported features ...

Страница 823: ...n TTL auto GN Distance priority manual M Manual 4 RPT Repeating flash Optical Advanced Wireless Lighting Master Remote flash control i TTL i TTL A B Quick wireless flash control qA Auto aperture A Non TTL auto M Manual RPT Repeating flash Remote i TTL i TTL 4 A B Quick wireless flash control 4 qA A Auto aperture non TTL auto M Manual 4 RPT Repeating flash 4 ...

Страница 824: ...trol modes 4 Available only in i TTL flash control mode Radio controlled Advanced Wireless Lighting Color Information Communication flash 4 Color Information Communication LED light Auto FP high speed sync 4 3 FV lock 4 4 Red eye reduction 4 Camera modeling illumination 4 Unified flash control Camera flash unit firmware update Supported features ...

Страница 825: ...to GN Distance priority manual M Manual 4 2 RPT Repeating flash Optical Advanced Wireless Lighting Master Remote flash control 4 2 i TTL i TTL 4 2 A B Quick wireless flash control qA Auto aperture A Non TTL auto M Manual 4 2 RPT Repeating flash Remote i TTL i TTL 4 A B Quick wireless flash control 4 qA A Auto aperture non TTL auto M Manual 4 RPT Repeating flash 4 ...

Страница 826: ...flash control modes 4 Available only in i TTL flash control mode Radio controlled Advanced Wireless Lighting Color Information Communication flash 4 Color Information Communication LED light 4 Auto FP high speed sync 4 3 FV lock 4 4 Red eye reduction 4 Camera modeling illumination 4 Unified flash control 4 Camera flash unit firmware update 4 Supported features ...

Страница 827: ...TTL auto GN Distance priority manual M Manual RPT Repeating flash Optical Advanced Wireless Lighting Master Remote flash control i TTL i TTL A B Quick wireless flash control qA Auto aperture A Non TTL auto M Manual RPT Repeating flash Remote i TTL i TTL 4 A B Quick wireless flash control 4 qA A Auto aperture non TTL auto M Manual 4 RPT Repeating flash ...

Страница 828: ...flash control mode Radio controlled Advanced Wireless Lighting Color Information Communication flash Color Information Communication LED light Auto FP high speed sync 4 1 FV lock 4 2 Red eye reduction Camera modeling illumination 4 Unified flash control Camera flash unit firmware update Supported features ...

Страница 829: ...Non TTL auto GN Distance priority manual M Manual 4 2 RPT Repeating flash Optical Advanced Wireless Lighting Master Remote flash control i TTL i TTL A B Quick wireless flash control qA Auto aperture A Non TTL auto M Manual RPT Repeating flash Remote i TTL i TTL A B Quick wireless flash control qA A Auto aperture non TTL auto M Manual RPT Repeating flash ...

Страница 830: ... Available only in i TTL flash control mode Radio controlled Advanced Wireless Lighting Color Information Communication flash 4 Color Information Communication LED light Auto FP high speed sync FV lock 4 3 Red eye reduction 4 Camera modeling illumination Unified flash control 4 Camera flash unit firmware update Supported features ...

Страница 831: ...Non TTL auto GN Distance priority manual M Manual 4 2 RPT Repeating flash Optical Advanced Wireless Lighting Master Remote flash control i TTL i TTL A B Quick wireless flash control qA Auto aperture A Non TTL auto M Manual RPT Repeating flash Remote i TTL i TTL A B Quick wireless flash control qA A Auto aperture non TTL auto M Manual RPT Repeating flash ...

Страница 832: ... Available only in i TTL flash control mode Radio controlled Advanced Wireless Lighting Color Information Communication flash 4 Color Information Communication LED light Auto FP high speed sync FV lock 4 3 Red eye reduction Camera modeling illumination Unified flash control 4 Camera flash unit firmware update 4 Supported features ...

Страница 833: ...f is not equipped with a flash Supported features Single flash i TTL i TTL balanced fill flash Standard i TTL fill flash qA Auto aperture A Non TTL auto GN Distance priority manual M Manual RPT Repeating flash Optical Advanced Wireless Lighting Master Remote flash control 4 i TTL i TTL A B Quick wireless flash control 4 1 qA Auto aperture A Non TTL auto M Manual RPT Repeating flash Remote i TTL i ...

Страница 834: ...the flash control mode for the remote flash unit or when the flash is configured to emit monitor preflashes in mode qA Radio controlled Advanced Wireless Lighting Color Information Communication flash Color Information Communication LED light Auto FP high speed sync 4 2 FV lock 4 3 Red eye reduction Camera modeling illumination 4 Unified flash control Camera flash unit firmware update Supported fe...

Страница 835: ...mode the flash has fired at full power and the photograph may be underexposed CLS compatible flash units only i TTL flash control can be used at ISO sensitivities between 64 and 12800 equivalent At ISO sensitivities over 12800 the desired results may not be achieved at some ranges or aperture settings In mode P the maximum aperture minimum f number is limited according to ISO sensitivity as shown ...

Страница 836: ...tween the camera and the battery pack The camera provides AF assist illumination as required AF assist illuminators on optional flash units will not light When an SC series 17 28 or 29 sync cable is used for off camera flash photography correct exposure may not be achieved in i TTL mode We recommend that you select standard i TTL fill flash Take a test shot and view the results in the camera displ...

Страница 837: ... need to set the flash control mode for the master or at least one remote group to TTL qA or A D Other Flash Units The following flash units can be used in non TTL auto A and manual modes The options available do not vary with the lens used 1 Available when the camera is used to select the flash mode 2 Mounting an SB 27 on the camera automatically sets the flash mode to TTL but setting the flash m...

Страница 838: ...lash compensation selected with the optional flash unit or with Flash control in the camera photo shooting menu is added to the flash compensation selected with the Flash compensation item in the photo shooting menu Flash control mode Metered area i TTL 6 mm circle in center of frame Auto aperture qA Area metered by flash exposure meter Flash control mode Metered area i TTL Entire frame Auto apert...

Страница 839: ...ng to preview the total lighting effect achieved with multiple flash units The effects of shadows cast by the flash are best observed directly rather than in the shooting display Modeling illumination can be turned off by selecting OFF for Custom Setting e5 Modeling flash A Studio Strobe Lighting To adjust the color and brightness of the view through the lens so that shots are easier to frame sele...

Страница 840: ...en on a single charge than with the EN EL18d 0889 MH 33 Battery Charger The MH 33 can be used to recharge EN EL18d batteries Batteries can be charged while the charger is connected to a power source via the EH 7P charging AC adapter EH 7P Charging AC Adapter The EH 7P can be used to charge batteries inserted in the camera The battery will not charge while the camera is on Charging AC adapters cann...

Страница 841: ...ns Filters may cause ghosting when the subject is framed against a bright light or when a bright light source is in the frame Filters can be removed if ghosting occurs Matrix metering may not produce the desired results with filters with exposure factors filter factors over 1 Y44 Y48 Y52 O56 R60 X0 X1 C PL ND2S ND4 ND4S ND8 ND8S ND400 A2 A12 B2 B8 B12 we suggest that Center weighted metering be se...

Страница 842: ...tely 85 cm 2 8 ft Remote shutter releases with timers for interval timer photography MC 21 MC 21A Extension Cords length approximately 3 m 9 9 ft Can be connected to ML 3 or MC series 20 22 22A 23 23A 25 25A 30 30A 36 or 36A but note that two or more extension cords cannot be connected together MC 23 MC 23A Connecting Cords length approximately 40 cm 1 4 ft Use an MC 23 or 23A to connect two camer...

Страница 843: ...accessory shoe when no flash unit is attached Body Caps BF N1 Body Cap The body cap prevents dust entering the camera when no lens is in place Viewfinder Eyepiece Accessories DK 33 Rubber Eyecup A rubber eyecup that comes fitted to the camera It can be removed by holding the eyepiece release q and rotating the eyecup in the direction shown w To re attach the eyecup align the mark on the rear of th...

Страница 844: ... with SB 5000 SB 910 SB 900 SB 800 SB 700 SB 600 SB 500 and SB R200 flash units Flash units can be divided into up to three groups for remote flash control The SU 800 itself is not equipped with a flash Mount Adapters FTZ II FTZ Mount Adapter An adapter that allows NIKKOR F mount lenses to be used with digital cameras that support interchangeable Z mount lenses For information on attaching removin...

Страница 845: ...controllers can also be used to control radio controlled flash units WR 1 Wireless Remote Controller WR 1 units are used with WR R11a WR R10 or WR T10 wireless remote controllers or with other WR 1 remote controllers with the WR 1 units functioning as either transmitters or receivers When a WR R11a WR R10 or a WR 1 configured as a receiver is connected to the camera ten pin remote terminal a secon...

Страница 846: ...emoving the Accessory Shoe Cover The BS 1 accessory shoe cover slides into the shoe as shown To remove the cover hold the camera firmly press the cover down with a thumb and slide it in the direction shown Battery Battery charger Charging AC adapter MH 33 MH 26a EN EL18d 4 4 EN EL18c 4 4 4 EN EL18b 4 4 4 EN EL18a 4 EN EL18 4 ...

Страница 847: ...ch the supplied clip to HDMI or USB cables as shown note that the clip may not fit all cables The illustrations show the USB cable Pass HDMI cables through the other channel Keep the monitor in the storage position when using the cable clip USB cable HDMI cable and USB cable used simultaneously ...

Страница 848: ...rection shown until it latches q and then rotate the cover clockwise to remove it from the camera w To re attach the cover insert the top hinge into the top socket on the camera body q and insert the end of the sprung hinge into the bottom socket w Keeping the bottom hinge aligned with the bottom socket slide the memory card slot cover release latch down until it clicks into place in its original ...

Страница 849: ...not be re attached with the latch lowered The inner cover may move when the memory card slot cover release latch is lowered The memory card slot cover cannot be reattached when the inner cover is out of position Slide the memory card slot cover latch down q and restore the inner and outer covers to their original positions w 2 1 1 Inner cover 2 Outer cover ...

Страница 850: ...e them as necessary to ensure the accuracy of the battery level display Calibration status and progress are shown by lamps on the battery charger If the calibration lamp flashes when a battery is inserted the battery needs to be calibrated CHARGE CALIBRATION 6h 4h 2h 100 80 50 1 2 3 1 Charge lamps 2 Calibration lamp 3 Calibration button ...

Страница 851: ... interrupted as desired If the calibration button is not pressed while the calibration lamp is flashing normal charging will begin after about ten seconds To interrupt calibration press the calibration button again Calibration will end and charging will begin When calibration is complete the charge lamps and calibration lamp will turn off and charging will begin immediately Approximate time needed...

Страница 852: ...he BL 7 battery chamber cover Lift the battery chamber cover latch turn it to the open A position q and remove the BL 7 battery chamber cover w 2 Connect the EH 6d AC adapter to the EP 6a power connector Pass the DC cable over the power connector cable guide q and slide it down until it is at the bottom of the slot Insert the DC plug into the DC IN connector w ...

Страница 853: ...wn 4 Latch the power connector Rotate the latch to the closed position q and fold it down as shown w To prevent the power connector being dislodged during operation be sure that it is securely latched The battery level is not displayed in the control panel while the camera is powered by the AC adapter and power connector ...

Страница 854: ...a settings can be adjusted remotely using controls in the computer display NX Studio View and edit photos and videos shot with Nikon digital cameras NX Studio can be used to fine tune files in Nikon s unique NEF NRW RAW format and convert them to JPEG or TIFF NEF RAW processing It supports not only NEF NRW RAW pictures but also JPEG and TIFF photos shot with Nikon digital cameras for such tasks as...

Страница 855: ...ons to be observed during use see the Webcam Utility page in the Nikon Download Center Smartphone Tablet Apps Smartphone tablet apps are available from the Apple App Store and Google Play For the latest information on our apps visit the Nikon website SnapBridge Download photos and videos from the camera to your smart device via a wireless connection NX MobileAir offers in app purchases Import pict...

Страница 856: ...ving the battery confirm that the camera is off Do not store the camera in locations that are poorly ventilated or subject to humidities of over 60 are next to equipment that produces strong electromagnetic fields such as televisions or radios or are exposed to temperatures above 50 C 122 F or below 20 C 4 F Caring for the Camera ...

Страница 857: ...y cause product malfunction Damage due to the presence of foreign matter inside the camera is not covered under warranty Lens and Viewfinder These glass elements are easily damaged remove dust and lint with a blower If using an aerosol blower keep the can vertical to prevent the discharge of liquid that could damage glass elements To remove fingerprints and other stains apply a small amount of len...

Страница 858: ... menus or cleaning can be performed automatically when the camera is turned off If image sensor cleaning fails to resolve the problem contact a Nikon authorized service representative Using the Menus For maximum effect hold the camera in normal orientation base down Select Clean image sensor in the setup menu then highlight Start and press J to begin cleaning Camera controls cannot be used while c...

Страница 859: ...ng camera controls interrupts any image sensor cleaning begun in response to the operation of the power switch If image sensor cleaning is performed several times in succession image sensor cleaning may be temporarily disabled to protect the camera s internal circuitry Cleaning can be performed again after a short wait Option Description 6 Clean at shutdown The image sensor is automatically cleane...

Страница 860: ...d stays open for Sensor shield behavior at power off in the setup menu 1 Turn the camera off and remove the lens 2 Holding the camera so that light can enter examine the image sensor for dust or lint If no foreign objects are present proceed to Step 4 3 Remove any dust and lint from the sensor with a blower Do not use a blower brush The bristles could damage the sensor Dirt that cannot be removed ...

Страница 861: ...atter that cannot be removed using the image sensor cleaning option 0858 clean the image sensor as described in Manual Cleaning 0860 or have the sensor cleaned by authorized Nikon service personnel Photographs affected by the presence of foreign matter on the sensor can be retouched using the clean image options available in some imaging applications D Servicing the Camera and Accessories The came...

Страница 862: ...era Place the camera in a sealed bag or plastic case before taking it across a temperature boundary The camera can be taken from the bag or case once it has had time to adjust to the new temperature Keep Away from Strong Magnetic Fields Static charges or the magnetic fields produced by equipment such as radio transmitters could interfere with the monitor corrupt data stored on the memory card or a...

Страница 863: ...indicate a malfunction The display will soon return to normal Cleaning the Lens and Viewfinder These glass elements are easily damaged remove dust and lint with a blower If using an aerosol blower keep the can vertical to prevent the discharge of liquid that could damage glass elements To remove fingerprints and other stains from the lens apply a small amount of lens cleaner to a soft cloth and wi...

Страница 864: ...ipment that produces strong electromagnetic fields or where it will be exposed to extremely high temperatures for example near a heater or in an enclosed vehicle on a hot day Failure to observe these precautions could result in product malfunction Long Term Storage To prevent damage caused for example by leaking battery fluid remove the battery if the product will not be used for an extended perio...

Страница 865: ... apply pressure to the monitor The monitor could malfunction or suffer damage Dust or lint on the monitor can be removed with a blower Stains can be removed by wiping the monitor lightly with a soft cloth or chamois leather Should the monitor break care should be taken to avoid injury from broken glass Be careful that liquid crystal from the monitor does not touch the skin or enter the eyes or mou...

Страница 866: ...le immediately after use wait for it to cool before charging Attempting to charge the battery while its internal temperature is elevated will impair battery performance and the battery may not charge or charge only partially If the battery will not be used for some time remove it from the camera and store it in a cool dry location with an ambient temperature of 15 C to 25 C 59 F to 77 F Avoid hot ...

Страница 867: ...may show a temporary increase from 0 to 1 in the setup menu Battery info age display but the display will return to normal once the battery has been recharged at a temperature of about 20 C 68 F or higher Battery capacity drops at low temperatures The change in capacity with temperature is reflected in the camera battery level display As a result the battery display may show a drop in capacity as ...

Страница 868: ... when the battery is fully discharged will shorten battery life Batteries that have been fully discharged must be charged before use A marked drop in the time a fully charged battery retains its charge when used at room temperature indicates that it requires replacement Purchase a new rechargeable battery Do Not Attempt to Charge Fully Charged Batteries Continuing to charge the battery after it is...

Страница 869: ...usual sounds when used The symbols on this product represent the following p DC Cautions Using the Charging AC Adapter Latch the battery chamber cover before charging the battery via the charging AC adapter Do not move the camera or touch the battery during charging failure to observe this precaution could in very rare instances result in the camera showing that charging is complete when the batte...

Страница 870: ...mount Lens Compatible lenses Z mount NIKKOR lenses F mount NIKKOR lenses mount adapter required restrictions may apply Effective pixels Effective pixels 45 7 million Image sensor Type 35 9 23 9 mm CMOS sensor Nikon FX format Total pixels 52 37 million Dust reduction system Image sensor cleaning Image Dust Off reference data requires NX Studio ...

Страница 871: ... 3 M 4128 4128 Medium 17 0 M 2752 2752 Small 7 6 M 16 9 36 20 selected for image area 8256 4640 Large 38 3 M 6192 3480 Medium 21 5 M 4128 2320 Small 9 6 M File format image quality NEF RAW 14 bit choose from lossless compression high efficiencym and high efficiency options JPEG JPEG Baseline compliant with fine approx 1 4 normal approx 1 8 or basic approx 1 16 compression size priority and optimal...

Страница 872: ...erent sizes and image qualities pictures can be copied between cards File system DCF 2 0 Exif 2 32 Viewfinder Viewfinder 1 27 cm 0 5 in approx 3690k dot Quad VGA OLED electronic viewfinder with color balance and auto and 16 level manual brightness controls Frame coverage Approx 100 horizontal and 100 vertical Magnification Approx 0 8 50 mm lens at infinity 1 0 m 1 Eyepoint 23 mm 1 0 m 1 from rearm...

Страница 873: ... frame capture self timer Approximate frame advance rate Continuous low speed Approx 1 10 fps Continuous high speed Approx 10 20 fps High speed frame capture C30 Approx 30 fps High speed frame capture C120 Approx 120 fps Maximum frame advance rate as measured by in house tests Self timer 2 s 5 s 10 s 20 s 1 9 exposures at intervals of 0 5 1 2 or 3 s Exposure Metering system TTL metering using came...

Страница 874: ...Active D Lighting Auto Extra high 2 Extra high 1 High Normal Low and Off Multiple exposure Add average lighten darken Other options HDR overlay photo mode flicker reduction Autofocus Type Hybrid phase detection contrast AF with AF assist Detection range 6 5 19 EV 8 5 19 EV with starlight view Measured in photo mode at ISO 100 and a temperature of 20 C 68 F using single servo AF AF S and a lens wit...

Страница 875: ...e sensor shift Lens on board VR Lens shift available with VR lenses Flash Flash control TTL i TTL flash control i TTL balanced fill flash is used with matrix center weighted and highlight weighted metering standard i TTL fill flash with spot metering Flash mode Front curtain sync slow sync rear curtain sync red eye reduction red eye reduction with slow sync off Flash compensation 3 1 EV choose fro...

Страница 876: ...candescent fluorescent 3 types flash choose color temperature 2500 10 000 K preset manual up to 6 values can be stored all with fine tuning Bracketing Bracketing Exposure and or flash white balance and ADL Video Metering system TTL metering using camera image sensor Metering mode Matrix center weighted or highlight weighted Frame size pixels and frame rate 7680 4320 8K UHD 30p progressive 25p 24p ...

Страница 877: ...l options available equivalent to approximately 0 3 0 7 1 or 2 EV ISO 102400 equivalent above ISO 25600 auto ISO sensitivity control ISO 64 Hi 2 0 available with selectable upper limit Modes P S A Auto ISO sensitivity control ISO 64 Hi 2 0 with selectable upper limit Active D Lighting Extra high High Normal Low and Off Other options Time lapse video recording electronic vibration reduction time co...

Страница 878: ...dio output Stereo mini pin jack 3 5 mm diameter Ten pin remote terminal Built in can be used with MC 30A MC 36A remote cords and other optional accessories Ethernet RJ 45 connector Standards IEEE 802 3ab 1000BASE T IEEE 802 3u 100BASE TX IEEE 802 3 10BASE T Data rates 1000 100 10 Mbps with auto detect Port 1000BASE T 100BASE TX 10BASE T AUTO MDIX Maximum logical data rates according to IEEE standa...

Страница 879: ...annel 11 and 5745 5805 MHz Georgia 2412 2462 MHz channel 11 and 5180 5320 MHz other European countries Maximum output power EIRP 2 4 GHz band 8 4 dBm 5 GHz band 6 0 dBm Georgia 5 GHz band 9 0 dBm other countries Authentication Open system WPA2 PSK WPA3 SAE Bluetooth Communication protocols Bluetooth Specification version 5 0 Operating frequency Bluetooth 2402 2480 MHz Bluetooth Low Energy 2402 248...

Страница 880: ...ime 6 12 or 24 hours Log deletion Supported Power source Battery One EN EL18d rechargeable Li ion battery EN EL18c EN EL18b EN EL18a and EN EL18 batteries can also be used Note however that fewer pictures can be taken on a single charge than with the EN EL18d The EH 7P charging AC adapter can be used to charge EN EL18d EN EL18c and EN EL18b batteries only Charging AC adapter EH 7P charging AC adap...

Страница 881: ...right to change the appearance and specifications of the hardware and software described in this document at any time and without prior notice Nikon will not be held liable for damages that may result from any mistakes that this document may contain Dimensions weight Dimensions W H D Approx 149 149 5 90 5 mm 5 9 5 9 3 6 in Weight Approx 1340 g 2 lb 15 3 oz with battery and memory card but without ...

Страница 882: ...ries EN EL18d EN EL18c and EN EL18b rechargeable Li ion batteries Charging time Approx 4 hours approx 3 hours with EN EL18c EN EL18b batteries Time required to charge battery at an ambient temperature of 25 C 77 F when no charge remains Operating temperature 0 C 40 C 32 F 104 F Dimensions W H D Approx 87 25 86 5 mm 3 5 1 3 5 in excluding projections Weight Approx 101 g 3 6 oz ...

Страница 883: ...ing m AC p DC q Class II equipment the construction of the product is double insulated Rated input AC 100 240 V 50 60 Hz MAX 0 5 A Rated output DC 5 0 V 3 0 A 15 0 W Supported batteries EN EL18d EN EL18c and EN EL18b rechargeable Li ion batteries Operating temperature 0 C 40 C 32 F 104 F Average active efficiency 81 80 Efficiency at low load 10 72 50 No load power consumption 0 075 W Dimensions W ...

Страница 884: ...n number 34036589 Importer UK Nikon UK Branch of Nikon Europe BV with Chamber of Commerce BR022801 The Crescent Surbiton Surrey United Kingdom KT6 4BN EN EL18d Rechargeable Li ion Battery Type Rechargeable lithium ion battery Rated capacity 10 8 V 3300 mAh Operating temperature 10 C 40 C 14 F 104 F with Z 9 Dimensions W H D Approx 56 5 27 82 5 mm 2 3 1 1 3 3 in Weight Approx 175 g 6 2 oz excluding...

Страница 885: ...rship to another person you should also use the Reset all settings item in the camera setup menu to delete network settings and other personal information D Supported Standards DCF Version 2 0 The Design Rule for Camera File System DCF is a standard widely used in the digital camera industry to ensure compatibility among different makes of camera Exif Version 2 32 The camera supports Exif Exchange...

Страница 886: ...45 MB s 300 are recommended for video recording and playback CFexpress or XQD cards with a maximum data transfer rate of at least 250 MB s are recommended for recording and playback of videos with a high frame size or rate Slower speeds may result in recording or playback being interrupted When choosing cards for use in card readers be sure they are compatible with the device Contact the manufactu...

Страница 887: ...ty Image size File size Number of exposures remaining 2 Buffer capacity 2 3 NEF RAW lossless compression Approx 55 1 MB 3600 frames 79 frames NEF RAW high efficiencym Approx 33 0 MB 8500 frames 685 frames NEF RAW high efficiency Approx 22 0 MB 12 100 frames Over 1000 frames JPEG fine 4 Large Approx 24 1 MB 10 400 frames Over 1000 frames Medium Approx 14 3 MB 17 700 frames Small Approx 7 0 MB 35 40...

Страница 888: ...tuations including when an optimal compression m JPEG option is selected for Image quality or ON is selected for Auto distortion control 4 Figures assume a size priority option an option not marked with m is selected for Image quality Selecting an optimal compression m option increases file size the number of images and buffer capacity drop accordingly JPEG basic 4 Large Approx 5 3 MB 39 900 frame...

Страница 889: ... with ON selected for Energy saving photo mode in the setup menu Approx 740 shots OFF selected for Energy saving photo mode in the setup menu Approx 700 shots Monitor only selected for monitor mode with ON selected for Energy saving photo mode in the setup menu Approx 770 shots OFF selected for Energy saving photo mode in the setup menu Approx 740 shots Photo Mode Burst Photography Number of Shots...

Страница 890: ...on pressed halfway repeated autofocus operations taking NEF RAW photographs slow shutter speeds using camera Wi Fi wireless LAN and Bluetooth features using the built in GNSS receiver using the camera with optional accessories connected repeatedly zooming in and out and taking pictures at low ambient temperatures ...

Страница 891: ...easured with a NIKKOR Z 24 70mm f 4 S lens 4 In house measurements Image quality set to JPEG normal image size to Large shutter speed to 1 250 s shutter release button pressed halfway for 3 s and focus cycled from infinity to minimum range three times before a burst of six shots after which the viewfinder is turned on for 5 s and then turned off and the standby timer allowed to expire This process...

Страница 892: ...e iPad Mac and macOS are trademarks of Apple Inc registered in the U S and or other countries Android Google Play and the Google Play logo are trademarks of Google LLC The Android robot is reproduced or modified from work created and shared by Google and used according to terms described in the Creative Commons 3 0 Attribution License IOS is a trademark or registered trademark of Cisco Systems Inc...

Страница 893: ... are trademarks or registered trademarks of their respective holders Use of the Made for Apple badge means that an accessory has been designed to connect specifically to the Apple products identified in the badge and has been certified by the developer to meet Apple performance standards Apple is not responsible for the operation of this device or its compliance with safety and regulatory standard...

Страница 894: ... Unicode Inc All rights reserved Distributed under the Terms of Use in https www unicode org copyright html Permission is hereby granted free of charge to any person obtaining a copy of the Unicode data files and any associated documentation the Data Files or Unicode software and any associated documentation the Software to deal in the Data Files or Software without restriction including without l...

Страница 895: ... THE DATA FILES OR SOFTWARE Except as contained in this notice the name of a copyright holder shall not be used in advertising or otherwise to promote the sale use or other dealings in these Data Files or Software without prior written authorization of the copyright holder D AVC Patent Portfolio License THIS PRODUCT IS LICENSED UNDER THE AVC PATENT PORTFOLIO LICENSE FOR THE PERSONAL AND NON COMMER...

Страница 896: ...e for the open source software included in the camera s NVM Express driver is as follows https imaging nikon com support pdf LicenseNVMe pdf D Other Open Source Software Additional open source licenses can be found at the URL below https imaging nikon com oss en index htm ...

Страница 897: ...ces 0885 Navigation This product is a camera It is not intended for use as a navigation or surveying device The location reported by the camera is an approximation only It is not to be used for surveying or for navigation when travelling by air or car on foot or by other means Overseas Use Before travelling check with your travel agent or the embassy or tourism board of the countries you will be v...

Страница 898: ...ncy energy and if not installed and used in accordance with the instructions may cause harmful interference to radio communications However there is no guarantee that interference will not occur in a particular installation If this equipment does cause harmful interference to radio or television reception which can be determined by turning the equipment off and on the user is encouraged to try to ...

Страница 899: ...oration may void the user s authority to operate the equipment Interface Cables Use the interface cables sold or provided by Nikon for your equipment Using other interface cables may exceed the limits of Class B Part 15 of the FCC rules Nikon Inc 1300 Walt Whitman Road Melville New York 11747 3064 U S A Tel 631 547 4200 Notice for Customers in Canada CAN ICES 3 B NMB 3 B Z 9 ...

Страница 900: ...might result from incorrect disposal For more information contact the retailer or the local authorities in charge of waste management This symbol on the battery indicates that the battery is to be collected separately The following apply only to users in European countries All batteries whether marked with this symbol or not are designated for separate collection at an appropriate collection point...

Страница 901: ...uct outside the country of purchase The Bluetooth transmitter in this device operates in the 2 4 GHz band Notice for Customers in the U S A and Canada This device complies with part 15 of FCC Rules and Innovation Science and Economic Development Canada s licence exempt RSSs Operation is subject to the following two conditions 1 this device may not cause harmful interference and 2 this device must ...

Страница 902: ...gned to provide reasonable protection against harmful interference in a residential installation This equipment generates uses and can radiate radio frequency energy and if not installed and used in accordance with the instructions may cause harmful interference to radio communications However there is no guarantee that interference will not occur in a particular installation If this equipment doe...

Страница 903: ... has been tested and found to comply with FCC ISED radiation exposure limits set forth for an uncontrolled environment and meets the FCC radio frequency RF Exposure Guidelines and RSS 102 of the ISED radio frequency RF Exposure rules Please refer to the SAR test report that was uploaded to FCC website Compliance with RSS 247 Issue 2 6 4 Data transmission is always initiated by software which is th...

Страница 904: ...i Operating frequency 2412 2462 MHz channel 11 Africa Asia and Oceania 2412 2462 MHz channel 11 and 5180 5825 MHz U S A Canada Mexico 2412 2462 MHz channel 11 and 5180 5805 MHz other countries in the Americas 2412 2462 MHz channel 11 and 5745 5805 MHz Georgia 2412 2462 MHz channel 11 and 5180 5320 MHz other European countries Maximum output power EIRP 2 4 GHz band 8 4 dBm 5 GHz band 6 0 dBm Georgi...

Страница 905: ... to steal user IDs passwords and other personal information Unauthorized access Unauthorized users may gain access to the network and alter data or perform other malicious actions Note that due to the design of wireless networks specialized attacks may allow unauthorized access even when security is enabled Unsecured networks Connecting to open networks may result in unauthorized access Use secure...

Страница 906: ...906 Bluetooth and Wi Fi Wireless LAN A Certificates ...

Страница 907: ...ering 520 i button 65 i menu 65 O Q button 101 c button 148 c button 429 E button 143 b button 295 g Fn4 button 192 249 d help 63 Numerics 1 1 24 24 Image area 103 16 9 36 20 Image area 103 3D tracking 116 A AC adapter 852 Access point mode 329 367 Active D Lighting 512 583 ADL bracketing Auto bracketing set 187 AE flash bracketing Auto bracketing set 178 AE bracketing Auto bracketing set 178 AE L...

Страница 908: ...ates for deletion 262 Center weighted area 614 Center weighted metering 520 Charging AC adapter 75 Choose color temperature White balance 160 Choose image area 103 Clarity Set Picture Control 196 Clean image sensor 719 858 Cloudy White balance 159 Color space 511 Color temperature 162 167 Conformity marking 741 Connect to computer 760 Connect to FTP server 392 765 Connect to other cameras 770 Conn...

Страница 909: ...on 231 File naming 502 578 File number sequence 622 Fill flash 429 Filter effects Set Picture Control 196 Filtered playback 255 Filtered playback criteria 255 696 Finder display size photo Lv 712 Fine tune optimal exposure 615 Firmware version 754 Flange back distance 131 Flash White balance 160 Flash bracketing Auto bracketing set 178 Flash burst priority 643 Flash compensation 432 Flash control ...

Страница 910: ...White balance 159 Infrastructure mode 336 373 Interval timer shooting 542 IPTC 726 S Q button 154 ISO sensitivity 154 ISO sensitivity settings 508 580 ISO sensitivity step value 612 J JPEG Slot 1 JPEG Slot 2 Role played by card in Slot 2 503 K Keep exp when f changes 616 L Landscape Set Picture Control 193 Language 708 LCD illumination 627 LCD Illuminator 40 627 Lighten 287 Limit AF area mode sele...

Страница 911: ...ettings Connect to FTP server 765 Neutral Set Picture Control 193 N Log 225 Non CPU lens data 718 NX Studio 323 O On camera flash photography 422 Overflow Role played by card in Slot 2 503 Overlay add 285 Overview 239 P Pairing Bluetooth 757 Perspective control 283 Photo flicker reduction 518 Photo information 230 Photo shooting menu 491 Photo video selector 88 93 Picture review 696 Pictures shot ...

Страница 912: ... for upload to computer 356 Select pictures for upload 253 Select pictures for upload Connect to smart device 758 Selected pictures 261 Self timer 146 152 617 Sensor shield behavior at power off 719 Set Picture Control 192 Set the clock 85 Setup menu 706 Shade White balance 159 Sharpening Set Picture Control 196 Shooting data 235 Shooting menu bank 493 Shooting mode 132 Shutter speed 133 135 Shutt...

Страница 913: ... record button 93 View all in continuous mode 629 View assist 685 View mode photo Lv 624 Viewfinder brightness 711 Viewfinder color balance 712 Vignette control 516 584 Virtual horizon type 631 Vivid Set Picture Control 193 Voice memo 295 Voice memo options 732 W Warm display colors 626 WB bracketing 183 U button 158 White balance 158 Wide area AF L 116 Wide area AF S 116 Wi Fi connection 758 Wi F...

Страница 914: ...eproduction in any form of this document in whole or in part except for brief quotation in critical articles or reviews may be made without written authorization from NIKON CORPORATION SB1L01 11 6MO02511 01 ...

Отзывы: