background image

© 2021 Copyright Newmar Corporation. All rights reserved. For the most up-to-date version of this content, and for more product-specific information, please refer to Newgle.

90

ELECTRONICS

This monitor is an optional component and is not 

installed in all coaches with the XSG4 system.

NOTICE

!

Function

Description

1

Bluetooth Microphone

2

LDR (Light Dependent Resistor) 

and IR (Infra-red Receiver)

• 

LDR is used for the dimming of the 

display and is active when Auto dim in 

System Settings is set to Sensor.

• 

IR receiver is used with remote control 

operations.

3

Menu

• 

Tap MENU button once to go to the 

Main Menu (or Home Page).

• 

When in the Main Menu, you can either 

use the touch screen to select the 

desired icon (source) or you can keep 

tapping the Menu button to select 

different icons on the screen. When icon 

is highlighted for more than 1 second, 

the system will automatically open that 

icon.

• 

You can also access the Main Menu 

from any screen by tapping the function 

icon in the top left corner of the current 

screen.

• 

Note: When viewing video in full screen, 

touch the screen once to bring up 

the icon header which will display the 

function icon. Tap the icon to return to 

the Main Menu.

4

Navi

• 

Press the NAVI button once to go to the 

navigation system.

• 

While viewing the navigation press 

the NAVI button to return to the active 

source (Radio, or SXM, etc.). If the 

navigation route is running, navigation 

audio voice prompts will continue to be 

heard over the speakers according to 

the Navigation audio settings you have 

selected in the Settings menu.

• 

To hear only the navigation audio voice 

prompts, press and hold NAVI button 

for 2 (two) seconds. This will mute 

the active source until you leave the 

navigation screen.

5

Cam

• 

Press CAM button to directly go to 

Camera Control page.

6

Fav

• 

Your Infotainment Center is equipped 

with a favorite source hotkey. Press the 

FAV button once to directly access your 

favorite audio source.

• 

Favorite audio source is defaulted to 

Sirius XM, and it can be changed by 

going to Setup -> System -> Favorite 

Mode.

7

Volume/Power Rotary 

Button 

• 

Turn on the ignition to power up the 

Infotainment Center. When powered up, 

it will immediately go to the last mode 

(memory on playback) before it was 

turned off.

• 

In order to put the unit in standby mode, 

press and hold the rotary button once. 

During standby, your vehicles graphics 

together with date and time will be 

displayed.

• 

Press and hold the rotary button again 

to turn the unit on.

• 

Turn the rotary button left / right to 

adjust the volume to the desired level. 

A short press of the rotary button will 

Mute the audio.

• 

Note: When in standby mode, 

Infotainment Center consumes power. 

To completely turn the system on, 

remove the ignition key and / or ensure 

any auxiliary battery power to the 

system is turned off.

8

LDR (Light Dependent Resistor) 

and IR (Infra-red Receiver)

• 

LDR is used for the dimming of the 

display and is active when Auto dim in 

System Settings is set to Sensor.

9

Power Button

• 

Turns the Monitor On or Off.

10

Up Arrow

• 

Adjust settings up.

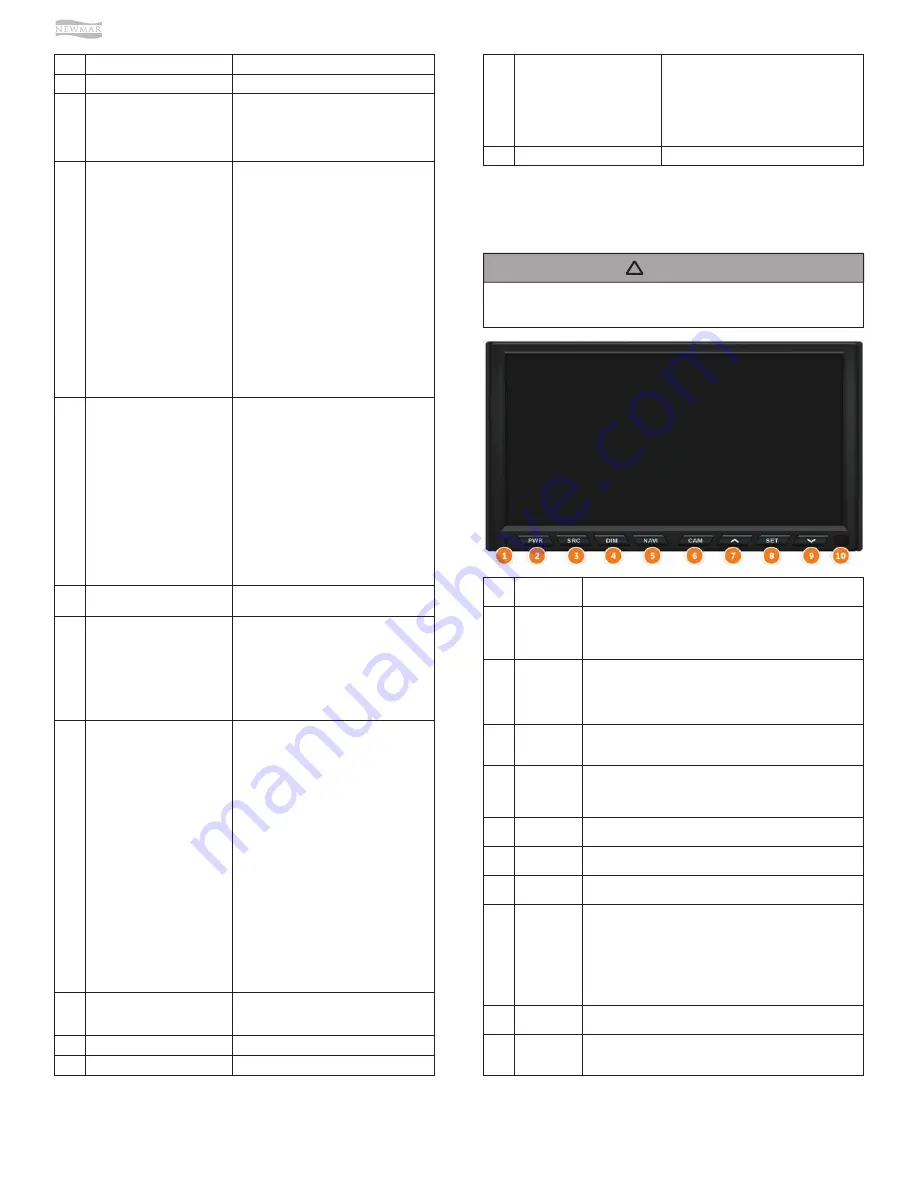
Function

Description

1

Status LED

• 

No light means power to the monitor is off.

• 

Red Light indicates that unit is in sleep mode.

• 

Green Light indicates that unit is powered on and working.

2

PWR

• 

If the status LED is red, press the PWR button once to turn 

the monitor on.

• 

If the status LED is green, press and hold PWR to turn the 

monitor off.

3

SRC

• 

Press SRC button to change the video source displayed 

on monitor.

4

DIM

• 

Press DIM to change the brightness of the screen (1 to 5).

• 

Set to SYNC for the brightness to be controlled by the 

Main Monitor.

5

NAVI

• 

Press NAVI button to enter / exit Navigation Menu.

6

CAM

• 

Press CAM button to directly go to camera view.

7

Up Arrow

• 

Up and Down Arrows work in combination with SET button.

8

SET

• 

Press SET button to adjust screen display.

• 

Use this button in combination with arrow buttons.

• 

Available options are:


Brightness (-10 to +10)


Contrast (-10 to +10)


Tint (-10 to +10)


Touch Adjustment for touchscreen calibration

9

Down Arrow

• 

Up and Down Arrows work in combination with SET button.

10

IR Receiever

• 

IR receiver is used with remote control operations 

(optional).

11

Set Button

• 

Press SET button to adjust screen 

display. Use this button in combination 

with arrow buttons.

• 

Available options are: Brightness (-10 

to +10), Contrast (-10 to +10), Tint (-10 

to +10), and Touch Adjustment for 

touchscreen calibration.

12

Down Arrow

• 

Adjusts settings down.

7” Secondary (Passenger) 
Monitor

Содержание LONDONAIRE 2022

Страница 1: ...SM 2022...

Страница 2: ...l engine exhaust exposes you to chemicals known to the State of California to cause cancer and birth defects or other reproductive harm Always start and operate the engine in a well ventilated area If...

Страница 3: ...2021 Copyright Newmar Corporation All rights reserved For the most up to date version of this content and for more product specific information please refer to Newgle This page is intentionally blank...

Страница 4: ...Slideouts 185 Care and Maintenance 197 This Owner s Guide is published and printed from Newmar s online knowledgebase For the most up to date version of this content and for more product specific info...

Страница 5: ...yright Newmar Corporation All rights reserved For the most up to date version of this content and for more product specific information please refer to Newgle TABLE OF CONTENTS This page is intentiona...

Страница 6: ...e are selective about what we put into our coaches We start with a foundation forged in the strength of steel and aluminum We fill it with beautiful durable hardwoods and select name brand appliances...

Страница 7: ...recreational vehicle 4 Responsible Use Your vehicle is designed to be used for recreational or temporary living purposes It is not designed to be used as a full time residence or for commercial use C...

Страница 8: ...this package will help you safely operate maintain and troubleshoot these items For more details about each of the components and systems installed in the coach refer to Newgle An information sheet i...

Страница 9: ...ble and trustworthy resources about your coach How much time do you spend trying to figure out how to operate your appliances or what cleaning products are safe to use on your floors What about troubl...

Страница 10: ...ge or from anywhere in the site using a key word or phrase or by the product name manufacturer or model number There is no need to search using coach information like the production number VIN model o...

Страница 11: ...he article about Sanitizing the Fresh Water System to view the step by step instructions for this procedure But that s not all For this particular topic you even have a video available for this topic...

Страница 12: ...ferent coach please request a new account to ensure that we have the most up to date information in our system Your login credentials may or may not change pending the newly provided email address LOG...

Страница 13: ...nformation visit the Parts and Support page on Newmar s website If you wish to schedule maintenance work schedule service work or order parts you should notify your local authorized Newmar Service Cen...

Страница 14: ...9 994 3328 Ottawa Gatineau area or internationally 800 333 0510 Toll free Online http www tc gc ca recalls Adresse postale Transports Canada ASFAD 330 rue Sparks Ottawa Ontario K1A 0N5 T l phone 819 9...

Страница 15: ...r solvent should be checked and filled if necessary Disconnect the unit from power Store the sewer and water supply hoses as well as shoreline power cords Secure all cargo in the storage compartments...

Страница 16: ...a safe location not under a bridge or overpass lay down away from windows and cover your head In the event of heavy rain or floodwaters do not attempt to drive through water that is crossing a road T...

Страница 17: ...the release button on the buckle There are different sizes and types of restraints for children from newborn to near adult size children Use the restraint that is correct for your child The restraint...

Страница 18: ...larm If a fire occurs in the vehicle evacuate the vehicle as quickly and as safely as possible Consider the cause and the severity of the fire and the risk involved before trying to extinguish it If t...

Страница 19: ...unit alarms get everyone out of the house immediately WARNING If the alarm ever fails to test properly replace it immediately Do not stand close to the alarm when the horn is sounding Exposure at clos...

Страница 20: ...re Extinguishers Source s Kidde Fire Extinguisher Owner s Manual Product s Kidde 10 lbs Fire Extinguisher UL Model 466295MTL Newmar Part Number 143817 Carbon monoxide is deadly Read and understand the...

Страница 21: ...ery holder and observe the polarity After approximately 30 seconds the battery operated detector will begin monitoring for carbon monoxide making the device operational The test reset button is used t...

Страница 22: ...ls the alarm will sound repeating horn pattern 4 beeps a pause 4 beeps etc Press and hold the Test Silence button until the horn is silent The initial Silence cycle will last approximately 4 minutes N...

Страница 23: ...batteries For products requiring multiple batteries replace all batteries of a set at the same time Do Not Mix Old and New Batteries Clean the battery contacts and also those of the device prior to b...

Страница 24: ...ergency Egress Exit Door and Ladder This article provides the Newmar recommended step by step instructions for operating the emergency exit door and ladder Emergency Egress Exit Door and Ladder TO USE...

Страница 25: ...Copyright Newmar Corporation All rights reserved For the most up to date version of this content and for more product specific information please refer to Newgle 20 SAFETY This page is intentionally...

Страница 26: ...that you contact the appliance manufacturer right away so they can note the account They may also assist with locating an authorized service technician near your location In order to service an appli...

Страница 27: ...over with a built in cutting board True Induction 2 Burner Induction Cooktop Operation Model TI 2B S2F3 This article provides basic operation instructions for a True Induction 2 Burner Induction Cookt...

Страница 28: ...ing this auto off setting In the event your food requires further cooking the unit can easily be turned back on and re set to the desired setting Turning Off Unit When you are finished cooking simply...

Страница 29: ...restarted Controls and Indicators TO RESTART DELAY START Close the drawer The clock icon will flash Press the Play Pause button to resume CANCEL WASH CANCEL DELAY START Press the Power button to cance...

Страница 30: ...t is in transit If it is not it can extend suddenly without warning potentially damaging the dishwasher its contents the cabinetry and may become dangerous to anyone standing near it IMPORTANT WASH PR...

Страница 31: ...ater temperature setting Heat Off Press to turn heat Off indicated by 1 short beep Note After the heater is switched off the fan will continue on for 60 seconds before turning off C Temp Press multipl...

Страница 32: ...with high intensity halogen lights ceramic heaters convection heating element and or conventional microwave energy Other Features CLOCK The clock must be set before you can use your oven for the firs...

Страница 33: ...NCEL OFF for 3 seconds to lock and unlock When the control panel is locked CONTROL IS LOCKED will be displayed briefly anytime a pad or dial is pressed TIMER Use this feature anytime you need a genera...

Страница 34: ...ght 12 HR 24 HR sound remind end signal daylight savings time adjustment demo mode filter remind word scroll screen clock For a list of functions options and corresponding numeric buttons refer to you...

Страница 35: ...ch SELECT to select desired option and follow the prompts CLOCK OPTIONS TIMER SET OFF KITCHEN TIMER 1 Touch TIMER SET OFF 2 Touch the number keypads to set the length of time For example to set 12 min...

Страница 36: ...BLE ON OFF Press and hold CONNECT while your router s WPS indicator light is blinking to connect your range to your Wi Fi network CONNECT WI FI 1 Press the Menu keypad to light up the back lit buttons...

Страница 37: ...d outside with a damp cloth for hygienic reasons NOTICE USING THE COOLER 1 Place the cooler on a firm foundation Make sure that the ventilation slots are not covered and that the heated air can dissip...

Страница 38: ...h on the WiFi transmitter to use the app The WiFi transmitter uses a small amount of power For optimal energy performance switch the WiFi transmitter off if it is not being used NOTICE RESETTING THE W...

Страница 39: ...IN THE APP You can personalise the name of your CFX in the app The same name applies to both Bluetooth and WiFi You can also personalise your password in the app applicable only to WiFi Proceed to CFX...

Страница 40: ...r button If condensation occurs on the doors turn the Energy Saver Button function off 4 Ice Off If you don t want to make more ice Press the Ice Off button The LED will light up and the Ice Maker sto...

Страница 41: ...s not required These steps cover the most common models NOTICE 3 Touch and hold Button 1 Button 2 and Button 4 at the same time until you hear a chime Vacuums Central cleaning systems make cleanup a s...

Страница 42: ...an in washing machine Let filter dry completely before reusing Source s InterVac CS Series Installation and Operating Manual Product s InterVac Central Vac System Model CS RM Newmar Part Number 142013...

Страница 43: ...er or similar brand per wash load These softeners tend to appear light in color and dissolve more quickly in less water minimizing build up within your machine Note Use powder detergent for white cott...

Страница 44: ...on the display MUTE The Mute symbol speaker icon indicates the possibility to silence the key tones While the mute is active almost all sounds will be turned off Only the sound signals and the alarms...

Страница 45: ...hnicians to ensure electrical and mechanical safety IMPORTANT Source s DV6400X Splendide Tumble Dryer Care Use and Installation Booklet Product s Splendide DV6400X 24 in Dryer Model DV6400X Newmar Par...

Страница 46: ...fer to Freightliner s Driver and Maintenance Manuals in Newgle for all chassis related information including but not limited to Vehicle Identification Dash Instruments Controls and Switches Steering a...

Страница 47: ...replaced please check if the smart key fob functions properly WHEN TO REPLACE THE SMART KEY FOB BATTERY 1 When the ignition is active and the smart key fob battery is between 1 to 2 15 V the instrume...

Страница 48: ...to answer and or end a call or change the call volume from the steering wheel control pods Steering Wheel Buttons The OptiView instrument panel provides the driver with engine and vehicle information...

Страница 49: ...es the basic positions for a rotary style headlight switch on Freightliner coaches equipped with an OptiView dash 1 Fog lights Activate by pulling the switch out when the marker lights or headlights a...

Страница 50: ...uthenticated If the key fob does not open the doors this may be an indication of a low battery in the key fob AMBER LAMP Indicates vehicle power is ON in ACC and IGN modes Lamp is off to avoid driver...

Страница 51: ...r to Newgle 46 CHASSIS Spartan Valid Glass Dash Instrument Panel Quick Start Guide This article provides a quick reference guide for the indicators and gauges on the Spartan Valid Glass Dash Instrumen...

Страница 52: ...ed by Spartan and Newmar based on the model and year of coach as well as the available standard and optional equipment The location of gauges and icons on the instrument panel may vary from what is sh...

Страница 53: ...rear stone guard before loading vehicle Verify air suspension will hold air never tow vehicle with air springs deflated Verify front tow mounting will not damage other vehicle components Drive shaft...

Страница 54: ...ion with a pedestrian or bicyclist Operational during daylight hours only Active under 31 MPH Green pedestrian icon appears in area defined as the Danger Zone Time to collision is not critical no audi...

Страница 55: ...lision Mitigation OnGuard ACTIVE detects objects ahead and measures the vehicle s position and speed in relation to other vehicles on the road to warn the driver of a possible collision by providing a...

Страница 56: ...ation you may have to simply reapply the cruise control button or turn ACC off and back on again It is possible that you may lose the ability to throttle the vehicle for a short time couple of seconds...

Страница 57: ...inflate floats bike tires or car tires If necessary the compressor can be used to inflate a coach tire in a emergency when other sources of compressed air are unavailable however it will take some tim...

Страница 58: ...at least once a month to keep the system in operating condition IMPORTANT 5 Verify that the path of the slideout is unobstructed and free from any surrounding objects both inside and outside of the co...

Страница 59: ...ulic Leveling Operation Place transmission in the recommended position for parking the vehicle and set parking brake Turn the coach engine off Turn the ignition to the Accessory position One or two ye...

Страница 60: ...the product s offered for your coach s model year Jacks will extend or retract in pairs to raise or lower a side or end of the vehicle Any jack not used for leveling can be extended to the ground This...

Страница 61: ...iguration on the screen using the up and down arrows 2 Press the OK button on the steering wheel to select 3 Navigate to Steering Effort on the screen using the up and down arrows 4 Press the OK butto...

Страница 62: ...ufactured after the year 2000 signify the week and year of manufacture The tire in the example picture was made during the 29th week of 2017 D O T Example This article provides information about the c...

Страница 63: ...ed equipment Weigh each axle end separately and use the heaviest end weight to determine the axle s cold inflation tire pressure For units operating significantly under maximum weight carrying capacit...

Страница 64: ...tart features must be disabled prior to servicing WARNING 12 Volt Electrical System This article provides general information about the components and functions of the 12 Volt Electrical System DC in...

Страница 65: ...g the battery disconnect in the off position make sure the inverter if equipped is turned off When an older coach is stored while plugged into shore power do not use the battery disconnect If the batt...

Страница 66: ...r mini breaker before progressing to the load When a 12 Volt load or component is not working both 12 Volt power and 12 Volt ground are needed for the load to complete the 12 Volt circuit IMPORTANT 12...

Страница 67: ...0 Volt alternating current The inverter performs this action by using a transformer to increase the voltage and modify the higher voltage into a useable alternating current power Power then goes to th...

Страница 68: ...ng full power MAIN SERVICE PANEL BREAKER BOX The main service panel or 120 Volt breaker box is typically located inside a bathroom bedroom or front overhead cabinet depending on the coach model and fl...

Страница 69: ...able power it can control up to seven loads The EMS controls air conditioner loads using low voltage switching and other 120 Volt heavy load appliances such as block heaters water heating elements and...

Страница 70: ...Push the reset button again until a click is heard to reactivate the protected circuit If the GFCI is working properly the reset button will remain in the IN position If an item plugged into a Slideou...

Страница 71: ...g the electrical terminology as well as the average amperage current draw of all the electrical appliances in your coach can help you manage electrical use and prevent the inconvenience of tripping a...

Страница 72: ...ry bank when a new battery becomes necessary as the battery bank is only as good as the weakest cell One simple way to extend battery life is to hook it up to a solar charger during the off months Man...

Страница 73: ...voltage charging Gel Cell batteries are best used in very deep cycle applications and may last longer in hot weather applications CAUTION Follow battery manufacturer instructions Do not add any liqui...

Страница 74: ...er than in an even layer This article provides a brief overview of the two different battery banks in a Newmar coach House and Chassis Chassis Battery Bank The Chassis Battery Bank supplies power to e...

Страница 75: ...a diesel pusher coach Freightliner chassis batteries are sealed non serviceable batteries They are provided with the chassis and warrantied through the chassis manufacturer Freightliner The type and...

Страница 76: ...t on the disconnect and will need to be powered off separately This allows the inverter to charge the batteries when plugged into shore power with the battery disconnect turned off Some switches have...

Страница 77: ...not warrantable Failure to charge a battery during a period of six months or more Inactivity can be extremely harmful to all lead acid batteries This article provides information regarding the inspec...

Страница 78: ...nsion forcing excess electrolytes from the battery This article provides information about how and when to replace coach batteries Replacement batteries should be the same brand and capacity as the or...

Страница 79: ...management systems used by Newmar Whenever possible connect coaches equipped with 50 amp shore power cord to 50 amp service and connect coaches with 30 amp shore power cords to 30 amp service accordin...

Страница 80: ...the compartment with the shore power cord This fuses control the battery boost battery disconnect keyless entry hydronic heat LP detector and entrance steps In this same location there are also 12 vol...

Страница 81: ...anking This pre heat condition is noted by flashing the light on the generator start switch until the cycle is complete up to 15 seconds Once it has pre heated sufficiently the starter will engage and...

Страница 82: ...rn off one of the air conditioners as the 8kw generator is not intended to run all three roof air conditioners at the same time NOTICE Inverters and Converters Provides basic information about the rol...

Страница 83: ...r a brief delay Any AC loads previously powered by the inverter will also work at this time NOTE On dual input models only AC Input L1 needs to be powered for the unit to operate Freedom SW AC and DC...

Страница 84: ...ny wiring modifications be performed by an authorized service technician When replacing halogen bulbs do not touch the bulb as the oil from your hands will reduce the bulb s life IMPORTANT Turn off th...

Страница 85: ...cated throughout the interior of the coach 120 Volt Outlets Several 120 volt receptacles are located throughout the interior of the unit These receptacles require three pin plugs that provide proper g...

Страница 86: ...button will remain in the IN position If an item plugged into a slideout or outside receptacle is not working check for a tripped GFCI in the kitchen or bathroom Likewise if the floor heat or holding...

Страница 87: ...view Diesel coaches may have an outlet designed for use with the engine block heater It may be located in the engine compartment or in one of the rear compartment bays Block Heater Outlet This outlet...

Страница 88: ...cle provides basic operation instructions for a Xantrex C Series Solar Charger Remote and Controller Model C35 C40 C60 Remote Display C40 The Xantrex C Series Meter Display provides a digital display...

Страница 89: ...and the integrated surge protector The transfer switch allows your coach to be powered by more than one power source while only allowing one active power source connection at a time When the generator...

Страница 90: ...d reads Delay Active this means that the fault condition has cleared and that the switch is going through a 2 5 minute delay before it will attempt to close the contactor again Wait until this delay i...

Страница 91: ...his is handy as it allows you to view the voltage or current when there is a fault condition being displayed on the main screen FAULTS SCREEN Allows you to view a history of up to 50 faults which have...

Страница 92: ...e month year and so on by pushing the lever to the left Once you have entered the correct time and date press and HOLD the lever IN for 3 seconds You will see TIME IS SET once complete You can now rel...

Страница 93: ...opyright Newmar Corporation All rights reserved For the most up to date version of this content and for more product specific information please refer to Newgle 88 ELECTRICAL This page is intentionall...

Страница 94: ...ent System with Dual 10 4 Touchscreens Model XSG4NA X4S Please review all disclaimers warnings and detailed operating instruction in your Xite Owner s Manual prior to using your Infotainment Center IM...

Страница 95: ...Infotainment Center When powered up it will immediately go to the last mode memory on playback before it was turned off In order to put the unit in standby mode press and hold the rotary button once...

Страница 96: ...of these sources is active To exit the Settings menu at any time press the Settings icon in the top left of the screen SYSTEM SETUP By touching the SYSTEM button the settings for the system part of th...

Страница 97: ...detected Select Xite systems may have a CAM button that serves as a shortcut to the camera settings Xite systems with a 360 Camera Select switch allows the user to toggle through and select multiple...

Страница 98: ...reverse and decide you want to go to a different view press a button and the view will change to the selected view That view now becomes the DEFAULT If a turn signal is active and the coach is put int...

Страница 99: ...screen to view the picture on the camera monitor 2 If the doorbell button on the grab handle is pressed several things will happen All the displays front overhead and bedroom SilverLeaf monitor and d...

Страница 100: ...LCD Touchscreen Operation This article provides brief operating instructions for a KIB LCD touchscreen Operation Touch the inactive blank screen to activate and display the Lighting screen Once the pa...

Страница 101: ...e fan is currently in operation which fan speed is selected or the automatic rain sensing technology is disabled KITCHEN MASTER BATH STOOL ROOM WATER PUMP HEATER Turns the fan blower on and off TV LIF...

Страница 102: ...our maps POI database and the Navigation program itself via an internet connection You will be automatically notified when new updates are available and can download them when it is most convenient fo...

Страница 103: ...s and sets the value Drag the handle to move the slider to its new position Tap the slider where you want the handle to appear Virtual Keyboard Used to enter text and numbers Each key is a touch scree...

Страница 104: ...restrictions may not be taken into account in route calculation Route Planning Method Optimize the route calculation for different situations and vehicle types by changing the planning method Navigati...

Страница 105: ...l accurate Warnings Settings SPEED LIMIT The program is able to warn you if you exceed the current speed limit This information may not be available in your region or may not be fully correct for all...

Страница 106: ...he original default state The application will prompt to confirm your selection The application will restart to apply the changes Updates The XSG4NA is set up to only allow Over the Air updates This m...

Страница 107: ...f the page to continue to the next step 2 Accept the license agreement by pressing Accept 3 Proceed to the configuration wizard by pressing the Next button at the bottom of the page 4 Select the desir...

Страница 108: ...t the Vehicle line to access the vehicle profile selections 3 When in the vehicle selection list press the Arrow up icon in the bottom right corner to access the Edit function 4 Select which vehicle p...

Страница 109: ...ass transponder vehicle and pre payment method Once activated you will only be charged for replenishing your account when the balance drops below a minimum and you will only be charged a service fee p...

Страница 110: ...E OPERATIONS Button 1 Unlock entry doors Button 2 Unlock doors wired to 2nd unlock output Button 3 NA Button 4 Sequentially activate entry unlock and 2nd unlock outputs LIGHT ACTIVATION When the alarm...

Страница 111: ...beep and not change anything E Fob Operation and Features Cargo Mode Button Function Entry Lock Locks entry doors and arms security system Entry Unlock Unlocks entry doors and disarms security system...

Страница 112: ...voltage the status of the chargers inverters and the rate of charge as well as a Battery Disconnect button that functions similarly as the rocker switch in the front overhead GENERATOR Pressing the G...

Страница 113: ...s Monitor Diagnostics Tank Configuration View AC Power History Customize Monitor Monitor Configuration Climate Screen Configuration View Logo View Clock Test Touchscreen BRIGHT This button controls th...

Страница 114: ...5 8GHz WiFi a USB port for LTE tethering and 1000Mbps LAN ports OUTDOOR ROUTERS Teton WiFiRanger Teton is an entry level outdoor router with 2 4GHz WiFi 1mi range a 100Mbps LAN port and an integrated...

Страница 115: ...not have the offerings you desire or you may need a more knowledgeable representative to handle your request Ask different cellular stores resellers or a direct Carrier representative until you find t...

Страница 116: ...d SIM Size Be sure that SIM card is Standard size as Nano and Micro sizes will not fit properly within Converge routers or LTE modems A SIM card size adapter kit may be used to resize the SIM REFRESHI...

Страница 117: ...pyright Newmar Corporation All rights reserved For the most up to date version of this content and for more product specific information please refer to Newgle 112 ELECTRONICS This page is intentional...

Страница 118: ...olt accessories Do not use this outlet for a cigarette lighter Over The Air Signal If the reception is poor make sure the power switch for the power booster is in the ON position and all of the coax c...

Страница 119: ...kly cycle through the positional LED position to indicate the antenna is moving and direction it is moving After the search is complete the antenna will automatically go to the position which results...

Страница 120: ...xample while going through a tunnel under a bridge by a building etc programming will not be available Once the block is removed the programming will return DirecTV The RoadTrip T4 antenna switch sett...

Страница 121: ...This does not harm the unit The system will pause to acquire GPS 5 Once the dish begins its search it pauses on signals long enough to determine which satellite it has found The antenna may move off...

Страница 122: ...type check software hardware versions change desired satellite configuration or manually move the dish Ready To Travel The TRAV LER antenna is not meant for use while traveling To stow the unit when y...

Страница 123: ...source you want to control DIALOGUE MODE Dialogue mode improves the clarity of dialogue and vocals in movies TV programs and podcasts by adjusting the audio balance of the system On the remote press...

Страница 124: ...Entertainment Center may be an option on selected floorplans It may be located in either a basement compartment or in the sidewall of the passenger side of the coach and features a flat screen televis...

Страница 125: ...io cannot be played through the soundbar The radio may be played through the soundbar via the Xite radio s House Mode feature however the exterior television must be turned off To play media through t...

Страница 126: ...n a micro fiber cloth and then use the cloth to wipe away the smudges This article provides basic operation instructions for a Samsung 4K Crystal UHD 7 Series Television Model TU7000 Samsung 4K UHD 7...

Страница 127: ...until Settings appears on screen Push Select 3 Scroll down to Broadcasting and push Select 4 When Auto Program is highlighted push Select 5 Highlight Start and push Select The TV will search for loca...

Страница 128: ...ms button 2 Press and release the TV Lift Up button to raise the TV 3 Press and release the TV Lift Down button to lower the TV 4 The lift will continue in the selected direction until it reaches the...

Страница 129: ...ht Newmar Corporation All rights reserved For the most up to date version of this content and for more product specific information please refer to Newgle 124 ENTERTAINMENT SYSTEMS This page is intent...

Страница 130: ...ocations based on coach model and year but will always be within the driver s reach 1 With the Air Horn Switch turned on and adequate air pressure in the air tanks press the horn icon on the steering...

Страница 131: ...er Power batteries must be charged for inverter operation The main patio awnings are operated by a handheld remote switch or a switch mounted in the overhead cabinets or on the wall in the passenger c...

Страница 132: ...n as an unlocked padlock icon To lock the doors press the switch to the locked position shown as a locked padlock icon Electric Compartment Locks Overview This article provides basic information about...

Страница 133: ...pped opposite of the operational position the step will stay extended The step will remain in the extended position unless the ignition signal is activated which overrides the Entrance Step switch In...

Страница 134: ...nd and lock in the DOWN position This is the Auto Extend feature When the vehicle ignition is turned on the step will always activate with the door movement regardless of the step switch position Sour...

Страница 135: ...Some mirrors can be operated via remote control This article provides basic operation and adjustment instructions for an exterior mirror Mirrors Overview Your coach may be equipped with convex remote...

Страница 136: ...ose the opposite end and attach mounting chain 4 Loose parts may include the optional tablet phone mount slide into Aire Nest 5 Sit on the edge of hammock first near center then swivel legs up into co...

Страница 137: ...sing stiff bristle brushes may cause scratches in the fiberglass surface EXTERIOR PAINT MAINTENANCE For cleaning and waxing instructions and recommended products refer to the Miscellaneous Care and Ma...

Страница 138: ...ce is essential to keeping your film looking great This will also reduce the risk of staining and discoloration from bug acids runoff stains and road grime left on for an extended period When done app...

Страница 139: ...Unclip and lower the arm 2 Swing the arm 90 degrees and push out on the arm until the red handle latches TO CLOSE THE VENT 1 Unclip the red handle from the latch by lifting slightly while pushing outw...

Страница 140: ...How To Operate The Driver Side Power Window The Driver Side Window Directional Switch on the dash operates the driver side window 1 With the ignition on press and hold the switch in the up or down pos...

Страница 141: ...in your ceiling cavity This condition often causes the occupants to believe the recreational vehicle has a roof leak Walls and ceiling panels may also become wet when the moisture accumulates on thes...

Страница 142: ...heating air conditioning system Select coach models may have a driver and passenger control with a switch that allows the driver to override the passenger controls If the mode knob is in any position...

Страница 143: ...ower The blower knob left of center provides four speeds in any mode except when the control is set to OFF Controls and Settings While actively changing the driver control settings the climate status...

Страница 144: ...article provides a brief overview of the roof air conditioning and heat pump as well as filter maintenance Keep your coach comfortable year around On some coach models grills with filters may be locat...

Страница 145: ...e formaldehyde vapors into the air which may cause headaches and in some people eye nose and throat irritation Formaldehyde may intensify some allergies or upper respiratory problems like asthma Provi...

Страница 146: ...output of the diesel burner is 50 000 BTU s select double shower floorplans may be equipped with the 85 000 BTU model The second heat source is an electric heating element It is important to note the...

Страница 147: ...proximately 50 000 BTU s of heat and is designed to start and operate the system at full capacity The electrical heating element provides approximately 5000 BTU s of heat IMPORTANT Oasis Basement Heat...

Страница 148: ...ER PRIMARY HEAT SOURCE The burner switch on the Remote Operating Panel controls the ON OFF of the diesel burner primary heat source When the burner switch is turned ON the diesel portion of the Oasis...

Страница 149: ...by examining the Control Panel located on the front of the Oasis Chinook There are indicator LED s on the panel that are used for diagnostics ZONE FAULT LED RED When ON indicates a space heating zone...

Страница 150: ...ulate the engine coolant through the engine heat exchanger The Summer Loop is an automatic action of the Oasis system and requires no action from the user It works like a stir pump and causes water to...

Страница 151: ...at zone settings are controlled by slider bars Use your finger to drag the slider bar or use the up down arrows on the touchscreen display to select your preferred time The higher the number of bars s...

Страница 152: ...te The Auto button is used to activate the auto climate feature of the HVAC system This feature allows the temperature to be set and determines whether to use heat or A C to maintain the set temperatu...

Страница 153: ...Copyright Newmar Corporation All rights reserved For the most up to date version of this content and for more product specific information please refer to Newgle 148 HVAC This page is intentionally b...

Страница 154: ...ge Turn the switch off 5 Place the air mattress on the bed To inflate the air mattress 1 Route the pump plug to a nearby 120 volt outlet 2 Remove the valve cap on the air mattress by simply turning it...

Страница 155: ...Sleep Number setting This may take a few minutes Sleep Number Mattress Operation Model Comfortaire r5 This article provides a basic overview of a Sleep Number Mattress Comfortaire r5 At the heart of t...

Страница 156: ...ange of 40 90 degrees The air conditioner or a dehumidifier will reduce the humidity level however in dry climates a humidifier may also aid in maintaining the appropriate humidity levels by raising t...

Страница 157: ...the main countertop to release the island extension 4 Pull out on the extension until the magnetic catches engage To retract the counter push in the extension until it latches COACHES BUILT PRIOR TO...

Страница 158: ...ay leave a waxy build up that dulls the surface IMPORTANT Wipe up spills as soon as they occur Film can also build up on the countertop if water is left to dry making it appear blotchy and uneven Alwa...

Страница 159: ...ht is not covered by the Newmar Limited Warranty IMPORTANT Fabrics and Materials Care and Maintenance This article provides care and maintenance recommendations for the fabrics and materials installed...

Страница 160: ...ughly rinse all solution residue with clean water Air dry Flooring Flooring both tile and carpet is installed with Newmar s own in house process ensuring the best in quality and longevity as well as t...

Страница 161: ...seats and is NOT all inclusive of available features on any one particular seat Chair manufacturers styles and features vary by coach Seat features may be controlled via rocker or joystick style swit...

Страница 162: ...es may be equipped with a memory package that allows you to set and store up different combinations of seat steering wheel pedal and exterior rear view mirror positions for up to three drivers For mor...

Страница 163: ...coaches the switch for the interior step cover is located either on the side of the passenger console or on the dash console near the center This cover allows you to freely walk inside of the coach wi...

Страница 164: ...ush the reset button Replace the cap securely over the reset button after setting your combination Failure to do so will compromise the safety and security of the safe Entering Your Security Code To e...

Страница 165: ...pressing the Volume key To turn the Beep sound on press the Volume key again Product s Stack On PWS 1822 E Security Wall Safe Owner s Manual Model PWS 1822 E Newmar Part Number 144484 Shades and Wind...

Страница 166: ...h operated shades require the switch to be held until the shade either reaches its limit or the desired intermediate position the shade can be stopped at any point by simply releasing the switch The s...

Страница 167: ...opyright Newmar Corporation All rights reserved For the most up to date version of this content and for more product specific information please refer to Newgle 162 INTERIOR This page is intentionally...

Страница 168: ...for the plumbing system prior to using your coach Failure to connect and operate the system correctly may result in damage not covered by the Newmar Limited Warranty About The Waste Water System Ther...

Страница 169: ...ut the coach 4 Fresh City Water Connection via Hose Reel This potable water connection is used in conjunction with the Fresh Water Fill Valve for a number of purposes including pressurizing the plumbi...

Страница 170: ...sewage tank rinse connection After the tank is drained leave the gate valve open and open the water valve to the attached hose allowing water to spray inside the sewage tank for several minutes to fl...

Страница 171: ...Reel and City Water Connection Overview How to Operate the Cargo Lights How to Winterize a Coach Waste Water Disposal Waste Water Holding Tanks Water Filter Care and Maintenance Water Pump Operation...

Страница 172: ...lines and or inline water filters The valve s could be located various places depending on the coach year model and floorplan i e under the kitchen sink under the dinette booth in the false pantry fl...

Страница 173: ...ORTANT The fresh water fill valve located in the service compartment near the water hook up determines whether the city water is going through the water system or into the fresh water tank The excess...

Страница 174: ...esh Water Valve to the appropriate position to perform the desired function FRESH WATER VALVE EXAMPLES Auto Fill For coaches equipped with an Auto Fill function the coach must be connected to a pressu...

Страница 175: ...rticle provides a brief overview of the fresh water auto fill function If a coach is equipped with the Auto Fill function it is used to automatically fill the fresh water tank and shut off the water s...

Страница 176: ...et is opened the pump will turn on and operate as necessary to maintain the preset pressure in the system Water pump operation is not necessary while the coach is connected to city water since the pot...

Страница 177: ...asive chemicals Alcohol or similar solvents should never be used IMPORTANT To use the hot water spigot in the front generator area 1 Make sure the fresh water tank has water in it Make sure the water...

Страница 178: ...sic instructions for replacing a Flow Pur Whole House Water Filter Replacement filter cartridges are available through the Newmar parts department For parts inquiries refer to the NewPar formerly ComN...

Страница 179: ...levels above this level can damage the fresh water plumbing in the coach If the water pressure ever surpasses 60 PSI a pressure regulator must be installed to reduce the incoming pressure or fill the...

Страница 180: ...original luster Clean the entire surface including the exterior of the lavatory and kitchen sinks and shower with mild soap and warm water Wipe the entire surface completely dry with a clean soft clot...

Страница 181: ...r over the spout of the pump to block the airflow up into the pump This creates a partial vacuum in the pump chamber when the button is released c Keep your finger over the spout and release the pump...

Страница 182: ...hower pipe This knob also selects the water output intensity If left in the diverted recycle position while the coach is connected to city water the Aqua Miser system will continue to add water to the...

Страница 183: ...en using your stool it is wise to fill the bowl 3 4 full of water This will help to wash the solids away from directly below the stool and to ensure complete dumping of the holding tank After flushing...

Страница 184: ...5 gallons per flush and adds water to bowl after ever flush 2 Dry Bowl Flush Uses 0 45 gallons per flush and does not add water to bowl after flush To change from Normal to Dry Bowl flush setting pres...

Страница 185: ...Electrical power to the toilet is activated Power On Flashing Green The flush mode is changing Tank Level Amber The holding tank is 75 full Tank Level Red The holding tank is 100 full UNDERSTANDING TH...

Страница 186: ...s it may impair the tank sensor s ability to read tank levels properly Preventive tank maintenance is recommended Both tanks should be rinsed after dumping and treated with a waste tank additive to he...

Страница 187: ...un louder when the tank is empty 8 Turn off the pump switch once the tank is empty 9 Flush the black tank and operate the macerator while it is flushing 10 Turn off the flush system then turn off the...

Страница 188: ...ugh the stool As you travel the agitation of the water should help liquefy any solids left in the tank You can dump the sewage tank again at your next destination Select coaches may also have a tank f...

Страница 189: ...opyright Newmar Corporation All rights reserved For the most up to date version of this content and for more product specific information please refer to Newgle 184 PLUMBING This page is intentionally...

Страница 190: ...ll and return to ride height units without air suspension will return to normal suspension 4 Turn the engine off 5 For a full wall slideout visually inspect the front vertical trim for adequate cleara...

Страница 191: ...in the overhead cabinet above the driver or passenger chair or the overhead cabinet above the entrance door ELECTRIC WARDROBE SLIDEOUTS The operating switch for the wardrobe slideout is usually locat...

Страница 192: ...c Slideout Maintenance This article provides care and maintenance information for the electric slideout Electric slideout drive mechanisms do not require lubrication as part of the scheduled maintenan...

Страница 193: ...d the bottom of the slideout in a few different places to create more clearance 5 Clean the rollers one at a time with a soft cloth and a mild cleaner A wet Swiffer cloth can also be used Do not use h...

Страница 194: ...operational This can also be done at the slideout controller s wiring harness by removing the motor s red and black harness plug from controller and jumping a 12 VDC power source at the Molex plug 3 D...

Страница 195: ...tract the slideout If the wire polarity is reversed the slideout will extend instead of retract If the slideout motor has a brake installed you must also hook one brake wire to the battery with the re...

Страница 196: ...wheel well area under a cover NOTICE Hydraulic Slideouts The operating switch for the Hydraulic Flat Floor Slideout is usually located in the overhead control panel WARNING Read the HWH Operation man...

Страница 197: ...s before moving room 3 Caution on motorhomes Move driver seat forward before moving room 4 Press and hold the appropriate slideout switch until the slideout room is fully retracted and stops moving 5...

Страница 198: ...ill be necessary to use the lift bolts and room retract screws 2 Locate the lift cylinder covers like the examples shown Some coaches may have an additional rubber cover installed over the ABS cover t...

Страница 199: ...t This article provides instructions for manually retracting an HWH hydraulic slideout 1 Start both threaded rods until resistance is met one for the front and one for the rear mechanism should be pro...

Страница 200: ...the room has been serviced Any solenoid valves left open should be closed The threaded rods should be completely removed before room is fully extended If there is not enough room to remove both thread...

Страница 201: ...opyright Newmar Corporation All rights reserved For the most up to date version of this content and for more product specific information please refer to Newgle 196 SLIDEOUTS This page is intentionall...

Страница 202: ...h Gross Axle Weight Rating GAWR The maximum permissible weight for an axle Gross Combination Weight Rating GCWR The value specified by the manufacturer of the vehicle as the maximum allowable loaded w...

Страница 203: ...nner or paint on decals Do not overcoat the decals with clear paint Do not allow gasoline or other fuels to drip or stay on the decals for any length of time If this occurs immediately flush the area...

Страница 204: ...at least 90 days from the coach s date of manufacture The coating on your coach is a state of the art base coat and Urethane clear coat The clear coating is designed to protect the colored base coat s...

Страница 205: ...or corrosion you may use a very fine steel wool but should be a last effort Test it in an inconspicuous area to ensure no damage is occurring while using the steel wool 4 Rinse the area with clean wat...

Страница 206: ...olt element depending on your coach s equipment 4 Turn on the refrigerator 5 While the tank is draining remove all of the water filters Install a bypass or the filter canister including the whole hous...

Страница 207: ...with a sprayer activate and flush it until the antifreeze flows from the sprayer IMPORTANT Make sure you run enough antifreeze through each faucet to fill each P trap IMPORTANT For coaches equipped w...

Страница 208: ...tifreeze Clean out the ice maker and the tray until clear ice is available 10 If the coach is equipped with a water heater install a drain plug Open the water heater valves and close the by pass valve...

Страница 209: ...es equipped with a 75 gallon fresh water tank This will approximately be a 50 ppm parts per million bleach solution 5 Reinstall the housing and the water heater drain plug after it has drained complet...

Страница 210: ...or oil fuel and air filter change X Lubricate the moveable parts on the entrance step X Inspect the slideouts for proper seals If realignment is necessary please contact an Authorized Newmar Service C...

Страница 211: ...recommended by the tire manufacturer X X X X Replace air cleaner X X Inspect radiator and CAC for debris and damage X X X X Check alternator chassis batteries and starter X X X X Inspect belts and bel...

Страница 212: ...to Newgle 207 CARE AND MAINTENANCE IMPORTANT Service Record Use this chart to keep track of all service work performed on the coach For additional pages refer to Newgle Date Service Center Dealer Nam...

Страница 213: ...this content and for more product specific information please refer to Newgle 208 CARE AND MAINTENANCE Date Service Center Dealer Name and Address Description of Service Work Performed Cost xx xx xxxx...

Страница 214: ...formation please refer to Newgle 209 CARE AND MAINTENANCE Date Odometer Milage Fuel Gallons Oil Quarts Average MPG Cost Date Odometer Milage Fuel Gallons Oil Quarts Average MPG Cost Fuel Oil and MPG R...

Страница 215: ...most up to date version of this content and for more product specific information please refer to Newgle 210 CARE AND MAINTENANCE IMPORTANT Date Odometer Milage Fuel Gallons Oil Quarts Average MPG Cos...

Страница 216: ...2022 NE W AIRE SM When You Know The Difference Newmar Corporation 355 N Delaware St PO Box 30 Nappanee IN 46550 0030 574 773 7791 Fax 574 773 2895 NewmarCorp com...

Отзывы: