


NV-HMI-7XX User Manual
28
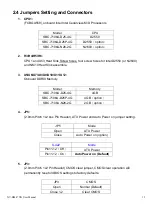
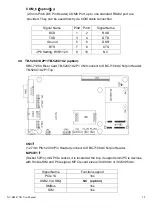
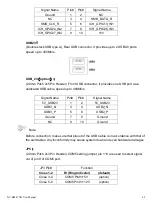
with USB2.0 and LPC and SMBUS and PCIe signal. MPCIe card size is 30x30mm.
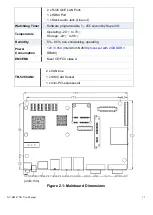
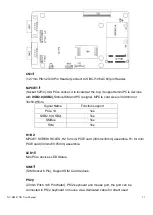
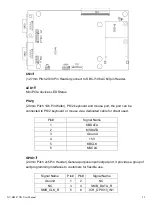
30. H1/H2:
MPCIE1 SCREW HOLES, H1and H2 for mini PCIE card (30mmx30mm) assemble.
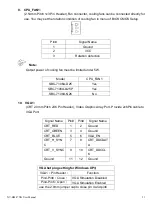
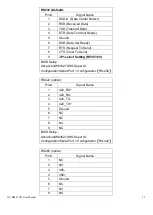
31. AUDIO:
(2.0mm Pitch 2X6 Pin Header), Front Audio, An onboard Realtek ALC662 codec is used
to provide high-quality audio I/O ports. Line Out can be connected to a headphone or
amplifier. Line In is used for the connection of external audio source via a Line in cable.
MIC is the port for microphone input audio.
Signal Name
Pin#
Pin#
Signal Name
+5V
1
2
GND_AUD
LINE-OUT-L
3
4
LINE-OUT-R
FRONT_JD
5
6
LINE1_JD
LINE-IN-L
7
8
LINE-IN-R
MIC-IN-L
9
10
MIC-IN-R
GND_AUD
11
12
MIC1_JD
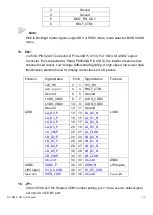
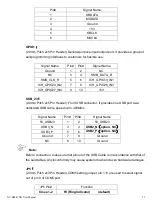
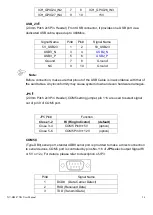
32. LINE_OUT:
(Diameter
3.5mm Jack), HD Audio port, An onboard Realtek ALC662 codec is used to
provide high quality audio I/O ports. Line Out can be connected to a headphone or
amplifier.
33. USB45:
USB4/USB5
:
(Double stack USB type A), Rear USB connector, it provides up to 4
USB2.0 ports, High-speed USB 2.0 allows data transfers up to 480 Mb/s ,support USB
full-speed and low-speed signaling.
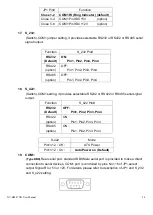
Each USB Type A Receptacle (2 Ports) Current limited value is 1.5A.
If the external USB device current exceeds 1.5A, please separate connectors into
different Receptacle.
Содержание NV-HMI-717P
Страница 9: ...NV HMI 7XX User Manual 9 1 2 Dimensions Figure 1 1 Dimensions of NV HMI 717...
Страница 10: ...NV HMI 7XX User Manual 10 Figure 1 2 Dimensions of NV HMI 721...
Страница 12: ...NV HMI 7XX User Manual 12 Figure 1 5 Rear View of NV HMI 721 Figure 1 6 Rear View of NV HMI 721...
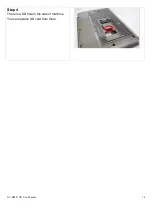
Страница 14: ...NV HMI 7XX User Manual 14 Step 4 There is a SD hole in the side of machine You can replace SD card from there...
Страница 49: ...NV HMI 7XX User Manual 49 3 3 Main Settings...
Страница 69: ...NV HMI 7XX User Manual 69 Step 3 Read license agreement Click Yes Step 4 Click Next...
Страница 77: ...NV HMI 7XX User Manual 77 Step 2 Select Resistive Touch Step 3 Click Next to continue...
Страница 79: ...NV HMI 7XX User Manual 79 Step 6 Wait for installation Then click Next to continue Step 7 Click Continue Anyway...
Страница 81: ...NV HMI 7XX User Manual 81 Step 2 Select Projected Capacitive Step 3 Click Next to continue...
Страница 84: ...NV HMI 7XX User Manual 84 Step 9 Go to C Program Files eGalaxTouch Click Next Step 10 Click Next...
Страница 102: ...NV HMI 7XX User Manual 102 Hardware Saturn Hardware Configuration...
Страница 103: ...NV HMI 7XX User Manual 103 About To display information about eGalaxTouch and its version...


