


NV-HMI-7XX User Manual
13
1.4 Installation of HDD (NV-HMI-717/NV-HMI-721)
Step 1
There are 2 screws to deal with when
enclosing or removing the chassis. Gently
remove 2 screws.
Step 2
You can put or remove HDD into the
machine by pulling the HDD bracket.
Step 3
You can remove HDD by unscrewing 4
screws in the HDD bracket.
Note: 4 screws are packed in the packing
package.
Содержание NV-HMI-717P
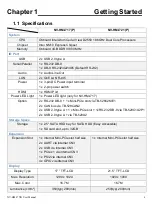
Страница 9: ...NV HMI 7XX User Manual 9 1 2 Dimensions Figure 1 1 Dimensions of NV HMI 717...
Страница 10: ...NV HMI 7XX User Manual 10 Figure 1 2 Dimensions of NV HMI 721...
Страница 12: ...NV HMI 7XX User Manual 12 Figure 1 5 Rear View of NV HMI 721 Figure 1 6 Rear View of NV HMI 721...
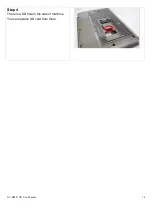
Страница 14: ...NV HMI 7XX User Manual 14 Step 4 There is a SD hole in the side of machine You can replace SD card from there...
Страница 49: ...NV HMI 7XX User Manual 49 3 3 Main Settings...
Страница 69: ...NV HMI 7XX User Manual 69 Step 3 Read license agreement Click Yes Step 4 Click Next...
Страница 77: ...NV HMI 7XX User Manual 77 Step 2 Select Resistive Touch Step 3 Click Next to continue...
Страница 79: ...NV HMI 7XX User Manual 79 Step 6 Wait for installation Then click Next to continue Step 7 Click Continue Anyway...
Страница 81: ...NV HMI 7XX User Manual 81 Step 2 Select Projected Capacitive Step 3 Click Next to continue...
Страница 84: ...NV HMI 7XX User Manual 84 Step 9 Go to C Program Files eGalaxTouch Click Next Step 10 Click Next...
Страница 102: ...NV HMI 7XX User Manual 102 Hardware Saturn Hardware Configuration...
Страница 103: ...NV HMI 7XX User Manual 103 About To display information about eGalaxTouch and its version...


