


NV-HMI-7XX User Manual
20
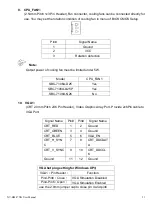
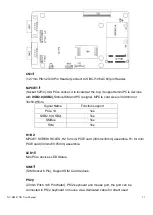
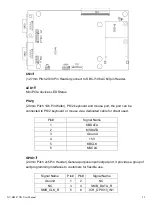
Procedures of CMOS clear:
a) Turn off the system and unplug the power cord from the power outlet.
b) To clear the CMOS settings, use the jumper cap to close pins 1 and 2 for about 3
seconds then reinstall the jumper clip back to pins open.
c) Power on the system again.
d) When entering the POST screen, press the <F1> or <DEL> key to enter CMOS Setup
Utility to load optimal defaults.
e) After the above operations, save changes and exit BIOS Setup.
Model
JP3
SBC-7106A-N26
No
SBC-7106A-D25
Yes
SBC-7106A-D25P
Yes
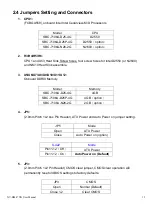
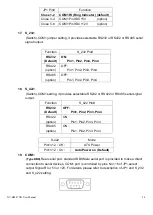
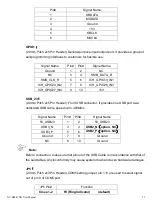
6. BAT1:
(1.25mm Pitch 1x2 box Pin Header) 3.0V Li battery is embedded to provide power for
CMOS.
Pin#
Signal Name
Pin1
VBAT
PIN2
Ground
7. DC_IN1:
(5.08mm Pitch 1x3 Pin Connector),DC9V~32V System power input connector.
Pin#
Power Input
Pin1
DC+9V~32V
Pin2
Ground
Pin3
FG
Model
DC_IN1
SBC-7106A-D25
180
°
Connector
SBC-7106A-D25P
45
°
Connector
SBC-7106A-N26
180
°
Connector
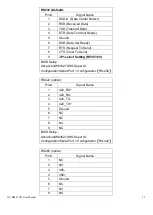
8. BT1/BT2:
Power on/off button
, They are used to connect power switch button. The two pins are
disconnected under normal condition. You may short them temporarily to realize system
startup & shutdown or awaken the system from sleep state.
Содержание NV-HMI-717P
Страница 9: ...NV HMI 7XX User Manual 9 1 2 Dimensions Figure 1 1 Dimensions of NV HMI 717...
Страница 10: ...NV HMI 7XX User Manual 10 Figure 1 2 Dimensions of NV HMI 721...
Страница 12: ...NV HMI 7XX User Manual 12 Figure 1 5 Rear View of NV HMI 721 Figure 1 6 Rear View of NV HMI 721...
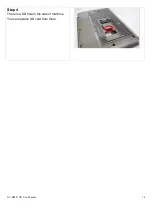
Страница 14: ...NV HMI 7XX User Manual 14 Step 4 There is a SD hole in the side of machine You can replace SD card from there...
Страница 49: ...NV HMI 7XX User Manual 49 3 3 Main Settings...
Страница 69: ...NV HMI 7XX User Manual 69 Step 3 Read license agreement Click Yes Step 4 Click Next...
Страница 77: ...NV HMI 7XX User Manual 77 Step 2 Select Resistive Touch Step 3 Click Next to continue...
Страница 79: ...NV HMI 7XX User Manual 79 Step 6 Wait for installation Then click Next to continue Step 7 Click Continue Anyway...
Страница 81: ...NV HMI 7XX User Manual 81 Step 2 Select Projected Capacitive Step 3 Click Next to continue...
Страница 84: ...NV HMI 7XX User Manual 84 Step 9 Go to C Program Files eGalaxTouch Click Next Step 10 Click Next...
Страница 102: ...NV HMI 7XX User Manual 102 Hardware Saturn Hardware Configuration...
Страница 103: ...NV HMI 7XX User Manual 103 About To display information about eGalaxTouch and its version...


