Nelweld Operations and Service Manual
- 19 -
equipment, settings, welding cables and ceramic
ferrules to be used in production welding.
All ten studs of each diameter and position to be
qualified must be tensile and/or bend and/or
torque tested to failure. They must also meet
visual inspection requirements. Failure must be in
the stud shank or in the base plate material, not in
the weld for all studs tested.
Note that
failure is allowed in the base plate
material,
given certain conditions
.
This provision
is acceptable when it is known that the base plate
material may be of a composition, strength or
thickness that will not fully develop the strength
of the stud weld, but the strength and weld results
are acceptable for the end use intended.
Such a
failure is not acceptable in the case of embedment
plates used for structural connections or for
attachments requiring full strength and ductility.
The successful completion of the application
qualification tests qualifies both the operator and
the process.
Documentation of the qualification of the
operator and the stud welding process should be
part of the overall records of the plate fabrication
facility. This can be done by first establishing a
Welding Procedure Specification (WPS) and
Procedure Qualification Record (PQR) for the
stud diameters, equipment, settings, cable lengths,
welding positions, weld plate materials and
ceramic ferrules that are to be used in the welding
operation.
Once the welding procedure specifications are
completed and documented, the operators trained
in stud welding should be tested. They should set
up and do the stud welding using the WPS
guidelines, seen in the
Stud Qualification Testing
chart. The welds are then visually inspected,
tested, and certified by the welding supervisor or
welding trainer, and the operator is certified by
name using the same form as a Welder
Qualification Record (WQR).
These records should be retained, along with
material certifications and production inspection
records, as part of the documentation files for
review by customers, the engineer of record,
quality certification agencies, or other interested
parties.
2.7.4 Visual Weld Inspection
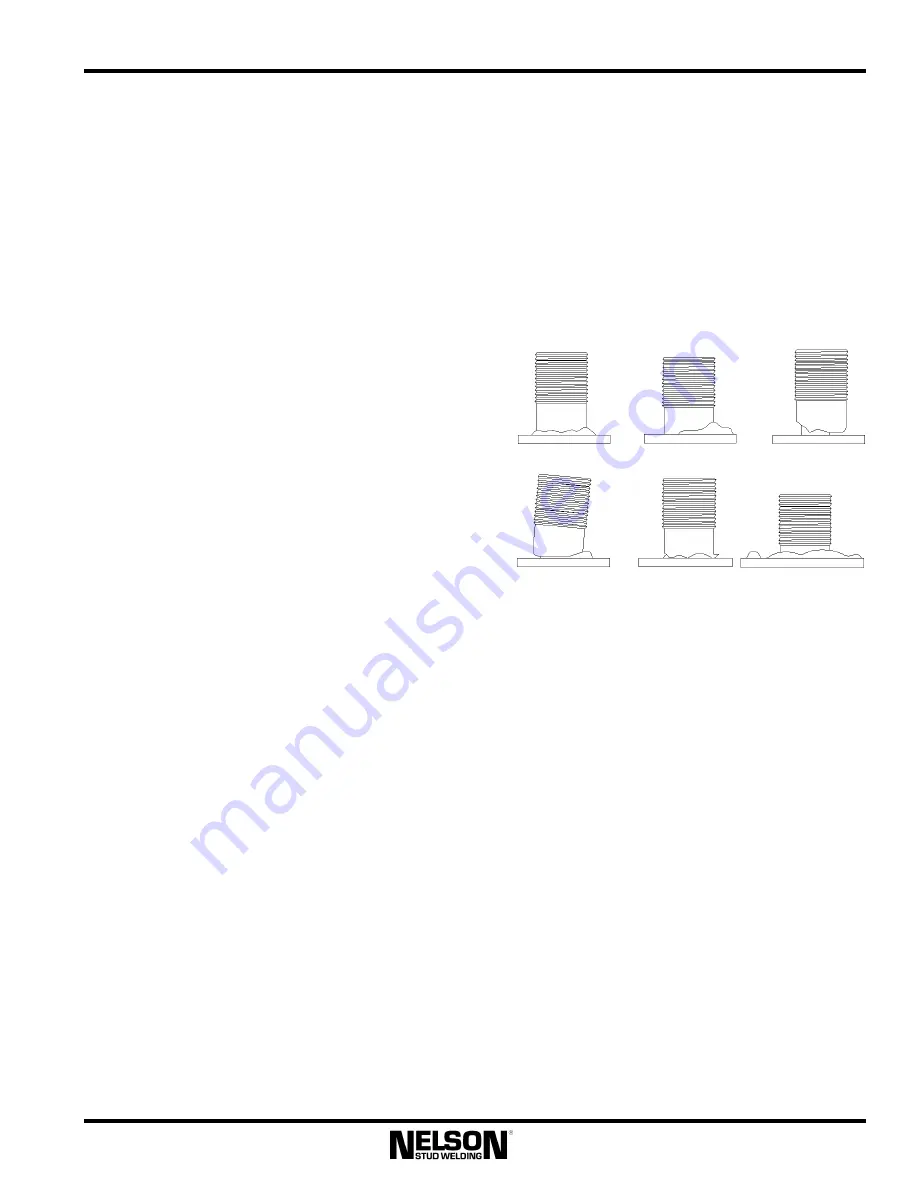
A proper relationship between the Lift, Plunge,
Time, and Amperage is needed to obtain good
weld results. The length reduction or burn-off and
the weld fillet appearance are determined by the
weld settings. Visual weld inspection consists of
interpreting the appearance of the weld flash, and
is normally very accurate if certain guidelines are
followed.
Figure 2-3: Visual Weld Quality
A
Satisfactory weld with good flash formation
B
Stud in which plunge is too short
C
Hang-up during plunge – possible ferrule/stud binding
D
Poor vertical alignment
E
Stud weld made with insufficient heat
F
Stud weld made with excessive heat
A
good weld
is characterized by:
•
Even flash formation.
•
A shiny, bluish hue to the flash surface.
•
A slight flow or bend of flash metal into the base
material.
•
Good flash height.
•
Consistent after-weld length.
•
Full “wetting” – flash around the stud periphery
A
cold weld,
which requires more time and/or amperage, is
indicated by:
•
Low flash height.
•
Incomplete flash formation.
•
A dull gray cast to the flash surface.
•
Stringers of flash metal forming "spider legs."
A
hot weld
made with too much time and/or amperage is
distinguished by:
•
Excessive splatter.
•
A washed-out flash.
•
Undercutting of the stud.
E
F
D
A
B
C
Содержание Nelweld 4000
Страница 58: ...Nelweld Operations and Service Manual 58 7 5 Declaration of Conformity...
Страница 59: ...Nelweld Operations and Service Manual 59 8 0 Diagrams and Parts Lists 8 1 Front Section Not shown...
Страница 61: ...Nelweld Operations and Service Manual 61 8 2 Base and Side Cabinet Section...
Страница 65: ...Nelweld Operations and Service Manual 65 8 4 Rear Cabinet Section...
Страница 67: ...Nelweld Operations and Service Manual 67 8 5 Wiring Diagram...


