Service Manual
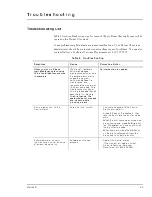
Troubleshooting
Oxinet III
45
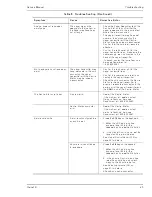
A pager does not receive an
alarm page
The pager may not be
assigned to that patient or
the pager may have been
out of range.
• Check the Pager Assignments on the
Central Station to confirm that the
pager is assigned to the room/patient
where the alarm occurred.
• The pager transmitter may have lost
power or the cord connecting the
pager transmitter with the Central
Station may be loose or disconnected.
Confirm that the cord is still securely
attached.
• Confirm the red power light for the
pager transmitter is on; make sure the
power supply is still connected to the
back of the pager transmitter.
• If needed, contact Nellcor’s Technical
Services Department at
1.800.635.5267.
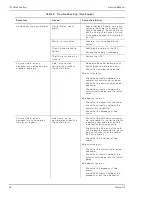
Multiple pagers do not receive an
alarm
The pager transmitter may
have lost power or the cord
connecting the pager
transmitter with the Central
Station may be loose or
disconnected.
• Confirm the red power light for the
pager transmitter is on.
• Confirm the power supply is still con-
nected to the pager transmitter.
• Check the cord connecting the Central
Station to the pager transmitter to
ensure it is securely connected to the
serial port of the pager transmitter and
the
COM1
port of the Central Station.
The Central Station is frozen
Program error
• Restart the Central Station.
If the problem still exists, contact
Nellcor’s Technical Services
Department at 1.800.635.5267.
Central Station computer
error
• Restart the Central Station.
If the problem still exists, contact
Nellcor’s Technical Services
Department at 1.800.635.5267.
Alarms not audible
Alarm is not configured as
an audible alert.
• Press the
F10
key on the keyboard:
1. When the uShield dialog box
appears, type 1234 for the
password and press the Ok button.
2. In the Oxinet Control Panel, set the
type of audible alarm desired.
See
Oxinet Control Panel (F10)
on
page 30 for details.
Volume is turned off/down
for speakers.
• Press the
F8
key on the keyoard:
1. When the uShield dialog box
appears, type 1234 for the
password and press the Ok button.
2. In the Volume Control dialog box,
raise the volume by clicking and
dragging the Volume slider up.
See
Adjusting Volume (F8)
on
page 21 for details.
• Check Audio cable connection.
Table 8: Troubleshooting (Continued)
Symptom
Cause
Corrective Action
Содержание Oxinet III
Страница 10: ...Introduction Service Manual 4 Oxinet III...
Страница 20: ...Installation Service Manual 14 Oxinet III Figure 3 Wired Configuration System Connection...
Страница 24: ...Installation Service Manual 18 Oxinet III Figure 4 Wireless Configuration System Connection...
Страница 44: ...Administrative Functions Service Manual 38 Oxinet III...
Страница 48: ...Maintenance Service Manual 42 Oxinet III...
Страница 58: ...Specifications Service Manual 52 Oxinet III...
Страница 61: ......

