Disassembly and Reassembly 3-21
Main Board
Remove the main board as follows.
1.
Remove any installed Mini PCI card option and PC card.
2.
Remove the LCD panel, keyboard, heat plate, top cover, audio board, I/O board, CD-ROM
drive, diskette drive, and Kensington lock latch from the system.
3.
Locate and remove the three hex screws and one Phillips head screw that secure the main
board to the base assembly.
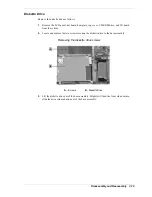
Removing the main board screws
A
– Hex Screws
C
– Main Board
B
– Screw
4.
Lift the main board out of the base assembly.
CPU Removal
Remove the Pentium III or Celeron CPU as follows.
1.
Remove the LED/button assembly, keyboard, and heat plate.
2.
Locate the CPU and the locking screw next to it.
3.
Using a flat-head screwdriver, turn the locking screw 3/4-turn counterclockwise to unlock
the CPU. Do not attempt to remove the screw.
Only touch the CPU on the sides. Do not touch the top of the CPU.
4.
Lift the CPU out of the socket and store it in a static-free bag.
Содержание VERSA VXi
Страница 61: ...3 Disassembly and Reassembly Required Tools and Equipment Disassembly Reassembly...
Страница 84: ...4 System Board Layout Audio Board DC DC Board I O Board Main Board...
Страница 87: ...5 Illustrated Parts Breakdown Illustrated Parts Breakdown Parts List...
Страница 94: ...7 Troubleshooting Quick Troubleshooting Helpful Questions...
Страница 102: ...9 Specifications System Components Memory Map Interrupt Controllers...
Страница 123: ...NEC Computers Inc 15 Business Park Way Sacramento CA 95828 www neccomp com 819 200733 000 04 2001...


