background image

Option Installation     3-13

When upgrading the processor, you must first remove the processor currently installed in
the system (see “Processor Removal”).

Once removed, you can then install the upgrade processor, see “Processor Installation.”

Processor Removal

To remove the installed processor on the system board, proceed as follows.

1. 

Remove the system unit side panel (see “Removing the Side Panel”).

2. 

Locate the processor socket (see Figure Section 3-2).

3. 

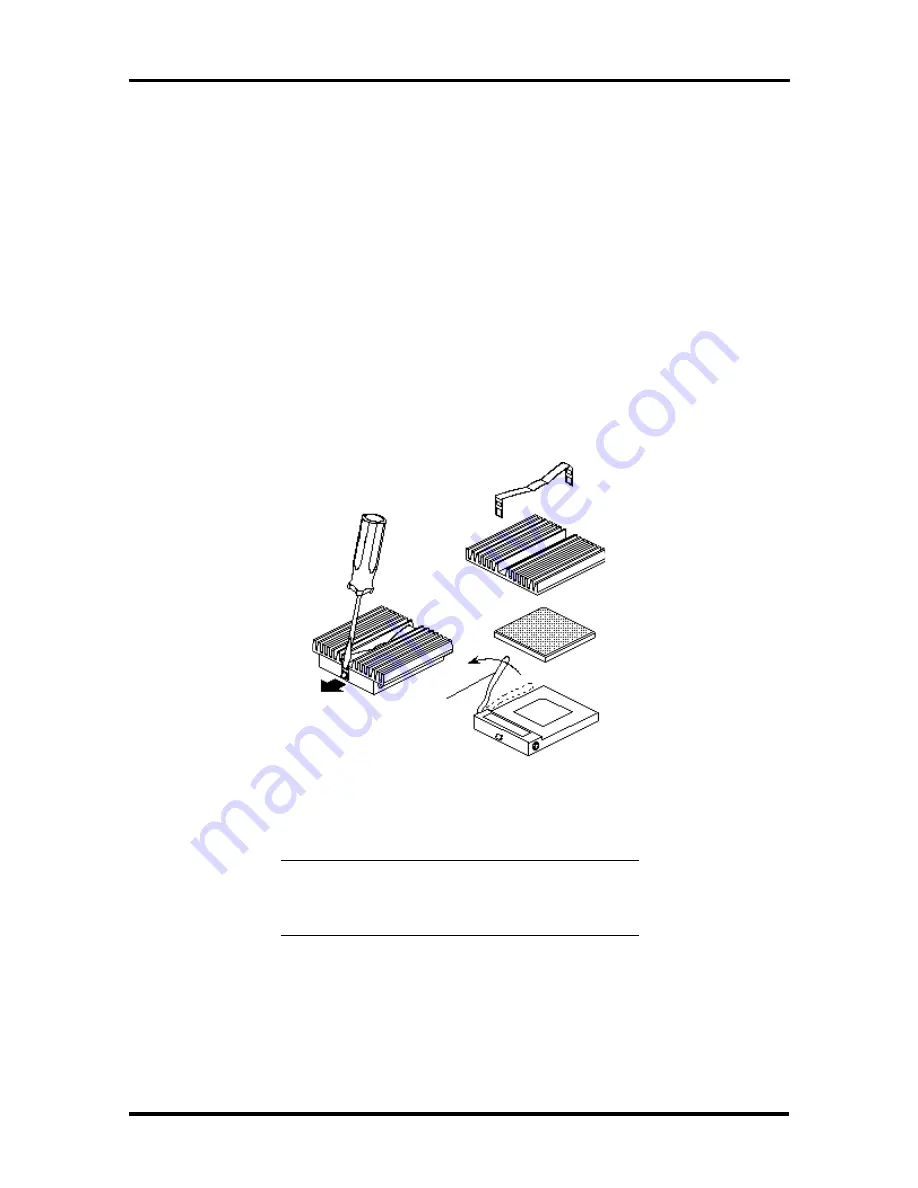
Release the heatsink clip from the tabs on the socket.

4. 

Release the processor by pulling the lever on the socket away from the socket and
as far back as it goes.

 Figure Section 3-8   Releasing the processor


CAUTION:

  Before picking up the processor,

reduce static discharge by touching the metal
frame of the system unit.

5. 

Lift the processor out of the socket.

6. 

Install the new upgrade processor (see the following procedure “Processor
Installation”).


Lever

Содержание POWERMATE P - SERVICE MANUAL 1995

Страница 1: ...PowerMate P Series PowerMate Service and Reference Manual Printed in U S A 9 95 819 181365 000 Rev 00 ...

Страница 2: ...t are warranted in accordance with the terms of the Warranty Statement accompanying each product However actual performance of each such product is dependent upon factors such as system configuration customer data and operator control Since implementation by customers of each product may vary the suitability of specific product configurations and applications must be determined by the customer and...

Страница 3: ... System Memory 1 9 Interrupt Controller 1 11 Integrated Graphics 1 12 Motion Video Controller 1 12 Feature Connector 1 12 Graphics Accelerator 1 13 Video Memory 1 13 Plug and Play 1 13 ISA Bus 1 13 PCI Local Bus 1 13 PCI IDE Ports 1 14 Power Management 1 14 Parallel Interface 1 14 Serial Interface 1 15 Infrared Interface 1 16 Diskette Drive 1 17 Hard Disk Drive 1 17 Power Supply 1 17 Keyboard 1 17...

Страница 4: ...tem Setup 2 2 CD ROM Reader 2 5 System Configuration 2 6 NEC Utilities and Drivers 2 6 Setup Utility 2 6 When to Use Setup 2 7 How to Start Setup 2 7 How to Use Setup 2 8 Main Menu 2 9 System Date Time 2 9 Diskette Drive 2 9 Hard Disk 2 9 Hard Disk Submenu 2 11 Hard Disk Type 2 11 Maximum Capacity 2 11 IDE Translation Mode 2 11 Multiple Sector Setting 2 13 Fast Programmed I O Modes 2 13 Language 2...

Страница 5: ... 18 Advanced Chipset Submenu 2 18 Base Memory Size 2 19 ISA LFB Size 2 19 ISA LFB Base Address 2 19 Video Palette Snoop 2 19 Latency Timer PCI Clocks 2 20 PCI Burst 2 20 Banks 0 and 1 SIMM Detected 2 20 Power Management Configuration 2 20 Power Management Submenu 2 20 Plug and Play Configuration 2 22 Plug and Play Submenu 2 22 Security Menu 2 24 Exit Menu 2 26 Exit Saving Changes 2 27 Exit Discard...

Страница 6: ...Precautions 3 1 Optional Hardware 3 2 Removing the System Unit Side Panel 3 3 Removing the Side Panel 3 4 Replacing the Side Panel 3 5 Adding Internal Options 3 5 Expansion Boards 3 6 Slot Locations 3 6 Expansion Board Installation 3 7 Expansion Board Removal 3 8 SIMM Upgrade 3 9 Checking the Memory in the System 3 9 SIMM Removal 3 11 SIMM Installation 3 11 Processor Upgrade 3 12 Processor Removal...

Страница 7: ...anel 3 24 Installing the 5 1 4 Inch Device 3 25 Replacing the Front Panel 3 27 Adding External Options 3 28 Parallel Printer 3 28 Serial Devices 3 29 Speakers 3 29 Microphone 3 33 Section 4 Maintenance and Troubleshooting Maintenance 4 2 System Cleaning 4 2 Keyboard Cleaning 4 3 Mouse Cleaning 4 4 Troubleshooting 4 5 Error Messages 4 5 Diagnosing and Solving Problems 4 7 Beep Codes 4 11 CMOS Batte...

Страница 8: ... Assignments Parallel Interface Connector A 2 Serial Interface Connectors A 3 Power Supply Connector A 4 Diskette Drive Connector A 5 IDE Connectors A 6 Turbo Connector A 7 Hard Drive LED Connector A 8 Power LED Connector A 9 Reset Button Connector A 10 Suspend Button Connector A 11 Infrared Connector A 12 Fan Connector A 13 Speaker Connector A 14 Audio Riser I O Connector A 15 Wavetable Connector...

Страница 9: ...the Processor with the Socket 3 14 3 10 Device Slot Locations 3 16 3 11 System Board Cable Connectors 3 17 3 12 Diskette Drive Signal Cable 3 17 3 13 IDE Cable Connectors 3 18 3 14 Power Cable Connectors 3 19 3 15 Connecting IDE Device Cables 3 20 3 16 Connecting 1 2 MB Diskette Drive Cables 3 20 3 17 Removing the 3 1 2 Inch Drive Bracket 3 21 3 18 Securing a 3 1 2 Inch Drive 3 22 3 19 Securing th...

Страница 10: ... 7 5 6 Removing the 3 1 2 Inch Drive Bracket 5 8 5 7 Speaker Tabs 5 9 5 8 3 1 2 Inch Diskette Drive Cables 5 10 5 9 Diskette Drive Bracket Screws 5 10 5 10 3 1 2 Inch Hard Disk Drive Cables 5 11 5 11 Removing the 3 1 2 Inch Drive 5 12 5 12 Inserting the Device 5 13 5 13 Removing the Device Rails 5 13 5 14 Power Supply Screws 5 14 5 15 System Board Removal 5 15 5 16 PowerMate P Series Illustrated P...

Страница 11: ...dress Map 1 8 1 4 SIMM Memory Upgrade Path 1 10 1 5 Interrupt Level Assignments 1 11 1 6 Parallel Port Addressing and Interrupts 1 15 1 7 Serial Port Addressing and Interrupts 1 16 1 8 Specifications 1 20 2 1 Navigation Keys 2 8 2 2 Hard Disk Assignments 2 10 2 3 Partitioned Hard Disk Assignments 2 10 2 4 Hot Key Parameters 2 22 2 5 Security Passwords 2 24 3 1 Recommended Memory Upgrade Path 3 10 ...

Страница 12: ...ments A 5 A 6 IDE Interface Pin Assignments A 6 A 7 Turbo Connector Pin Assignments A 7 A 8 Hard Disk LED Pin Assignments A 8 A 9 Power LED Pin Assignments A 9 A 10 Reset Pin Assignments A 10 A 11 Suspend Pin Assignments A 11 A 12 Infrared Pin Assignments A 12 A 13 Fan Pin Assignments A 13 A 14 Speaker Pin Assignments A 14 A 15 Audio Riser I O Pin Assignments A 15 A 16 Wavetable Pin Assignments A ...

Страница 13: ...n includes unpacking setup and operation information Also included are procedures for configuring the system through the Setup utility program setting passwords and power management features and using the BIOS Update utility Section 3 Option Installation provides installation procedures for adding optional expansion boards diskette and hard disk storage devices system and video memory and processo...

Страница 14: ...IP dual in line package DMA direct memory access DMAC DMA controller DOS disk operating system DRAM dynamic RAM ECC error checking and correction ECP enhanced capabilities port ECP EGA Enhanced Graphics Adapter EPP Enhanced Parallel Port EPROM erasable and programmable ROM EVGA Enhanced Video Graphics Array F Fahrenheit FAX facsimile transmission FCC Federal Communications Commission FG frame grou...

Страница 15: ...assistant PFP plastic flat package PIO parallel input output pixel picture element PROM programmable ROM RAM random access memory RAMDAC RAM digital to analog converter RGB red green blue RGBI red green blue intensity ROM read only memory rpm revolutions per minute R read RTC real time clock R W read write S slave SCSI Small Computer System Interface SG signal ground SIMM single inline memory modu...

Страница 16: ...nclude two 8 16 bit ISA slots one shared PCI ISA slot and three 32 bit PCI slot The six storage device slots accommodate up to four accessible devices and two internal hard disk drive devices The accessible devices include the standard one inch high 3 1 2 inch 1 44 MB diskette drive and up to three 1 6 inch high 5 1 4 inch storage devices The internal device slots support up to two 1 inch high 3 1...

Страница 17: ...cess memory SRAM cache n system Setup program built into the BIOS n flash ROM for fast economical BIOS upgrades n integrated input output I O controller with keyboard diskette drive and hard disk drive controllers Supports two serial ports a parallel port and an IR port n PCI local bus for fast data transfer n support for Intel processor upgrades n 16 MB RAM ships with 32 bit non parity 70 ns Fast...

Страница 18: ...und multimedia configurations only Sound Blaster compatible chip on system board OPL3 FM synthesis chip on system board built in 16 bit stereo and FM synthesis Wavetable sound upgradeable Wave Blaster MIDI synthesizer 3D sound effects Surround Sound n two intelligent drive electronics IDE interface channels one fast IDE PCI channel primary connector used by the hard disk drive to transfer data at ...

Страница 19: ...on the system board for installation of an optional Wave upgrade Table 1 1 lists the major chips on the system board See Appendix A Connector Pin Assignments for a list of the system board connectors See Appendix B System Board Switches for a description of board switches Table 1 1 System Board Chips Chip Description Pentium Chip 120 60 MHz Intel Pentium processor 133 66 MHz Intel Pentium processo...

Страница 20: ... data The processor is an advanced pipelined 32 bit addressing 64 bit data processor designed to optimize multitasking operating systems The 64 bit registers and data paths support 64 bit addresses and data types To use the Pentium processor s power the system features an optimized 64 bit memory interface and complementary asynchronous pipelined 256 KB secondary cache The processor is compatible w...

Страница 21: ...ice Flash ROM The system BIOS uses 64 KB the video BIOS uses 32 KB and the rest is utilized as listed in Table 1 2 The system BIOS is capable of being shadowed and cached through the system s Setup utility see Section 2 for Setup information System BIOS is write protected and automatically enabled NEC s Flash ROM allows fast economical BIOS upgrades NEC Flash ROMs are reprogrammable system and vid...

Страница 22: ...CI bus A0000 C7FFF 160 KB Available HI DOS memory normally reserved for Video BIOS 9FC00 9FFFF 1 KB Extended BIOS data 80000 9FBFF 127 KB Extended conventional 00000 7FFFF 512 KB Conventional base memory Power Management Each system incorporates power management features that lower power consumption when there is no activity detected from the keyboard mouse diskette drive CD ROM reader or hard dis...

Страница 23: ...troller 1 channel 0 3 0020 0021 Interrupt controller 1 0040 0043 Timer 1 0048 004B Timer 2 0060 Keyboard controller data byte 0061 NMI speaker control 0064 Keyboard controller command status byte 0070 bit 7 Enable NMI 0070 bits 6 through 0 Real time clock address 0071 Real time clock data 0078 0079 Reserved board configuration 0080 008F DMA page registers 00A0 00A1 Interrupt controller 2 00C0 00DE...

Страница 24: ...an be expanded up to 128 MB using optional single in line memory modules SIMMs installed in SIMM sockets on the system board The memory configuration consists of two banks bank 0 and bank 1 with two sockets each The SIMM memory sockets accept 32 bit non parity 4 8 16 or 32 MB 70 ns Fast Page Mode FPM or 60 ns Extended Data Out EDO SIMMs NOTE 36 bit SIMMs may be used but parity bits are ignored The...

Страница 25: ...e memory is changed The system BIOS automatically detects the SIMMs Table 1 4 shows the SIMM memory upgrade path Table 1 4 SIMM Memory Upgrade Path Total Memory Bank 0 Bank 0 Bank 1 Bank 1 16 MB 8 MB 8 MB Empty Empty 24 MB 4 MB 4 MB 8 MB 8 MB 24 MB 8 MB 8 MB 4 MB 4 MB 32 MB 8 MB 8 MB 8 MB 8 MB 32 MB 16 MB 16 MB Empty Empty 40 MB 4 MB 4 MB 16 MB 16 MB 40 MB 16 MB 16 MB 4 MB 4 MB 48 MB 8 MB 8 MB 16 ...

Страница 26: ...gnments 0 through 15 are in order of decreasing priority See Section 2 Setup and Operation for information on changing the interrupts using Setup Table 1 5 Interrupt Level Assignments Interrupt Priority Interrupt Device NMI I O channel check IRQ00 Reserved Interval Timer IRQ01 Reserved Keyboard buffer full IRQ02 Reserved Cascade interrupt from slave IRQ03 Serial Port 2 IRQ04 Serial Port 1 IRQ05 On...

Страница 27: ...integrates the 64 bit Windows GUI engine and unique motion video playback hardware for superior performance The graphics engine includes an on chip color space converter to accelerate decompression and a hardware scaler to scale continuously from native size up to full screen at full speed The graphics engine delivers a full screen smooth display of motion video data up to 30 frames per second fps...

Страница 28: ...aced 60 Hz 70 Hz 72 Hz and 75 Hz n 800 by 600 pixels 16 8 million colors 60 Hz 72 Hz and 75 Hz Plug and Play The system comes with a Plug and Play BIOS which supports Plug and Play technology Plug and Play eliminates complicated setup procedures for installing Plug and Play expansion boards With Plug and Play adding a Plug and Play expansion board is done by turning off the system installing the b...

Страница 29: ...Power Management Each system is Energy Star compliant and comes with the power saving features enabled If the keyboard mouse or drives are not used after 30 minutes the default the screen goes blank and the system goes into a partial power shutdown A blinking power lamp indicates that the system is in the power saving mode As soon as activity is detected the system resumes where it left off The sy...

Страница 30: ...278 IRQ07 LPT1 or LPT2 3BC IRQ07 LPT1 or LPT2 Parallel interface signals are output through the system board s 25 pin D subconnector The connector is located at the rear of the system unit Pin locations for the parallel interface connector are given in Appendix A Serial Interface The system has two 16C550 UART compatible serial ports COM1 and COM2 integrated on the I O controller The serial ports ...

Страница 31: ...pin D subconnector The connectors are located at the rear of the system unit Pin locations for the serial interface connector are shown in Appendix A Infrared Interface The I O controller incorporates an infrared interface that provides two way wireless communication through the IR window port on the front of the system The interface uses infrared as the transmission medium instead of a traditiona...

Страница 32: ...ires an optional two drive connector The optional cable plugs into the secondary connector on the system board If adding a fourth hard drive in a 5 1 4 inch accessible slot it connects to the unused connector on the optional cable POWER SUPPLY The power supply is mounted inside the system unit It supplies power to the system board option boards diskette drives hard disks keyboard and mouse A fan i...

Страница 33: ...uilt in FIFOs for full duplex simultaneous playback and record in 16 bit stereo n WaveBlaster upgradeable for Wavetable synthesis n 3D sound effects n 20 voice FM synthesis The integrated components are compatible with Sound Blaster Pro Sound Blaster 2 0 Ad Lib MPU 401 and Microsoft Windows Sound System for PC sound applications The components work with the pre installed Voyetra AudioStation audio...

Страница 34: ...idelity stereo music for computer audio systems Quad Speed CD ROM The IDE quad speed CD ROM reader is pre installed as drive E on multimedia configurations The reader can be used to load programs from a CD or it can be used to play audio CDs The reader operates at different speeds depending on whether the CD contains music or data The reader is fully compatible with Kodak Multisession Photo CDs an...

Страница 35: ...ector rear panel PS 2 style mouse connector rear panel Two RS 232C serial ports rear panel Parallel printer port rear panel VGA port rear panel Front Panel Power button Power indicator lamp Hard disk drive busy indicator lamp Suspend button and indicator lamp Reset button Consumer Infrared IR receiver infrared IrDA transceiver Processor Intel Pentium 120 MHz or 133 MHz dependent on system Cache Me...

Страница 36: ... in 5 or 7 channel 16 bit step multimedia PC level 2 MPCII compliance Sound Blaster and Adlib compatible Stereo jacks for microphone line in and line out Wave Blaster upgradeable for wavetable synthesis Built in MPU 401 MIDI and game port interface Speakers Standard in multimedia systems Magnetic shielded 8 watt stereo speakers Power on off switch power lamp volume control Treble and bass tone con...

Страница 37: ...1 22 Technical Information ...

Страница 38: ...Switches UNPACKING AND REPACKING Find an area away from devices that generate magnetic fields electric motors transformers etc Place the carton on a sturdy surface and carefully unpack the system The carton contents for non multimedia configurations include the system unit keyboard mouse power cord and user documentation The carton contents for multimedia configurations include the previous items ...

Страница 39: ... 1 NOTE The correct AC input voltage must be properly set Select the appropriate voltage with the voltage selector switch located at the rear of the system Figure Section 2 1 Voltage Selector Switch 2 Connect the keyboard mouse monitor and printer cables to the back of the system see Figure Section 2 2 Figure Section 2 2 Peripheral Connections Printer Port Serial Ports VGA Monitor Connector Keyboa...

Страница 40: ...e Figure Section 2 6 to power on the system The power lamp lights green indicating that the system is in Full Power mode The system automatically goes into its Power On Self Test POST and checks system components One beep indicates that the system has successfully completed its power on test If a problem occurs a series of beeps may sound If this happens repeatedly after powering on power off the ...

Страница 41: ...dow 5 Press the suspend button see Figure Section 2 6 to place the unit in the power management mode The power lamp blinks indicating that the system is in the power saving Suspend mode If the system is left alone for a preset time it goes into the automatic Suspend mode The screen goes blank and the system goes into the power saving mode of operation Moving the mouse or pressing a key on the keyb...

Страница 42: ...ng or closing the CD tray when the power is on n CD tray that opens and closes when the eject retract button is pressed n emergency eject hole in the front panel for manually opening the CD tray if power is lost Insert a jewelers screwdriver into the hole Turn the screw counterclockwise to open the tray and clockwise to close the tray Figure Section 2 8 Typical CD ROM Reader Controls and Indicator...

Страница 43: ... a real time clock battery module on the system board The battery supplies continuous power to the CMOS memory and maintains configuration information when system power is off NEC UTILITIES AND DRIVERS Click on a topic for information about using NEC utilities and drivers n Setup Utility n Flash Utility n Video Drivers n NEC Backup Utility n Desktop Management Interface Setup Utility The Setup uti...

Страница 44: ...system parameters when you add or remove expansion options n to change or set power management features n to correct a hardware discrepancy when the Power On Self Test POST displays an error message and prompts you to run Setup n to check the installation of optional memory by comparing the amount of memory installed with the amount of memory displayed by Setup n to change certain system operating...

Страница 45: ...Table Section 2 1 Navigation Keys Key Function F1 Provides help for the parameter field being displayed Esc Exits the menu Enter Executes Command or Selects submenu or arrow keys Moves cursor up and down or arrow keys Selects next menu F5 Loads the Default Configuration values for this menu F6 Selects the Previous Value for the field F10 Loads the Previous Configuration values for this menu To dis...

Страница 46: ...h and year in dd mm yyyy format To set the time enter the current hour minute and seconds in hh mm ss 24 hour format To example type 13 30 00 for 1 30 P M Diskette Drive This menu selects the type of diskette drive in your system Unless you are changing your hardware you do not need to change the diskette drive floppy A or B settings If you add an optional 5 1 4 inch diskette drive to your system ...

Страница 47: ...rtitions on them partitions beyond the primary partition will be assigned in ascending order based on available drive letters and other installed drives Partitions are assigned to primary partitions first and then to secondary partitions This means that when there are multiple drives with multiple partitions the logical drive numbering scheme may result in discontinuous logical partitions on the s...

Страница 48: ...of Cylinders Number of Heads and Number of Sectors Maximum Capacity The hard disk maximum capacity value is calculated from the cylinder head and sector information in the Hard Disk Type IDE Translation Mode The IDE Translation Mode parameter controls the way in which the BIOS interacts with the drive in terms of drive geometry Proper choice is dependent upon the drive s size capabilities and the ...

Страница 49: ...ted unpredictable results may occur including data loss Different OS have different abilities regarding IDE translation Modes n UNIX does not currently support either LBA or ECHS and must utilize the Standard CHS method UNIX can support drives large than 528 MB but does so in its own way n OS 2 2 1 and OS 2 WARP can support LBA ECHS or Standard CHS methods Note that LBA support may require a switc...

Страница 50: ...then the BIOS will operate as Disabled If the drive does not support the 4 or 8 sectors the BIOS will default to the largest number of sectors smaller than the value supported by the drive Fast Programmed I O Modes The Fast Program I O mode field controls the speed in which programmed I O PIO transfers occur on the PCI IDE interface This field should only be set to Disabled if a drive is being use...

Страница 51: ...nd secondary caches Setting the system cache to Disabled will hurt performance but might be required when running software which utilizes software timing loops and needs to be slowed down to execute properly Boot Speed Boot speed refers the system CPU cycles The default boot speed is Turbo De turbo mode slows the CPU by disabling the system cache and adding increased refresh cycles NOTE De turbo d...

Страница 52: ...n The delay times are as follows n 250 msec default n 500 msec n 750 msec n 1000 msec Typematic Rate The Typematic Rate Delay field controls the speed characters repeat when you hold down a keyboard key The higher the number the faster the repeat delay times are as follows n 6 char sec n 8 char sec n 10 char sec n 12 char sec n 15 char sec n 20 char sec n 24 char sec n 30 char sec default Video Mo...

Страница 53: ... Configuration n Power Management Configuration n Plug and Play Configuration CAUTION Setting items in this menu to incorrect values can cause your system to malfunction Processor Type This field cannot be entered it is an information field only The processor is Pentium processor that is backward compatible with 8086 80286 I386 and Intel 486 processors Processor Speed This field cannot be entered ...

Страница 54: ...the you to customize the peripheral ports PCI IDE Interface The PCI IDE Interface field enables the PCI interface connector on the system board This field can be either Enabled or Disabled The default is Enabled Floppy Interface The Floppy Interface field enables the diskette drive interface connector on the system board This field can be either Enabled or Disabled The default is Enabled Serial Po...

Страница 55: ...arallel Port EPP mode Audio Configuration Mode The Audio Configuration Mode field controls whether the onboard audio resources The options are as follows n Auto default automatically configures the audio subsystem during power up n Manual allows the user to configured onboard audio subsystem n Disabled removes the onboard audio resources Advanced Chipset Configuration When the cursor is placed in ...

Страница 56: ...h has memory greater than 64K needs to be accessed by the CPU and you are not using the Plug and Play run time utilities The following choices are available n Disabled default n 1 MB ISA LFB Base Address This field cannot be entered it is an information field only If the ISA LFB field is Disabled this field does not appear The ISA Video LFB Base Address field displays 15 MB the starting address of...

Страница 57: ...ys either Fast Page Mode EDO Mode or None installed depending upon what the BIOS detects Power Management Configuration When the cursor is placed in the Power Management field and you can select it by pressing Enter The Power Management Submenu appears for setting parameters which affect the power saving features Power Management Submenu The Power Management Submenu lets you check or change the Ad...

Страница 58: ...r of minutes that the system will detect no user activity before going into low power mode Minutes range between 0 and 255 the default value is 30 minutes Hot Key The hot key field is used to define a key which when entered will cause the BIOS to put the OS into power management mode Use this field to choose an alphabetic character Press CTRL ALT user defined alphabetic character when not in Setup...

Страница 59: ...check or change the Configuration Mode parameters The Configuration Mode field is used to choose the method in which information about legacy ISA expansion boards ISA boards which do not have Plug and Play capabilities is conveyed to the BIOS to allow the BIOS to set up PCI and ISA plug and Play expansion boards without conflicting with the legacy ISA cards The choices are as follows n Use ICU The...

Страница 60: ...e Address field is not displayed This field provides the following choices When a value other than Disabled is selected a block is unshawdowed and the ISA Shared Memory Base Address field will appear Disabled 16 KB 32 KB 48 KB 64 KB default 80 KB 96 KB NOTE If a value of 96 KB is selected then the ISA Shared Memory Base Address field can only be set to C8000h if 80 KB then a value of C8000 or CC00...

Страница 61: ...rd Security Menu There are two types of passwords available User Password and Administrative Password The user passwords can be used to access the Setup Utility the keyboard upon initial boot and the keyboard when used in conjunction with the Security Hot Key The Administrative Password is used to control access to the Setup Utility The following table describes the interaction between these passw...

Страница 62: ...d This field allows you to enable a user level password during POST and to enter Setup When both the User Password is and Administrative Password is are Enabled only the Administrative Password gives you full access to all Setup fields This field can be either Enabled or Disabled the default is Disabled n Administrative Password This field allows you to enable a administrative level password durin...

Страница 63: ... SYS and AUTOEXEC BAT then locks the keyboard The User Password must be entered to unlock it The BIOS does not provide any prompt string Security Hot Key CTRL ALT The Security Hot Key field is used to lock the keyboard when you step away from the system When you press CTRL ALT alpha numeric key the alpha numeric key is defined be the user the system enters secure mode locks the keyboard When this ...

Страница 64: ...out saving the changes press Enter Press Esc to return to the Exit submenu without affecting your changes Load Setup Defaults To load all the default Setup values in the Setup menus select Load Setup Defaults from the Exit Submenu Reloading the defaults does not affect the any set passwords The program displays this message Load Setup Defaults Press Enter to Continue Press ESC to Abort To load the...

Страница 65: ...ice for information about using the bulletin board available in the U S and Canada NEC Bulletin Board Service Log onto the BBS as follows NOTE First time users must answer a new user questionnaire 1 From the Windows for Workgroups Program Manager select Accessories and double click on Terminal 2 From the Settings menu click on Communications check that the settings match the following BBS paramete...

Страница 66: ...Turn off the system 3 Insert the flash diskette in drive A and turn on the system 4 The update proceeds automatically and shows a BIOS Update successfully completed message when done 5 Press any key to reboot the system 6 Remove the flash diskette Video Drivers Video drivers let you take advantage of your computer s integrated video hardware and extended graphics modes Your system ships with the f...

Страница 67: ... through the NEC Bulletin Board Service see NEC Bulletin Board Service earlier in this section NOTE A multifrequency monitor such as an NEC MultiSync monitor is required to access the extended graphics mode Changing Video Drivers If Windows 95 is installed change the video drivers through the control panel 1 Start Windows 95 and Point to Settings 2 Click on Control Panel 3 Double click the Display...

Страница 68: ...ns Microsoft Backup with the proper configuration file for your choice NEC Backup gives you two backup options n Full Backup Use this option to back up all of the files on your hard disk NEC recommends that you select this option when you first start up your system Full Backup provides you with a copy of all of the software on the system as it was delivered to you CAUTION Perform a Full Backup imm...

Страница 69: ...u run your new system for the first time It appears automatically every time you run Windows If you do not want NEC Backup to run every time you enter Windows click on this button to remove NEC Backup from your StartUp group n Help Brings up this help document n Exit Exits NEC Backup Start Up To use the NEC Backup follow these simple steps 1 Choose click a backup procedure in the Type of backup bo...

Страница 70: ...emental backups plus the last month s full backup Therefore it is important NOT re use last month s Full Backup diskettes at this time n Four weekly Incremental Backups using last month s weekly diskettes Since the monthly Full Backup was successful the weekly diskettes are no longer needed n A monthly Full Backup using the diskettes from two months ago Since last month s Full Backup replaces the ...

Страница 71: ...nagement information Each product may or may not include an instrumentation module in order to provide real time support CI Module The CI module is a Windows Direct Interface application provided by NEC Technologies The module uses the CI to communicate with the SL and provides management for a set of components defined in the PC system group standard MIF The NEC implementation of this MIF provide...

Страница 72: ... Install to install a new MIF file Use to add a component such as a printer that supports DMI to the MIF database n Remove to remove a MIF file Use to remove a component from the MIF database Only remove the system component when it needs to be replaced n Expand to expand a component n Collapse to collapse a component n View Component Detail to review the selected component s details n View Group ...

Страница 73: ... DMI Browser here are a few suggestions on how to clear up the problem Reboot the system after installation otherwise you may have problems running the NEC DMI Browser If the product name serial number system boot time or other attribute returns a N A check the following n Look at the AUTOEXEC BAT file to see if the line DMIDIR WIN16 BIN NECDMI EXE is present n Make sure the file NECDMI DAT is loc...

Страница 74: ...ble n Turn off and disconnect all peripherals n When handling boards or chips touch the system unit frame to discharge static n Do not disassemble parts other than those specified in the procedure n All screws are Phillips head unless otherwise specified n Label any removed connectors Note where the connector goes and in what position it was installed Precautions Take care when you work inside the...

Страница 75: ...Always hold a chip or board by its edges Avoid touching the components on the board n Take care when connecting or disconnecting cables A damaged cable can cause a short in the electrical circuit Misaligned connector pins can cause damage to system components at power on When installing a cable be sure to route the cable so it is not pinched by other components and it is out of the path of the sys...

Страница 76: ... second hard disk drive The system also provides three accessible 5 1 4 inch 1 6 inch high device slots for optional storage devices In multimedia configurations a CD ROM reader is installed in the top slot See Data Storage Devices for information on installing optional devices n Processor upgrade n A 320 pin zero insertion force ZIF socket on the system board supports the primary processor or an ...

Страница 77: ...ect the keyboard mouse monitor and any other device such as a printer connected from the rear of the system CAUTION Electrostatic discharge can damage computer components Discharge static electricity by touching a metal object before you remove the system unit side panel 3 Remove the two side panel screws from the rear of the system unit If you have installed a padlock on the system unlock the pad...

Страница 78: ...el on the side of the system unit about one inch back from the front panel Turn off and unplug the system unit 2 Insert the tabs along the inside top and bottom of the panel with the slots in the unit frame 3 Slide the side panel forward to meet the front panel 4 Secure the side panel with the two panel screws removed earlier Lock the system with a padlock if you desire 5 Connect the monitor keybo...

Страница 79: ...nd Play automatically configures the board for the system Industry standard 8 or 16 bit ISA and 32 bit PCI expansion boards are supported in the system unit ISA expansion boards can either be Plug and Play or non Plug and Play boards NOTE The system unit side panel must be removed before installing an expansion board See Removing the Side Panel Slot Locations The system has six expansion board slo...

Страница 80: ...n 1 Remove the system unit side panel see Removing the Side Panel in this section 2 Follow any preinstallation instructions that comes with the expansion board such as setting switches or jumpers on the board 3 Remove the screw securing an expansion slot cover and remove the cover Save the screw for installing the expansion board Store the slot cover in case you choose to remove the expansion boar...

Страница 81: ... signal cables required by the expansion board 7 Replace the system unit side panel see Replacing the Side Panel in this section Expansion Board Removal 1 Remove the system unit side panel see Removing the Side Panel in this section 2 If you have any cables connected to the board that you need to remove label the connectors before you remove them 3 Remove the screw that secures the board to the su...

Страница 82: ...ith Extended Data Output CAUTION To avoid corrosion between different metals only use tin plated SIMM sticks To determine the memory needed for the memory upgrade see Table Section 3 1 If you are ready to install the SIMM sticks see SIMM Installation in this section Checking the Memory in the System Use the following procedure to n check the memory installed in the system n to determine the SIMM c...

Страница 83: ...4 MB 8 MB 8 MB 24 MB 8 MB 8 MB 4 MB 4 MB 32 MB 8 MB 8 MB 8 MB 8 MB 32 MB 16 MB 16 MB Empty Empty 40 MB 4 MB 4 MB 16 MB 16 MB 40 MB 16 MB 16 MB 4 MB 4 MB 48 MB 8 MB 8 MB 16 MB 16 MB 48 MB 16 MB 16 MB 8 MB 8 MB 64 MB 16 MB 16 MB 16 MB 16 MB 64 MB 32 MB 32 MB Empty Empty 72 MB 4 MB 4 MB 32 MB 32 MB 72 MB 32 MB 32 MB 4 MB 4 MB 80 MB 8 MB 8 MB 32 MB 32 MB 80 MB 32 MB 32 MB 8 MB 8 MB 96 MB 16 MB 16 MB 3...

Страница 84: ... from the socket Figure Section 3 6 Removing a SIMM SIMM Installation 1 Remove the system unit side panel see Removing the Side Panel 2 Locate the correct SIMM sockets for the desired configuration see Figure Section 3 2 If you need to remove a currently installed SIMM see SIMM Removal CAUTION Before you install a SIMM reduce static discharge by touching the system s metal chassis 3 Align the notc...

Страница 85: ...he amount of memory displayed at the Power On Self Test with the amount of memory that you installed check that you installed the SIMMs correctly Processor Upgrade The zero insertion force ZIF socket makes a processor upgrade easy The ZIF socket accepts pin grid array PGA processors such as the primary processor or an OverDrive processor CAUTION Incorrect installation of the processor can damage t...

Страница 86: ...it side panel see Removing the Side Panel 2 Locate the processor socket see Figure Section 3 2 3 Release the heatsink clip from the tabs on the socket 4 Release the processor by pulling the lever on the socket away from the socket and as far back as it goes Figure Section 3 8 Releasing the processor CAUTION Before picking up the processor reduce static discharge by touching the metal frame of the ...

Страница 87: ...or Figure Section 3 9 Aligning the Processor with the Socket 3 Swing the lever down to lock the processor into the socket CAUTION Remember to either reattach the heatsink used with the old processor or to install any new heatsink required for the upgrade processor 4 Check to see if the newly installed processor requires the switches on the system board to be changed see Appendix B System Board Swi...

Страница 88: ...drive n up to four IDE devices such as IDE hard disks and an IDE CD ROM reader Other storage devices might require the installation of a compatible controller board Device Slots The system has six storage device slots n a 3 1 2 inch accessible device slot which contains the standard 1 44 MB diskette drive n two 3 1 2 inch internal hard disk drive slots 1 inch high thin height n All configurations ...

Страница 89: ... settings on the device before you install it See the documentation that comes with the device for jumper setting information An IDE device such as an IDE hard disk or IDE CD ROM reader must be set correctly as the first master or second slave device on the IDE channel The standard IDE hard disk in hard disk models is set as the master device on the primary IDE connector The CD ROM reader in multi...

Страница 90: ...ard and to the standard 1 44 MB diskette drive The installation of a second diskette drive in the system does not require the replacement of the existing diskette drive signal cable Connect an optional diskette drive to the middle connector on the standard diskette drive signal cable The colored edge of the cable goes to pin 1 on the cable connector Align the red edge of the cable with pin 1 the n...

Страница 91: ...connector does not require the replacement of the existing IDE signal cable If you install an optional IDE CD ROM reader connect it to the secondary IDE connector This lets you use the primary IDE port for hard disks The following figure shows a typical three connector IDE signal cable If the IDE cable is not keyed with a connector tab align the colored edge of the cable with the pin 1 side of the...

Страница 92: ...tem Power Cables Power cables come from the power supply and are attached to the standard storage devices System power cables vary in length and provide connector sizes to accommodate a variety of supported storage configurations ...

Страница 93: ...such as the 1 2 MB diskette drive Cabling an IDE Device 1 Connect the appropriate connector on the IDE signal cable to the IDE connector on the IDE device Align the colored edge of the cable with the pin 1 side of the device connector NOTE For best performance connect the stan dard and optional hard disk drive on the same IDE signal cable using the primary IDE con nector on the system board Take c...

Страница 94: ...opriate connector on the Diskette Drive Signal Cable to the sig nal connector on the diskette drive Align the colored edge of the cable with the pin 1 side of the device connector 2 Locate an available power connector coming from the power supply see System Power Cables 3 Connect the appropriate power cable to the power connector on the device Figure Section 3 8 Connecting 1 2 MB Diskette Drive Ca...

Страница 95: ...inch drive bracket containing the standard 1 44 MB diskette drive and hard disk drive as follows 1 Remove the system unit side panel see Removing the Side Panel 2 Label and disconnect the cables attached to the diskette drive and any hard disk drive installed in the 3 1 2 inch bracket 3 Remove the screw securing the drive bracket to the 5 1 4 inch device cage and slide the bracket toward the rear ...

Страница 96: ...n instructions that come with the device such as setting jumpers and switches 4 See Device Preparation for device preparation information 5 Insert the hard disk drive so that the connectors are extended out the bracket on the same end as the standard diskette drive connectors 6 Align the holes in the hard disk drive with the holes in the bracket 7 Secure the drive to the bracket with the four scre...

Страница 97: ... 1 2 inch drive bracket only after it has been removed in a 3 1 2 inch drive in stallation 1 Place the tabs on the 3 1 2 inch drive bracket into their slots on the bottom of the device cage 2 Slide the drive bracket forward until the screw hole in the drive bracket is aligned with the hole in the 5 1 4 inch device cage 3 Replace the bracket screw you removed earlier to secure the bracket in place ...

Страница 98: ...nel Tabs Figure Section 3 12 Removing the Front Panel 4 Disconnect the LED and IR cables on the front panel from the system board 5 Pull the left side out enough to clear the power reset and suspend buttons When the buttons have been cleared slide the right side of the front panel out from the system unit 6 Identify the slot for the device you plan to install 7 Remove the blank panel from the sele...

Страница 99: ...allation instructions that come with the device such as setting jumpers and switches See Device Preparation for device preparation information NOTE If the 5 1 4 inch device comes with drive rails do not attach them Remove any rails already attached See the documentation that comes with the device 3 Locate the device rails and ground clips that ship with the system Attach the rails and ground clips...

Страница 100: ...ve tape drive or CD ROM reader attach the rails to the device so that the front of the device extends be yond the chassis and is even with the blank panels on the front of the system Figure Section 3 15 Attaching the Device Rails 4 Insert the device into the device slot from the front of the system unit connector end first 5 Align the rails with guides in the selected slot Push the device into the...

Страница 101: ... the front panel only after it has been removed in a 5 1 4 inch device installation If you are installing a 5 1 4 inch device see Installing the 5 1 4 Inch Device 1 Route the LED and IR cables on the front panel through the chassis to the system board and connect the cables to the board 2 Insert the tabs on the right side of the front panel with the holes in the front right side of the system unit...

Страница 102: ... n Serial Devices n Speakers multimedia models n Microphone multimedia models Parallel Printer NOTE Before connecting a printer to the sys tem be sure that you have set up the printer cor rectly Follow the setup instructions that come with the printer 1 Make sure the power to the system unit and printer are off 2 Connect the printer cable to the printer port on the rear of the system unit 3 Secure...

Страница 103: ...the system unit and serial device are off 2 Connect one end of the serial cable to one of the two serial ports on the rear of the computer 3 Secure the cable with the screws provided 4 Connect the other end to the serial device Figure Section 3 20 Connecting an RS 232C Cable Speakers Connect the speakers to the system unit as follows 1 Locate the speaker with the control knobs This is the right sp...

Страница 104: ... Section 3 21 Speaker Cables 3 Attach the left speaker cable with the black connectors at each end to the speaker as follows n Insert one end of the speaker cable into the jack marked LEFT SPEAKER INPUT on the back of the left speaker n Insert the other end of the speaker cable into the jack marked L SPEAKER OUTPUT on the back of the right speaker Figure Section 3 22 Connecting the Two Speakers Re...

Страница 105: ...ite jack marked LEFT LINE IN on the back of the right speaker n Insert the other end of the cable into the Line Out jack on the rear of the sys tem unit see System Setup in Section 2 Figure Section 3 23 Attaching the Y Cable 5 Locate the AC adapter 6 Plug the AC adapter into the jack marked 15 DC on the back of the right speaker To System Unit Line Out Jack connector with two rings Right Speaker ...

Страница 106: ...ystem 1 Push the power button on the front of the right speaker 2 Turn on the audio source 3 Adjust the volume by turning the volume control on the front of the right speaker 4 Adjust the Base and Treble controls on the front of the right speaker to the de sired levels NOTE Headphones can be connected to the jack in the front of the left speakers AC Adapter Right Speaker 15V DC Jack ...

Страница 107: ...der all the way into the slot Figure Section 3 25 Inserting the Microphone Holder into the Stand 2 Insert the microphone into the holder as follows n Place the microphone cable into the slot in the microphone holder n Slide the microphone into the holder Figure Section 3 26 Inserting the Microphone into the Holder Microphone Holder Microphone Stand Microphone Cable Microphone ...

Страница 108: ...3 34 Option Installation 3 Adjust the microphone by pivoting it up and down and side to side Figure Section 3 27 Adjusting the Microphone ...

Страница 109: ...the appropriate menu to reach one of the following departments Information Center literature dealer locations sales leads response to ads NASC National Authorized Service Centers Administration new dealer service authorization warranty claims NSRC National Service Response Center questions other than products spare parts or technical support Service Contracts TAC Technical Assistance Center techni...

Страница 110: ...wing procedure for cleaning the system 1 Power off the system and unplug all power cables 2 Periodically wipe the outside of the system keyboard mouse and monitor with a soft clean cloth Remove stains with a mild detergent Do not use solvents or strong abrasive cleaners on any part of the system 3 Clean the monitor screen with a commercial monitor screen cleaning kit Or use a glass cleaner then wi...

Страница 111: ...replaceable assembly Therefore disassembly of the key board is necessary only when cleaning the inside Figure Section 4 1 Removing the Keyboard Enclosure 2 Separate the two halves of the enclosure Clean the enclosure and keys with a damp cloth A small soft bristle brush may be used to clean between the keys Do not wet or dampen the keyboard s printed circuit board PCB If the PCB accidentally gets ...

Страница 112: ...he system 2 Turn the mouse upside down and locate the mouse ball cover see Figure Section 4 2 3 Turn the ball cover counterclockwise and remove the cover Figure Section 4 2 Removing the Mouse Ball Cover 4 Turn the mouse over and remove the ball 5 Clean the mouse as follows n Clean the mouse ball with tap water and a mild detergent then dry it with a lint free cloth n Remove any dust and lint from ...

Страница 113: ...ement at the end of this section CMOS Checksum Failure After CMOS RAM values are saved a checksum value is generated for error checking The previous value is different from the current value Run Setup CMOS System Options Not Set The values stored in CMOS RAM are either corrupt or nonexistent Run Setup see Section 2 CMOS Display Type Mismatch The video type in CMOS RAM does not match the type detec...

Страница 114: ... There is a error in the keyboard connector No ROM BASIC Cannot find a bootable sector on either diskette drive A or hard disk drive C The BIOS calls INT 18h which generates this message Use a bootable disk Off Board Parity Error Parity error in the installed expansion memory The format is OFF BOARD PARITY ERROR ADDR HEX XXXX XXXX is the hex address where the error occurred On Board Parity Error P...

Страница 115: ... outlet 2 Check cable connections between power supply and system board 3 Systematically eliminate possible shorted PCBs by removing cables and expansion boards 4 Check the 5 and 12 power supply voltages see Appendix A Connector Pin Assignments Measure voltages with the system board installed 5 Replace power supply 6 Replace system board Power supply malfunction Any one or more of the following co...

Страница 116: ...ng sequence 1 Power the computer off Check for proper jumper settings see Section 2 then power on the computer 2 Check condition of selected bootload device diskette or hard disk for bad boot track or incorrect OS files 3 Try booting OS from diskette or recopy OS files onto hard disk 4 Verify correct hard disk is selected Diskette drive does not work Lamp on drive panel does not light when diskett...

Страница 117: ...nd malfunction No output from both the 8 bit and 16 bit digitized sounds 1 Check interrupts Refer to Section 1 for interrupt settings 2 Check DMA channels Refer to Section 1 for DMA channel settings Keyboard or mouse malfunction Monitor has prompt but cannot input data 1 Check that keyboard mouse is plugged in 2 Check password see Section 2 3 Disable password see Section 2 4 Replace keyboard or mo...

Страница 118: ...the AC power supply and monitor 5 Adjust brightness and contrast controls on the monitor 6 Check cable connections between the monitor connector and the system board or optional video board 7 Replace system or video board 8 Replace monitor CD ROM Malfunction Disc tray does not open 1 Check that the system power is on 2 System power failed Insert a jewelers screwdriver into the emergency eject hole...

Страница 119: ...self test If a long beep or a series of long beeps occur power off the computer and try again If the long beeps persists see Table Section 4 8 for the diagnostic beep codes The beep codes are announced on the speaker only if a fatal failure is detected For instance three long beeps indicates a failure in the first 64 K of RAM Table Section 4 8 Diagnostic Beep Codes Message Beeps Description of Fai...

Страница 120: ...M Checksum Error 9 ROM checksum value does not match the value encoded in the BIOS CMOS Shutdown Register Read Write Error 10 The shutdown register for CMOS RAM failed Cache Error External Cache Bad 11 The external cache is faulty CMOS Battery Replacement Remove the 3 volt lithium battery from system board as follows 1 Turn off and unplug the system unit and any external option connected to it 2 R...

Страница 121: ...he socket tabs and out of the socket Figure Section 4 5 Battery Removal 5 With the positive side facing up press the new battery into the socket 6 Replace the system unit cover 7 Connect external peripherals and power cables 8 Run Setup to reconfigure your system parameters ...

Страница 122: ... Section 5 1 To reassemble follow the table and procedures in reverse order Individual removal procedures do not require the total disassembly of the computer Each of the following subsections lists the parts that must be removed before beginning the removal procedure Table Section 5 1 PowerMate P Series System Unit Disassembly Sequence Sequence Part See Page 1 Side panel 5 2 2 Expansion board s 5...

Страница 123: ...peration If a fault occurs verify that the reassembly was performed correctly CAUTION When handling boards or chips ground yourself to release static Side Panel Removal Remove the system unit side panel as follows WARNING Before removing the system unit side panel turn off the power and unplug the system power cable Power is removed only when the power cable is unplugged 1 Turn off and unplug the ...

Страница 124: ...installed a padlock on the system unlock the padlock and remove it 4 From the rear of the system position one hand on the protruding handle and the other hand under the side panel and slide the panel toward the rear about one inch 5 Lift the side panel away from the system unit Figure Section 5 1 Side Panel Removal ...

Страница 125: ...el Removal in this section 2 If you have any cables connected to the board that you need to remove label the connectors before you remove them 3 Remove the screw that secures the board to the support bracket see Figure Section 5 2 4 Pull the board out of the connector Gently rock the board from side to side to release it from its connector Figure Section 5 2 Expansion Board Removal ...

Страница 126: ...escribed 2 Open the clips at each end of the SIMM connector see Figure Section 5 4 Tilt the SIMM forward so that the SIMM can be removed from the socket 3 Remove the SIMM stick from the system board Repeat steps 2 and 3 for each SIMM being removed NOTE For information on installing SIMM sticks is in Section 3 Options Figure Section 5 4 SIMM Socket Clips Hole Post ...

Страница 127: ...nel to the system unit 3 Release the two front panel tabs on the lower left side of the front panel Figure Section 5 6 Removing the Front Panel 4 Disconnect the LED and IR cables on the front panel from the system board 5 Pull the left side out enough to clear the power reset and suspend buttons When the buttons have been cleared slide the right side of the front panel out from the system unit Tab...

Страница 128: ...l tabs from inside the front panel and pushing the blank panel out see Figure Section 5 7 Store the blank panel for possible later reinstallation 2 Press in on the tab and remove the metal slot cover from the selected slot on the front of the system Store the slot cover in case you choose to use it in the future Figure Section 5 7 Removing the Blank Panels Slot Cover Slot Cover Tab Blank Panel Tab...

Страница 129: ...he card guide fan bracket assembly consists of three parts the plastic card guide the internal fan and a metal bracket These parts are removed as one assembly from the system unit chassis per the following steps 1 Remove the side panel as previously described 2 Remove the 3 1 2 inch bracket as previously described 3 Remove the screw securing the card guide fan bracket assembly to the chassis see F...

Страница 130: ...ction 5 11 Speaker Tabs 5 Remove the speaker from the system unit 3 1 2 inch Diskette Drive Removal Remove the 3 1 2 inch diskette drive as follows 1 Remove the side panel as previously described see Side Panel Removal 2 Unplug the diskette drive power cable and signal cable from the diskette drive see Figure Section 5 13 NOTE When reinstalling the diskette drive note that all power cables are key...

Страница 131: ... see 3 1 2 Inch Device Bracket Removal 4 Remove the four screws two on each side from the 3 1 2 inch drive bracket see Figure Section 5 15 5 Slide the 3 1 2 inch diskette drive out of the bracket Figure Section 5 15 Diskette Drive Bracket Screws 3 1 2 Inch Diskette Drive Connector Power Cable Diskette Drive 3 1 2 Inch Red Edge ...

Страница 132: ... panel as previously described 2 Unplug the hard disk drive power and signal cables from the hard disk drive see Figure Section 5 17 NOTE When reinstalling the drives note that all power cables are keyed to fit only in the correct position Figure Section 5 17 3 1 2 Inch Hard Disk Drive Cables IDE Cable Power Cable ...

Страница 133: ...l Remove a 5 1 4 inch device CD ROM reader or other device from the 5 1 4 inch device cage as follows 1 Remove the side panel and front panel as previously described NOTE The 5 1 4 inch devices are installed with drive rails 2 Disconnect the device signal and power cables from the inside of the system unit If removing a CD ROM reader also disconnect the audio cable 3 Remove the 51 4 inch device by...

Страница 134: ...evice into the slot until the rails lock in place Figure Section 5 21 Inserting the Device 5 Remove the rails and ground clips from the sides of the device by removing the four screws shown in Figure Section 5 22 Figure Section 5 22 Removing the Device Rails Device Rail Tabs ...

Страница 135: ...r connector locations 4 Unplug the power cables from all installed devices 5 Cut any tie wraps that may be securing the power cables to the system unit chassis or drive brackets 6 Remove the four screws securing the power supply to the system unit chassis see Figure Section 5 24 Figure Section 5 24 Power Supply Screws 7 Pivot the left side of the power supply toward you to free it from the metal t...

Страница 136: ...nal device cage n 3 1 2 inch drive bracket n SIMMs 2 Remove and label all cables connected to the system board Appendix A provides the connector identifiers and pin assignments for each connector 3 Remove the eight screws that hold the system board to the system unit chassis Remove the system board from the system unit see Figure Section 5 26 Figure Section 5 26 System Board Removal ...

Страница 137: ...er Assembly 158 050945 000 5 Card Guide Fan Bracket metal 158 030849 000 6 Card Guide Fan Cover plastic 158 030850 000 7 Fan Assembly 158 050944 000 8 8 MB SIMM 32 bits 158 082553 070 9A Pentium 120 60 CPU with heatsink VR voltage 158 050924 009 9B Pentium 133 66 CPU with heatsink VR voltage 158 050924 001 10 Heatsink Clip 158 060368 000 11 Battery 158 056137 000 12A System Board with Audio multim...

Страница 138: ...8 050916 000 25 Audio Cable 158 050922 000 26 Device Guide Rails 158 030835 000 27 4X IDE CD ROM Reader 158 050915 000 28 3 1 2 Inch x 1 Inch 1 2 GB Hard Disk 158 050395 343 29 3 1 2 Inch x 1 Inch 1 44 MB Diskette Drive 158 050912 000 30 3 1 2 Inch Drive Bracket 158 030824 000 31 5 1 4 Inch Blank Panel Cover plastic 158 030833 000 32A Logo 120 60 CPU 158 030804 000 32B Logo 133 66 CPU 158 030804 0...

Страница 139: ...Section 5 28 PowerMate P Series Illustrated Parts Breakdown ____________ This data was prepared September 1995 For an up to date listing of spare parts please call FastFacts 800 366 0476 and order document number 42181365 ...

Страница 140: ...on 5 5 lists PowerMate P Series documentation and packaging Table Section 5 5 PowerMate P Series Documentation and Packaging Description Part Number PowerMate P Series User s Guide 819 181295 000 PowerMate P Series Quick Setup Roadmap 819 181296 000 PowerMate P Series Service and Reference Manual 819 181365 000 Shipping Carton 158 040513 001 Shipping Carton Inserts 4 158 040519 004 ____________ Th...

Страница 141: ...ector A 2 Serial Interface Connector COM1 COM2 A 3 Power Supply Connector A 4 Diskette Drive Connector A 5 IDE Interface Connectors A 6 Turbo Connector A 7 Hard Disk LED Connector A 8 Power LED Connector A 9 Reset Button Connector A 10 Suspend Button Connector A 11 Infrared IRDA Connector A 12 Fan Connector A 13 Speaker Connector A 14 Audio Riser I O Connector A 15 Wavetable Connector A 16 CD ROM ...

Страница 142: ...ix A 1 Parallel Interface Connector Table Appendix A 2 Parallel Interface Pin Assignments Pin Signal Name Pin Signal Name 1 Strobe 14 Ground 2 Auto Feed 15 Data Bit 6 3 Data Bit 0 16 Ground 4 ERROR 17 Data Bit 7 5 Data Bit 1 18 Ground 6 INIT 19 ACK 7 Data Bit 2 20 Ground 8 SLCT IN 21 BUSY 9 Data Bit 3 22 Ground 10 Ground 23 PE Paper End 11 Data Bit 4 24 Ground 12 Ground 25 SLCT 13 Data Bit 5 26 N ...

Страница 143: ...the serial interface connector on the system board Table Appendix A 4 provides the pin assignments Figure Appendix A 2 Serial Interface Connectors Table Appendix A 4 Serial Interface Pin Assignments Pin Signal Name 1 DCD 2 DSR 3 Serial In 4 RTS 5 Serial Out 6 CTS 7 DTR 8 RI 9 GND 10 N C ...

Страница 144: ...shows the power connector on the system board Table Appendix A 6 provides the pin assignments Figure Appendix A 3 Power Connector Table Appendix A 6 Power Connector Pin Assignments Pin Signal Name 1 PWRGD 2 5 V 3 12 V 4 12 V 5 GND 6 GND 7 GND 8 GND 9 5 V 10 5 V 11 5 V 12 5 V ...

Страница 145: ...A 8 Diskette Drive Pin Assignments Pin Signal Name Pin Signal Name 1 Ground 2 FDHDIN 3 Ground 4 Reserved 5 Key 6 FDEDIN 7 Ground 8 Index 9 Ground 10 Motor Enable A 11 Ground 12 Drive Select B 13 Ground 14 Drive Select A 15 Ground 16 Motor Enable B 17 Ground 18 DIR 19 Ground 20 STEP 21 Ground 22 Write Data 23 Ground 24 Write Gate 25 Ground 26 Track 00 27 Ground 28 Write Protect 29 Ground 30 Read Da...

Страница 146: ...E Interface Pin Assignments Pin Signal Name Pin Signal Name 1 Reset IDE 2 Ground 3 Host Data 7 4 Host Data 8 5 Host Data 6 6 Host Data 9 7 Host Data 5 8 Host Data 10 9 Host Data 4 10 Host Data 11 11 Host Data 3 12 Host Data 12 13 Host Data 2 14 Host Data 13 15 Host Data 1 16 Host Data 14 17 Host Data 0 18 Host Data 15 19 Ground 20 Key 21 DRQ3 22 Ground 23 I O Write 24 Ground 25 I O Read 26 Ground ...

Страница 147: ... Ground 35 Addr 0 36 Addr 2 37 Chip Select 0 38 Chip Select 1 39 Activity 40 Ground TURBO CONNECTOR The following figure shows the turbo connector on the system board Table Appendix A 12 provides the pin assignments Figure Appendix A 6 Turbo Connector Table Appendix A 12 Turbo Connector Pin Assignments Pin Signal Name 1 PULL_UP_330 2 LED_TURBO ...

Страница 148: ...ng figure shows the hard disk LED connector on the system board Table Appendix A 14 provides the pin assignments Figure Appendix A 7 Hard Disk LED Connector Table Appendix A 14 Hard Disk LED Pin Assignments Pin Signal Name 5 PULL_UP_330 6 Key 7 HD ACTIVE 8 PULL_UP_330 ...

Страница 149: ...ing figure shows the power LED connector on the system board Table Appendix A 16 provides the pin assignments Figure Appendix A 8 Power LED Connector Table Appendix A 16 Power LED Pin Assignments Pin Signal Name 10 Ground 11 KEY LOCK 12 Ground 13 Key 14 LED_PWR ...

Страница 150: ...NECTOR The following figure shows the reset button connector on the system board Table Appendix A 18 provides the pin assignments Figure Appendix A 9 Reset Button Connector Table Appendix A 18 Reset Pin Assignments Pin Signal Name 16 Ground 17 RESET ...

Страница 151: ...ECTOR The following figure show the suspend button connector on the system board Table Appendix A 20 provides the pin assignments Figure Appendix A 10 Suspend Button Connector Table Appendix A 20 Suspend Pin Assignments Pin Signal Name 1 5 V 2 Comatose ...

Страница 152: ...following figure shows the infrared IR connector on the system board Table Appendix A 22 provides the pin assignments Figure Appendix A 11 Infrared Connector Table Appendix A 22 Infrared Pin Assignments Pin Signal Name 4 5 V 5 Key 6 IR_RX 7 Ground 8 IR_TX ...

Страница 153: ...TOR The following figure shows the fan connector on the system board Table Appendix A 24 provides the pin assignments Figure Appendix A 12 Fan Connector Table Appendix A 24 Fan Pin Assignments Pin Signal Name 10 Ground 11 12 V fused 12 Ground ...

Страница 154: ...lowing figure shows the speaker connector on the system board Table Appendix A 26 provides the pin assignments Figure Appendix A 13 Speaker Connector Table Appendix A 26 Speaker Pin Assignments Pin Signal Name 14 SPKR_DAT 15 Key 16 SPKR_DAT connect 17 Ground ...

Страница 155: ...pendix A 28 Audio Riser I O Pin Assignments Pin Signal Pin Signal 1 5 V 2 5 V 3 JoyStick But0 4 JoyStick But2 5 JoyStick X1 6 JoyStick X2 7 Ground 8 MIDI Out 9 Ground 10 JoyStick Y2 11 JoyStick Y1 12 JoyStick But3 13 JoyStick But1 14 MIDI In 15 5 V 16 Key 17 Key 18 Key 19 Line Out Right 20 Ground 21 Right Speaker 22 Ground 23 Left Speaker 24 Key 25 Line Out Left 26 Ground 27 Line In Right 28 12 V ...

Страница 156: ...s the wavetable connector on the system board Table Appendix A 30 provides the pin assignments Figure Appendix A 15 Wavetable Connector Table Appendix A 30 Wavetable Pin Assignments Pin Signal Name 1 Wave Right 2 Ground 3 Wave Left 4 Ground 5 Key 6 Ground 7 MIDI_Write 8 Ground ...

Страница 157: ...nments Figure Appendix A 16 CD ROM Audio Interface Connector Table Appendix A 32 CD ROM Audio Interface Pin Assignments Pin Signal Name 1 CD Right 2 Ground 3 CD Left 4 Ground ISA CONNECTORS The following figure shows the ISA expansion board connectors on the system board Table Appendix A 34 provides the pin assignments Figure Appendix A 17 ISA Expansion Board Connectors ISA Slots ...

Страница 158: ...CS16 C2 LA23 B10 GND A10 IOCHRDY D3 IRQ10 C3 LA22 B11 SMEMW A11 AEN D4 IRQ11 C4 LA21 B12 SMEMR A12 SA19 D5 IRQ12 C5 LA20 B13 IOW A13 SA18 D6 IRQ15 C6 LA19 B14 IOR A14 SA17 D7 IRQ14 C7 LA18 B15 DACK3 A15 SA16 D8 DACK0 C8 LA17 B16 DRQ3 A16 SA15 D9 DRQ0 C9 MEMR B17 DACK1 A17 SA14 D10 DACK5 C10 MEMW B18 DRQ1 A18 SA13 D11 DRQ5 C11 SD8 B19 REFRESH A19 SA12 D12 DACK6 C12 SD9 B20 SYSCLK A20 SA11 D13 DRQ6 ...

Страница 159: ...nal A1 GND B1 12 V A32 AD16 B32 AD17 A2 12 V B2 No Connect A33 3 3 V B33 CBE2 A3 No Connect B3 GND A34 FRAME B34 GND A4 No Connect B4 No Connect A35 GND B35 IRDY A5 Vcc B5 Vcc A36 TRDY B36 3 3 V A6 PCIINT3 B6 Vcc A37 GND B37 DEVSEL A7 PCIINT1 B7 PCIINT2 A38 STOP B38 GND A8 Vcc B8 PCIINT4 A39 3 3 V B39 PLOCK A9 Reserved B9 No Connect A40 SDONE B40 PERR A10 Vcc B10 Reserved A41 SBO B41 3 3 V A11 Res...

Страница 160: ... REQA A49 AD9 B49 GND A19 Reserved B19 Vcc A50 KEY B50 KEY A20 AD30 B20 AD31 A51 KEY B51 KEY A21 3 3 V B21 AD29 A52 CBEO B52 AD8 A22 AD28 B22 GND A53 3 3 V B53 AD7 A23 AD26 B23 AD27 A54 AD6 B54 3 3 V A24 GND B24 AD25 A55 AD4 B55 AD5 A25 AD24 B25 3 3 V A56 GND B56 AD3 A26 AD22 IDSEL B26 CBE3 A57 AD2 B57 GND A27 3 3 V B27 AD23 A58 AD0 B58 AD1 A28 AD22 B28 GND A59 Vcc B59 Vcc A29 AD20 B29 AD21 A60 SR...

Страница 161: ...sword and cannot boot your system You need to set a switch to clear your current password n You changed your CMOS settings in setup and want the default settings You need to set a switch to clear your current setting and set the factory defaults CAUTION Do not change any jumper settings on the system board They are for manufacturing purposes only The Figure Appendix B 1 shows the switch locations ...

Страница 162: ...ode default ON Reset CMOS settings 5 Enables disables access to Setup OFF Setup access default ON Setup access disabled 6 Internal processor clock OFF 3 2 speed ON 2 1 default 7 8 External processor clock speed 7 8 50 MHz ON OFF 60 MHz OFF OFF 120 MHz 66 MHz OFF ON 133 MHz CHANGING SWITCH SETTINGS To change the switch settings follow these steps CAUTION Switches are set correctly at the factory fo...

Страница 163: ...YOUR PASSWORD If you forgot your password use the following procedure to clear your current password and to set a new one 1 Turn off and unplug the system and any external options 2 Remove the system unit side panel see Removing the Side Panel in Section 3 3 Locate the SW3 Password Clear switch on the system board see Figure Appendix B 1 4 Set SW3 Password Clear switch to the ON position 5 Connect...

Страница 164: ...he Side Panel in Section 3 3 Locate the SW4 Reset CMOS switch on the system board see Figure Appendix B 1 4 Set SW4 Reset CMOS switch to the ON position 5 Connect system power cable and monitor cable 6 Power on your computer Let the system completely boot 7 Power off and unplug the system and monitor cable 8 Reset SW4 Reset CMOS switch to the OFF position 9 Replace the system unit side panel see R...

Страница 165: ...sis 1 1 CMOS 2 6 CMOS battery 4 12 replacement 4 12 Configurations 1 1 setup 2 6 Connections 2 2 multimedia 2 3 rear 2 2 Connectors A 1 audio riser A 15 CR ROM audio A 17 diskette drive A 5 fan A 13 feature 1 12 hard disk LED A 8 IDE A 6 infrared A 12 ISA A 17 MIDI 2 3 parallel A 2 PCI A 19 power LED A 9 power supply A 4 reset A 10 serial A 3 speaker A 14 suspend A 11 system board A 1 turbo A 7 Wa...

Страница 166: ...essages 4 5 Exit menu 2 26 Expansion board installation 3 7 removal 3 8 5 4 Expansion slots 1 1 3 6 External options 3 3 F Fan connector A 13 Fast page mode 2 20 Feature connector 1 12 Flash utility 2 28 Flash ROM 1 6 Front panel removal 3 24 5 6 H Hard disk 1 17 assignments 2 10 connector A 6 LED connector A 8 Hardware options 3 2 I I O addressing 1 8 map 1 8 IDE assignments 2 10 cables 3 18 conn...

Страница 167: ... 6 external 3 3 3 28 internal 3 5 memory 1 9 microphone 3 33 printer 3 28 processor 3 12 serial devices 3 29 speakers 3 29 storage devices 3 15 P Packing 2 1 Parallel connector A 2 Parallel interface 1 14 addressing and interrupts 1 15 Passwords 2 24 PCI connectors A 19 PCI local bus 1 13 PCI IDE ports 1 14 Pentium 1 5 Peripheral configuration 2 17 Pin assignments A 1 Plug and play 1 13 2 22 POST ...

Страница 168: ...s 1 20 Surround sound 1 19 Suspend connector A 11 Switches B 1 System board 1 2 chip sets 1 4 features 1 2 flash ROM 1 6 infrared interface 1 16 integrated audio 1 18 integrated graphics 1 12 interrupt controller 1 11 ISA bus 1 13 jumper setting B 1 parallel interface 1 14 PCI local bus 1 13 PCI IDE ports 1 14 processor 1 5 removal 5 15 secondary cache 1 5 switch settings B 1 video memory 1 13 Sys...

Страница 169: ...Index 5 ...

Страница 170: ...ver there is no guarantee that interference will not occur in a particular installation If this equipment does cause harmful interference to radio or television reception which can be determined by turning the equipment off and on the user is encouraged to try to correct the interference by one or more of the following measures n Reorient or relocate the receiving antenna n Increase the separation...

Страница 171: ...ou d un type recommandé par le constructeur Mettre au rébut les batteries usagées conformément aux instructions du fabricant BATTERY DISPOSAL Do not place used batteries in your regular trash The nickel cadmium or nickel metal hydride batteries must be collected recycled or disposed of in an environmentally approved manner The incineration landfilling or mixing of batteries with the municipal soli...

Отзывы: